

Tagged Under
Scenes and Track Mutes
A Scene is a stored set of MIXING and SEQUENCER settings. This term comes to us from the Yamaha digital mixers and hard disk recorders, where a “snapshot” of settings can be recalled at any time either manually or via automation. It is very much like recalling a pre-set set of parameters same as a program change event would recall, except this recalls sequencer mix settings. Imagine being able to recall all fader settings, all pan positions, etc., instantaneously. The Motif XS/XF allows five such snapshots to be taken and then recalled at the press of a button. The SCENE is stored to the Sub-Function buttons [SF1]-[SF5] in a simple gesture: hold down [STORE] + [SFx] to take the ‘snapshot’. You will find these SCENES in both SONG mode and PATTERN mode and they can be a very useful part of your musical composition construction. They do operate differently in each mode and this short article will point out how you can make the best use of this very powerful feature.
Track Mute status is simply whether a track is set to output its MIDI data or not. To the right of the sixteen track buttons on the XS/XF front panel you will find a dedicated [MUTE] button. When it is illuminated the 16 Track LEDS will show the current status of the corresponding Track. If a Track LED is lit, then it is audible, if a Track LED is off, then the track is “muted”. This means the track will no longer send data to the internal or any connected external tone generator. You can at any time manually Mute Tracks but you can also automate this procedure within the linear timeline of the sequencer (that is, either in a PATTERN CHAIN or in SONG mode). There is a dedicated event called a TRACK MUTE Event – this is independent of the SCENE. We’ll describe these Track Mute Events in more detail later in this article.
SCENE parameters memorized per snapshot in the Motif XS/XF:
• Tempo: The current tempo as shown on the main screen
• Transpose: The Transpose as shown on the main screen – which will transpose all PARTS except those containing a Drum Kit. Drum Kit tracks are not transposed as this would cause drum sounds to be different
• Play Effect: Play FX include quantize, swing quantize, Note Shift, Clock Shift, etc.
• Volume (cc007): Fader settings for all 16 PARTS
• Pan (cc010) :The current pan position is documented for all 16 PARTS
• Reverb Send (cc091): Send amount settings for each of the 16 PARTS
• Chorus Send (cc093):Send amount settings for each of the 16 PARTS
• Filter Cutoff Frequency (cc074): settings for each of the 16 PARTS
• Filter Resonance (cc071) :settings for each of the 16 PARTS
• AEG Attack (cc073): settings for each of the 16 PARTS
• AEG Release (cc072): settings for each of the 16 PARTS
Additionally, a SCENE snapshot will remember the current Track Mute status. This turns them into very powerful tools indeed. This means you can change the entire tenor of the mix of the SONG or PATTERN at any time. Change the fidelity of the mix… make it sound filtered, far away, crystal clear, make it sound like it is underwater, inside out…break it down to a few instruments, and so on.
PLAY FX are found in SONG or PATTERN mode at [F2] and allow you to change the quantize settings and the swing quantize of any track. This can be done initially non-destructively, meaning it is flexible and not permanent. However, you can normalize (make those changes permanent) if you wish.
[SF1] – [SF5] SCENE
You can assign the settings of the Song-related parameters (Song Scene), Pattern related parameters (Pattern Scene) and the Arpeggio-related parameters to these buttons. You can also recall the settings by pressing these buttons. After registering the Song Scene or the Pattern Scene, an 8th note icon will appear on the tab corresponding to the pressed button. You can confirm whether the Arpeggio Type is assigned to that button in the Arpeggio display of Song Record or Pattern Record. From the RECORD SETUP screen, press [F2] ARPEGGIO to view the ARPEGGIOS assigned to the [SF1]-[SF5] buttons. This screen is useful when recording multiple arpeggios to the sequencer.
>>>Why would the scene track contain tempo changes when there is already a tempo track?<<<<
It is both useful and convenient to be able to recall a tempo change at any time during playback, instantly. The Tempo track is permanent and automated – while the Scene is flexible. A SCENE can be used in real time. For example, you have a section of music that needs to be bumped up in tempo for 12 measures then returned (a tempo) to the original. You can store two different Scenes, each preset at different tempos and you can, at any time, change between them instantly with a press of a button. And you can change back at any time as well. It is about real time access and convenience. Tempo is part of the “picture” that the Scene snapshot takes. Additionally, the Tempo Track is only available when a linear timeline has been constructed for the music… that is, when you have created a PATTERN CHAIN or a SONG. There is no tempo track in PATTERN mode.
SONG Mode and the Scene Track
There are 5 SONG SCENES – the buttons are located directly below your screen. You can record as many MUTE events to the Scene track as you need. MUTE EVENTS are a separate type of event. Although SCENES include what track is playing, MUTE events only remember what track is playing. Therefore, while all 5 SCENE events include MUTING, not all MUTE events are Scenes. You can insert TRACK MUTE events into a SONG track anytime you need to mute a track.
Storing a SCENE simply memorizes the current conditions. You hold [Store] + [SF] button 1-5. “Snap” you have taken a snapshot. It says in the screen briefly, “SCENE STORED”. The transport does not even need to be running to create the SCENE snapshot. Recalling a Scene can be done at any time by simply pressing the SCENE button. You can “automate” the recall of SCENE snapshots and Track Mute status events by recording them to a special SONG mode track, the Scene Track. Events that are written on to the SCENE track are MUTE button presses and SCENE Memory recalls. A SCENE recall is simply pressing a SF button while the SCENE track is record ready and the transport is running.
One SCENE is a record of ‘what’s happening now’. If tracks are muted when you take the snapshot – they will be recalled as is, it is that simple.
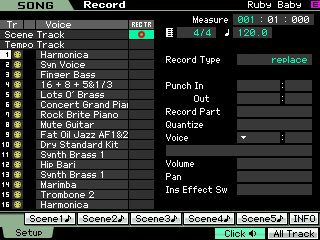
Song Mode has a SCENE Track. You can select the SCENE track as your real time record track or you can insert Events directly to the SCENE Track via the SONG EDIT screen (shown below).
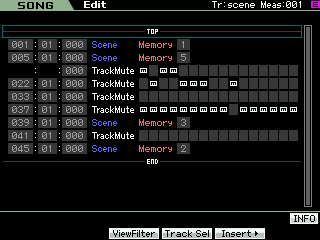
While there are five SCENE snapshot memories, you can insert as many Track Mute status events as you require. While the Scene track is in record pressing the [SF1]-[SF5] buttons or the sixteen Track MUTE buttons will create the events – same as if you inserted them manually. Events can be moved and/or edited as required.
• Press [SONG]
• Press [EDIT]
• Press [F4] TRACK SEL
The [F4] TRACK SEL button will toggle (3-way toggle) between a normal numbered Track Edit 1-16, the Scene Track and the Tempo Track.
To record directly to the SCENE Track in real time, simply activate the RECORD button and move the cursor to select the SCENE TRACK (shown below).
If you need to get back to initial conditions, simply store the initial conditions as one of your five SCENES. And it highly recommended that you do store the initial conditions as one of your SCENES. Otherwise the last SCENE recalled will remain in effect until you recall another Scene (or you recall the Song). There are two ways to recall the Song:
• Press [PROGRAM]. The A-D Group buttons and the 1-16 buttons let you recall Songs 1-64. A-1 is Song 1, D-16 is Song 64.
• Move to Song 2 and back to Song 1 using the data wheel… to name two PATTERN Mode and Scenes
There are 5 PATTERN SCENES – they are located, same as Song Scenes, directly accessible via your [SF] buttons. You can activate these in real-time. In fact, they are useful only for real-time access. Unlike SONG SCENES you cannot record them into Pattern Sections. Pattern does not have a SCENE Track. This is due to the cycling nature of Sections… it would make no sense to have these type of events repeating every cycle. Automating them is best left until you create a linear timeline of the data (Song mode). Again Scene events include Track Muting, so it is possible to at anytime recall particular track combinations.
PATTERN CHAIN and TRACK MUTES
Pattern Chains can contain Track Mute events. You can insert as many of these as you require. As is true with PATTERN mode you cannot record SCENE Events to a Pattern Chain but you can record Track Mutes, either in real time or insert them on the EVENT LIST when you EDIT the PATTERN CHAIN.
Some tips on using the Scene function:
You do not un-record or clear a SCENE from a SF button. Technically speaking, it simply takes a picture of your current settings. SCENE 1, for example, should be the condition of the MIX when you start playback. Once you create a SCENE (no pun intended) ‘snapshot’ you cannot clear it, you cannot undo it; you cannot do anything but change it. It is important to store a SCENE that represents the start condition. That is, the condition you want the mix to be in normally, because once you recall a Scene its parameters are applied and remain applied until you activate another SCENE. If you need to return to the basic setting you either have to recall the SONG or recall the PATTERN (which is not always convenient if you need to return to normal during play). Once you create a Scene you can update it so that it reflects exactly what you want the condition of the SONG to be when this button is pushed. But there is always going to be a start condition. You cannot ever take it back. There always must be some condition of the mix. Once you put a little eighth note icon next to the SF button reading SCENE, it is there forever… simply Edit it!
How is this function useful?
In certain genres of music (techno, electronica, dance, etc.) it is quite typical to bring tracks in and out via MUTE functions. Also it is quite typical to alter the entire mix on the fly by recalling filter cutoff settings that make the music sound purposefully muffled… and then on cue burst back to full fidelity. In other genres you may find it useful to transpose a musical section up or down a few scale points… there is no need to copy an entire Section if all you need to do is move the music up a musical fourth or down a fifth, etc. Scene events can be creatively used – simply use your own imagination.
How do you tell what events are changed in a particular Scene?
There is no list of settings that you have changed. Scenes can very much be used real time (on-the-fly) as a creative tool. You will have to remember what you are doing. It is not the kind of tool that has or can have a read out. There are still uses for track sheets if your memory is not that sharp – simply make notes for yourself about what you are doing with a particular composition.
For an example of the Transpose function in action… Download and load the “Cool Funk” pattern file from the tutorial on: “Real Time Loop Remix”
You can select to LOAD just a single Pattern by entering FILE from PATTERN mode. Go to FILE > Type = “pattern”; highlight the “RealTimeLoopRemix.X0P” file, press [ENTER]. It will open and reveal Pattern 001 = “Cool Funk”. You can now target any empty PATTERN in your current Motif XS/XF.
In the ALL PATTERN file provided with that tutorial is a single PATTERN that has four Scenes stored.
SCENE 1 – the main transpose parameter = +00 Key is C
SCENE 2 – the main transpose parameter = +05 Key is F
SCENE 3 – the main transpose parameter = +07 Key is G
SCENE 4 – the main transpose parameter = -02 Key is Bb
Notice that all tracks transpose except the drums (insert drummer joke here). The 8 Sections of the PATTERN can easily be turned in to a blues progression by simply recalling the SCENE buttons at the appropriate time. All you need to create a blues is Scenes 1, 2 and 3. I use Scene 4 to drop the Key of “C” to a “Bb” for Section [E]… at which time I switch to Track [15] and rock out on an organ solo. Used in conjunction with the Remix function, you have a lot of real-time alterations you can perform.