

Sampling Basics on the Motif XS
Terminology
A digital recording is called a “sample” or a “wave”, initially it is placed on a single note, once you map this to a KEY, or range of KEYS on the XS keyboard it is referred to as a “KEYBANK”; multiple KEYBANKS are grouped together to create a “WAVEFORM”.
When you press the [INTEGRATED SAMPLING] button you will arrive initially at the “Sample Select” screen. This will be true from whichever mode you enter Sampling: VOICE mode, PERFORMANCE mode or one of the two Sequencer modes, SONG or PATTERN.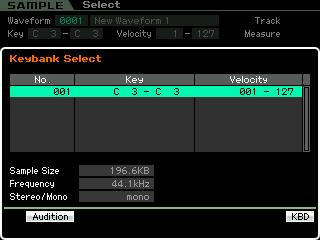
The current screen, “Sample > Select”, is identified in the upper left corner. From this screen you can choose a Waveform to work with. You can view the attributes of that sample (size, frequency, stereo/mono status), you can audition [SF1] the current selection. If there are multiple samples in this waveform you can choose a Keybank [SF5] within the selected Waveform. And/or move on to actually recording your own samples REC [F6], move to [EDIT] or move to the sample [JOBS]. You can press [SF1] to AUDITION, or hear, your selection.
There are a couple of methods to select a different KEYBANK in the currently selected WAVEFORM:
• You can hold [SF6] KBD and touch a note on the keyboard.
A Keybank can be a single note or a range of notes – touching any key in the range will recall the entire KEYBANK.
• You can press [SF5] KEYBANK to view a list your data
– this is helpful when you have multiple samples stacked on a single note.
• From this “SAMPLE > SELECT” screen you can enter “SAMPLE > RECORD” by pressing [F6] REC
• From this “SAMPLE > SELECT” screen you can enter “SAMPLE > EDIT” by pressing the dedicated [EDIT] button
• From this “SAMPLE > SELECT” screen you can enter “SAMPLE > JOB” mode by pressing the dedicated [JOB] button.
If you are recording your own sample, editing a sample or applying a job to a sample, you return to the “Sample > Select” screen by pressing the [EXIT] button. Spend a little time getting used to navigation of these screens. The upper left corner will always indicate exactly where you are at anytime.
Sample to VOICE, Sample to PERFORMANCE, Sample in the SEQUENCER:
The Motif XS is “context sensitive”. What this means is that certain options are available to you depending on the mode you are currently in. For example, if you enter sampling from VOICE mode the selection of options will be tailored specifically for Voice mode. If you enter sampling from one of the Sequencer modes, a different set of selection options will be available. This is a very logical way to layout the operating system and will make a lot of sense as we go through the modes. Sampling in VOICE mode will allow you to create your own playable Voices. There are two kinds of Voices you might want to create: Normal Voices and Drum Voices.
In order to sample to a VOICE you would enter [INTEGRATED SAMPLING] from VOICE mode.
Sampling in PERFORMANCE mode will allow you to create a Voice within a Performance.
Sampling in SEQUENCER mode will allow you to create a sample that can be synchronized with playback of a Song or Pattern
• Press [INTEGRATED SAMPLING]
• Press [F6] REC – you’ll arrive at the “SAMPLE > RECORD” setup screen
• The screen is divided so that the SOURCE parameters are on your left and the DESTINATION parameters are on your right.
SAMPLE SOURCE: These will be context sensitive, according to the mode you enter from…
Recording type = “sample” – for VOICE mode/Performance mode sampling
Recording type = “sample+note” – for sampling in the Sequencer. A note-on event is automatically generated to trigger playback of the sample audio
Recording type =”slice+seq” – for sampling in the Sequencer. Once the sample is complete you are taken directly to the SLICE setup function. SLICE chops up the audio and creates a new waveform; SEQ creates a precisely timed sequence to playback the audio loop. Use this on audio clips up to 8 measures in length that you want to loop and tempo adjust.
Input Source = AD input, resample, mLAN
Stereo/Mono = stereo, monoL, monoR or monoL+R
Record Next = off/on – this is useful when recording multiple samples in a row, for example, drum and percussion samples
Frequency = 44.1kHz, 22.05kHz, 11.025kHz, 5.5125kHz
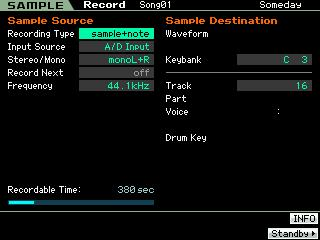
SAMPLE DESTINATION: These will be context sensitive, according to the mode you enter from…
WAVEFORM = location from 0001~1024
KEYBANK = a note from C-2~G8
TRACK = only available when sampling from a Sequencer mode (SONG/PATTERN)
PART = only available when sampling from PERFORMANCE mode or a Sequencer mode
VOICE = targets a specific location for your user sample USER or USER DRUM
DRUM KEY = only available when sampling a VOICE and specifically a Drum Voice.
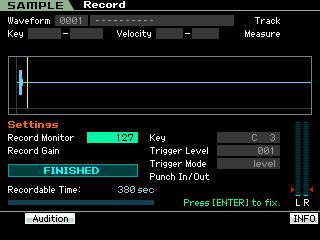
PREPARE TO SAMPLE
Press [F6] STANDBY
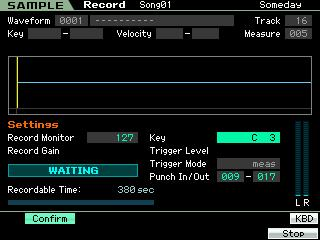
You can review your SETUP parameters at the top of the screen. It is a good idea to always glance at the setup to ensure you are targeting the sample to the correct location.
The bottom of the screen your actual sampling SETTINGS including:
RECORD MONITOR – the output level of the incoming the source
RECORD GAIN – Available only when you are “resampling”. If you are sampling from the AD input adjust the gain on the back panel of the Motif XS.
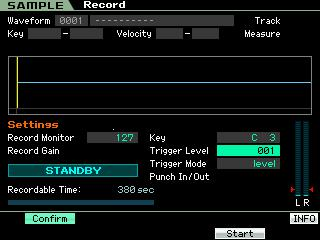
The bottom right of the screen deals with the TRIGGER MODE – basically this is how sampling will take place. It is important to choose the proper mode to best accomplish your goal.
TRIGGER MODE = LEVEL – sampling will begin, once armed, when the level exceeds the “Trigger Level” setting. This is ideal when you are sampling from an audio source like a CD player or other external audio source. You must stop sampling manually by pressing the [F6] STOP button
TRIGGER MODE = MANUAL – sampling will begin when you press the [F5] START button
TRIGGER MODE = MEASURE (shown above) – sampling will begin, once armed, when the sequencer reaches the measure number set as the Punch In point.
Sampling will stop automatically when the measure counter reaches the Punch Out point.
To arm the sampler press [F5] START, if LEVEL or MEASURE is selected “WAITING…” will appear and sampling will begin as prescribed by those trigger methods.
EXPERMIMENT #1: SETUP an AUDIO SAMPLE (simple)
Plug a microphone into the AD input on the back panel
Set the Motif XS for mic input
• Press [UTILITY]
• Press [F2] I/O
• Set the MIC/LINE parameter to MIC
Mic Gain is set with the small knob on the back panel next to the AD INPUT. In general, microphones are a low level (weak) signal so turn the gain all the way up.
• Go to [INTEGRATED SAMPLING]
To get the basic idea of a sample down let’s do a simple setup:
Sample Source
• Record Type = “Sample”
• Input Source = monoL+R
• Record Next = off
• Frequency = 44.1kHz
Sample Destination
• Select an empty Waveform number
• Select KEYBANK = C3
• TRACK and PART are not applicable in VOICE mode
• VOICE = USER 1:001 Everlasting Glory – the screen will show you what Voice location you are writing over
Press [F6] STANDBY
Here you can setup the RECORD MONITOR and TRIGGER MODE
(If you are recording in the room with speakers now would be a good time to turn them down and work in headphones. Alternatively you can set the REC MONITOR to 000 this will prevent your Voice from going to your speakers and ruining your recording – you will still hear your sample on playback).
For this recording we will use the LEVEL option and set the trigger level to a setting of ‘1’ – sampling will begin after we arm the sample by pressing [F5] START and once we exceed that value. Sampling will stop when we press [F6] STOP
Try it. If you can’t think of anything to say, say “BOOM”. When you have completed your test recording, press and hold the [SF1] AUDITION button. Yes, playback monitoring will be quite a bit softer than input monitoring. This is normal. Mixing your sample in with other tracks is a separate operation. Next, press the [ENTER] button – you’ll see in the screen “Press [ENTER] to fix” – this is saying if you accept the sample and want to keep it.
• Press ENTER.
If it is our first sample it will be given a default designation of “WAVEFORM 0001”. We have made a simple audio sample. It may not be spectacular – it does not have to be, we simply want to learn about how our sample can now be mapped across the keyboard, made to be velocity sensitive, how we ultimately can add effects, and so on.
• Press [EXIT]
This returns us to the “SAMPLE – SELECT” screen, (our Home screen). From here you can press [SF5] KEYBANK to see that you have one sample in the particular Keybank and it is mapped from “C3 – C3” on the Keyboard and will respond to any Velocity between 001-127
It was given a default number, Waveform 0001: and name “New Waveform 1”
The New Waveform ‘#’ may differ as this value increments and will keep track of how many takes you make at creating the “keeper” sample.
We have only one sample, mapped to one Key on the keyboard. The list in the screen shot above can contain as many as 128 samples. Each could be mapped to a different key or if mapped to the same key, each could be set to respond to a different Velocity range. For example, say you have a musical synthesizer sound made up of a dozen samples, mapped to various key ranges across the keyboard. This is how many multi-sampled instrument sounds are made. With each sample responsible for a range of notes across the keys. Additionally, several samples can be stacked vertically, so that they trigger at different velocity ranges. This means the harder you strike a key would change the sample assigned to playback.
Let’s see how we can EDIT this sample
• Press [EDIT]
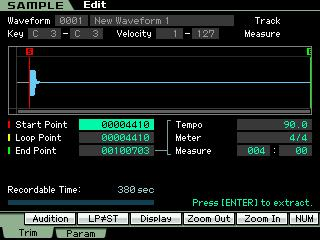
The [EDIT] button takes us to the screen above where [F1] TRIM (allows us to edit the Start Point, End Point and establish a Loop Point.
You will notice that your sample begins at 4410 samples into the record process. This is normal. If you are sampling at the highest resolution 44,100 samples per second, the Motif XS sampler has a 100ms pre-record buffer. This means that before sampling begins the sampler keeps the previous 100ms. Samplers are always recording. The trigger mode start and stop points only define what gets kept! This 100ms buffer can capture a good amount of signal prior to the trigger point. This is very essential for sounds that begin gradually. Say you said the word “five” – the sound comes up slowly out of nothing – as opposed to the word “petunia” or “boom” which has an abrupt, percussive attack. So 100ms is exactly 4,410 samples @ 44.1kHz.
Let’s zoom in… Highlight the “START POINT” value and press [SF5] ZOOM IN, repeatedly.
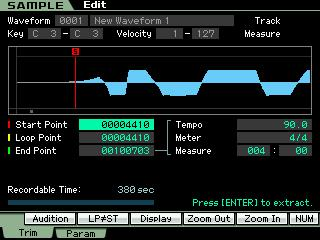
You can see a small amount of signal is out in front of the Start Point – but because of the pre-record, I can roll the START POINT number back in time and capture that attack. Use the [ZOOM IN] and [ZOOM OUT] functions to see, up-close, different areas of the sample. If you highlight the END POINT and use the Zoom functions you will concentrate the view on that area of the audio.
Let’s see if we can find the End Point. Highlight the End Point value… You may think you hit the STOP button fairly quickly after the end of recording, but in fact, you may have lots of extra data in your audio clip. Use the Zoom Out tool so you can find the actual end point (“E”) and set the Start and End Points, as necessary.
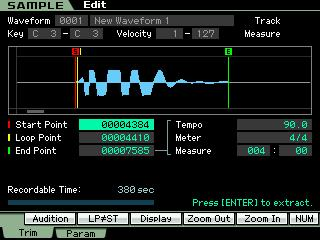
Here you can see my Start Point (red ‘S’) is 4384 and my End Point (green ‘E’) is 7585. That is the complete length of my audio recording… “Boom”
• Press [ENTER] to extract
What this will do is discard (trim off) the audio prior to the Start Point and after the End Point – making by sample an efficient use of memory.
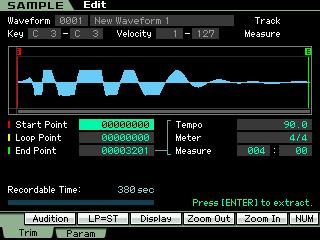
• Press the [SF2] LP=ST button Loop Point = Start Point.
This will zero out the Loop point (yellow ‘L’) and make it the same as the Start Point.
• Press [F2] PARAM
Here you can view the other parameters of our audio sample including the Key Range and Velocity Range.
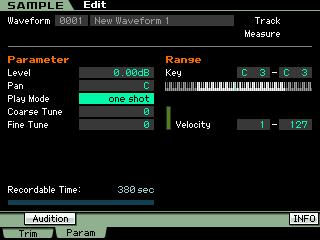
Level = 0.00dB This is a scientific measure meant and you can reduce the level of an audio clip here
Pan – this is useful when setting up a stereo pair of samples or samples you want to pair left and right
Play Mode = one shot, reverse, loop Experiment here so you can see how a sample can be played backwards or can loop endlessly or play once for key stroke.
Coarse Tune/Fine Tune: fairly self-explanatory
Range – KEY: Here you can set the range of keys that will trigger this sample. If you want to play it pitched across the keyboard simply set the key range here. When you highlight a value here, [F6] will change to KBD (keyboard) meaning you can enter the note by holding down [F6] and touching the XS keyboard.
Range – Velocity: By default the range is for the sample to respond to all velocities 1-127. Here you can set a velocity limit for the sample – great for when you are setting up a velocity swap. Say you have 3 snare drum samples you map to the same KEY range but want each to respond to a different velocity range.
The [SF1] AUDITION button can be used to trigger the sample. Press and Hold.
• Set the Key Range so that you can play the sample across the full range of the keyboard.
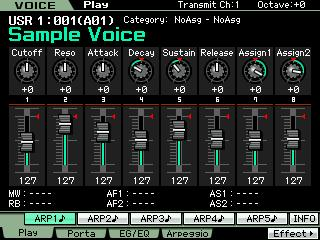
Notice we do not have to press [STORE] with any of these parameters. What you set is what you get. And these will be what the USER VOICE will reference. Every Voice in the Motif XS references a similar WAVEFORM. That WAVEFORM can be a single sample or a group of multi-samples, but every VOICE (Preset and User alike) points to a specific Preset Waveform or User Waveform. To see how this works, press [EXIT] to leave the Sample EDIT area; Press [EXIT] again to leave the Sample Select area. You will arrive at our newly created “SAMPLE VOICE” in [VOICE] mode. Remember that we targeted a USER VOICE location, USR1:001(A01), at the very beginning of our sample session. This allows the XS to automatically assign your current work to the Voice location.
To complete our journey from raw sample to complete Voice – let’s take a quick look at the most important Edit page when it comes to a user sample in a Voice. That is, the screen where the Voice data actually points to (references) our USER sample “Waveform 0001”
• Press [EDIT]
• Press Track button [1] to view Element parameters.
• Press [F1] OSCILLATOR
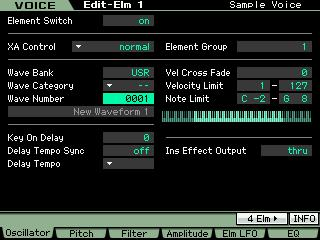
Above you can see that the WAVE BANK is accessing the USER wave bank, the Wave number is 0001, “New Waveform 1”. This is now Element 1 in this Sample Voice… Always the upper left corner of the screen will tell you what you are viewing: VOICE Edit-Elm 1
That translates to: Voice mode, Edit mode, Element 1
Each Voice can have 8 Elements – each element could itself be a multi-sample containing a maximum of 128 samples each. From here you can see how you can now continue to edit and improve the sound of our sample.
One last tip/trick for this quick tour:
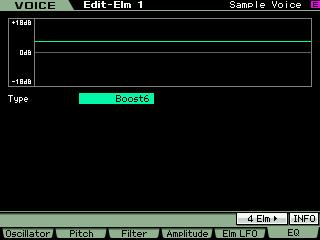
• Press [F6] EQ
Each Element has its own EQ (of course, each Voice additionally has its own overall EQ). This individual Element EQ device can be configured as either a single band parametric EQ, a two band EQ, or as a straight level boost. Equalizers are combination of amplifiers and filters (please see the Power User article on “Equalizers”). If you did not sample using the compressor, you may want to boost the output of the sample within the Voice. You can select a +6dB, +12dB or +18dB boost: Resist the urge to boost anything +18dB; that is a tremendous amount of level and would only be necessary in the most extreme cases. Shown below the EQ configured as a +6dB boost.
SETUP an AUDIO SAMPLE (USER DRUM KIT)
Sample direct to a UDR (User Drum Kit): Going over the parameters we just discussed setup to record
a basic Human drum kit.
Sample Source
• Record Type = “Sample”
• Input Source = monoL+R
• Record Next = off
• Frequency = 44.1kHz
Sample Destination
• Select an empty Waveform number
• VOICE = UDR:1 (User Drum Kit)
• DRUM KEY = C1 (The Drum Key parameter will ensure that the sample is assigned to the Key you select here… the actual sample will reside on the C3 key, the Drum Voice will assign the sample to the KEY you select with this DRUM KEY parameter. Proceed with sampling a vocal hit “BOOM!” and show how it is mapped to the USER DRUM VOICE at C1 even though it is in the Waveform at C3.
Editing the Vocal Drum hit within the Kit:
Go to UDR 1 and see how the waveform is assigned to C1 in the kit
• Press [EDIT]
• Press Track Select [1] to see KEY parameters
• Press note C1 to recall its information
See how you can boost the output of an KEY using the EQ device at [F5]
• Set the EQ = Boost 6dB, Boost 12dB or Boost 18dB
Sampling in the Sequencer
The Integrated Sampling Sequencer allows you to record audio into a SONG or PATTERN. Sample with Note is ideal if you simply want to add audio phrases to your song. In this mode, you can record vocal and guitar phrases directly into your sequence while listening to playback of any MIDI tracks you’ve already created. After recording the audio, the Integrated Sampling Sequencer will automatically create a sample voice, map it to the keyboard and put a MIDI note in the pattern/song at the appropriate time. If you would like to play the same audio phrase later in the song, you can simply trigger it with a MIDI note instead of having to sample it again and use up valuable sample RAM. When you make your final arrangement, your phrases will play back in perfect time.
Setting up to sample Vocals through the VCM Compressor 376
Call up a PATTERN or SONG you have previously composed. Here we will learn to Sample with Note so that we can overdub audio to MIDI tracks. The Compressor is one of the powerful professional tools in the arsenal of recording studio engineers. It is basically a leveling amplifier and is used to control the DYNAMIC RANGE of audio. If you have ever sampled and found that your level okay but that your recording lacked presence – the compressor is the device that will give you presence. It will make your sample perceptibly louder without actually going over the 0dB line. One of the special new features in the Motif XS is the inclusion of the VCM processors. The Compressor 376 is a phenomenal recreation of the classic studio compressors of the 1970’s and 80’s:
It is an Insertion Effect so let’s set this up on the vocals:
• Press [MIXING]
• Press [EDIT]
• Press the [COMMON EDIT] button
Turn the main VOLUME down while we setup the processor – this is important as you do not want to scroll through various effects with an open microphone – it is just good standard practice. Once you have selected your Effects, you can bring the main Volume back up.
• Press [F5] AUDIO IN
Here you can see the parameters that are controlling the OUTPUT assignment of your AD Input. Although you see sends to the REVERB and CHORUS these will not be recorded to the sampler. The INSERTION EFFECT however will be recorded to the sampler.
• Press [F6] EFFECT
• Press [SF2] INS SW – Insertion Switch
Here you can activate the Insertion Effects on any eight PARTS. You may need to temporarily turn the Insertion Switch OFF on one of the Parts so that you can turn it ON for the AD PART.
• Select the INSERT SWITCH for AD
• Press [F5] AUDIO IN
• Press [SF2] CONNECT
Here you will see the AD PART routing to the Dual Insertion Effects
• Press [SF6] LIST – to see a list of effects that you can assign
• Select “CMP” the “VCM Compressor 376” is the first one of the compressor types
• Press [SF3] INS A – to see the parameters of the “VCM Compressor 376”
• Move the cursor down from TYPE to “PRESET”
• Press [SF6] LIST – to view a list of Preset configurations
• Select “Vocal Comp 117x”
Tweak the INPUT until you see about –1dB of Gain Reduction. What this is doing is setting both the threshold and Gain Reduction. A compressor reduces the incoming signal when it ‘sees’ a loud peak, this has the end result of reducing the overall dynamic range – those giving the signal more weight or presence. The amount you will need to change the INPUT to see one dB of Gain Reduction will, of course, depend on the input signal, i.e., this is based on how loud or strong the signal coming in registers. This can vary depending on the microphone and the person in front of it. One dB of reduction may not seem like a lot; but in fact it is a protection against the incoming signal going over into the red. You will be able to see your incoming signal meter when you go to the Sample Record screen.