

Tagged Under
Let’s begin by being clear about this entity called a PERFORMANCE, so we can intelligently discuss the “Live Set”, which is a collection of Performances arranged in specific order for quick access. We need to know exactly what makes a PERFORMANCE tick.
A PERFORMANCE can be made up of as few as one Part and as many as sixteen Parts. Each Part can be a complete instrument sound on its own made from either a multi-sampled AWM2 program, or an FM-X synth program. Each slot in a Performance can be addressed as an individually playable program or you can “link” as many as eight by placing them under KBD CTRL (Keyboard Control) using as many as 8 separate Arpeggiators!
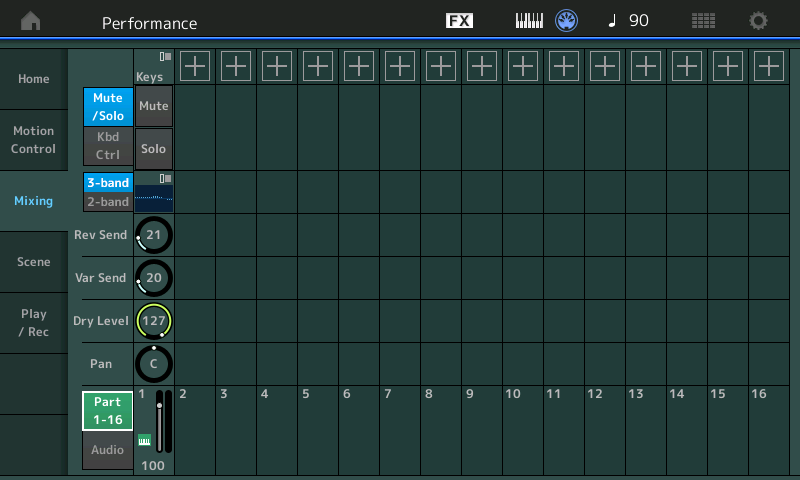
Shown below is the MIXING view when a PERFORMANCE contains a Single Part:
A PART is the fundamental playable sound. If you are familiar with the Motif series, each PART is the equivalent power of a complete Motif-series VOICE. Within a PART are the Waveforms responsible for the tone – these are the oscillators – the sound building blocks. An AWM2 PART, for example, can have as many as 8 Waveforms. A Waveform is a collection of as many as 256 samples mapped to the keyboard with note ranges and velocity ranges. A PART can stand alone, or can be combined with other PARTs to build an extremely detailed sound. The more Waveforms available, the more detail and nuance you can add to your sound. When you hear an acoustic guitar sound performed on a Montage utilizing the Motion Control Engine with its expanded articulations and morphing environments versus an acoustic guitar sound that doesn’t have access to all of this – the difference is stunning. It’s not trivial when you hear it and it is certainly not trivial when you perform it. Being able to control the incredible nuance within the instrument sounds here, is what Motion Control and the MONTAGE expanded architecture is all about.
Keyboard Control
Parts 1-8 have the option of being placed into a single massive playable entity, where you can split, layer, and assign some portions for real time direct play while others are under control of one of eight arpeggiators. It is when addressing eight Parts simultaneously that the massive Controller Matrix of MONTAGE comes into full play. You will find a wide variety of different types of Performance programs. But one key to understanding the MONTGE is the understanding that these are not simply layered sounds being addressed together (as if you had 8 MIDI modules you were triggering all together), instead each can have a unique relationship to your control. You can bring in certain Elements only when you need to express a specific articulation. Each of the eight Keyboard Control Parts has 32 knob controlled parameters; 8 of which are completely assignable and scalable to your requirements – it is this that is new and expanded in MONTAGE. If you just MIDI’ed 8 synth modules together and used cc074 to control Filter Cutoff, you’d have two options: either all the filters changed together or you could set a Part to ignore cc074. All or nothing at all. Well, on MONTAGE not only does each AWM2 Part have its own 8 Filters, but each one of those 8 filters is individually and directly addressable and controllable. You can assign a different movement, even movement in opposite directions, open some, closing others, customized and controlled with a single gesture (via the Super Knob). This is not like anything you’ve necessarily encountered before.
The movement of these individual parameters can be ganged or linked to the movement of the Super Knob – called that simply because it can be responsible for such dramatic changes. When sound designing, these Keyboard Controlled PARTs can be used for very unique and highly refined music transitions. On an advanced programming level you can design sounds for any specific purpose. In other words, with one approach of problem solving, you could use two slots of a LIVE SET to transition from one instrument to another, however, with another approach you could merge the two instruments into a single Keyboard Controlled entity where the transition is customized and personal. Each person will need to seek the depth level they wish to dive down to… There are PERFORMANCES where this is demonstrated to great effect – and we’ll take a look at some of these.
Typically, if you are using simple Control Change (cc) message everything on the channel must either respond to or ignore the message. MONTAGE uses direct Parameter Change messages which allow you individually customize movement in response to the control message. The PART Assignable Knobs can be directly assigned to specific parameter destinations, even assigned to multiple parameter destinations within the PART, it can be addressed via MIDI using standard cc messages; and it can be linked to the Super Knob. The massive Controller Matrix in MONTAGE is an innovation. When Pan is selected as a Destination, for example, you can send each PART, each Element, under Keyboard Control in a different direction, each with a completely different customized movement curve and amount. Instead of just the ‘usual suspects’ cc message Destinations, you can select from over 250 parameter Destinations within the synth engine. And the Super Knob and the PART AssignKnobs are all about this deeper multi-dimensional control.
When controlling the MONTAGE via MIDI (from a MIDI sequence or from an external device/controller) you will want to explore assigning your Control Change (cc) message to the specific Assign Knob (cc17-24) each acts as a PART “super knob”, in that each can be tasked with controlling multiple parameter destinations simultaneously. MONTAGE offers both types of control; you have dedicated “Quick Access” Knobs for cc5 Portamento, cc10 Pan, cc71 Harmonic Content, cc72 Release Time, cc73 Attack Time, cc74 Brightness, cc75 Decay Time, cc91 RevSend, and cc94 VarSend
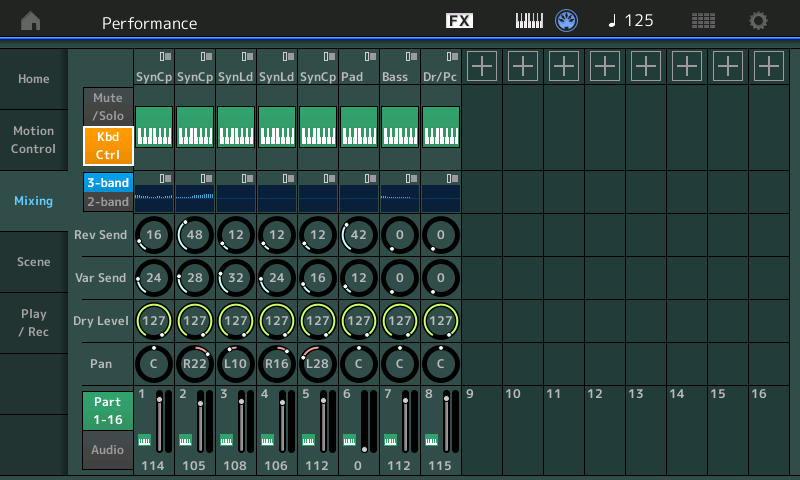
Shown below is the MIXING view when a PERFORMANCE contains 8 PARTs under KEYBOARD CONTROL (Kbd Ctrl). The KBD CTRL icon appears for Parts 1-8.
PERFORMANCES
Each Performance slot that contains an AWM2 sampled based Part (equivalent to a Motif XF Voice), can have as many as eight Oscillators, eight Filters, eight filter envelope generators, eight amplitude envelope generators, etc., etc. Or a PART can contain an FM-X Part. The FM-X engine, coincidentally, has eight Operators (more on this in a future article) and its own complete set of controllable parameters.
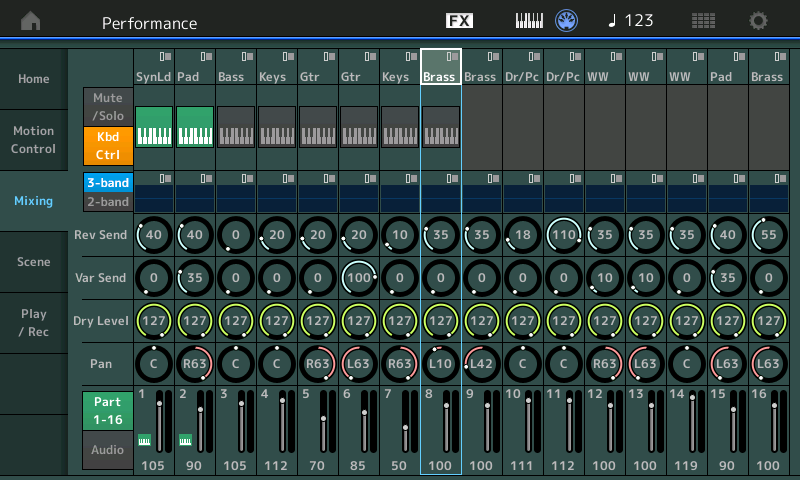
In the screenshot shown below, a Multi Part KBD CTRL sound occupies PARTS 1 and 2 (green keyboard icon) while PARTS 3 through 16 each have a Single Part sound available for immediate individual selection or available for simultaneous play from a sequencer or via MIDI file/or external controller.
See the Light
Shown below is the [PART CONTROL] button (1) which turns the top two rows of right front panel buttons into “PART SELECT 1-16” buttons.
When [PART CONTROL] is lit, you read the second number – the one after the slash mark.
When [PERFORMANCE CONTROL] is lit you read the first number the one before the slash. 
See the dotted lines from the [PERFORMANCE CONTROL] button to the “PART SELECT” and “PART MUTE” 1/8 buttons.

Assembling your own Multi Part Performances
You must begin to think about MULTI-PART sounds as your “featured” instrument. It is going to be one that can have great detail and expression. It’s the one you leave for yourself (as keyboardist) to play in a featured situation.
A single Part AWM2 Performance is the equivalent to a Motif XF VOICE. In fact, all 1352 XF Voice programs are available in MONTAGE as single Part Performances and make up the core of is 2143 factory Presets. A single Part Performance has an instrument sound in slot 1 and then fifteen empty slots. When building your own USER programs each Performance can contain sixteen Parts! at maximum. In a performing situation one way to use this type of PERFORMANCE setup is to place the sounds you are going to use into this one program. Quick and completely seamless access (selection) among these sixteen Part programs is available via the sixteen dedicated direct [PART CONTROL] > PART SELECT buttons.
The PARTs assembled in your own custom User Performances could represent your favorite sixteen “go-to” sounds. By placing them side-by-side in a single recallable Performance, you have seamless transitioning between the Parts by using the [PART CONTROL] PART SELECT 1-16 buttons to directly switch between the active Part. You can hold one Part with the sustain pedal, while you switch and begin playing the new sound while continuing to sustain the original. You can hold one Part by holding the keys, while you switch to another using the sustain pedal on the newly selected Part. When you directly select a Part it becomes the active sound – and your arsenal of controllers immediately control the active Part. Each Part can even be linked to an external device for control (using the ZONE MASTER keyboard settings).
The PARTs assembled in your Performance could represent the instruments you are using to playback a MIDI file or that you are triggering from your favorite DAW computer program. How you use a Performance can be designed by you, for whatever purpose you require.
Full Digital Mixer
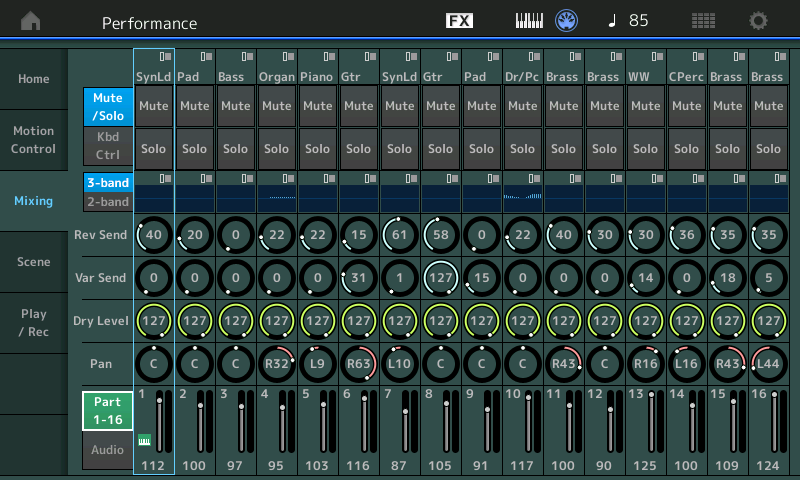
On the MIXING screen you can see each of the sixteen PARTS and their communal parameters: Each has a Volume setting (Fader), a PAN position, Dry Level, Sends to the Variation and the Reverb (System) Effects, a 3-Band EQ pre the Insertion Effect block, a 2-Band EQ post the Insertion Effect blocks, the KBD CTRL icon on the first 8 Parts, a SOLO and a MUTE button. If you were to press the [EDIT] button while a PART is selected, you would drop into EDITING the synth sound assigned to this channel/slot – this EDIT area will include access to the Oscillator, the Filters, the envelopes and of course, the Dual Insertion Effect blocks which are, technically speaking, part of the Synth instrument (and is why they do not appear on this mixer view). You can assign physical controllers to manipulate the synth Part and its two assigned Insertion Effects.
Think of the MIXING screen as the band’s Mixer (because it is), think of dropping into EDIT as modifying the Synthesizer engine (the instrument) assigned to the current slot.
Each PART in a PERFORMANCE can be a completely unique customized instrument for whatever use. For example, a unique version of your Favorite piano can appear in as many different PERFORMANCES as you deem fit. And the MONTAGE allows you to completely customize it in each use case! Think of the PERFORMANCE as a place to gather your sounds for a specific use. How you organize your data is strictly a personal preference. And can range from the very basic single instrument requirements to very complex setups integrating external devices with multiple internal sounds. The MONTAGE seeks to accommodate the full gamut.
Your Requirements
Your PERFORMANCE could represent any combination of different sounds. Perhaps you want to have a PERFORMANCE that features the multi-Part CFX CONCERT piano (KBD CTRL in PARTS 1-4), while PARTs 5-16 are your favorite other twelve “go-to” sounds. You can certainly combine one multi-Part Keyboard Controlled Performance with a series of single Parts. Depending on your needs, you may never have to leave this one PERFORMANCE. Knowing when you need to actually create a new PERFORMANCE is a programming skill you will need to work that out for yourself. But recognize assembling your favorite sounds into one Performance is very doable and represents one of the workflows.
Additionally, some PARTS can be assigned to playback from the PERFORMANCE RECORDER while you use other PARTS to play along with the MIDI data or AUDIO file. This is how this works: Any single PERFORMANCE can be accessed prior to activating the PLAY/REC feature. But you must access the PERFORMANCE prior to playing back or recording – therefore, it makes sense to have a prepared PERFORMANCE for each SONG… use the Load feature “Song&Perf” so that your sixteen PARTS are in place before starting playback. (That is how this works). We’ll look at some examples of this, as well.
An understanding of the construction of Performances will help you decide on how best to transition between sounds that you need to access. There are going to be times on-stage when you need to smoothly transition between instrument sounds. There are other times when you have plenty of time to move between instrument sounds. Don’t talk yourself into the corner where you think you need both hands on the keyboard at all times! This is a synthesizer, “playing” the front panel is part of what playing a synthesizer is all about… Knowing that there are times when you can actually work the front panel can help you plan out your Performances and plan out how you’ll list them in your “Live Set”. You may need just one slot for the whole gig, you may need scores of slots for the first set. The mileage here will vary dramatically, user-to-user. However, knowing the power of a single Performance can serve both types of user. Efficient use of the available program resources can save you lots of time and effort.
Seamless Sound Switching, [PART SELECT] Transitions, and Synth Programming
SSS works between large Multi (8) Part Performances. But also know you can switch seamlessly between single Parts in a Performance via the [PART SELECT] buttons. And for those of you who program, you can create a sound that morphs between Elements/Operators, morphs between PARTs and does exactly what you need for the specific transition you require. Knowing which will work for you will be important.
SSS is specifically for overhanging one sound (hold/sustain) while you switch to a new sound and begin playing it without cutting off the first sound. Knowing how to use this is a skill worth a few minutes time to master. This can be done via the screen, buttons or even with a foot switch.
Part Select transitions are handled strictly by the front panel buttons and allows you to instantly play the newly selected Part, while you can still hold/sustain the previous PART. These [PART SELECT] buttons are the fastest way to transition between two factory Preset sounds. There will be no hesitation or sonic glitch whatever using the select buttons. press the [PART CONTROL] function to switch the top two rows of buttons to direct PART SELECT 1-16 buttons.
Synth Programming the MONTAGE has the ability to transition sounds simply in the programming. In fact, many of the factory Presets show this off to great affect, the Choir-to-Choir/Strings-to Choir/Strings/Pipe Organ is pretty dramatic. You can have one sound morph into another, morph in to many (ensemble), or smoothly switch using the Motion Control Engine to morph sounds and/or the innovative XA Control (Expanded Articulation Control) which was designed to be musically invisible when transitioning Elements.
The LIVE SET Function
Placing a Performance into the USER LIVE SET could not be easier:
Call up the PERFORMANCE you would like to include in your USER LIVE SET
Press [SHIFT] + [LIVE SET] to “Register” the current Performance in the lowest available empty space in the USER Live Set area.
You will see a white highlight flashing around the Live Set slot. Touch the slot you wish to place this PERFORMANCE.
Done.
Next time we’ll take a look at some different Performance examples and assemble them into a “Live Set” in Performances and the Live Set II. Knowing when and how, exactly, to use a Live Set is an important skill. ‘Til then…
In the meantime, if you have questions/comments, join the conversation on the Forum here.