

Tagged Under
SWING QUANTIZE and the PLAY FX
The Swing Quantize feature is found in the Pattern sequencer by navigating to the “Edit/Job” area, then touching “Play FX”. There are two tabs: “Play FX 1” and “Play FX 2”. This is a special function that allows you to set up your own real-time “groove quantize”.
You can try out different timing offsets to give your performance feel, “swing”. It basically has offset parameters that can be applied, non-destructively, to your Track data. When we say non-destructively, this means that the changes occur in real-time without actually re-writing the events on the Track. This allows you to make changes in real-time, as the Pattern is playing.
This can be used to “try out” different quantize feelings before committing to rewriting the original data. This is a similar kind of real-time offsets applied to Arpeggio Phrases, except this can be used on data that you’ve recorded to the TRACKS yourself.
The principal parameters are: Quantize (Value and Strength), Swing (Velocity, Gate, Rate):
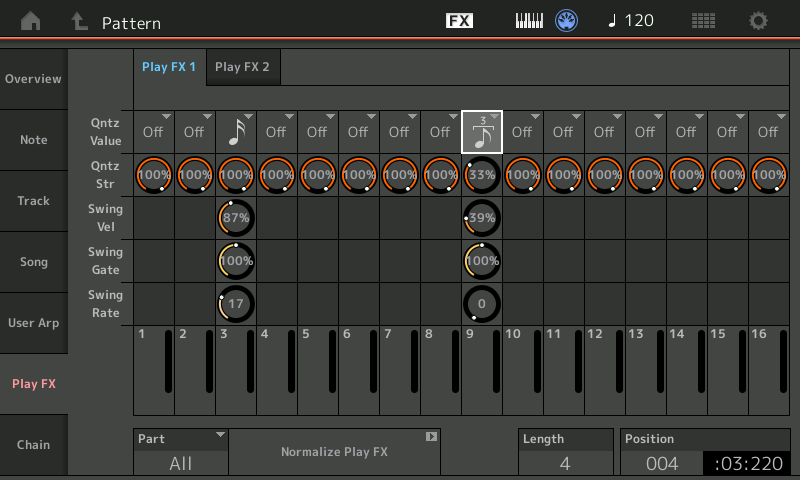
Here Quantize Value can be applied, forcing notes to different timing. You can take straight time and apply the various timing grids (from straight time to triplet). These changes are applied in real-time. Remember, quantizing is not a cure-all. The use of quantize cannot not always fix all timing issues in your recording. It is possible that quantizing can actually make it quite a bit worse. If, for example, you select a Quantize Value that is too large, you may find that notes are jammed to the same clock pulse – giving a phased kind of sound.
For example, say you played 16th notes and you quantize to 8th notes or quarter notes, you will likely hear notes moved on top of each other. You will have to determine this for yourself:
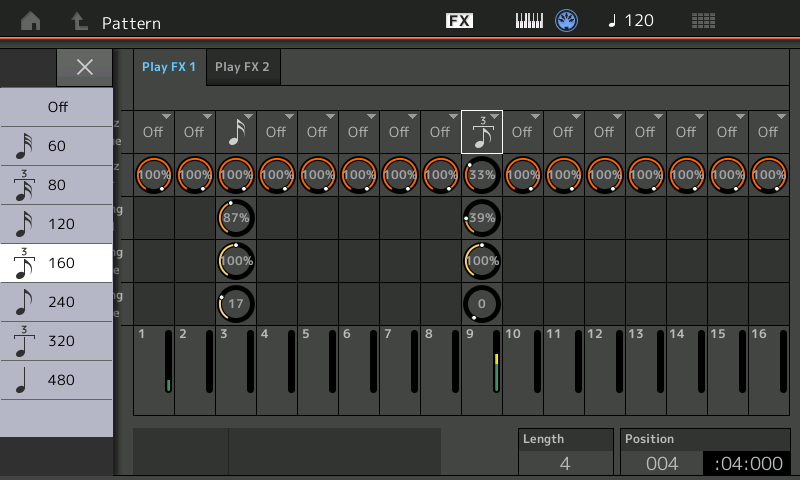
If you are unfamiliar with the musical symbols for timing VALUE, you may want to get a basic book on music notation. A note with 3 flags is a 32nd note (60 clock ticks), a note with 2 flags is a 16th note (120 clock ticks), a note with 1 flag is an 8th note (240 clock ticks), and a note will no flags (just a stem) is a quarter note (480 clock ticks). Any of these values under the number “3” bar denotes a triple value (80, 160, 320).
The Quantize Strength parameter will determine whether the notes are moved fully to the quantize value (100%) or to some lesser degree. If the Quantize Strength is 0% then no timing correction will occur.
What’s on order here are the three components of Swing Velocity (how strongly the “swung” note is sounded), Swing Gate (how long the “swung” note is held) and Swing Rate (the amount in clock ticks that the “swung” note is offset).
The “swung” note is the offbeat note (the even number count).
In eighth note swing: You would count “1 + 2 + 3 + 4 +” _ It is the “+” count, that is affected.
In sixteenth note swing: You would count “1e+a2e+a3e+a4e+a” _ It is the “e” and the “a” that are affected.
The Swing Velocity will only be heard on instrument sounds that are velocity sensitive. In an eighth note Swing Velocity, the even numbered eighth notes will be altered in velocity. 100% is no change from the original value; values higher than 100% increase the velocity, and values lower than 100% decrease the velocity.
The Swing Gate will only be heard on instruments set to receive note-off commands – so you may not hear its effect on a many Drum Kits because drums are typically set to ignore note-off. However, this would be very apparent of the “8Z Drum Kits” and any FM-X Drum Kits, where note duration is typically accepted.
The Swing Rate value will depend on the quantize value you select. If you select 8th note quantize (240 clock ticks), the maximum RATE offset will be 120 clock ticks (or exactly half the value… 120 ticks being a 16th note). If you select 16th note quantize, the maximum RATE offset will be 60 clock ticks (again half the value of a sixteenth note which is a 32nd note). Offsetting the ‘swung’ note means you can position it later in the beat.
Under the “Play FX 2” heading you will find Note Shift, Clock Shift, Gate Time, and Velocity (Rate and Offset):

The Note Shift function can be used to change the Key on Normal musical sounds by semitones. You would not necessarily want to Note Shift the data triggering an entire Drum Kit. However, this can be useful on drum and percussion sounds if you switch the program to the appropriate Kit. Used in conjunction with the “Divide Drum Track” function (see separate article), you can easily and quickly alter the drum sound played by a track. For example, say you recorded a Pattern and want to try out a different snare drum sound – you can use Divide Drum Track to isolate the drum to its own track, then you can use the Note Shift to shift that drum to a new sound using a PART that is dedicated to all Kick drums or all Snare drums.
You can Clock Shift any event occurring on a track by designated number of clock ticks. You can shift it as far back as 120 ticks (a 16th note) or you can “push” the beat by shifting it as many as 120 clock ticks forward. Sometimes shifting a snare 6-10 ticks back is just enough to give the right feel. This function is like a programmable quantize… as the offset is applied to each measure as it cycles around.
Gate Time is how long a note makes sound – duration. You will hear this immediately on Normal instrument sounds. Most of the preset drum sounds are programmed to ignore note-off. You can edit a drum sound to “Receive Note-Off allowing it to affect the duration. This is very useful on a crash cymbal when you want to create a “choked cymbal” effect. Edit the Crash cymbal in your drum kit so that it “RECEIVE NOTE OFF” = ON. This way the GATE parameters will affect it. You can also use the Gate parameter very effectively on musical (non-drum) sounds.
You will find this Gate Time (duration) parameter most useful on ‘normal’ music sounds. Part of what makes something swing is as much when you play it as it is how long you play it for. If you picture a band with a horn section hitting a riff together – it is just as important to know where the note stops as it is where it begins. If one of the horns hangs a note over into the next beat it will kill the swing.
The Velocity Offset can be used to add accents or de-emphasize a particular beat. Offset adds or subtracts a set value to each event. Remember swing is not just timing, but about impact and volume of what is played.
The Velocity Rate parameter is offsetting the velocity but by percentage – so instead of adding a fixed value to each event (offset) it increases or decreases the value in proportion. 100% is no change 200% doubles the velocity of all notes, while 50% reduces the value by half. Of course, you cannot exceed a maximum value of 127, nor can you reduce output level below a velocity of 0.
With this function you are setting up a custom quantize – think of it as a programmable Groove Quantize.
Programming Tip: While on this subject (Velocity), it is a good idea to make your principal kick and snare strikes somewhat less than 127. A drummer does not always hit the snare drum as hard as they can on each stroke. They have something in reserve. How can you program an accent if every hit is 127? If you make your main kick and standard backbeat snare a velocity of 96 or 105, then when you punch it up to 127 it will have some IMPACT!
This, of course, is subjective. But recognize that in listening to live drummers you can pick up on things like this. For example, they very often “punch” up a crash cymbal by simultaneously hitting the kick drum. Use the mixer in the MONTAGE to mix. If you want the drums up front (as in many types of popular music), you can still do that without making every snare and kick 127. Learning how to turn some instruments down so that others stand out is the “art” of mixing. You will find that 0-127 is a nice range if you use it. If you have everything up near 127 you cannot appreciate the soft-loud dynamics of your own music. It is that soft-loud dynamic range that makes music (and sounds, in general) interesting to the human ear.
Of course, the genre of music dictates how much, but when dealing with MIDI, recognize that the full dynamic spectrum ranges from 0 through 127 – and if 127 is the absolute loudest that you can get, you probably want to reserve this for the very loudest portions of the music composition. It is just common sense.
Normalize Play Effects
Normalizing Play Effects takes any non-destructive alterations you have made to the “Play FX 1” and “Play FX 2” functions and writes those changes into the track data. This makes a destructive, or permanent, change to the data. When you Normalize Play FX the Play FX grid will be “zeroed out” (all offsets that you made are returned to their neutral values).
Set the PART (All, 1-16), then touch the box “Normalize Play FX” :

Use this Job when you want to lock in the changes and write that data to the track. As mentioned, Play FX are initially applied nondestructively. You can use your discretion here: do you want to dynamically apply the Play Effects or make their influence a permanent part of your data?
How you use this will depend on your musical goal. You might opt to just use these offsets during playback as part of your real time manipulation. In this case, you would not opt to Normalize (change permanently) the data in the Track. On the other hand, you might be using the PATTERN function to deeply edit a Track you brought in from a linear MIDI SONG (using the “GET PHRASE” function). Remember, you can use the PATTERN function in a variety of ways. In such an instance you might be reconstructing the Drum Track for a lengthy linear recording.
By using the “Get Phrase” Job, found by touching “Song”, you can grab data from a linear Song; you can bring the entire Drum Track (or any Track, or all Tracks) into the PATTERN where you can put fill-ins and rolls, change the feel and attitude of the composition. Once you’ve completed work, or at any time, you can use the PATTERN “Put Phrase” to copy the data back into your linear Song. There is no one-way to use these functions – they are tools for composition construction.
As an alternative to executing the Job: “Normalize Play FX”, you can simply place the track in OVERDUB Record and let it play through once (Loop = Off). This will realign the data according to the settings you have made on the PLAY FX screens; just as if you had sifted the data through a grid and realigned it. Once you have played it through once with the OFFSETS the data is rewritten and all offsets that you made are returned to their neutral values.
UNDO? REDO?
You will find the option to undo your last edit by touching the “Edit/Job” > “Overview” option. A box appears to “Undo last media change” – if you take this option, the last EDIT/JOB performed will be undone, and the box changes to “Redo last media change”. This allows you to “try out” an edit, then compare the results with the original. If you are getting ready to perform a function that cannot be undone, you will be warned ahead of time.
Normalized Play Effects will apply to all 8 Scenes for the selected Track(s).
Extra Credit: This normalizing function should not be confused with the normalizing of an audio waveform. When you are talking about normalization of wave data, you are changing the output level of a sample so that the loudest peak reaches 0VU on the meter. This normalization (of MIDI data offset) is all about making the non-destructive edits you have made, permanent by rewriting the data in the track.
Want to share your questions/comments? Join the conversation on the Forum here.