

Tagged Under
The best way to learn about any effect is to play with it. The CONTROL DELAY can be setup to work like the classic “tape delay” systems of the 1970’s. Not only can you have multiple repeats but you can create the same effects as if you had a moveable playback head – for wild scribbling effects that are from another world. Experiment with the Effects and Controller Set assignments in VOICE EDIT:
• Press [EDIT]
• Press [COMMON EDIT]
• Press [F6] EFFECT
• Press [SF1] CONNECT to gain access to the edit parameter of each of the EFFECTS
• Use [SF2] INS A or [SF3] INS B to gain access to the parameters of the selected Insertion Effect
• Press [F4] CTRL SET to edit and assign the controllers
CONTROL DELAY Algorithm
_Select this EFFECT Type from the DLY (DELAY) category and assign it to a VOICE.
_Press [SF2] or [SF3] to enter the Insertion Effect edit screen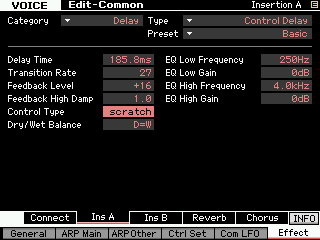 _And then set the CONTROL TYPE = SCRATCH.
_If you assign a controller (your favorite) to the DELAY TIME, you will be able to create the same effect as having a movable playback head (like on the ‘Echoplex’). The Echoplex was a classic tape recorder delay unit with multiple playback heads and a slide control to move one of the heads in real time.
Try assigning the RB (22) Controller to control the Insertion Effect’s DELAY TIME, while the CONTROL TYPE = scratch. This gives you a way to do vinyl-type scribble and scratch effects (where you are changing the speed of the audio delay by movement of the controller)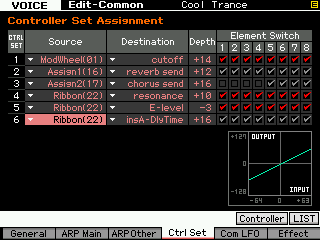
Back in the INSERTION EFFECT parameters, set the DRY/WET balance D/W63 (completely wet) and you will only hear sound when you touch a key and move your finger across the Ribbon – provided all ELEMENTS are routed to the INSERTION EFFECT. (You can view the ELEMENT routing on the [F6] EFFECT > [SF1] CONNECT screen. In the upper left corner you can see the routing of each Element to the “Insertion A” or “Insertion B” or “Thru” (no effect)).
The thicker the original sound the more dramatic the effect. Experiment with the TRANSITION RATE parameter – the lower the number the more fragmented and stuttered the results, the higher the number the smoother the transition. The longer the DELAY TIME parameter – the more “lag” there is. This is also very effective on user samples (audio clips).