
Tagged Under
We will start our exploration of synthesizer basics with a discussion of the basic building blocks. Oscillator_Filter_Amplifier. We highly recommend that you follow along using the Yamaha Editor for your particular synth.
_ Yamaha Motif XF Editor Standalone/VST
_ Yamaha MOXF Editor Standalone/VST
_ Yamaha S90 XS/S70 XS Editor Standalone/VST
*The Editors are available from the Official Yamaha Download site: http://download.yamaha.com
The Oscillator can be understood as the sound source, the object that creates the audible consistent musical vibration. Think of any acoustic instrument… there is something that is caused to vibrate at a consisent rate – this is the oscillation. There are only two categories of sound: Noise, which is random vibrations and Music, which is consistent vibrations. The air molecules around us are disturbed by the energy of the oscillation… while all music is noise, not all noise is music! Only when the vibration is consistent do we refer to air molecule distrubence as MUSIC.
The Filter can be understood as a modifier _ it is responsible for the timbre or tone of the instrument. In the real world things like the material an instrument is built out of will determine its tone. The kind of wood, or metal used in an instrument. The shape of that instrument also affects the timbre/tone of the instrument. In a synthesizer a Filter can be understood as a device that removes something (like a coffee filter or water filter removes something)… the synthesizer Filter removes harmonics. As musicians we should understand harmonics _ more on this in a minute.
The Amplifier can be understood as the device that controls the loudness _ both louder and softer.
The Yamaha Motif XF-series, the S90 XS/S70/XS and the MOXF-series are based on the same 8 oscillator (Element) sample playback synthesis engine. They are extremely powerful synthesizers. While the Motif XF and MOXF can be edited fully from their front panels, the S90 XS/S70 XS must use the Yamaha S90 XS/S70 XS Editor Standalone/VST to access the Element level parameters that are at the core of sound designing.
We will take a look at the basic concept of building a sound using the sample-playback engine found in all of these synthesizers. A brief look at the history of synthesizers is a good place to start. In the 1960’s experimentation with “voltage controlled” analog synthesizers was limited to College and University labratories. But by the early 1970s the first of the commercially “affordable” monophonic and duophonic synthesizers started to hit the market. These had a few geometric waveforms (triangle, saw, pulse, square, etc) as sound sources. Typically you had a buzzy bright Sawtooth waveform and an adjustable width Pulse waveform. The buzzy Sawtooth (and reverse Sawtooth, sometimes called Saw Up and Saw Down) was used to create everything from strings to brass sounds, while the adjustable width Pulse waveform was used to make hollow sounds (clarinet/square wave) through to nasal tones (oboe, clavinet/narrow pulse).
Analog Synthesizer Background
The fundamental building blocks in an analog synth are the sound source – the tone/timbre adjustment – the amplification.
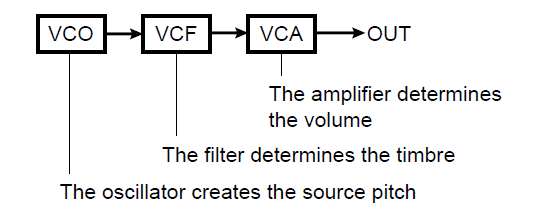 The VCO or Voltage Controlled Oscillator was responsible for creating the musical pitch.
The VCF or Voltage Controlled Filter was responsbile for shaping the tone/timbre of the sound.
The VCA or Voltage Controlled Amplifier was responsible for shaping and controlling the loudness.
This is also the basic synthesizer model that sample playback synthesizers are based on – with the significant difference that instead of shaping a handful (literally) of source waveforms into emulative sounds with voltage control, the sample synthesizer has an enormous library of highly accurate digital recordings of the actual instrument being emulated.
Without getting into a discussion of what can and cannot be replicated by samples versus analog voltage control, and other very inflammed subjects, let’s take a look at the yet unexplored possibilities that today’s sample playback engines offer. Particularly since the synth engine today has far more variety and many more directions you can explore. (If you only look back, you may only see the past… or something like that).
In most of the early analog synthesizer the oscillators, no matter how many, all shared the same filter and the same amplifier so that sounds had a specific type of movement. As we’ll see, in the sample playback engine here, you have 8 oscillators (Elements) each being a complete Oscillator-Filter-Amplifier building block. This “times 8” means you have a very flexible tone generating system that can be used to create extremely complex and detailed musical timbres.
SAMPLE PLAYBACK SYNTHESIS
The block diagram of the current Yamaha AWM2 (sample playback engine) is shown here. The significance of having a digital audio recording (sample) as the sound source is one that does affect the results. Naturally, if you start with a waveform that is an audio copy of the real thing, you can use the Filter and Amplitude blocks to refine the results and therefore, you can rely on it less to create the emulative resulting tone. Because a digital recording is a fixed entity, samples do work best on triggered-event musical instruments (percussion family).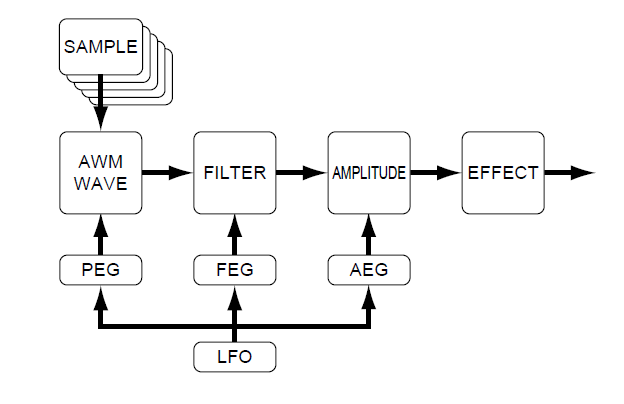
Instruments that can sustain and be played with varying length notes, present a unique problem for digital recording based syntheszers. Samples are most often looped, not, as many believe, simply to save memory so much as to allow the keyboardist to intuitively control the destiny of the note-on event (note-length). In other words, if you are playing a flute sample, if the original player only held the note 8 seconds then you, as a keyboardist, would never be able to hold a note longer than that. (If you remember the early history of audio recordings being used in keyboards: the Mellotron had magnetic tape strips that engaged when you pressed a key, but you were limited to the length of that recording). Also, if you decide to play a note shorter than the original player, you need the envelope to move to an end strategy (Release) whenever you decide to lift your finger. Looping is a necessary evil in sample engines – it allows the keyboard to be used as an emulative instrument. Percussion instruments, like drum hits, are simple – they typically play their entire envelope without the necessity of looping (there are exceptions, the acoustic pianoforte being one of them). The Yamaha sample playback engine has added some new variations to the list of programming tricks to make emulative playing a reality. For many years velocity switching was the primary tool of the sample playback engines ability to change expression and articulations. The XA (Xpanded Articulation) Control allows for dynamic real time changes in active Element switching. These can be manually manipulated or adjusted by “how” you play.
Translations: PEG, FEG, AEG and the LFO
Pitch, Filter and Amplitude are the pillars upon which the synthesizer is built. The fundamental structure again follows the paradigm of the analog synth engine. The Envelope Generator (EG) is a device that is responsible for how things change over time: the envelope “shape” (called “contour” on a MiniMoog) determines how it comes in at key-on, what it does while it sustains, and how it disappears at key-off. For example, some instruments can scoop up to a pitch or drop-off of a pitch – this would be a job for the Pitch Envelope Generator. Some instruments change timbre and loudness as the note is held, for example, a slowly increasing trumpet note (sforzando) will need both a Filter Envelope Generator and Amplitude Envelope Generator to create the shape of the sound. A trumpet “fall-off” will require a Pitch Envelope to control the pitch over time. You can think of the PEG, FEG and AEG as a set of programmable parameters that control the shape or contour of the pitch, timbre and loudness of the oscillator from its start at KEY-ON, through to KEY-OFF until sound completely disappears. (ADSR is a common acronym that describes this tour: Attack, Decay, Sustain, Release).
The Low Frequency Oscillator (or LFO) is literally responsible for outputting frequencies that are sub-audio. We can hear musical tones between the frequencies of 20 cycles per second and 20,000 cycles per second. Above 20,000 we know that dogs can hear it, but did you know that you do not recognize sounds below 20 cycles per second as a cohesive sound. The sound breaks up into separate events, spaced evenly. These are used as “rates”. We can apply a change to a sound one or two times every second. Or even change (called “modulate”) the sound five or ten times every second. These comparitively “low” speed oscillations can be applied to the Oscillator block (pitch), to the Filter block (timbre) and/or to the Amplitude block (loudness).
_ When a rate of modulation is applied to pitch we musicians refer to that as vibrato.
_ When a rate of modulation is applied to a filter we call that wah-wah.
_ When a rate of modulation is applied to the amplifier we call that tremolo.
Pitch Modulation Depth – it sounds so scientific. But as musicians we understand this as a musical gesture called ‘vibrato’. As piano players, we are fundamentally pitched percussionist and therefore, we do not encounter this musical gesture in our vocabulary of terms. But think of any stringed instrument – a violin or an electric guitar. The oscillator is a plucked or bowed string. Once in motion it vibrates (oscillates) at a specific frequency (musical note). The pitch is determined by the length of string that is allowed to freely oscillate – from the fret being fingered to the bridge. The shorter the length allowed to vibrate, the higher the pitch and conversely, the longer the length, the lower the pitch. As the player shortens that distance the pitch goes higher, you lengthen that distance the pitch goes lower. Vibrato is the action of rhythmically varying the pitch sharper and flatter by moving the fretting finger up and down the string. Pitch Modulation Depth = Vibrato. (Although the undulating speaker effect you could apply to a Fender/Rhodes Suitcase Electric Piano was called “vibrato” on the product… this was a classic misnaming of what really was AUTO PAN between two sets of speakers and was more properly referred to as “tremolo”).
Filter Modulation Depth – again scientific terminology. Here’s your breakdown: A Filter, you know what a filter does. A Coffee filter keeps the grounds from getting into the part of the beverage that you drink. A Filter removes certain ‘unwanted’ items and discards them. A musical Filter does this to the harmonics in a sound. As musicians we are at least familar with harmonics even if we cannot give a text book definition. Harmonics are what we as humans use to recognize sounds. It is part of our identifying process that can tell very minute differences in the harmonics within any sound. The text book definition will describe harmonics as the whole integer multiples of the fundamental pitch. If you pluck a guitar string, say the open “A” string; it will oscillate at precisely 110 cycles in a second. A cycle is one complete journey of a Wave. A sine wave starts at 0 and reaches a maximum 1/4 of the way through its cycle; at the 1/2 point the amplitude returns to the 0 line; at the 3/4 point it reaches the deepest minimum opposite the maximum; and finally it returns to the 0 line as one complete cycle. When the string is creating a pitch of 110 cycles you can imagine that a very high-speed camera could capture a picture of 110 of these complete cycles. But you would find a certain number of pictures where the string contorts and as the wave bounces back from the bridge you capture a picture where 220 cycles appear. And 330, 440, 550, 660 cycles, and so on. The number of pictures per second that would be 220 would be some what less than the number of perfect 110s, and the number of 330 would less still, and even less showing 440… these whole integer multiples of the original pitch 110, are the harmonics. When you match the harmonic content of a sound – the ear begins to believe it is hearing that sound. What a vocal impressionist does is attempt to mimic the harmonic content of the person they are trying to imitate. Hamonics are like the fingerprint of the sound. They are why we have no problem telling a Trumpet playing A440 and a Trombone playing A440 – Both are brass instruments and made from similar design. However, even when playing the same exact pitch, the loudness of each “upper” harmonics creates a unique and identifiable tone (timbre) and when we hear it we have no problem recognizing it. The job of a filter is to alter either upper or lower harmonics to mimic the instrument being emulated. A Low Pass Filter (LPF) allows low frequency to be heard and block high frequencies. The LPF is the most used on musical instrument emulations for a good reason: The harder you strike, pluck, hammer, blow through, or bow a musical instrument the richer it becomes in harmonics. So the Low Pass Filter mimics this behavior – often a LPF is used to restrict the brightness of a sound so that as we play harder, the sound gets brighter – this is true in nature. When you change the tone or timbre of a musical instrument in a repeated rhythmic pattern you are playing with the resulting harmonic content. The musical gesture is commonly referred to as “wah-wah”. And contrary to popular belief the first wah-wah was not developed initially as a guitar pedal. ‘”Wah-wah” as a musical term predates the guitar pedal – you can imagine some trumpet player or trombone player with a mute or plumber’s plunger using it for comic effect in the jazz bands of the 1920-40’s. The act of covering and removing your hand from your mouth can create a wah-wah sound – as you block high frequencies and then release them by removing your hand, rhythmically; you are applying Filter Modulation Depth.
Amplitude Modulation Depth – A amplifier is designed to either increase or decrease signal. Yes, I said it: “…decrease signal.” Changing the volume of the musical tone by increasing and decreasing the volume – again, as piano players we do not encounter this gesture – but there are instruments that can easily to this by increasing pressure and decreasing pressure being applied to the instrument. Tremolo is the musical term and usually a string orchestra executing a tremolo phrase comes to mind – or again the term is used on guitar amplifiers where rhythmically the volume is pulsed up and down. Amplitude Modulation Depth = tremolo. Famously the Wurlitzer Electric Piano featured a Tremolo for keyboard players, the FenderRhodes Suitcase models used an oscillator to PAN energy between the left and right pairs of speakers (they improperly called it “vibrato”, but you now know it was really a tremolo situation). Once you start breaking down synth terminology with what you already know as a musician you will find that all of this gets much easier.
If the synthesizer were only doing piano you can see that Pitch Modulation, Filter Modulation and Amplitude Modulation do not get called upon much at all. We should mention here that with analog synthesizers you had to use these devices to help build the sound you were emulating. But in the world of the sampled audio Oscillator – we can opt to record the real thing. And in some cases that is exactly what you will find. There are examples – and we will see these in future articles – where these musical gestures are recorded into the sample and we’ll also find examples of when they are created by the synth engine applying an LFO to control the modulation. Vibrato when applied by a human is imperfect, naturally. When applied by a mechanical engine it can be too perfect. Music is all about the subtlties.
The way that sample-playback synthesizers and the way that analog synthesizers function is based on the same basic block diagram – the biggest difference, obviously, is in the oscillator sound source area. Rather than being based on an electronic circuit that generated pitched tones in response to precise voltage changes, the pitched sound is provided by a digital recording of this tone set to play across the range of MIDI. This basic block diagram works for recreating instrument sounds – it is, not the only way to synthesize, but it survives because it works fairly well. In every acoustic instrument you have the same building blocks – a tone source (something providing the vibration/oscillation); the instrument itself is the filter (the shape and material used to build the instrument affects its tone); the amplifier can be the musicians lungs, cheeks, diaphram, it can be mechanical bellows, an attached resonant chamber, etc., etc. The synthesizer is trying to ‘breakdown’ how musical instruments do what they do by using the OSC-FILTER-AMP setup as a model. This is not a perfect system but it has great potential for exploration and new sound design possibilities.
Sawtooth Waveform Example
We’ll take a simple Waveform, the Sawtooth, and show you how it is shaped into Strings, Brass, and Synth Lead sounds using the basic synthesis engine. Through exploration this will show you how this same Waveform can used to build different sounds. Back in the early days of synths (1970’s) – I’m talking when MiniMoogs and ARP Odysseys roamed the Earth – there were really only two types of synth sounds: “Lead” sounds and “Bass” sounds. If you played high on the keyboard, it was called a Synth Lead sound, and if you played principally below middle “C”, it was called a Synth Bass sound! In this screenshot from the (free) AN2015 iOS App (Yamaha SynthBook) you can see the typical SAWTOOTH Waveshape traveling across the center of the screen. The built-in OSCILLOSCOPE in this analog synth app allows you to “see” the waveform shape as it is generated. Looking like the teeth of a saw, it has a charactistic ramp that travels up and then drops rapidly before repeating. You can imagine that since this is Note “D3” that there would be 293.66 of these excursions per second (the number of cycles per second of the pitch D3). A Sawtooth Down (not shown) would be a wave where the rise in amplitude would be immediate and this would be followed by a ramp traveling downhill (left to right) before it repeated. The sound is bright and buzzy – and as we will see it can be used to build both synth string and synth brass like sounds.
Programming those early analog synthesizers was a requirement because they predated the “preset”. Oh, there were booklets that showed you how to set the knobs or sliders to create a flute or oboe or clarinet or what have you, but at the end of the day, most people listening to you would walk up and ask: what that sound was ‘supposed’ to be. It makes me smile now at how close we thought we were with some of those sounds. But it can be argued that the reason that the analog synthesizer went away (ultimately) had to do with the demand for more and more realistic emulations of acoustic instruments (also polyphony was too expensive to acheive with just analog as a source). Now, that said, it is not that every person wanted this, but this is what (looking back) drove the direction of evolution. There are synthesizer sounds that are just synth sounds – and that’s cool. Some sounds are not trying to ‘be something else’. The so called, Sci-Fi side of synthesis – where you create a sound that exists without trying to BE some other instrument! That is the fun part of it…
We should mention, there are some things that can be done on an analog synthesizer, or a real saxophone that cannot be duplicated by sample playback instruments in the same way. That is always going to be true, whether emulating real or synthesized instruments – because you cannot manipulate a recording of some things in the same way you can manipulate the real thing. And for those things nothing will replace the actual instrument. But to consider that this is some kind of “limitation” is to give up without even exploring what NEW avenues are now open. And that would be a shame. There are a number of things you can do now, we daren’t even dream about back then! And that is what is for you to explore…
Let’s start by exploring a group of very different sounding VOICEs made from the same source Waveform “P5: SawDown 0 dg”
Waveform Number: 1366 in the MOXF and Motif XF Preset Waveform Library
Waveform Number: 949 in the S90 XS/S70 XS Preset Waveform Library
Used in the VOICE:
“Soft RnB” Preset 5: 055(D07) – in the Motif XF and MOXF6/MOXF8;
“Soft RnB” Preset 5: 060(D12) – in the S90XS/S70 XS;
(This is a Prophet V sampled Sawtooth Down wave; the 0 degrees refers to the phase of the stored waveform). For those not around then – the Prophet V (the “V” is a Roman numeral for 5) was one of the popular polyphonic synthesizers of the day… a big five note polyphony; priced at about one thousand dollars a note (as we used to say…) it opened the door to popularizing synthesizers in the early 1980’s. The golden age of synthesis was about to begin. Sawtooth waveforms come in two varieties; Sawtooth Up ramps up in amplitude and drops immediately, while Sawtooth Down starts at maximum amplitude and fades out.
In general, the Sawtooth Waveform is a very familiar ‘analog’ sound – this Synth Lead Voice is typical of the type heard extensively in the 1970s and 80s. And it is a good sonic place to start so you can see/hear how it is based on the same waveform that builds synth strings and synth brass sounds. Explore this Voice by playing it and taking a close look at the parameters as setup.

Shown above is the “Oscillator/Pitch” screen for Element 1 from the Yamaha Motif XF Editor (Voice mode) – This will look identical in the MOXF Editor and the S90 XS/S70 XS Editor as well.
The VOICE being shown is “Soft RnB” Preset 5: 055(D07) You navigate to the above screen by highlighting Element 1, the Oscillator/Pitch screen is currently shown.
In the S90 XS/S70 XS the Voice “Soft RnB” is found at Preset 5: 060(D12)
Click on “Filter” and “Amplifier” to view how Element 1 is shaped into this synth lead sound. Pitch-Tone-Loudness = Oscillator-Filter-Amplifier.
In the next installment of the “Synth Basics” series, we will take a closer look at how a wide variety of Voices can be made from this same Sawtooth Waveform and how manipulating these building blocks can help you create your own custom Voices. Happy experimenting!
Next installment: Synth Basics Sound Experiments