

How to setup the A/D INPUT:
A/D is short for Analog-to-Digital. We will use a microphone for our example but you could substitute a guitar, a bass or virtually any kind of input device. These are analog devices and we are going to convert their audio to digital signals inside the Motif XS.
Set the A/D Input
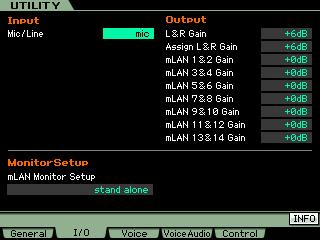
• Press [UTILITY]
• Press [F2] I/O
• Set the MIC/LINE parameter to MIC
• Use the Gain control on the back panel of the Motif XS to raise or lower the input gain. Microphones are weak signals so it is not unusual at all to have the gain set at maximum.
Setup for Audio processing
The A/D PART has its own setup parameters
[VOICE] mode:
• Press [UTILITY]
• Press [F4] VOICE AUDIO
• Press [SF1] OUTPUT
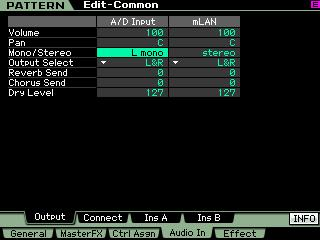
• Set the MONO/STEREO parameter to match the jack to which you connected your mic (e.g.: “L mono”)
• Set OUTPUT SELECT as desired
• Press [STORE] to set this as your preference. This will apply to all of VOICE mode
[PERFORMANCE] mode:
• Press [EDIT]
• Press [F4] AUDIO IN
• Press [SF1] OUTPUT
• Set the MONO/STEREO parameter to match the jack to which you connected your mic (e.g.: “L mono”)
• Set OUTPUT SELECT as desired
• Press [STORE]
This is programmed on a per PERFORMANCE basis
SONG/PATTERN MIXING mode:
• Press [MIXING]
• Press [EDIT]
• Press [F4] AUDIO IN
• Press [SF1] OUTPUT
• Set the MONO/STEREO parameter to match the jack to which you connected your mic (e.g.: “L mono”)
• Set OUTPUT SELECT as desired
• Press [STORE]
This is programmed on a per MIXING program basis.
If you are going to route your A/D INPUT Part to the main Left and Right outputs (L&R), you can use the System Reverb and Chorus Effects, and additionally assign the A/D PART its own (2) INSERTION EFFECTS. If, however, you are going to route the A/D INPUT PART to any of the assignable outputs (“asL&asR”, or any of the various mLAN/Firewire outputs, “m1~m14”) then the signal is isolated from the rest of the system, and will not use the SYSTEM EFFECTS, nor the MASTER FX or the MASTER EQ.
This is because when you route something to an assignable output you do so to isolate it from the rest of the signals – precisely because you want to process it differently from the rest. In such a case, you have the capability of assigning your A/D PART its own setup of INSERTION EFFECTS.
If you want to process the A/D Input you can use the INSERTION EFFECTS, let’s set that up now.
In VOICE mode:
• Press [UTILITY]
• Press [F4] VOICE AUDIO
• Press [SF2] CONNECT
Here you can select any two INSERTION EFFECTS. You have access to all manner of effect types (Reverbs, Delays, Chorus, Flangers, Phasers, etc., etc., etc.) . There are always going to be INSERTION EFFECTS available for the A/D INPUT while you are in VOICE mode.
In PERFORMANCE mode:
• Press [EDIT]
• Press [COMMON EDIT]
• Press [F4] AUDIO IN
• Press [SF2] CONNECT
There are always going to be INSERTION EFFECTS available for the A/D INPUT while you are in PERFORMANCE mode.
In SONG / PATTERN modes:
• Press [MIXING]
• Press [EDIT]
• Press [COMMON EDIT]
• Press [F5] EFFECT
• Press [SF2] INS SWITCH
In SONG MIXING or PATTERN MIXING modes, you can activate the INSERTION EFFECT Switch for a maximum of 8 PARTS.
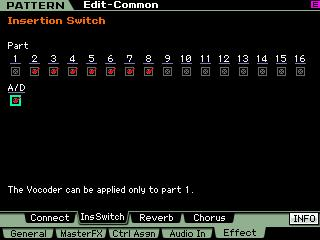
To turn on the Insertion Effect for the A/D input while in a MIXING mode:
Make sure that the INSERT SWITCH is checked for the A/D PART – remember a maximum of 8 PARTS can simultaneously have their INSERTION EFFECTS active, so you may need to turn OFF (uncheck) one of the synth PARTS in order to activate the INSERTION EFFECTS on the A/D PART
• Press [F4] AUDIO IN
• Press [SF2] CONNECT
(shown below)
• Please turn down your main Volume. It is always a good idea when scrolling through effects to prevent ear damage.
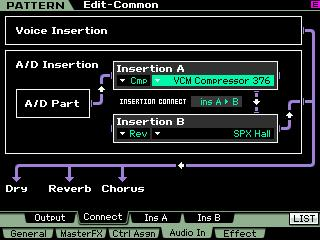
Here you have the dual processors, INSERTION A and INSERTION B.
Set the INSERTION A to the “Cmp” category and select the VCM Compressor 376. The VCM Compressor will allow you to maximize your level and add presence and punch vocals.
• Press [SF3] INS_A to edit the selected Insertion Effect parameters.
Now you can edit the INSERTION_A effect. Just below the CATEGORY and Effect TYPE you will see that you can select a PRESET. Move the cursor to highlight the “PRESET” parameter.
• Press [SF6] LIST
This will let you select from a list of preset setups for the VCM Compressor 376. Scroll down the list and select the Preset called, “Vocal Comp 117x”. This preset is a good starting point for vocals. If you are routing your A/D INPUT to the Assignable Outputs, you will be bypassing the SYSTEM EFFECTS, the MASTER EFFECTS and the MASTER EQ… so in order to use Motif XS reverberation, you might opt to select a reverb algorithm as the second effect (of course, this is entirely up to you).