

Tagged Under
RECORDING a PERFORMANCE to the Internal Sequencer as Audio
In our look at Arpeggios we’ve been discussing the different KEY MODES and how they affect the generated data. Because the Sequencer can record your note presses “direct” or it can record the arpeggiator generated (“sorted”) data some PERFORMANCES will not playback from the Sequencer properly as MIDI data. We can record these PERFORMANCES directly to the XF’s internal SDRAM as audio samples.
Let’s take a look at a unique new addition to the story: A Performance that features 4 PARTS, with two using the “sort” KEY MODE and the other two using the “sort+direct” KEY MODE.
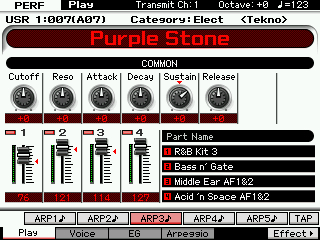
Recall the following PERFORMANCE USER 1:007(A07) “Purple Stone”
 The four PARTS are under control of the arpeggiators:
PARTS 1 and 3 are set to KEY MODE = “sort” (and need to be recorded without their trigger notes)
PARTS 2 and 4 are set to KEY MODE = “sort+direct” (and cannot be recorded to the sequencer easily)
You can find this as follows:
Press [EDIT]
Press a Track button [1]-[4] to select a PART for editing
Press [F2] ARP MAIN
Here you can see the main arpeggio parameters for this particular PART. At [F3] ARP OTHER, you can adjust how the arpeggio behaves.
This is the conundrum: How to capture both sorted and direct data?
If you want to use a PERFORMANCE that combines multiple KEY MODES to the internal sequencer – I recommend that you record it as an AUDIO data. The XF comes with 128MB of SDRAM to which you can record your playing performance in perfect synchronization with the sequencer tempo.
RECORDING a “live” PERFORMANCE to the Sequencer as Audio
Call up USER 1: 007(A07) Purple Stone
Theory of Operation:
1) In a blank SONG or PATTERN mode program we will COPY the PERFORMANCE so that it occupies the first 4 PARTS of the MIXING setup – you can play it just as you did in PERFORMANCE mode… all four PARTS will be assigned to MIDI channel 1; and you will be able to play them all when you select Track 1.
2) In the INTEGRATED SAMPLER we’ll setup to “resample” a live keyboard performance directly as audio.
3) The Integrated Sampling Sequencer will punch us out, then it will create a new USER SAMPLE VOICE, assign it to PART 1, and it will create a Note-On event to precisely trigger the playback of the audio sample
4) We will then reclaim PARTS 2, 3, 4 and return their MIDI Receive Channels for normal use.
The end result will be an accurate recording of your playing the Performance – it will use just one note-on event to trigger the entire thing (as opposed to the hundreds it would take if recorded as MIDI data). It will use just one PART and the data will occupy just one Track.
Why it is recommended to record as audio: The XF introduced several new PERFORMANCES that utilize multiple KEY MODE arpeggios. Additionally, they use the [AF1] and [AF2] buttons controlling the XA CONTROL parameter (Expanded Articulation Control) to create dramatic changes in the program. As you perform you can hit the [AF1] and [AF2] buttons to bring in different timbres/rhythms and even change the sound of a partiuclar rhythmic component. Moving the MOD WHEEL will also have dramatic affect on the feel of the resulting output.
Step-by-step
Call up an empty SONG or PATTERN
Press [MIXING]
Press [JOB]
Press [F3] COPY
Press [SF3] PERF
Select “USER1: 007(A01) Purple Stone” and mark the attributes you wish to COPY from the original PERFORMANCE to the current MIXING setup
Press [ENTER] to execute
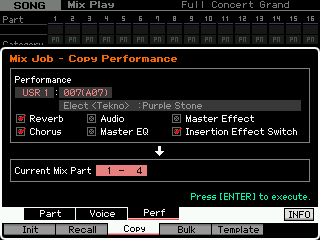
Doing so you have now assigned the four PARTS to the first four PARTS of the MIX – all assigned to Receive Channel 1 – so you can play them together from the XF keybed. In the screen shot below we have elected to view “4 PARTS” simultaneously so you can easily see all four PARTS are initially set to MIDI channel 1 – you can toggle the view between “1 PART” and “4 PART” via the [SF5] button.
On the main SONG or PATTERN screen you will see the Drum Kit VOICE (R&B Kit 3) assigned to TRACK 1, while TRACKS 2, 3 and 4 appear blank – this is because the PARTS 2, 3 and 4 are assigned to be triggered together by MIDI Receive Channel 1. Tracks 2, 3 and 4 no longer have a PART assigned to them.
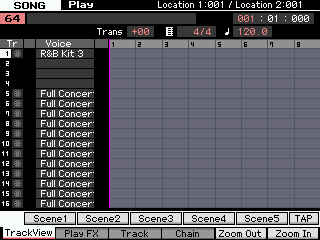
Select TRACK [1] – you can now play the PERFORMANCE same as you did in PERFORMANCE mode.
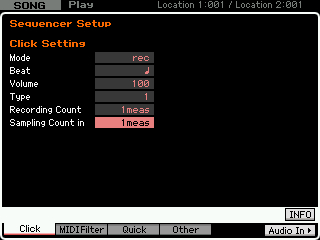
Because we will be recording a real-time performance to the sampler, we need to setup a metronome for SAMPLING COUNT-IN. When sampling audio you only want the COUNT-IN to alert you when to begin playing – then the metronome must STOP. After the count-in we do not want to record it clicking away – we are recording audio – the Performance’s arpeggio will give us the tempo. The XF has a special Sampling Count-in specifically for this reason.
Press [SEQ SETUP]
Press [F1] CLICK
Set the parameter SAMPLING COUNT-IN to the number of measures that is comfortable for you, 1-8 measures.
Press [INTEGRATED SAMPLING]
Select a blank WAVEFORM number
Press [F6] REC>
Setup the SAMPLE SOURCE and DESTINATION:
Record Type = “sample+note”
Input Source = “resample”
Mono/Stereo = “stereo”
Frequency = “44.1kHz”

Key = “C3”
Track = “01”
By using “sample+note” – the ISS will create a USER SAMPLE VOICE, assign it to the mix and create a MIDI note-on event to trigger the playback of that audio.
By using “resample” we are able to record audio directly from all available inputs to the XF sampler (including playing the keyboard directly, as we will be doing).
Press [F6] STANDBY
On the Standby screen you can set the TRIGGER MODE, etc., and you can review your current setup. Make sure you always check the current MEASURE location of the sequencer (upper right corner) – use the TRANSPORT buttons to return to the top: 001
Trigger mode = “meas” (measure)
Set a punch in and punch out region – this is recommended because starting and stopping the recording on cue by automation gives you one less thing to worry about. Say you want to record 16 measures of the PERFORMANCE data… set the MEASURE = 001-017
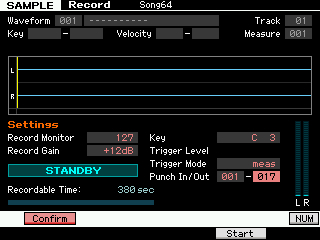
Always set the the punch out point to the top of the NEXT measure (one more than the number of complete measures you want to record). If you are targeting a PATTERN, it will not let you go farther than the current LENGTH setting of the PATTERN.
The “RECORD MONITOR” and “RECORD GAIN” parameters can be set on this screen as well.
RECORD MONITOR is subjective and does not affect record levels, only listening volume
RECORD GAIN is objective and does affect record levels, experment by playing your Performance and increase the gain if necessary. +6dB or +12 dB boosts are available; -6dB and -12dB cuts are available. The meter (lower right corner) will give you a stereo reading of the level for Left/Right channels… in general, increase so that the loudest peaks reach nearly to the top of the scale.
Press [F5] START
STANDBY will change to “WAITING…”
Press the PLAY button on the XF transport to begin the COUNT-IN
Begin to play at the appropriate time according to the number of COUNT-IN measures you set.
When the Punch out measure is reached – recording will stop automatically.
You can press the [SF1] AUDITION button to hear your performance. If acceptable press [ENTER] to fix. If not, Press [EXIT] and do it over. Making sure you return the sequencer to measure 001.
If you have a keeper… press [ENTER]
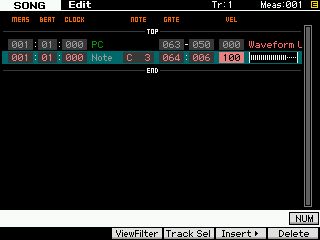
The ISS (Integrated Sampling Sequencer) will create the USER SAMPLE VOICE (SMPL 001), and the NOTE-ON EVENT (default velocity is 100, you can increase or decrease this VELOCITY value to change the playback VOLUME of your audio clip). The duration (or GATE TIME) of the NOTE-ON EVENT will be the exact number of beats to HOLD the audio sample for the number of measures you created with the PUNCH IN/OUT points.
Return to SONG/PATTERN mode (whichever you have been using)
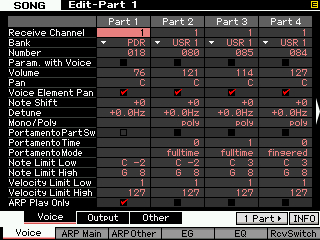
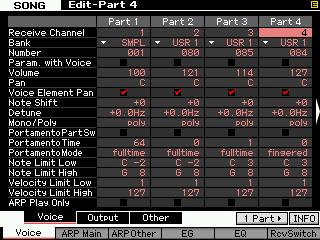
Before you PLAYBACK your sequence, you will want to return PARTS 2, 3 and 4 to RECEIVE on MIDI Channels 2, 3 and 4 respectively – or else you will hear your audio sample playing back 4 times (quite unnecessary since we have created an audio clip).
Press [MIXING]
Press [EDIT]
Press [Track 2] to view PART 2 parameters
Press [F1] VOICE
Press [SF1] VOICE
Set the MIDI RECEIVE CHANNEL = 2
press [TRACK 3]
Set the MIDI RECEIVE CHANNEL = 3
press [TRACK 4]
Set the MIDI RECEIVE CHANNEL = 4
Now you can playback your audio clip. You are also free to use Tracks 2, 3 and 4 with PARTS 2, 3 and 4.
Final Notes:
RESAMPLE as your INPUT SOURCE allows all available inputs to be recorded by the Integrated Sampling Sequencer… this includes the A/D INPUT, and the FW input, in addition to your real time play on the keyboard.