

This is your quintessential rock shuffle – “Everyone Wants to Rule the World” is the fairly obvious musical reference used here (Tears for Fears, circa 1980’s). We often get the question about copyright infringement – no, it’s not copyright infringement until you use this to create the same chords and melody line, and then try to claim it as your own! You cannot steal a song “by accident.”
So let’s get started:
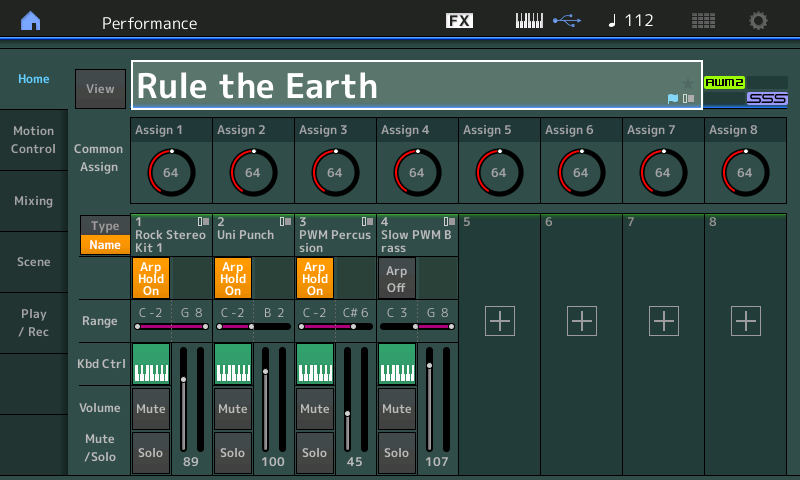
PART 1: Rock Stereo Kit 1
PART 2: Uni Punch
PART 3: PWM Percussion
PART 4: Slow PWM Brass
Let’s continue with the discussion of Assignable Outputs. The MONTAGE signal routing scheme mimics what you would find in any professional mixing console. The mixer here is very much a digital mixer, with Inserts and Sends, Mutes and Solo, Pan control and Faders. There are eighteen inputs to the console: 16 Synth Parts, an A/D Input Part and a Digital Input Part. It features methods of automation that integrate with the synthesizer engine and it can be controlled with tempo related commands. You can even create, store and recall on-demand, your own MIDI and audio setup templates – which can include Part output assignments, monitor preferences, and in general, settings for your most common tasks.
Yamaha pioneered digital mixing consoles back in 1987 when the DMP7 was introduced as the world’s first MIDI automated digital console designed to work with the TX816 – back then Synthesizers didn’t have EQs or Effect processing – those things were added at the mixing console. Old school. Today, all the sophistication found in stand alone digital mixers is built into the MONTAGE. It is important from a historical standpoint but also from a conceptual standpoint to understand exactly how the synth engine and the digital console integrate in your MONTAGE. As we’ll see, there are settings that can be made and stored as part of the synth sound, and others that are stored as part of the mixer. Imagine having a physical mixer, the Fader is set to 101 and currently Channel is a mic on a guitar… later you might change the channel to support an electric guitar. You could change the instrument on the channel and the Fader could still be set at 101. There are channel settings that can be made and maintained independent of the instrument on the channel. A Part can “inherit” certain mixer channel settings.
The factory QUICK SETUPs should be used to gain a basic understanding of what can be configured. In working with literally hundreds of first time users, I have discovered that there are three common “newbie” misconceptions 1) SETUP with a synth and a computer is difficult (it is not), 2) it must be done every time you want to work with the synth and computer (it does not, once you configure some basic things your computer “remembers” the configuration and 3) there is one configuration that works for everything (there is not, you need to learn several basic things to allow you to record, to overdub and to mixdown).
Once you’ve gained a feel for working with MONTAGE and your DAW, you can tweak these Factory Quick Setups and overwrite them with your own custom configurations. There is no “one way” to work. This means you can develop your own workflow and MONTAGE will remember your preferences. The common newbie misconception is that everyone works the same exact way. You will develop your own workflow.
For example, the factory AUDIO REC ON DAW “Quick Setup”, routes each of the 16 MONTAGE PARTS to its own stereo pair of Outputs. And you can understand why this is the factory default – it’s the one setup that would take you the longest amount of time to manually configure. If you want to create complete audio stems of each MONTAGE PART, the factory Quick Setup is ideal.
In many situations as a keyboard player/composer doing music for hire, you are asked to deliver your parts as individual audio stems for the convenience of mixing elsewhere. This is when having the option to route Parts, isolated to their own Audio Outputs and Tracks, without “shared” effects (Reverb), is on point. MONTAGE is flexible enough to route individual drums to USB Outputs from within your Drum Kit Part.
However, if you only need to route a few Parts in isolation, you might opt for a Quick Setup for Audio that resets all Parts to “Main L&R” – then you can make the individual settings on a case by case basis, as necessary. Point is, you can customize this to your most often used workflow.
Just when do you route an instrument (via Assignable Outputs) to its own isolated Track?
Since you can – using MIDI commands – automate fully the mixdown of your synth sounds, it seems like an extra layer of work to then separate everything as audio in the DAW. There is little reason to isolate instuments to separate audio tracks, unless you have plans to further process the sound in your DAW, prior to, or during mixdown. Because you can link the MONTAGE and your DAW via MIDI Clock, you can insure that tempo will remain locked between the two devices. This allows you the freedom to come back and overdub new tracks, keeping everything in synchronization.
If you’ve been thinking exclusively MIDI when Mixing, we must remind you that with MONTAGE there are results that only occur as a result of the interaction of the Parts as audio. If you are side chaining, or Vocoding signals, you will want to capture this interaction as audio. Your “music production” decision process must include the best way to capture this for your composition. Sometimes capturing the interaction is best done by isolating or combining certain of the Parts to certain audio Output buses. For example, when using an external audio source as a modifier in the Motion Control Engine, you may opt to use the Direct and encoded Signal, or just the encoded Signal. But our point is, some sounds you will be creating present a challenge as to how you should record them, and how you will route them. Discover and master the basics first, then branch out by experimenting.
“Rule The Earth”
Rock Stereo Kit – this Kit gives the sound of a drum kit in a room. A very open sound, not studio-slick, but plenty of ambient room sound (done without effects). There is even a ‘ring’ in the snare (an acquired taste thing). This is done purposefully and is a “production decision”. When you are choosing a Drum Kit, please recognize that they are fairly flexible when it comes to ‘producing’ a specific sound, but there is also a basic “character” fundamental to each Kit. In general, the two octaves from C1-B2 represent the drummer‘s “trap kit”: Kick, snare, sidestick, rimshot/clap, Hihats, cymbals, toms. It is these Keys that give the Kit it’s name.
Kits have “a personality” but you can freely substitute individual drums or entire Kits. Let’s take a close look at some things to know when substituting Drum Kits in a Performance that already has Arps phrases assigned and mixer settings that we would want to keep.
Using the “View” HOME screen, press [PART SELECT 1] we can view the PART 1 Drum Kit Elements: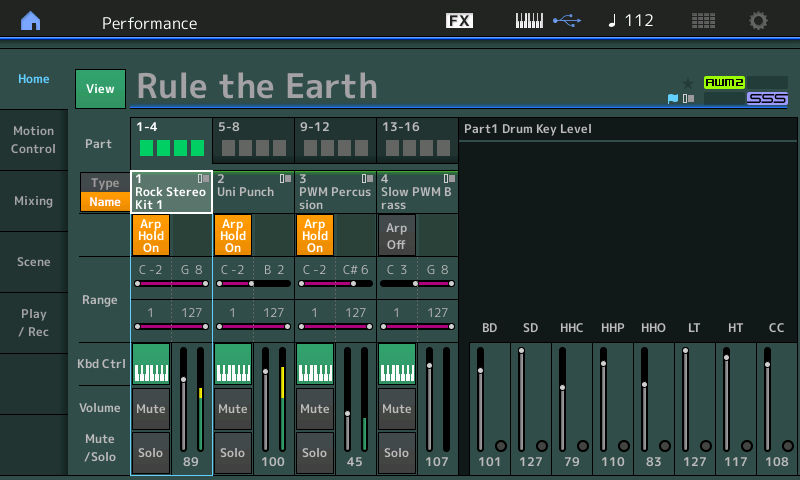
Let’s try substituting a different Drum Kit and understand the logistics.
We can audition different Kits. Instead of a using the PERFORMANCE CATEGORY SEARCH, we can use the PART CATEGORY SEARCH by pressing [SHIFT] + [CATEGORY SEARCH] This will ensure that we are searching to replace just a single PART and not searching to replace the entire PERFORMANCE:
– With PART 1 ‘selected’ (highlighted).
– Press [SHIFT] + [CATEGORY SEARCH].
– The screen will read “Part1 – Category Search”.
– Set the “Bank/Favorite” = Preset.
– Touch “Drum/Perc” > “Drums”.
Along the bottom we will want to deactivate the “Param. with Part” options for MIXING, ARP/MS, SCENE, and ZONE – deselect these prior to making a KIT selection: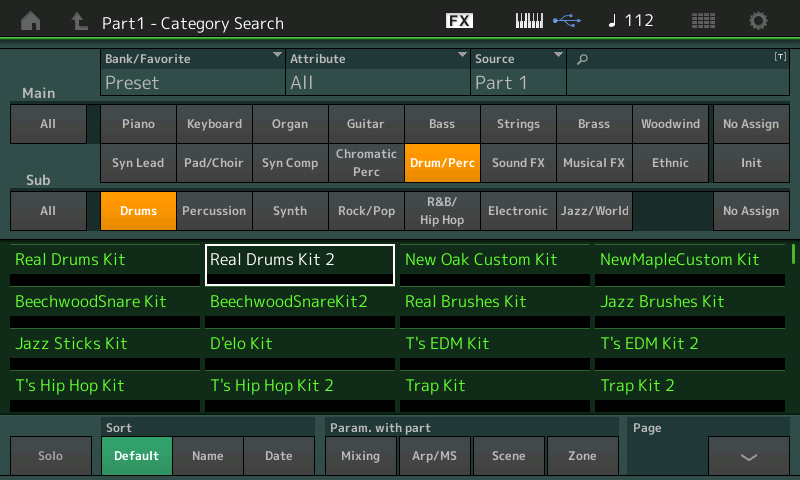
This means that instead of recalling the Drum Kit with its previous MIXING, its previously assigned ARPs and Motion Sequences, its previous SCENE settings and ZONE items, it will simply come in and inherit those settings we already have on our Mixer, it will inherit the Arpeggio phrases already selected in our PERFORMANCE, and the SCENE snapshots already taken for our PERFORMANCE, etc. If you fail to deactivate these then the Drum Kit will bring in the default Arp Phrase and settings for that Kit with the Part.
Above I have selected “Real Drums Kit 2”. Changing KITS is changing 73 instruments – you will need to retrigger a KEY to start the new KIT playing the ARP Phrase. The ARP PHRASE will remain assigned to the PART, the newly selected KIT will now inherit the current settings. Simply trigger a Key on the beat.
In this manner you can substitute KITs, and yet keep the current Performance settings. PARAMETER WITH PART – is used to bring previous settings into the current PERFORMANCE, in this case we want the new PART to inherit our current settings so you must OPT OUT (deactivate each option).
Some Kits are close miked, others have more room ambience. Find a kit that suits your taste or one that has some thing interesting to work with. In future articles we will come back to this and take a look at how you can assign any drum to your kit and how you can recreate drums that mimic any era of recorded sound.
DRUM ROUTE
Drum Kit PARTS are different from Normal PARTS, and it is not just that old joke about drummers being different from musicians, in a Drum Kit PART each KEY is autonomous. Each Key is a different instrument. While in the typical Normal PART all Keys make up one instrument. A Drum Kit is a conglomeration of individual drum and percussion sounds herded together into a single entity. Mostly each instrument occupies a single Key, although there are exceptions: the Hihat occupies three keys, the triangle occupies two keys… for different articulations. Each Drum Key has its own Waveform, its own Volume control, its own Pan position, its own Filters (HPF and LPF), its own AEG, its own EQ, it can even be tuned individually and can either receive or ignore NOTE-OFF. Where there is a Normal PART, the Keys usually share these things as a group; in a Drum PART, each KEY can stand alone. Each Key can even be routed to its own audio bus Output.
How can this be accomplished? That’s what we’ll tackle next:
Let’s say we want to take BD, SD and the three HHs and route them on their own buses to the DAW.
Drum Kit PARTS, like Normal PARTs, initially default to being assigned to the “Main L&R” Output. We can, on a DRUM KIT PART, select PART OUTPUT = “Drum”. This allows us to then route individual KEYs to an assignable Output:
What we need to understand about the DRUM PART is how it works as a whole. A Drum Kit, like all PARTs, can have two INSERTION EFFECTS. And just as we saw in the Normal PART, an individual Element could be routed to Ins A or Ins B as we may desire. Once we have set the Kit’s PART OUTPUT = “Drum”, we can select to send individual Drum Keys to Assignable Outputs. Set the Connect = Thru – this bypasses the Insertion blocks. you can see this in the flow chart shown on the screen exactly how each Key’s signal is routed: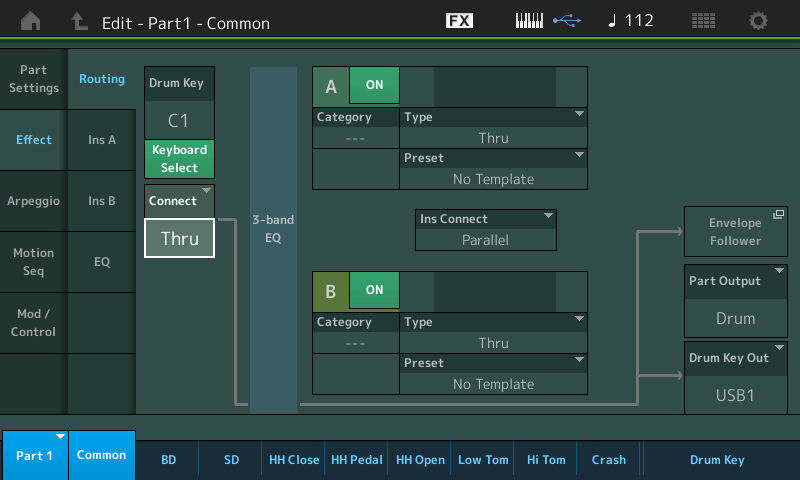
This will be important to understand about Drum Kit routing. The screen above shows the Drum PART (PART 1), Common, Effect, Routing. As you touch a KEY (“Keyboard Select” is active, green), you can see its routing connection through INSERT A, or INSERT B or THRU. The THRU option will allow you to send that drum and isolate it to its own DRUM KEY OUT. Shown below is the Bass Drum (C1) Key’s “Osc/Tune” screen. “Connect” = Thru and the “Drum Key Out” can be set as desired: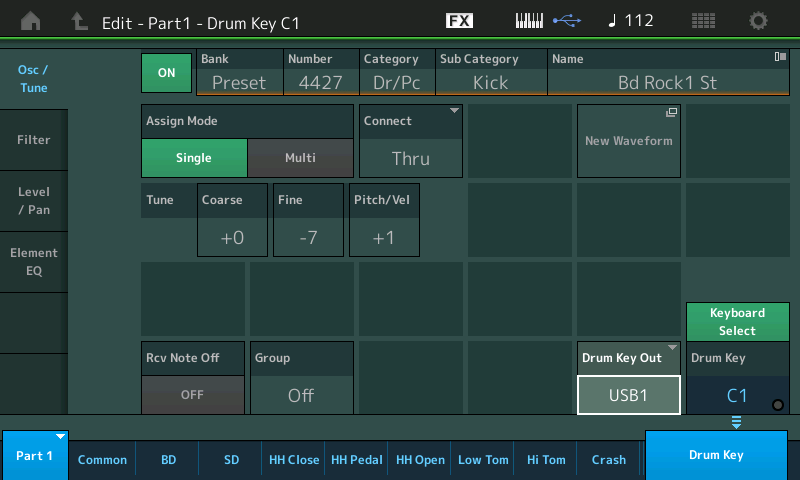
It is set by touching the DRUM KEY OUT box to view the option pop-in menu: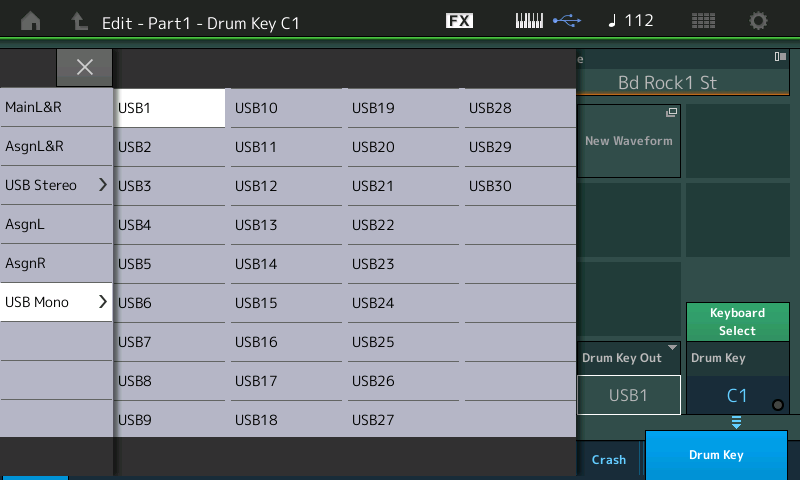
– Press the snare Key D1 to recall its data.
– Set the “Drum Key Out” = USB Mono > USB2.
– Touch each of the three Hihat Keys (F#1, G#1, A#1) Assign each in turn to “USB Mono > USB3”.
Such an assignment can only take place when the overall PART OUTPUT for the entire Kit has been set to “Drum”, then the individual Drum Key has been set to THRU (bypassing the Insertion A and B blocks). Within a Drum Kit Part, a Drum Key can “share” the Insertion Effect with the other Keys, so in the Drum universe the Insertion Effects are the “shared” effects.
Options
Lets take a look at the Drum Key options. For the sake of learning, let’s recall the factory Kit “Dry Standard Kit”. Using the Part Category Search, Select the “Dry Standard Kit”. More of a neutral sound, the character is different.
As you press various Keys in this Kit, while viewing the Part Common Effect Routing screen, notice that some Keys are routed to the Insertion blocks while others are routed THRU: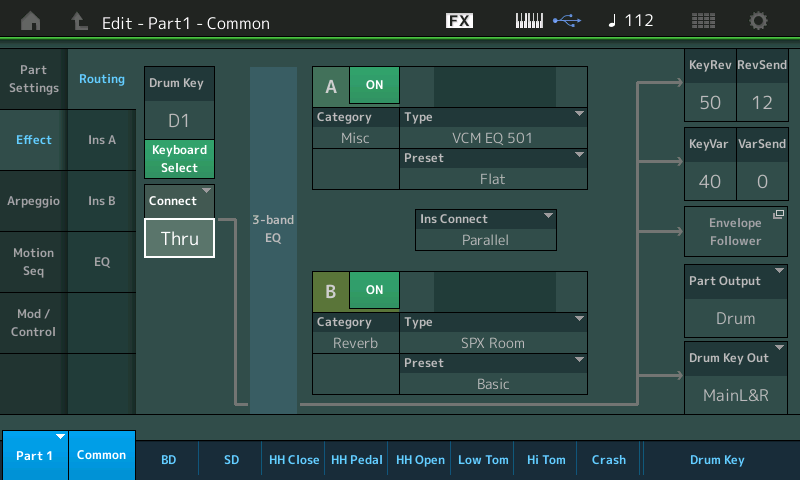
If you wanted to route the SD on D1 to an assignable Output, you would have to set the Connect parameter = “Thru”. Doing so insures its isolation from the other Drum Keys which may be using the Insertion Effects, When Thru is selected, and the PART OUTPUT = Drum, you will see the “Drum Key Out” option appear (lower right corner).
If you CONNECT the Drum Key to an INSERTION EFFECT block, for example, shown below D1 is ‘connected’ to the INS B block (SPX Room reverb):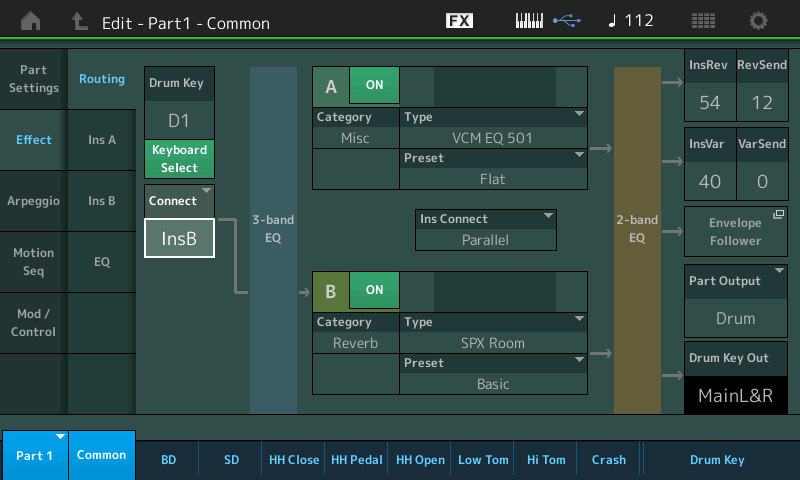
The “Drum Key Out” parameter will be unavailable (shown in black background which is the equivalent of being grayed out) for selection. Once you opt to use an INSERTION EFFECT, the signal will be returned to the “shared” system output with the rest of the drum Keys in this Kit.
Take your time with the routing options. An entire Drum Kit, all 73 Elements, each have the option to ’connect’ via the ROUTING scenario. If you want to route the entire Kit as a Stereo Instrument simply set the PART containing the KIT to “PART OUT” = “MAIN L&R”, but if you want to route some of the drums as individuals, you must set the “PART OUT” = “Drum”. This is the impetus for each KEY being able to be assigned to the MONTAGE Output matrix and having that assignment respected.
In a Drum PART, you may find certain drums routed to INSERTION Blocks in groups. For example, in the “Dry Standard Kit” it is the Tom-Toms on D2, C2, B1, A1, and G1 that are utilizing the VCM EQ 501 as a group. Anything you route to INSERT BLOCK A would share the EQ setting designed for the Toms.
If you are not going to use the Toms in your particular composition, you can certainly reallocate the INSERT EFFECT A block to do something else. Again, there is no one way to use the resources, but knowing how to explore them can help you when you need to accomplish something. I have often talked to long-time Motif users, who never realized that Insertion Effects could be applied usefully within a Drum Kit because they did not understand the routing and therefore could not see the potential. The INSERT CONNECTION parameter (located between the two Insert blocks) is set to “Parallel” meaning that these two effects can be used independently. Drums are not like a guitar where you are going to put multiple effects in a row – you might want to dedicate one of the Effect blocks to a group of drums (like the Toms) and the other to create an ambience for the Percussion.
In most MONTAGE Kits you will notice that Latin Percussion is covered in the two octaves bewteen middle “C”, C3 and C5. And it is these that are using the SPX ROOM to create a “percussion environment”: giving the ability to treat the reverb on the percussion separately from that on the prinicipal drum kit sounds. This bit of subtle difference can give your “Drums” more presence in your mix, instead of just a drummer, you can create the illusion of a drummer and several percussionists. If you begin to listen to your favorite recording, notice how percussion instrument sounds “fit” when there is also a drummer. Good use of placement (both volume and Pan position) is critical.
DAW Inputs
When you connect a Part or a Drum to a MONTAGE Assignable Output, you must create a corresponding input in the DAW to receive the audio. If you are using a stereo pair you’ll want to create a stereo input pair. If you are routing signals on mono buses you will make a mono bus input for each one. This is simple enough but an important thing to understand. Stereo Outs connect to Stereo Ins on the computer DAW, Mono Outs connect to Mono Ins. The importance of this rather simple rule will be discussed next.
And then finally, you create a corresponding stereo or mono audio track that uses that Input. A Stereo Track set to receive Audio from a Stereo bus; A Mono Track set to Receive Audio from each Mono bus. Many people when first encountering this type of configuration, opt to create Inputs for every possibility – then all you need to do is use the ones you need. Others opt to create the setups as they go. I believe it is best to create the inputs as you need them. Certainly software companies would likely recommend this as a strategy, because creating an Input that you are not using or not going to use does require some CPU muscle. Besides, once you understand the Signal Flow it really only takes a second to assign a Part in the MONTAGE, then with a couple of clicks in your DAW, you’ve create a corresponding Input, and Audio Track. The more familiar you are with this routine, the better you get at doing it quickly.
And you definitely want to get to the point where it is as second nature as anything you do often. The thing about Signal Flow is you can follow the audio from source to final destination and this makes it extremely easy to troubleshoot when issues arise.
Why when using USB Assignable Outputs are the sounds hard left or hard right?
When you assign a Bass Drum to USB1, as a mono bus Out, you may notice that the audio is sounding only in the left speaker channel, and when you assigned the Snare Drum to USB2 it only sounds from the right speaker. If this is the case, then you are still monitoring the MONTAGE Direct. In any Stereo pairing the odd number is the left channel and the even number is the right channel. If you were thinking, “It’s mono, hey, shouldn’t it be in the middle, equal in each speaker?” – you would not be completely wrong in thinking this way – and this brings us to our next important concept: “Monitoring” Direct or through the DAW.
When using the Assignable Output, we’ve said that the Part is removed from the system outputs. The only way you are able to hear it is because for monitoring purposes only, the Assignable buses are routed to the Main outs. Odd numbered buses left, even numbered buses right.
If, however, you turn DIRECT MONITOR = OFF, then complete the routing circuit through your DAW’s corresponding Audio Input and Audio Track, you will be able to monitor the signal after it arrives at the target destination. When you monitor the mono bus information post it arriving in the computer, the Bass Drum and Snare Drum, arriving on USB1 and USB2, respectively, will each default to “Center” as you were thinking. This is because of *where* we have selected to monitor. Once the “mono bus” arrives in the DAW, you can pan it as you desire.
If you are worried about the fact that monitoring through the computer means you are listening to the latency, yes you would be. Typically your latency is only a few milliseconds. If you think that you can hear that, you probably cannot. I don’t argue with people who say they do. If you simultaneously monitor two signals that are 6ms apart, of course you can hear the flanging as that is easily detectable by the human ear. The ear can hear items smaller than 0.01ms if they are simultaneously sounding. But if you are listen to just one signal, you probably cannot pick out which one is immediate, and which one is 6ms behind.
Perspective: when a guitar player strums a chord, there can be as much as 6ms between the E string and the A string. When transferring items from MONTAGE to audio tracks the issue of latency is often moot because the transfer can take place when no one is playing. Rendering audio can be done at non-critical times. So it is a complete non-issue here.
Often when wearing your technician (recording engineer) hat, you may switch back and forth between monitoring direct and monitoring post the DAW – once you realize that changing how you are monitoring does not interrupt or change the recording at all. Whether you choose to monitor direct or post the recorder, the signal your are monitoring is analog and totally separate from the actual digital signal that is recorded to your computer. How loud it is in your speakers does not matter; whether or not the level is turned up, at all, recording can still take place… monitoring is just listening. This is why when dealing with audio your meters are very important. Record Level is significantly different from Monitoring Volume.
Until next time, enjoy.
Questions or comments about this lesson? Join the conversation on the Forum here.
And stay tuned for more from Bad Mister!
Download here: Rule_the_Earth.X7B