

Tagged Under
In the first installment of this series, we discussed several different configurations of PERFORMANCES for your MODX. Here you will use what you learned to take a closer look at putting together your own Performances and your own LIVE SETs. A “Live Set” is designed to give you access to your MODX configurations when you are performing, thus the name, LIVE SET. Let’s get started…
Each LIVE SET slot (box) can be used to call up: a Performance. This could be a single Part Performance; a multi Part Performance; a Performance associated with a MIDI file you are going to play along with; a Performance that is setup to control an external device; or, any combination of things you have put together. There is no one way to use these tools – we encourage you to learn the basics and then be creative:
LIVE SET Examples
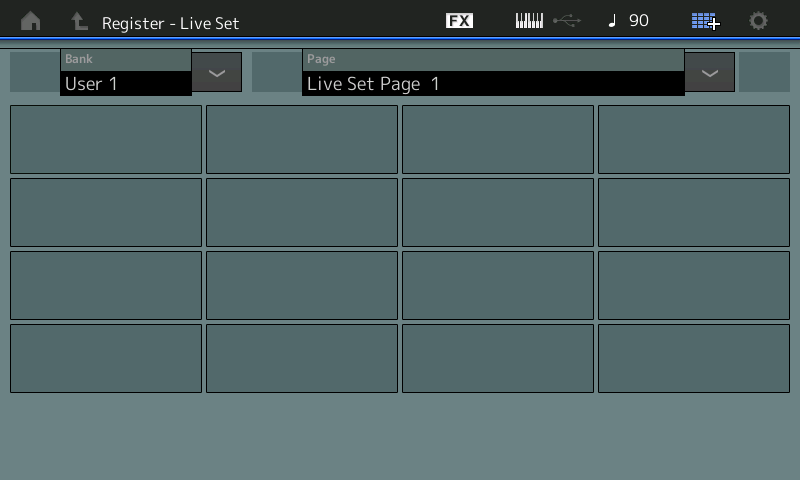
Creating your own Live Set could not be easier:
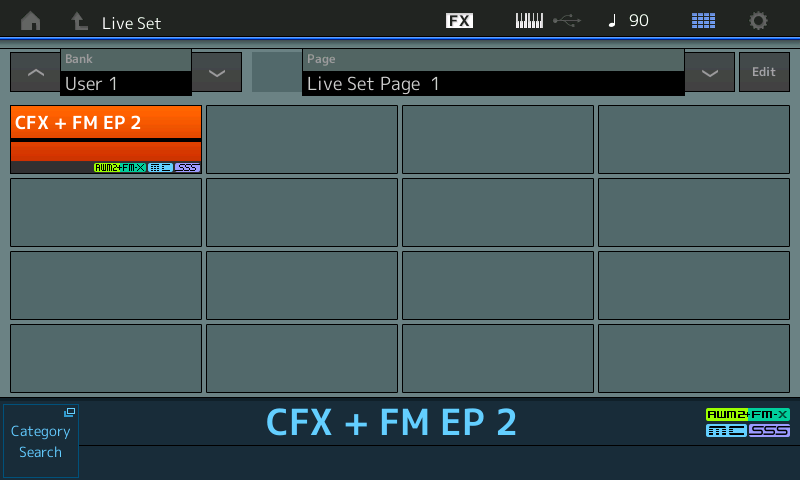
- Recall the Performance you wish to assign – as an example, I’ve recalled “CFX + FM EP 2”.
- Hold [SHIFT] + [LIVE SET] (Register) to register the current Performance to the first empty location in the User Live Set.
- A box will outline (in white) the target location.
- Touch that box or the box of the location you wish to place this Performance:
LIVE SET can be used to organize your sounds for performing on stage. Each time you increment to a new “Live Set” slot you are recalling (re-patching) Insertion Effects for the various Parts, scores of oscillators, filters, amplifiers, envelope generators, etc. Each slot can be a whole set’s worth of sounds, or it could be just a single setup among several others for a single composition.
What is it? That’s going to be up to you. Once you recall a “slot”, you may wish to interact with your front panel to control your various sounds. Don’t be afraid to use your front panel while on stage: you are not locked into looking at that ‘set list’ grid view if you’d prefer to “play/interact” with the synth engine.
If your LIVE SET slot contains a PERFORMANCE with 4 or less PARTS, it can utilize SSS (Seamless Sound Switching) which specifically allows you to hold one sound while silently switching to another Performance of 4 or less PARTS. For example, holding the last chord of one section of music while switching to another sound. If, however, your PERFORMANCE contains more than 4 PARTS, there will be a slight pause while a new PERFORMANCE is recalled. This should not be a problem once you understand how to prepare your data for on-stage access. We will discuss several ways of setting up smooth, overlapping transitions between instrument sounds.
Simply prepare for the situations where you need to transition rapidly/seamlessly. Part of the concept of Motion Control is transitioning sounds – prepare by learning to merge instruments so they “perform” as you musically require.
MODX is a very programmable synth!
NEW CONCEPTS: Looking at the LIVE SET grid screen, or not
Leaving the LIVE SET screen grid maybe a scary prospect, at first, but your LIVE SET is just a user created, custom list, laid out in the order you find convenient to access the programs. The MODX display does not have to be on that LIVE SET screen to follow your list. Once you activate the LIVE SET, you can use a momentary Foot Switch (like a Yamaha FC5) to advance through your LIVE SET’s programs, in the listed order, even while you are looking at the [PERFORMANCE (HOME)] screen or any EDIT screen. You do not have to be viewing the LIVE SET grid of 16 slots to be using your LIVE SET. In fact, you may prefer not to view it (unless you’ve forgotten what’s coming up next). Here’s how it works:
- Recall the Preset LIVE SET: “Best of MODX 1“.
- Connect a Yamaha FC5 (momentary) Foot Switch to the Assignable Foot Switch jack.
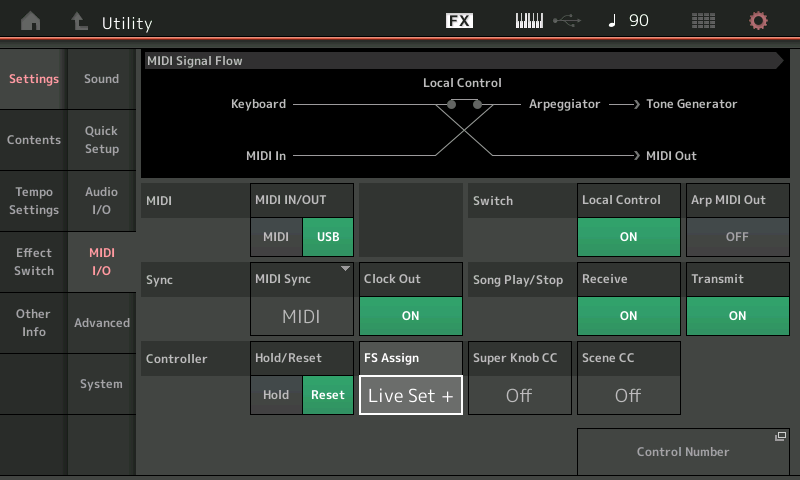
- Press [UTILITY] > “Settings” > “MIDI I/O” > set the “FS ASSIGN” = Live Set+:
- Press [EXIT] to return to the LIVE SET screen:

With a Yamaha FC5 plugged into the Assignable Foot Switch jack, (FS = Live Set+) a simple press will advance to the next item in your programmed list. You may already know that the FS will advance you through these 16 programs with each press.
But here’s the “did you know?” moment:
- Start by selecting “CFX + FM EP 2”, in the upper left corner of the LIVE SET grid.
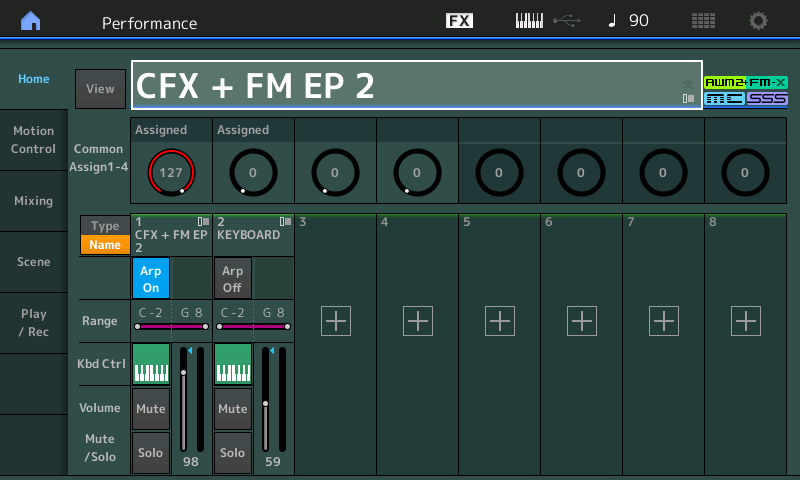
- Press [PERFORMANCE (Home)] button to navigate so you are looking at the Main screen of “CFX + FM EP 2“:
- Step on the FS to advance to “Creation” > step again to advance to “Pearly Gates“, again to advance to “Plastic Beat”, and so on.
You do not have to be looking at the “Live Set” grid screen, the pedal advances you through the most recently accessed Live Set, in the order you listed them. Continue advancing through the list one by one. The pedal will advance you through the currently active LIVE SET list even without the grid screen showing… even if you’ve dropped into EDIT… it matters not what screen you are on, you can advance when you step on the pedal. You don’t need to see the grid (unless you’ve forgotten what’s coming next).
You can return to the LIVE SET grid view, at any time, by pressing the [LIVE SET] button. This is extremely useful when working with Motion Sequences during a “live” performance, you don’t have to EXIT out – you can just advance when you’re ready.
You may be wondering how many User Live Sets are available. You have eight BANKs containing USER 1-8. Each of the eight BANKs has 16 PAGES, and each PAGE has 16 Slots. That’s 2048 Live Set slots. You can organize your data as you see fit. Each BANK could represent a different band, if you happen to play in multiple situations.
Your current User “LIVE SETS” are stored in their own MODX Folder. The Live Set is also placed in Read Only Memory (as a part of the data that makes up a LIBRARY).
The current User Bank LIVE SET can be managed from the [UTILITY] > “Contents” > “Data Utility” > “Live Set” folder. Like all Library data (ROM: Read Only Memory) you must execute a “Library Import” which moves the data to the USER BANK, in order to make any changes; then you can replace the old data. Read Only Memory can only be read, so editing it is basically redoing it. The advantage of having your data in ROM is that it will always be apart of your instrument (sort of like your own set of PRESETS).
Live Sets in the Real World
Each user will have to figure the most efficient way to utilize and manage LIVE SETS. If you play in a situation where you are constantly changing and altering your set list order, you may wish to use an external solution. The MODX’s current system does not have an “insert” function where subsequent assignments are pushed back, nor a “delete” function where assignments “close rank”, therefore, you will need to rely on an external application to assist you in instant realignment of programs. (See the “SoundMondo” App for iOS devices). With the App creating Set Lists is more easily accomplished and can be done ‘offline’ – you can then plug in your iOS device and use its touch screen to recall your Performances.
Warning: SAVE anything you have in your current USER Bank before loading the download example file below. The example file will overwrite your internal User memory. If you make a backup you can restore your User setup after learning from the tutorial.
For the next part please download the Live Set examples here!
Let’s look at the download examples of some typical “LIVE SETS” _ USER 1, PAGE 1:
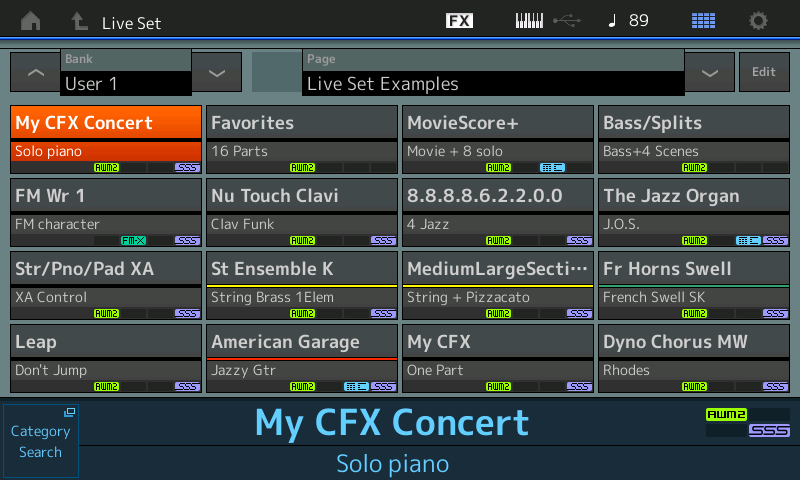
The purpose of these programs is to serve as examples of the different TYPES of Performances and how you might use them on a gig… We will highlight some of the entries and explain their particular use.
“My CFX Concert”: Press [LIVE SET] – select slot 1: “My CFX Concert”; Go to its Home screen. You do so by pressing [EXIT] or [HOME]:
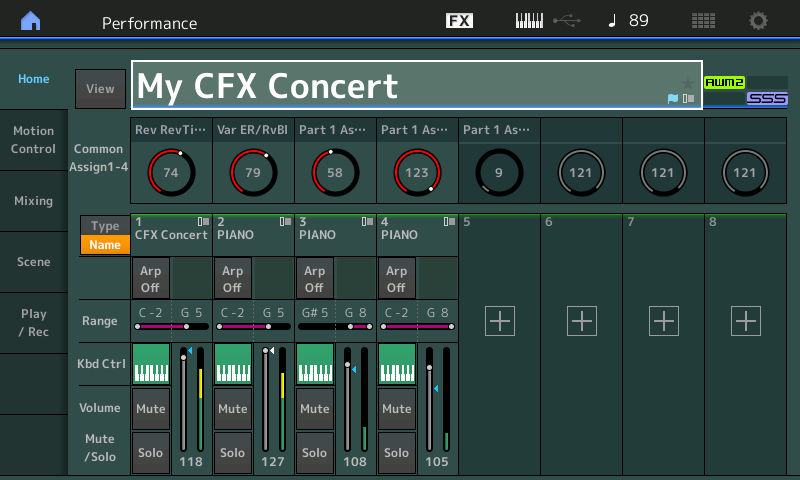
Here we have a multi Part, single instrument Performance. The “CFX Concert” in its full 4-Part, multi Element glory, is here, by itself, for when I need a solo piano, with lots of nuance and expression. I don’t use this piano when I’m in with other instruments, because much of what it does extremely well is in the soft, medium-soft and medium strike ranges. I use this particular program when an acoustic piano sound is used as a solo instrument (a rubato introduction, for example, before the rest of the band comes in). The acoustic piano I use in heavily instrumented compositions is typically a bit brighter and setup to cut through the mix of other instruments. I use this big multi Part acoustic piano for solo use or accompanying a vocalist or in small jazz trio ensembles where (frankly) the nuance can be heard and appreciated. And “featured”!
Tip: I renamed the Performance to distinguish it from the Factory CFX Concert. If you take the time to customize a Preset, be certain to rename it before you STORE it.
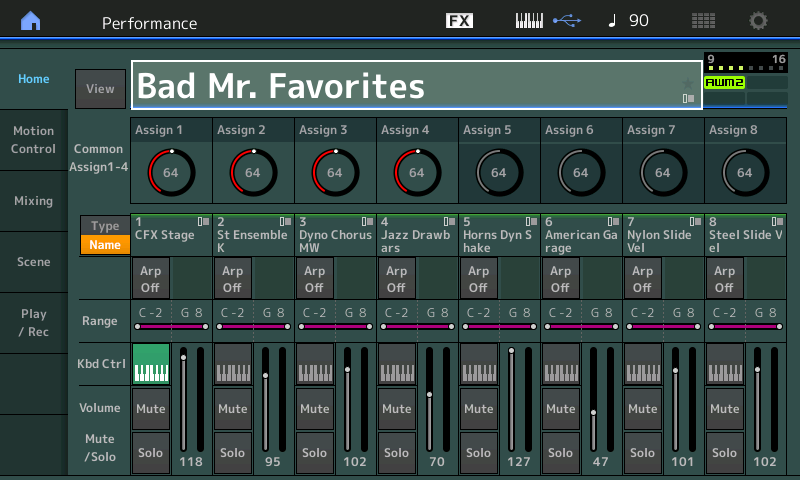
“Bad Mr. Favorites MODX”: In slot 2 of this LIVE SET is a Performance made up of Single Part programs. It contains my twelve favorite “go-to” sounds – I can cover a wide variety of standard gigs with just this one PERFORMANCE slot! In contrast to using a Performance per instrument, here is an example of how multiple sounds can occupy the same Performance. The benefit is you do not have to go far and all transitions are seamless (no interruption of sound when switching between Parts when using the PART SELECT method).
Touch slot 2 to recall “Bad Mr. Favorites” and then go to its Home screen… Or if you are using the FS for advancing through “Live Set+”, simply advance and then go to the Home screen.
My edited version of the Single Part “CFX Stage”. This piano is designed to be the Single PART CFX! It is initially selected to play when the PERFORMANCE is recalled (KBD CTRL is active), but I designed this Performance to be played by accessing each of the PARTs, separately, using the “PART SELECT” function to activate each instrument as a single sound:
When a PERFORMANCE has active PARTS in the 9-16 area, you will see an icon, just to the right of the Performance Name box, indicating the number of PARTS active in the second eight: “9……16” you can see a square for each active PART.
Try switching between Parts using the “PART SELECT” method of your choice:
- Touch the PART Name box in the screen
- User Cursor Arrows to move the cursor highlight
- Press [PART SELECT-MUTE/SOLO] and select via the screen overlay
Notice how this is a glitch-free method to move between your favorite single Part programs. As you access a Part the controller functions switch with you. You can, however, hold the sustain pedal on one PART, move to several new PARTs and play. Or you can hold the keys of one PART, move to a new PART and play using the sustain pedal on the new PART.
The Faders can do PART Volumes or can be switched to do ELEMENT/OPERATOR Levels depending on the [PART – ELEMENT/OPERATOR] button just to the left of the Faders. The button toggles the function.
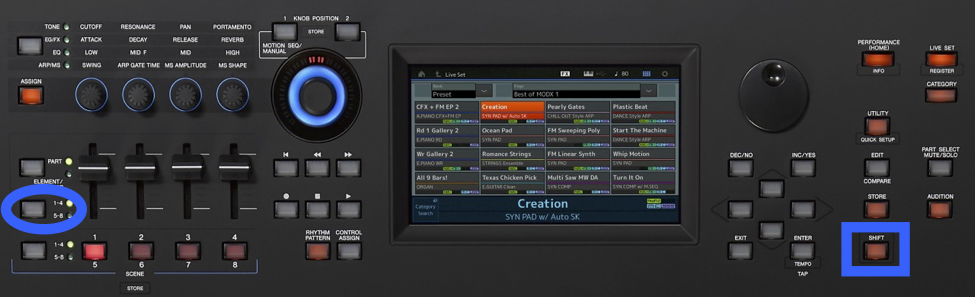
Navigation Tip: In order to switch Sliders 1-4 so that they control 5-8, is accomplished with the button labeled for the task (left front panel). In order to switch from 1-4/5-8 to being 9-12/13-16 use the [SHIFT] + [1-4 5-8] button. The green LED will flash next to 1-4 when 9-12 are available, and the LED will flash next to 5-8 when 13-16 are available:
- Try switching the Faders from controlling Part Volume 1-4/5-8, or 9-12/13-6, to controlling Element/Operator Volume. Once you’ve selected a Part the FADERs now work to “perform” and “control” the selected PART – and give you Element/Operator Level control.
- The button located just below the [PART – ELEMENT/OPERATOR] button will let you switch between the 1-4, 5-8, and when used in conjunction with the [SHIFT] button, 9-12 and 13-16 Parts:
- Try switching PART SELECT: Press the button [1-4/5-8] to toggle between the Performance Home screen and Part 5.
- Try the same button in conjunction with [SHIFT] + [1-4/5-8] button to toggle between Part 9 and Part 13.
ANALYSIS:
“Bad Mr. Favorites” In Use: Here I have assembled a solid “bread and butter” set of sounds with which I could do a standard gig. If ever you have someone come up and sit in, without having to baby-sit them, you could place them in this single Performance and they have everything they need, easily accessible via the “PART SELECT” function.
PART 1 – Acoustic piano: Shown below the Name box “CFX Stage” is highlighted (selected):
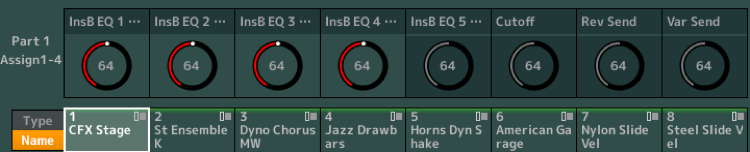 I’ve edited the “CFX Stage” data to suit my needs. I built this from the “CFX Stage” a Single Part version of the “CFX Concert”. I tweaked the Single Part CFX to cut through a band. Access to the 5-Band boutique EQ is available on Assign Knobs 1-5. When you *select* PART 1 you will see the “nicknames” for the PART 1 Assign Knobs:
- Assign 1 – EQ 1 Low
- Assign 2 – EQ 2 Low-Mid
- Assign 3 – EQ 3 Mid
- Assign 4 – EQ 4 High-Mid
- Assign 5 – EQ 5 High
- Assign 6 – Cutoff
- Assign 7 – Reverb Send (Rev-X Hall)
- Assign 8 – Variation Send (Symphonic)
Theory… Because this is an acoustic piano sound I use often, setting up the boutique VCM 5-band EQ on the first five Part Assign Knobs lets me tweak this for different venues without having to go through much trouble. Access to Filter Cutoff, the Reverb Send and Variation Send are also available.
PART 2 – Strings+:
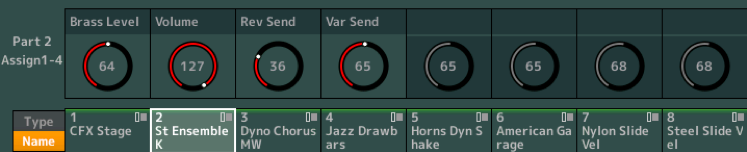 These Single Part Strings have a hidden feature: This is based on the “St Ensemble K” program which has the orchestral brass on the MW and the Super Knob, and an orchestral bell tone in the upper octaves… All in a single Part, showing the full power of a single MODX component. Notice moving the Super Knob moves only the one linked parameter (Brass Level). Or you can access the Brass Level directly with “Part 2 Assign 1”.
PART 3 – Electric Piano:
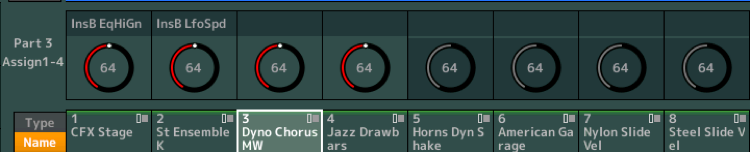 Rhodes style, “Dyno Chorus MW”, complete with L/R movement and Phaser. The Assign Knobs are controlling High EQ and Speed of the Auto Pan. Raise the MW to increase Auto Pan, use “Part 3 Assign 2” to change the Speed of the Auto Pan.
PART 4 – Jazz Drawbars:
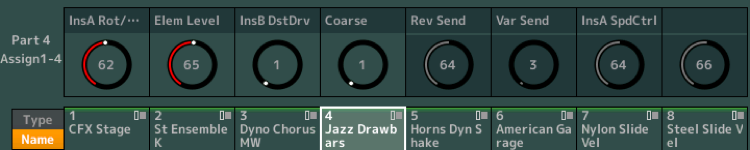 Jazz B3. Part 4 “Jazz Drawbars” is what B3 synthesis is all about… No, it is not all 9 drawbars but because I lean on the Jazz oriented side for this sound, my customized “drawbar” organ has Element 1 sounding the first four drawbars set as 8-8-8-8, full out; I’m using this to establish a solid jazz foundation (the first four ‘drawbars’ are all on Fader 1), followed by an Element each on Sliders 2-6; they are the next five drawbar footages: 2 2/3′, 2′, 1 3/5′, 1 1/3′, 1′; then a noise Element (Fader 7) and a Percussion Element (Fader 8).
This gives me a strong basis for the Jazz organs I use. When you select PART 4 the ASSIGN Knobs will show the Display names of the parameters selected for real time control. “Part 4 Assign 4” is both Coarse tuning and negative Volume – this can be used to mimic the sound of a B3 being powered down while playing – as you turn this Knob up the volume decreases as the tuning drops.
PART 5 Horns: Constructed from the multi-Part Performance “PopHorns Dyn Shake” this is just the Saxes, Horns and Shake on velocity.
PART 6, 7, 8, 9 – Guitars: This one Performance has several guitars (acoustic and electric); Jazz Guitar “American Garage”, Nylon string “Nylon Slide Vel”, Steel string “Steel Slide Vel”, Distortion lead with Feedback “Crunchy Guitar”. Each has its own Assign Knob controls for quick tweaks.
PART 10 – Clavinet: “Nu Touch Clavi” wah-wah on velocity. Virtual Circuitry Modeling “Touch Wah”.
PART 11 – Brass Orchestral: – “Fr Horn Swell” Super Knob/FC7 controls the timbre change from softly blown French Horns to raucous blaring section! When selected, the Assign Knobs will display the parameter assigned to be controlled. (Yes, the Super Knob can control any of the 16 Parts). Here the Super Knob is morphing Elements to bring that dynamic change in timbre.
PART 12 – String Orchestral: “MediumLargeSection” Orchestral Strings with pizzicato on [AsSw1].
A well-rounded basic gig set – all in one Performance. You, of course, will select your own favorites and begin to make your own collections. This just shows another unique way you can utilize the PERFORMANCE structure. No, there are no Factory setups like this, because it would be impossible for programmers to know exactly what you need – that is for you to figure out.
Make a Plan
When assembling your sounds into custom Performances, like this, you can begin to customize the Assign Knobs on a per Part basis, linking those Part Assign Knob parameters and/or if you wish, with the Super Knob. When you create a new Performance by “merging” (adding) existing programs, the PART level controller assignments are brought along, automatically, but you must establish new relationships between your newly added PARTs and this Performance’s Super Knob.
A Part, quite naturally, does not bring along its Super Knob relationship when added to a new Performance – the COMMON parameters of this, the new Performance home, need to be established. But the good news, for each individual Part, 1-16, you can establish a unique relationship with Super Knob control. And you don’t have to guess what an individual Part Assign Knob is controlling because you can give it a custom ‘Display Name’ or you can simply “get” the parameter name. This assignment will appear above the Knob in the screen when you select the Part.
As you get to know your favorite sounds, you can begin to customize exactly which performing parameters you want to have real-time direct Assign Knob access to and which ones should be ganged together on the Super Knob’s movement. Take your time.
Take a look at the tweaks made to PARTs listed here, when you select a PART, for example, you can see what your Assign Knobs are doing. You can customize the knobs so you have access to any parameters you feel you want direct access to when playing this sound.
In this example, each of the twelve instruments is a Single Part and has an equal weight. A Part plays only when selected directly. Once selected, the front panel can be used to interact with that sound. Because all Parts are equal, only one of them is activated when you first access this Performance or you press the [COMMON] button. Typically, a KBD CTRL icon is lit to designate the sound set to be played when Performance Common is selected. Once you are familiar with operations you can quickly create split and layers without leaving the Home screen! Positions of the PARTs can be EXCHANGED using an option of the “Copy” feature. ([SHIFT] + [EDIT])
“MovieScore+“: Return to LIVE SET – select slot 3 “MovieScore+” and go to its Home screen or advance using LiveSet+:
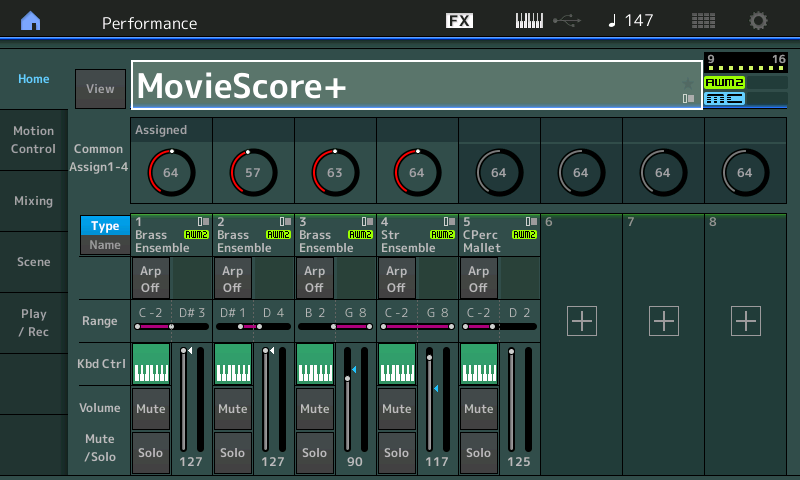 Here we have a MODX “merged” combination built up from an Orchestral Brass Swell, a String Orchestra and a ranged Timpani sound. Dynamic use of the Yamaha FC7 pedal controlling the Super Knob brings your best John Williams themes to dramatic life. Here we are, again, using KBD CTRL to address multiple Parts. If I need this type of thing for a particular theatrical introduction or interlude, I can use Performance slots 6-16 for holding convenient “go-to” Single sounds for what follows. This way I can easily switch between the big theatrical score setup and any individual instrument(s) I require, immediately. In Parts 9-16, for individual use, I have “go-to” bread and butter sounds.
Note: This Performance was created initially by using the Performance “Merge” function, (+) adding Parts to an existing Multi Part program (“Orch Brass Swell”) to create a new customized instrument, in this case one that morphs strings, brass and dramatic timpani effects based on velocity and Super Knob control. This sort of “merge” programming is a type of transitioning that is keyboard oriented and extremely musical, from a performing point of view. You can customize the selection of sounds to suit your personal musical needs. This represents a type of musical instrument merging that can be accomplished within MODX.
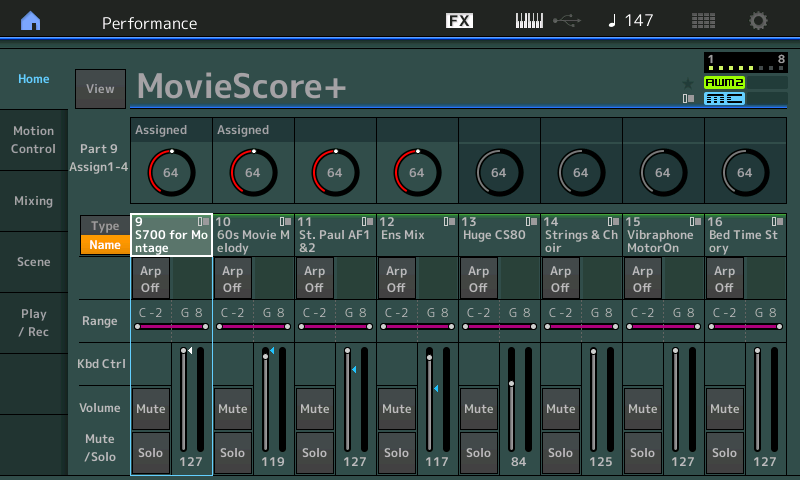
When a PERFORMANCE has active PARTS in the 9-16 area, you will see an icon in the upper right corner of the screen indicating that Parts “9…….16” have PARTS available. I’ve elected to add eight Single Part programs to slots 9-16 – sound related to the Movie Score – sounds I need to switch to immediately during this recording session.
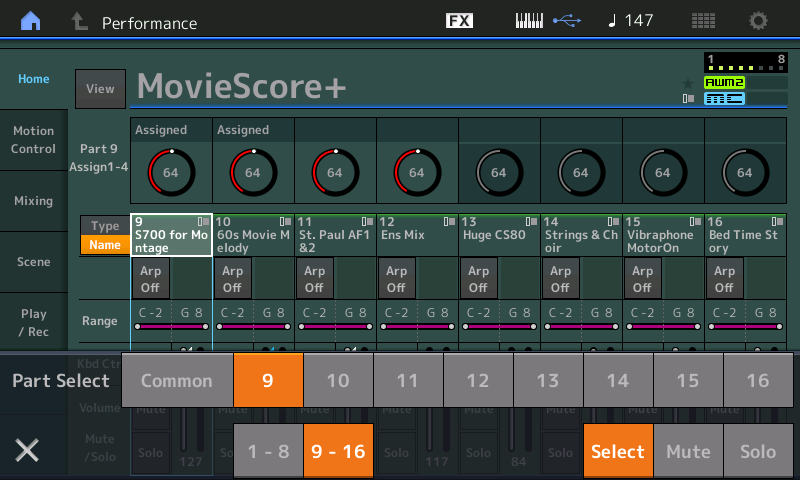
When viewing PARTs 9-16 (shown below), you can see the icon in the upper right corner indicates that specifically PARTs 1-5 are occupied back on the first view, 1-8: Below PART 9 has been selected (cursor highlight indicates this):
 Theory of use: By building this merged multi Part Performance up from the Orchestra Brass Swell Performance, we are using the Super Knob programming (links between the Brass Ensemble Parts and the Super Knob) in the original configuration. We must add links to the Super Knob movement for our newly added Parts, if desired. Remember, when you “merge” a new Part into an existing program, only the “Part” edit assignments are brought along, the upper “Common” level (Super Knob assignment) settings are not brought along, automatically.
You can, however, activate them which will activate the assigned parameter, updating it with the new PART number (if Control Set Destinations are available). The Common level settings of its new home now apply. This we will cover in a separate tutorial.
The new location for the Part in this new Performance, means a new relationship with the Super Knob (upper level) programming. When you merge a Part into an existing Performance make new associations with the Super Knob on a per Part basis. A maximum of sixteen Source/Destination Control sets exist for the upper level links.
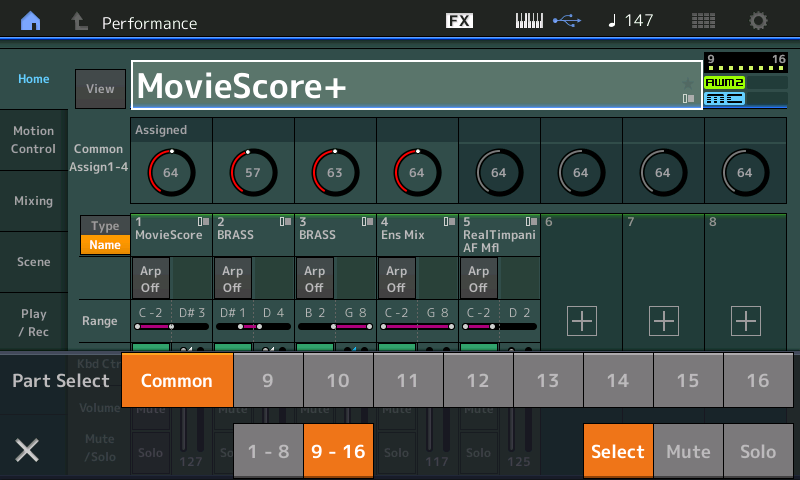 Above: When “Common” is selected in the overlay, you are playing the ‘John Williams’ movie combination Brass/Strings/Timpani, by having the 9-16 option in waiting, I simply touch a number 9-16 to directly play those individual instruments.
- Below I’ve touched the “9” box to access the S700 Acoustic Piano:
The take away here is that a PERFORMANCE can be combination of a MULTI PART construction (like the MovieScore+: String/Brass/Timpani) using Super Knob multiple morphing parameters and individual sounds that can be used in the same composition. One MULTI Performance can occupy a PERFORMANCE, the other slots are always available for whatever individual PARTs you might need to switch to within the context of the current composition. The MULTI PART (KBD CTRL) sounds are interactive and linked such that selecting any one of them selects them all, likewise, selecting [COMMON] selects them all. All transitions between sounds are seamless.
“Bass/Split”
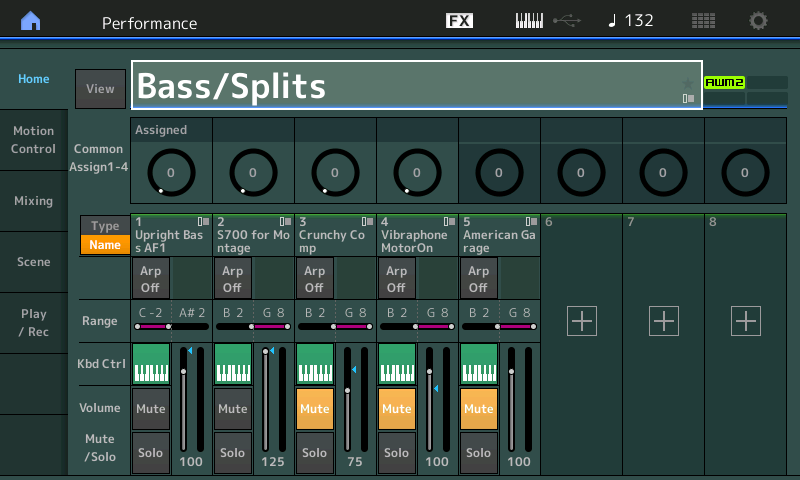
Here a PERFORMANCE is setup with an acoustic bass for (uninterrupted) left hand walking, and uses the SCENE buttons to switch right hand sounds: Acoustic piano, Electric Piano, Vibraphone, and Jazz Guitar. Scenes are instantaneously recallable conditions. Here we are using it to switch right hand sounds. Part 1 is the left-hand bass and the right-hand sound is changed in each of the red SCENE buttons. This is a perfect use for Scene buttons because, presumably you are “walking the bass” with your left hand and need to swap the right-hand lead sound while maintaining the walking bass… This is not “seamless transitioning”, this is a ‘switch’, the bass remains sounding, while you change to the next right-hand sound.
Viewing and editing the stored values in any SCENE can be done by touching “Scene” in the left column of the Home screen. This will drop you into an area where you can view and edit what is assigned to each Scene 1-8:
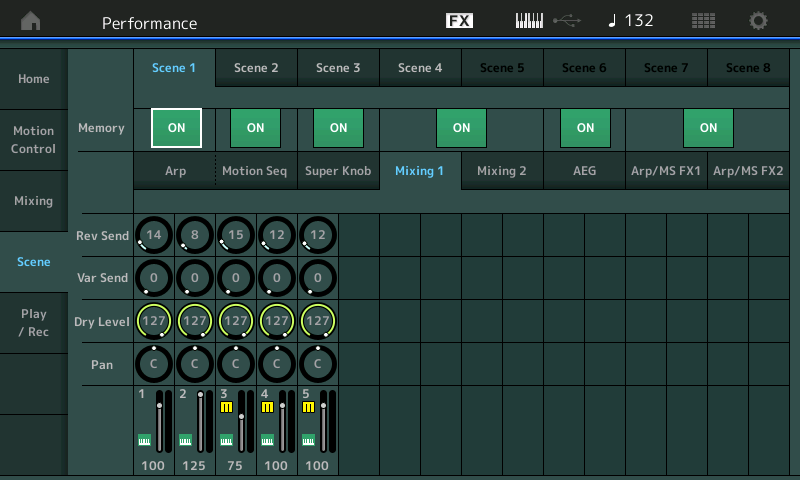 The SCENEs 1-8 are along the top of the screen (four Scenes are stored in the example). Once active a MEMORY area will show ON. Scenes can be used to instantly recall these select parameters.
Stay tuned for the next article in this series, coming soon!
In the meantime, join us to discuss this article on the Forum.