

Tagged Under
Sampling and Re-sampling
The sample process The EX’s come with just enough RAM (1 MB) for you to do short experiments with the sampling process. The EX samples at a fixed resolution of 44,100 samples per second (16-bit). That is a rate that delivers 5 Megabytes of data per mono minute, 10 megabytes of data per stereo minute. The 1 MB of memory gives you 12 seconds of sample time. The memory can be expanded via standard 72-pin SIMMs (JEDEC compliant):
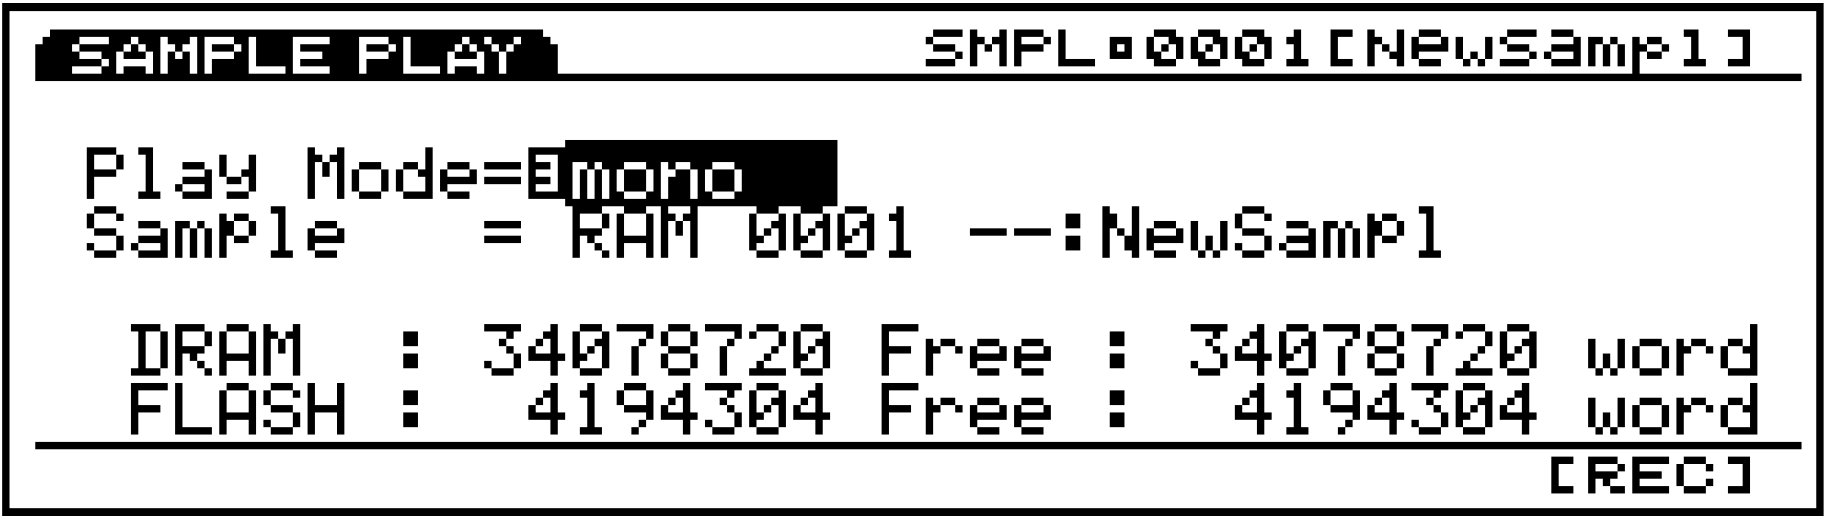
The above screen shows a fully loaded machine 1 word = 2 bytes:
- 34,078,720 word = 68,157,440 Bytes. This is the available memory when you have installed 64 MB of RAM.
- 4,194,304 word = 8,388,608 Bytes. This is the total of battery backed Flash Memory when upgraded with the 8 MB EXFLM1 expansion board.
- Total sample memory = 76,546,048 Bytes
- The longest single sample can be 380 seconds or 6 minutes, 20 seconds.
To begin the sample process:
- Press [SAMPLE] – you enter the Sample Play mode (indicated in the upper left corner of the screen)
- Press the [F8] REC button – to enter the Sample Record area (indicated in the upper left corner of the screen):
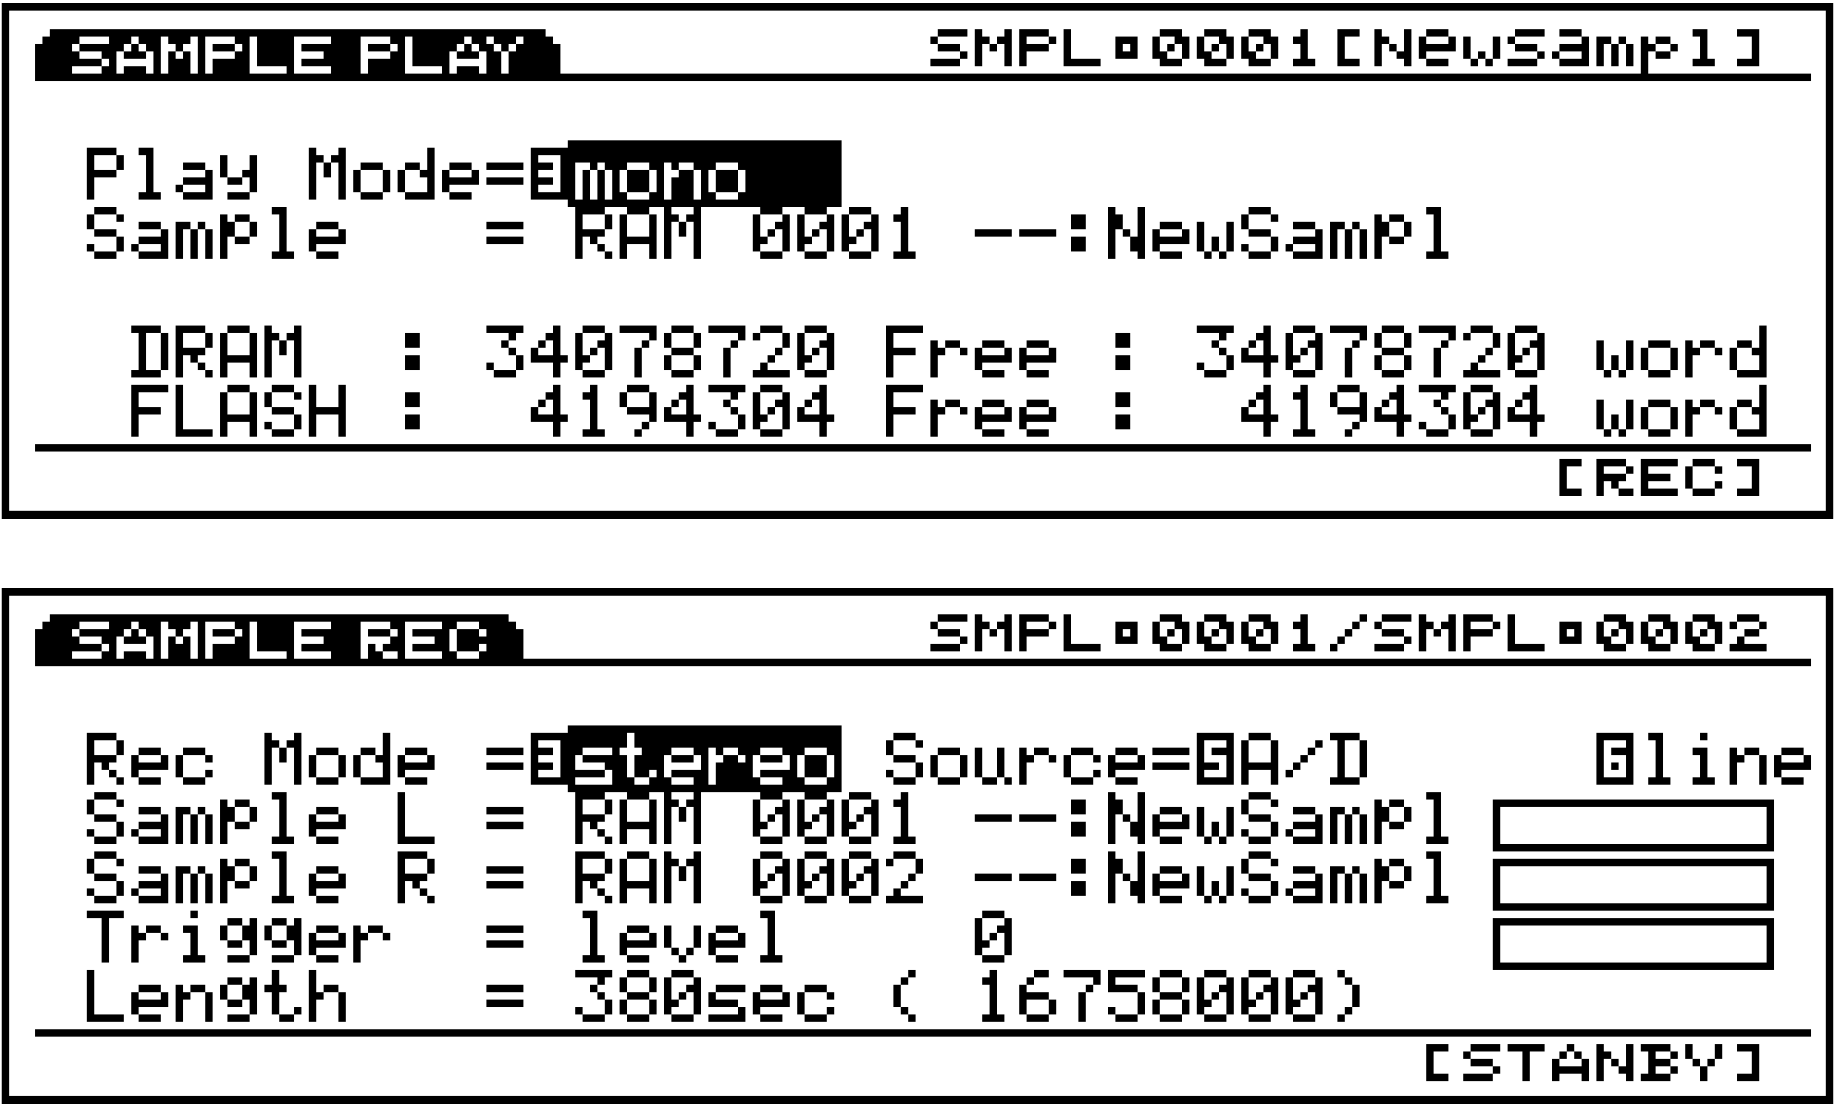
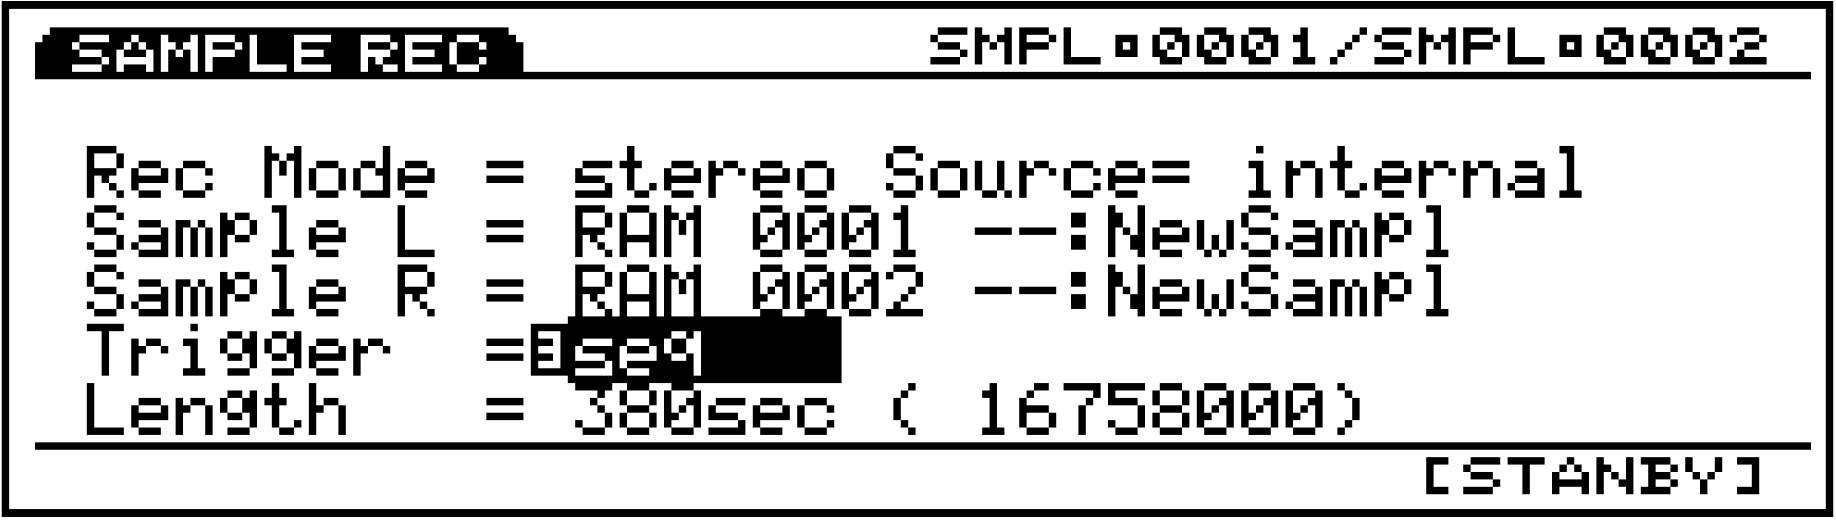
- The EX will display the Length of sample time available in seconds and show you several bar graphs to indicate the level of incoming signal. Set the Source to either the “A/D” (Analog to Digital) inputs or Internal. When set to Internal sampling the Trigger can be either “Key” (note-on) or “Seq” (sequencer). If you have A/D as the source you can set a trigger level, a minimum threshold that will start the sampling process.
- Check and set your levels, as necessary. If you are sampling Internal data the levels are set automatically. The bar graphs will disappear when Source = internal:
- Press [F8] Standby to engage Standby status. “Waiting…” appears in the screen and depending on the trigger method you have chosen, sampling will begin when you press [F8] START, you start the sequencer or when the level exceeds the trigger level.
When sampling is complete press [F8] STOP to end the sampling process. The EX will then begin processing the data. This can take a few seconds, depending on the length of your recording. Press [EXIT] once, to return to Sample Play (you can now play your sample). You can view the sample waveform by entering sample edit [EDIT] and pressing F7 [Loop]. The EX may take a few moments the very first time that it draws the waveform.
Editing a Sample
Some detailed editing can take place right on board the EX. You can Copy, Append, and Extract any part of any sample. The EX supports SMDI (SCSI-MIDI) and can use external computer editors like Yamaha TWE (provided on the CDROM disk that comes with the EX), or Sonic Foundry’s Sound Forge 4.0, etc. Samples can be moved from the EX, via SCSI, to these external editors, if you wish to take advantage of their capabilities (in order to do advanced editing functions like sample crossfading etc.). Then the samples can be moved back into memory after the editing session:
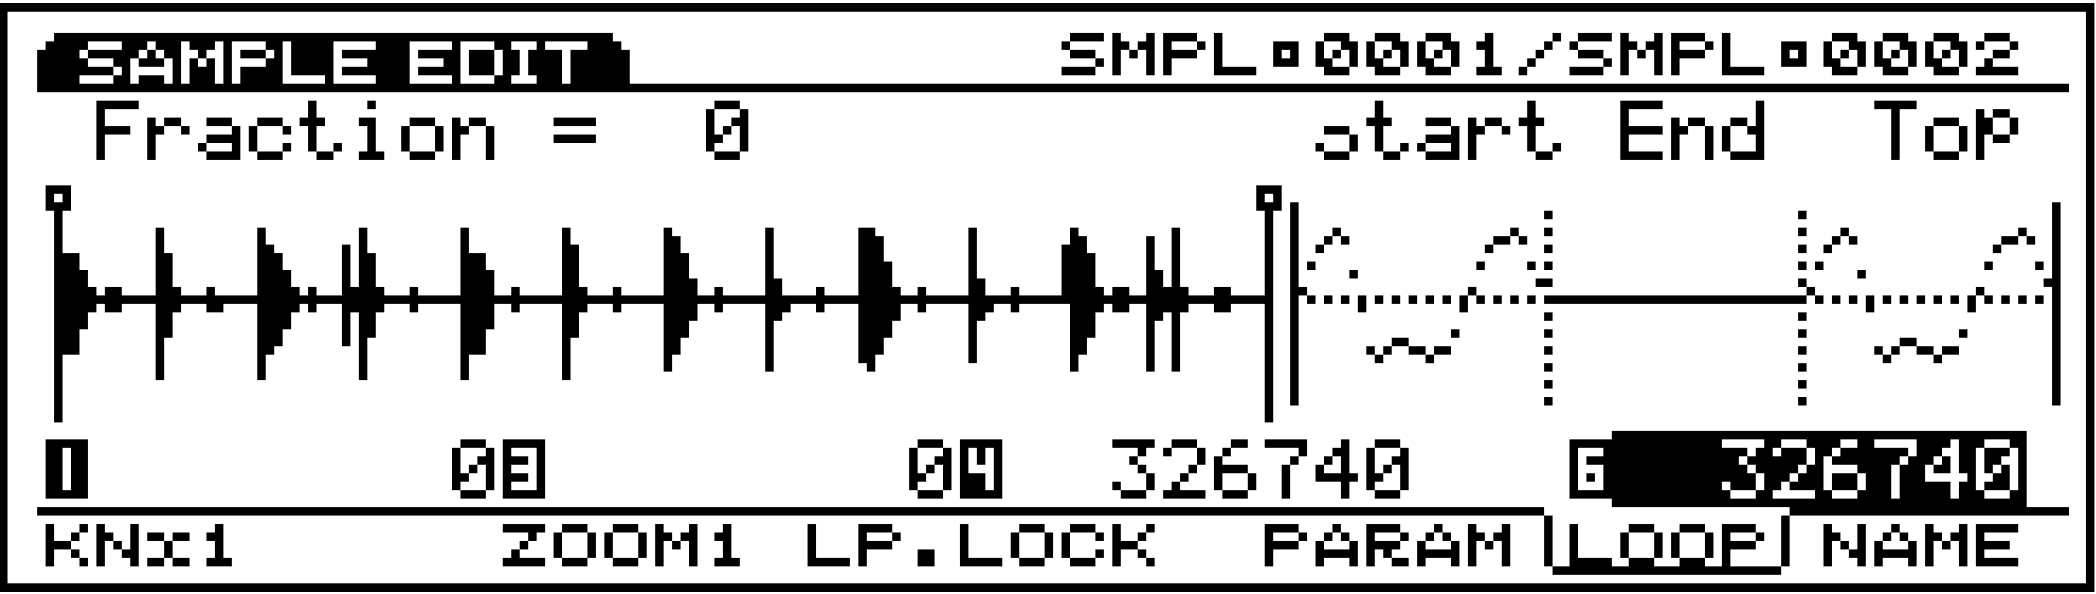
- KNx1 [F1] – repeated pressings of [F1] sets the resolution of the editing via the Knobs (Knob 1, 3, 4, and 6). When the little reverse video numbers appear in the screen, it means that you can use that Knob to directly edit the parameter value to the right. As you move the cursor up and down in the screen look for the numbers to indicate which knob is samples, x1. You can change the Wave Start (Knob 1), Loop Top (Knob 3), Loop Length (Knob 4) and Wave End (Knob 6) points in sample increments of x1, x10, x100, x1000, or x10,000.
In the example, the sample plays from Wave Start (0), is set to Loop from the very Top (0), the loop length is equal to the entire length of the wave (326,740) units. You can see from the graphic at the right, the Top of the loop looks exactly like the Wave Start. The End portion of the graphic is silent, as this is a visual of a drum groove that has silence just before the recycle begins. So this sample set to loop from top to end. Be sure to use your control KNOBS to edit the Start/End/ and Loop Length NOT the data wheel – the data wheel only increments – the knobs can be set to different resolutions when large distances need to be traversed.
- Zoom [F3] controls the resolution of the graphic on the right side of the screen. This is a zoom-in view of the Wave Start, Wave End and Loop Top portions of the wave. You can change the zoom ratio to a maximum x8.
- Lp. Lock [F4] Loop Lock. This parameter fixes the length of the window from Loop Start to End so that as you change the Loop Start point the segment stays the same length. Therefore, the end point is adjusted accordingly.
- Param [F6] Parameters. Here you can set the various points, tune the loop, set theoriginal pitch, and set the sample loop play mode.
- Loop [F7] (shown above) – You can view the waveform and adjust the length by fractions as small as 1/64th of a sample.
- Name [F8] – Name the sample.
Creating an AWM Voice From Scratch
Here we will outline the general steps in placing a sampled loop into a Voice. After recording the data, as above, return to Voice Mode by pressing [EXIT], then selecting [VOICE]:
- Initialize a Voice by pressing [JOB] and selecting “1: Init Voice” and pressing [ENTER].
- The default Init Voice creates an initialized AWM Voice. Press [EDIT].
- Press [F2] Osc or Oscillator. Then select [F6] Wave.
- On the Oscillator Wave page you can select the Bank and Wave Number. Set the Bank to RAM and the wave number, as appropriate. Select wave number 0001 or the lowest number available. RAM is the user sample area, PRE is the Preset wave data, and FLS ism the Flash Memory (if you have an EXFLM1 set installed).
- When you select the RAM Bank, the words [Wave-Edit] appear above [F3]. This is where myou can create the element and designate its layering, key range, and mix. These edits do not affect the raw sampled data directly, only how it is used in this particular element. The same sampled data can be used and treated entirely differently in another Voice. Press [F3] Wave-Edit.
- Once you have entered Wave Edit you can press [F3] ADD to create space for the number of samples you are going to put into this element. Up to 128 waves can be added to an element. You can then layer them and key zone them to perform as desired. Remember that only 2 waves can co-exist in the same velocity or key range (2 waves sharing the same range = stereo). If you are creating a mono element press ADD once. If you are going to create a stereo element press ADD twice. The Layer parameter will reflect the current wave and the total number of waves. Layer = 1 / 2 means there are a total of 2 waves in this element and you are currently set to edit layer 1. Layer = 2 / 2 means there are a total of 2 waves in this element and you are currently set to edit layer 2. Layer = 33/ 128 means there are a total of 128 waves in this element and you are currently set to edit layer 33. And so on:
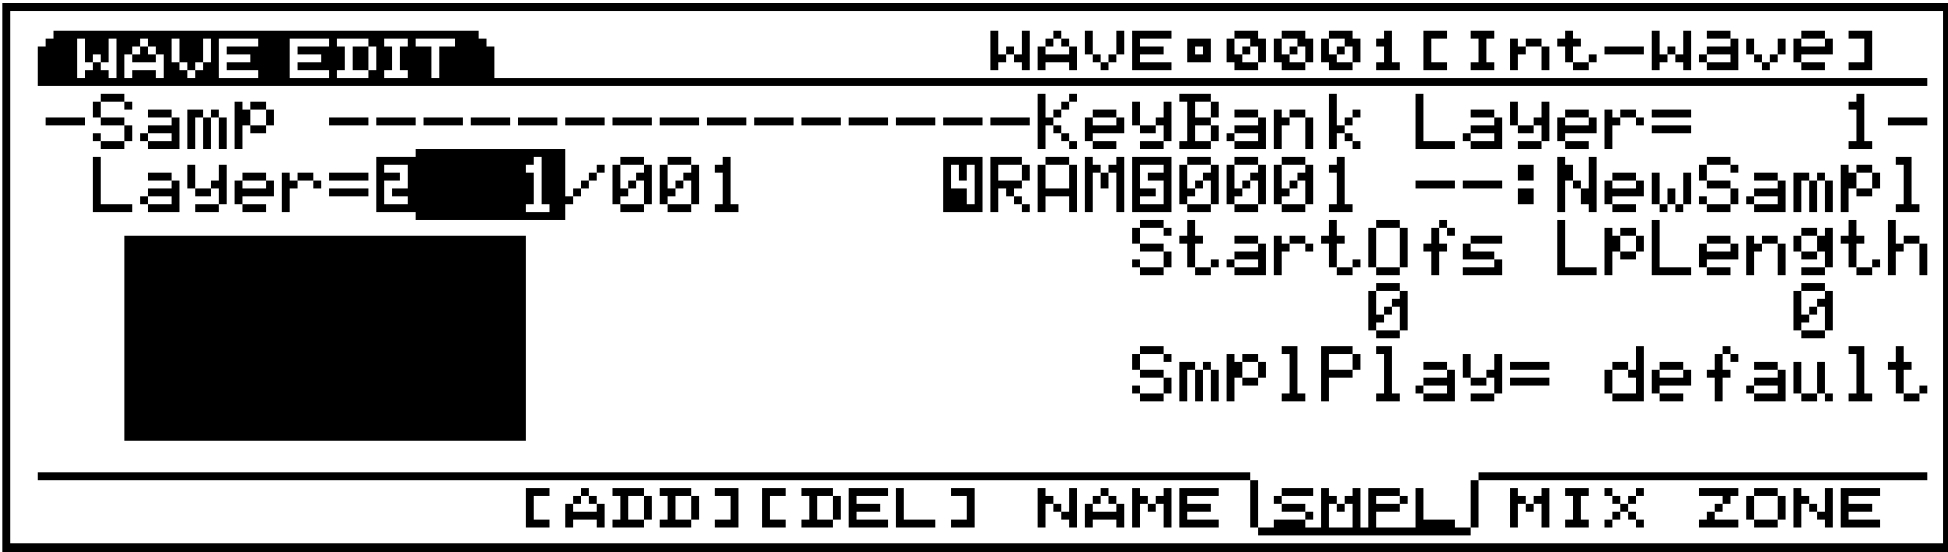
There are 4 wave-edit pages: Name, Sample, Mix and Zone:
- NAME – set a name for this particular element layerSMPL – Offset the sample start point, edit the total length of the loop, set the sample play mode to either no loop, forward loop, reverse no loop or special loop (remain in loop section until key-off then continue to wave end).
- MIX – set the relative level of each component wave, its pan position, its tuning mode (fixed or ratio) and the coarse and fine-tuning.
- ZONE – mapping to the keyboard. Set both velocity range and key zone:
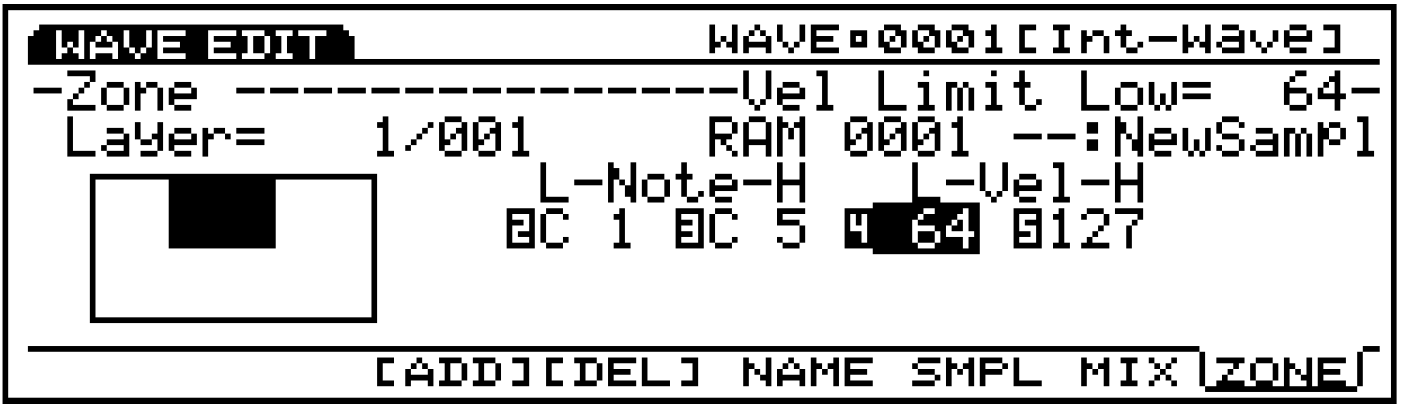
The above mono sample is mapped to sound only when a key between C1 and C5 with a velocity of greater than 64 is played. The graphic at screen left indicates by the dark area the conditions under which this element will sound. When you have completed editing on this element level press [EXIT] to return to the normal Voice Edit level. It is not necessary to store edits on this element level – they are retained automatically. Samples can be saved to disk only when you have completed this WAVE EDIT procedure. Be sure to press [F5] and NAME your sample. This is the Name you will see when you attempt to reload this element from disk.
Bringing the Sampled Voice up to ‘Ear Level’
After having set the element level parameters, press [EXIT] to return to the Voice Edit level. You may notice that your sampled element is softer in volume than the average EX Voice. One of the benefits of all this new technology is its increased output and dynamic range. To bring your sample’s output up to the level of other Voices, please use the Voice edit parameters. One great feature is each element can have its own filters. Among your voicing weapons are both SCF and DCF type filters. SCF is Static Control Filter and DCF is Dynamic Control Filter. There are 10 different selections in the SCF. One of the SCFs is a straight level boost. These boosts come in 6dB, 12dB and 18dB increments. Or you can use the Parametric Equalizer to help your sample in any deficient area. You can apply the SCF by selecting the Voice Edit parameter [F4] Filter then pressing [F4] SCF. Additionally, you can use the DCF filter in the THRU position, as it has a straight gain control, as well. Select the appropriate boosting method to bring your sample up to “ear level”. You can take advantage of the wealth of editing weapons available for an AWM sample. Samples do not have to be placed into Voices; they can be used directly from RAM in an EX structure called a Key Map. If you are going to assign the sample directly to a Key Map be sure to optimize the waves output via the sample Normalize function and Mix parameters.
In a Key Map you do not have the advantages of the Voice level filters and envelopes, because you are accessing the sample directly from RAM (or FLS). You can adjust the mix volume of individual Pattern tracks from within the Performance to match the levels of your samples. You will find that the EX offers plenty of output level for you to balance your work. To finish off your Voice be sure to name and store it to an Internal location and then back the data up by saving to disk. When you press the [STORE] button the EX will give you the opportunity to store it to the current Internal location or any other Internal location. Once you have placed your sample in a Voice you can then place this Voice in a multi-timbral Performance and you can trigger this sample with a single note-on event from a sequencer Song or Pattern track. A single EX Voice can hold hundreds of sample loops! In fact, the EX is powerful enough so that an individual AWM Element can hold up to 128 sample loops!
Re-Sampling a AN Voice
Another great use of the Internal sampling feature is the creation of analog sounds that have huge polyphony. Let’s walk through the steps for re-sampling an AN-type Voice.
- Press [SAMPLE].
- Press the [F8] REC button.
- Select mono sample mode. The EX will display the Length of sample time available in seconds and show you several bar graphs to indicate the level of incoming signal. Set the Source to Internal. When set to Internal sampling the Trigger can be either “Key” (note-on) or “Seq” (sequencer). Set the source to Key. If you are sampling Internal data the levels are set automatically. The bar graphs will disappear when Source = internal.
- Arm the sampler by pressing [F8] Standby. “Waiting…” appears in the screen.
- Play a single note.
- When you have enough data press [F8] Stop, to end recording.
- Press [EXIT] once, leaving the sampling screen and entering the sample edit area. The EX screen will read “Processing Data” while it does some minor housekeeping.
Sequencing with the EX
The sequencer in the EX series is made up of three different types of recorders. The first is SONG mode – 1 Song, 16 linear tracks. Songs saved as Standard MIDI Files (SMF) can be played directly from diskette without the need to load each time. The second is PATTERN mode – 50 Patterns, 8 tracks, up to 16 measures in length. Each track can be any length (measure – beat – clock pulse). Clock resolution for all sequencer functions is 480 ppqn. Patterns can be placed in Songs, or assigned to individual keys in a Key Map. You can assign either a single track or an entire Pattern to a Key Map. The third sequencer function is a unique recorder called the ARPEGGIATOR – 50 Preset and 50 User arpeggios, up to 4 simultaneous tracks. More than just a complex note recorder, the EX arpeggiator can record control change and pitch bend messages. For example, you can record an arpeggiation that is a control change track – Control Change #74 (filter brightness). Record the filter opening over 4 measures. This data track becomes the “arpeggiation” – and can be applied to any sound by activating the arpeggiator. (See the Owner’s Manual for more details on the Arpeggiator).
All three types of Sequencer functions feature both real time and step record. All sequencer tracks can be non-destructively adjusted via the Play Effects (PFX). These Play Effects have special quantization grids (Groove Templates) that can alter the ‘feel and attitude’ of all or any individual tracks. You can change the timing, the velocity and the duration (gate time) of played notes. In Pattern mode, PFX can change the length of playback of each to the tracks. This means that each track could be of a different, length making for great nonrepeating patterns. Complete event editing is available in all sequencer functions.
A Song track can be freely assigned to either to single Voice or to a Voice within a 16 Part multi-timbral structure called a Performance. Each track 1-16 defaults to Parts 1-16, however, you are free to reassign Parts to any track, as necessary. Similarly, Pattern tracks can be assigned, via Transmit Channel, to any of the 16 Parts of a Performance.
The arpeggiator data can be linked to any Voice and can be zoned to a particular portion of the keyboard. Arpeggios can be activated for a specific Part of a Performance.
Creating a multi-timbral Performance
A key to using the sequencer is the setup of a multi-timbral Performance. This requires some planning and thought about what you are trying to accomplish. Because of the multiple synth engine technologies, there are some restrictions as to what Voices can co-exist in a Performance. It is a good idea to start to plan your production by selecting the individual Voices that you want to use while in Voice mode. Make note of the Voices location, and the type of technology used in that Voice. Treat the DSP-based Voices (AN, VL and FDSP) as specialty Voices. Only one DSP-based Voice can be used at a time in a Performance. The EX Performance (multi-timbral) mode can support either 16 AWM Voices or 15 AWM Voices + 1 DSP-based Voice. You cannot have more than one DSP Voice at a time. Why? COMPUTING POWER. The DSP based Voices use a tremendous amount of chip muscle to recreate there sound – remember VL and AN are not based on samples – they are generated in real time by the DSP.
What if I want to use an AN-type bass line with a VL-type saxophone solo in the same Song?
Is this possible? No, that said, here’s what you can do. The EX’s have the ability to sample. You can, for example, re-sample the AN Voice making an AWM version of the sound, or you can sample your bass line in its entirety from the sequencer. By making a RAM sample version of the bass line, you can trigger that from a single note in a Pattern or Song track. Of course, if you are working with an external Multi-track Recorder (MTR) you can link the EX sequencer to it via MIDI Time Code (MTC) and MIDI Machine Control (MMC):

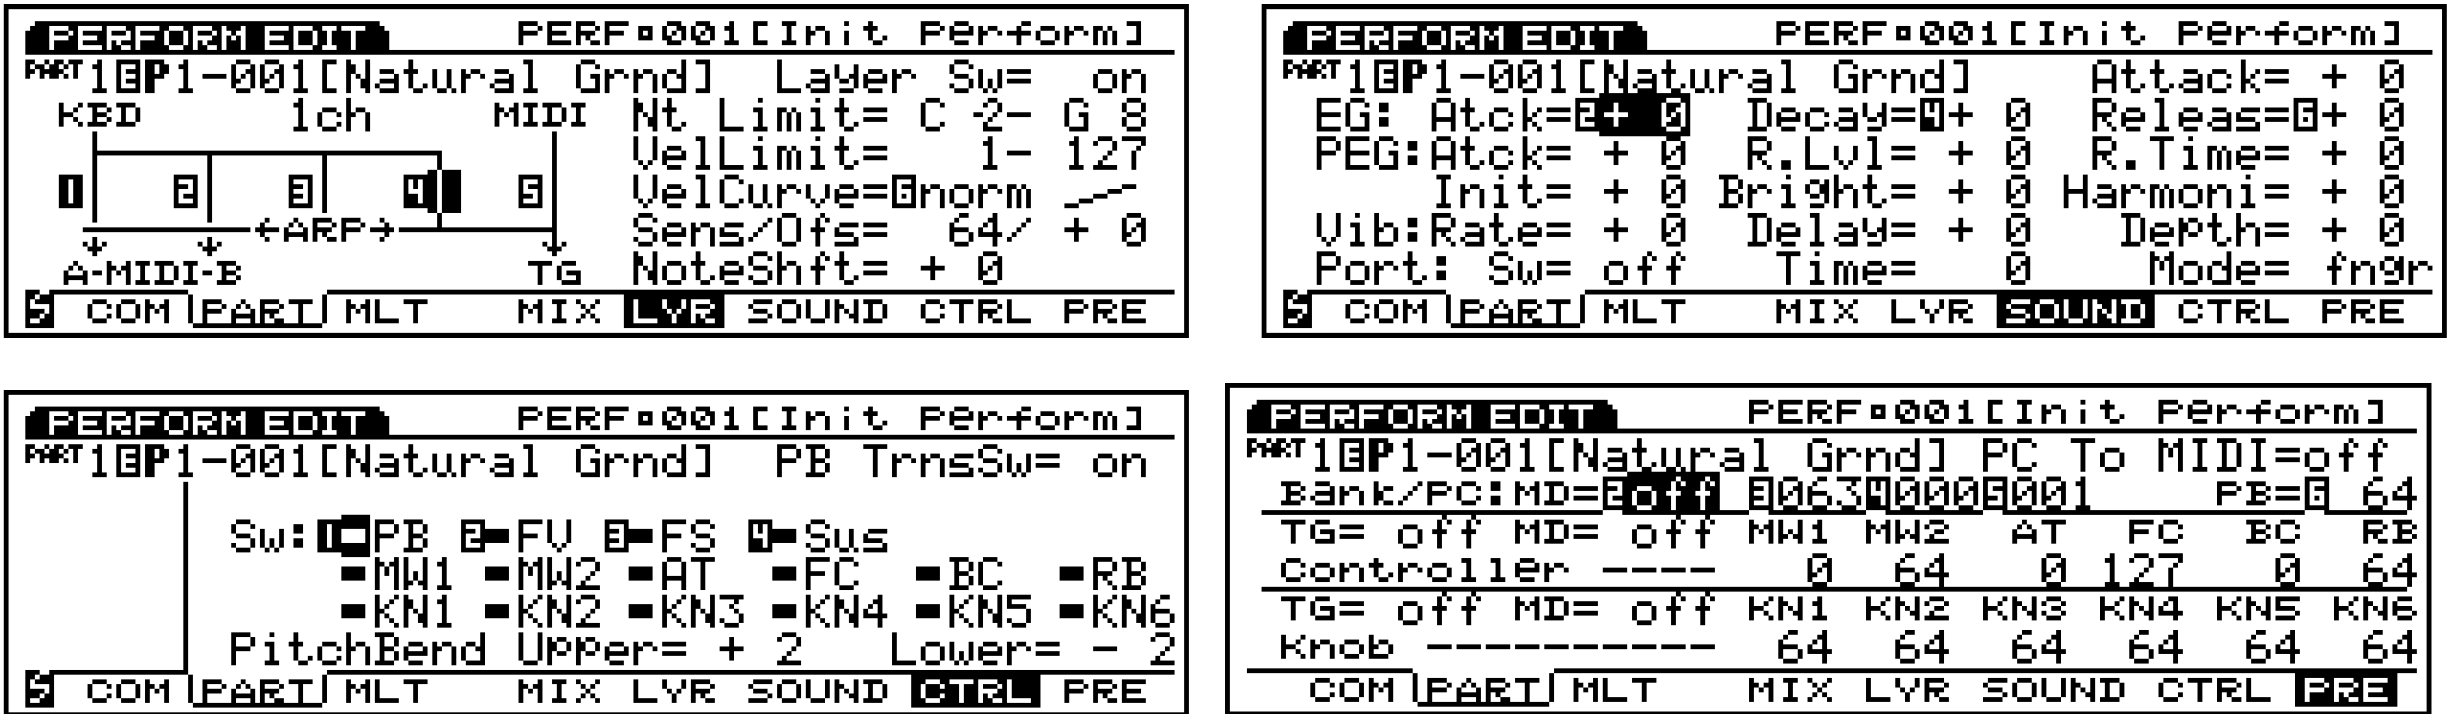
The screen shot on the left shows a typical Initial Performance viewing the first 4 Parts in columns. You can view Parts 5-10 and 11 16 by pressing [F3] or cursor to the right. The small inverse video numbers indicate the knobs that will directly edit these parameters. You can cursor down the list of available parameters which are divided into 5 areas: Mix, Lyr (layer), Sound, Ctrl (controllers), Pre (data pre-setter). That’s some 75 parameters in all. The small vertical slide indicator (familiar to those that use word processors) at the left of the screen indicates where on the list you are located currently. You can quickly locate to a particular section via the soft Function keys [F4] – [F8]. Or you can look at an overview screen for each of the five sections (Mix overview shown in the screen shot to the right above) by selecting [F2] Part and the particular section you want to view:
Select a few Parts to get yourself started. You can always change and update your Performance as your creative process flows. Store the Performance. Press [STORE]->[ENTER].You can now select either Song mode or Pattern mode. If you like to work in a linear fashion, like using a tape recorder, select Song mode. If you prefer to work in sections, or with loops select Pattern mode:

Song Play screen (at left) shows 16 linear tracks plus a Pattern control track (Pt) and a Play Effects (Fx) track to record real-time groove changes to the assigned Patterns. A track number in a black box signifies that data is recorded on that track. You assign what Part of the Performance they play under [F3] Tch or transmit channel – the default is for track 1 = Part 1, track 2 = Part 2, etc. Each track has a Mute and an Fx Thru (Play Effect bypass). A clear box means you will hear the track or the play effect. A black box is bypassed. Notice all the Play Effects are normally bypassed.
Pattern Play screen (at right) shows the 8 Pattern tracks. Patterns can have a maximum length of 16 measures. You assign what Part of the Performance they play under [F3] Tch or
transmit channel. The Length of each track can be independently set. This is handled as part of the Play Effect [PFX] F2 screen. The screen above shows Track 8. The Length of this track is set to the maximum of 16 bars. The Length parameter reads 17 measures, 1 beat, 0 clock pulses. Interpret this as meaning the 17th measure, very first beat and clock pulse will be the top, again. Each track can be made to repeat any amount of measures, beats and/or clock pulses up to the maximum (shown above). This means it is possible to have parallel tracks constantly changing against each other.
Quantization: Play Effects allow the user to non-destructively play tracks back through different quantization grids, called Groove Templates. There are 100 Groove Templates selected on line 2 of the above screen. “Typ” selects the templates and “Val” shows you the smallest note value allowed by the grid. You can change the feel and attitude of a track with the templates by varying the timing, velocity and gate time (duration). You can even create your own quantization grid.
Editing a Voice in a Performance: Performance + Voice
Often during Song creation or sound designing you may find the need to edit an individual Voice within a Performance. You can accomplish this by pressing [VOICE] while holding [PERFORMANCE].
[PERFORMANCE] + [VOICE]: Now when you press the [EDIT] button you enter the edit buffer of the Part indicated in the lower left of the screen. Changes you make take place at the Voice level and when you store you will be storing to the Voice itself. Alternatively, you can edit each Layer from within the Performance using the more than 70 parameters in Performance edit:
Key Map
The Key Map is special mode on the EX series where you can place phrases on the individual keys of the keyboard or controller (EX5R). These phrases can be from 1 of 3 sources:
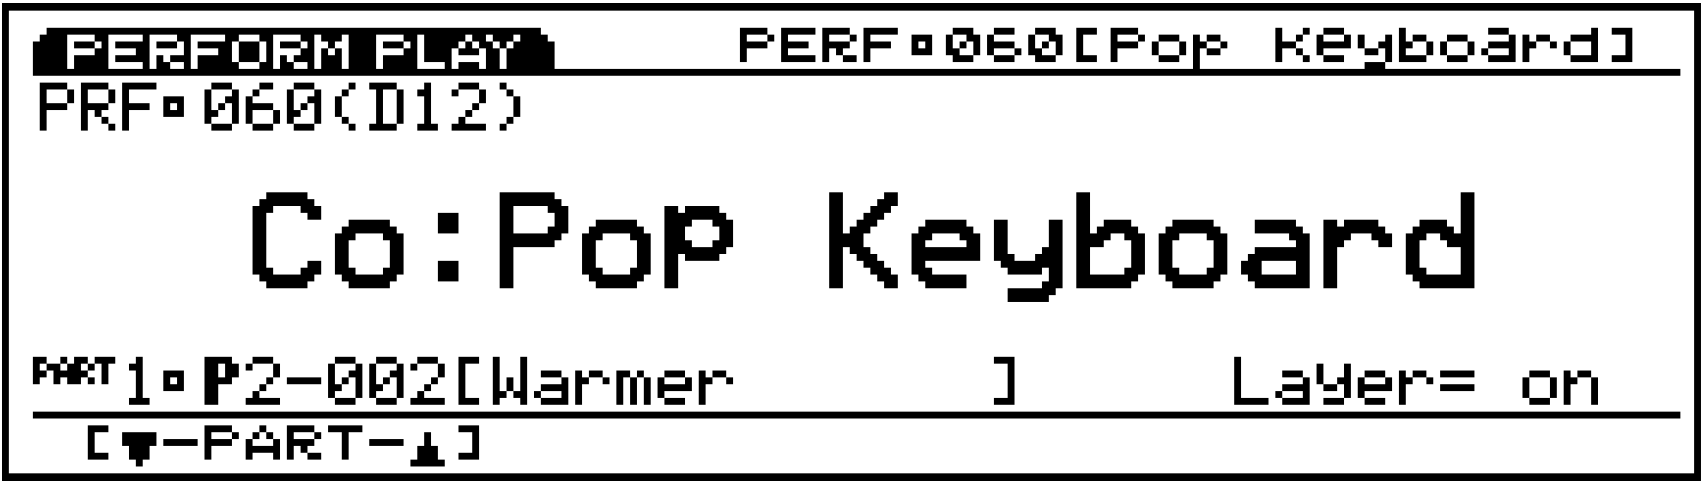
The ability to include sequencer tracks and sample loops together allows the performer to do real time mixes “on-the-fly”. A Key Map is best referenced to a multi-timbral Performance. To get a feel for the Key Map it is recommended that you load EX demo diskette #2; Select the DemoPerf located at A01; Press Key Map to activate the assignment. You will see information similar to the screen below:

The screen shot at left show a typical Key Map mode setup. By holding [F8] Sel (or Select) and striking your keyboard you can instantly have that notes information come to the screen.] Each Note is assigned a Mode; either “smpl” (sample) or “ptn” (pattern). The Tr/Bnk (or Track/Bank) settings are next. The Track setting can be an individual track or all tracks of a particular Pattern. The Bank setting can be “RAM” for samples directly from the SIMMs, or “FLS” (Flash Memory EXFLM1) if the optional boards are installed. Number refers to the particular sample or Pattern. There can be 1024 samples resident in the EX and 50 Patterns. The Play Mode can be gating, one shot, or toggle. Gating will stop the moment you raise your finger. One shot will play the entire sample from just a touch of the key (no need to hold the note down). This is great when triggering from drum pads, for example. Toggle will play until the note is played and released again. The Tune screen shot at right illustrates how each sample can be tuned for proper playback no matter what the original pitch of the sample.
Master MIDI Controller EX5/EX7
Each EX Performance can independently function as a Master Controller setup. Each one of the 128 locations is capable of recalling up to 16 specially edited internal Sounds and simultaneously recall, edit and control 16 external Parts. Each Performance has a data Preset area where you can send Bank select/ Program changes, controller setup data concerning all your physical control devices, etc. The screen below shows the data Preset page:

- PC to MIDI – makes Bank select/program change active/inactive OUT via MIDI.
- PB – sets the pitch bend value. 64 equals pitch wheel centered.
- TG – refers to the EX’s internal tone generator. MD is OUT via MIDI.
All values are minimum to maximum (0-127). A value of 64 is centered. It is possible to preset the position of the Mod wheels, aftertouch, foot controller, Breath Controller, ribbon controller and the 6 EX knobs. You can customize what parameters these controllers control in your external module. It is possible to handle a huge MIDI system all from the front panel of the EX. You can instant send this data when a Performance is recalled or you can send this data at any time. Hold [SHIFT] + [ENTER] to send data from this page OUT via MIDI:

It is a simple matter to activate or de-active a controller for a Part. A dark box is active. See screen at left. The screen at right shows the KBD (keyboard) connected to MIDI A OUT, MIDI B OUT, is transmitting to the ARP (arpeggiator) and is connected internally. You can designate MIDI channel, high and low note/velocity limits, a velocity curve ad note transposition per zone. There are a total of 16 MIDI zones.
Setting up a VL type Voice for Breath Control
You can set the EX Breath Controller Assign parameter, globally.
[UTILITY]-> 5: Controller -> set Breath Controller Assign
You can select Breath Control, Velocity or Touch EG. To use the Breath Control setting you must have a BC1, BC2 or BC3 unit plugged into the Breath Control jack, or a WX Windn Controller with appropriate MIDI Out. A Velocity setting will make the VL Voices that are programmed for Breath Control respond, instead, to Velocity. (If, however, the VL Voice is programmed originally to respond to Velocity, you will need to “re-map” the controller settings (see below). Touch EG uses the velocity of the note-on to start then ‘transfers’ control of Pressure to aftertouch. You can manipulate the flow of air (in a piped instrument) or the speed of the bow (in a bowed string model) with aftertouch (downward pressure on the key). In general, if you wish to use the Yamaha BC3 to control the VL Voices, set the Breath Controller Assign parameter to Breath Control, as described above. Then reprogram the individual VL Voice by re-mapping the controllers. This can be done manually or you can simply press the [REMAP] function on the Controller Set page. This will set up the basic VL parameters, i.e., Pressure, Embouchure, etc. for BC:

The screen at left above shows the Shakuhachi Voice where Vel (VL) signifies that this Voice has been programmed to be playable via standard Velocity control. The screen to the right shows the Voice after performing the [REMAP] function. VL Pressure is under control of BC.
Take note of the Element ON parameter and the Depth = +32. BC can be turned on for some elements and not others, and each controller’s depth can be programmed. When depth = 0 there is no effect. The Remap function programs the bare minimum of controls for VL breath control. Please experiment with the assignment of other parameters.
That’s it! Go to Part I and Part II if you missed the first two installments!
Questions/comments? Join the conversation on the Forum here.