

Tagged Under
The rehearse record and erase on-the-fly functions are very useful tools that can be used during real time Pattern record. To understand how they work, set up to record a Drum PATTERN. You may want to set up a Performance with several instruments already placed in PARTS:
- Select a Drum Kit
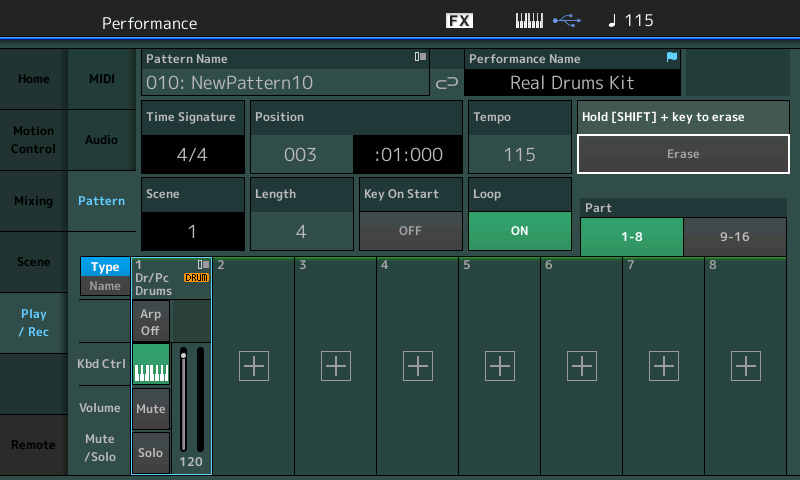
- Press the [Record] button – this takes you to the “Play/Rec” > “Pattern” area and selects a blank Pattern
- On the SETUP screen, set the Time Signature and Length parameters as you desire; Default is 4/4 and 4 Measures
- Set “Rec Quantize” (auto correction, if you wish); Set “Loop” = On
- Press the [Play] button to start the 1 measure count-in
- Begin entering data
The ERASE function = [SHIFT] + keys you want to Erase. While in RECORD, as your Pattern cycles around, if you want to remove a drum or drums you can hold [SHIFT] + the offending KEY or KEYS to remove its data from the phrase. This is a real-time erase feature. Continue to hold to control how much of the entered data is erased:
While you are recording, you can temporarily drop out of record mode without stopping the transport. This allows you to rehearse what you are going to play. It also allows you to find a drum sound on the keyboard. It sometimes is difficult at first to remember the location of each drum sound. The REHEARSE function is very useful when you need to hunt for that “just right” sound.
The workflow here with Drums is you can use these two functions together to perfect your original Pattern. Try laying down the Kick and Snare drum on the first pass; drop out of record, practice your hihat part; drop back into Record and lay down the hihats. If you make a mistake – use the Erase function to remove the bad notes.
To activate the Rehearse feature, simply press the [RECORD] button again – it will begin to flash, indicating you are temporarily out of record mode. No new data will be written to the track. You are free to play the keys without adding new data to your cycling pattern. Additionally, you can even move to a new track, rehearse what you want play, then drop back into record.
“Do Over”
What do you do if you want to redo everything? The “do over” is an important function to know about. If you have used one of the “Edit/Job” functions and you want to UNDO the most recent change you have made, go to “Edit/Job” > “Overview” screen. On the right side will be an option box to Undo your last executed Edit or Job.
However, if you want to do an entire recording, you can simply place the PATTERN into “Record Type” = Replace. For example, you don’t like your recorded data on a Track, the quickest fix is to simply use Replace Record to overwrite all the data on the Track.
Finding inspiration for drum programming: Many keyboard players spend a significant amount of time learning the fingering so that they can articulate an entire drum groove in a single pass. The good news is you do not have to if you don’t want to… there are no rules about how to record your drums and you get no extra points for being able to play it all at once.
Spend time listening to real drummers – it can help you “think like a drummer”. (No jokes, please). Watching and listening to real drummers can teach you a lot and even though you may not be as able to pull off exactly what they do, I guarantee you will learn something that will make your programming better. Real drummers will always have something that you cannot capture (hopefully); don’t worry about that… do the best you can. One key is that they only have four limbs – respect that (or not). I say, “or not” because, maybe your goal is not to sound like real drums… and that is legitimate too. Know the rules so you know when you are breaking them!
Try recording one drum at a time. On the RECORD Setup screen set the LENGTH parameter – this is very important. It tells the Pattern when to cycle. If you are new to counting music, learn how. If you are in 4/4 time… this means that there are 4 Beats to a measure and each ¼ note gets one beat. By far this is the most popular time signature in today’s popular music. Hipper than playing in 2… most folk music is in 2… Marches are also in 2. I met a professor who contended that most folk music is in 2 because even those with no sense of rhythm can find the beat, and if they miss it they are only off by 1 and no one knows and no one feels silly!
Music in four, on the other hand, leaves plenty of room for the uncoordinated to get lost. The ‘back-beat’ evolved to help keep everyone in line. The “back-beat” is the strong accent you find in many types of popular music that occurs on beat 2 and beat 4. Without getting into a big discussion about what is hip?… let’s just say, the more you listen the better you will be able to program your own.
Where you place the stress can change the dialect of the groove. Sometimes the downbeat, the “1” is accented, sometimes the downbeat is totally implied… learning to work with your rhythm patterns is an important part of music production.
Questions or comments? Join the conversation on the Forum here.