

Tagged Under
DIVIDE DRUM TRACK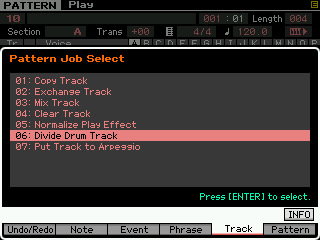 Divide Drum Track” – which is found by pressing [JOB] > [F5] TRACK from the main PATTERN screen is a sequencer JOB that basically allows you to use the first 8 tracks of the sequencer to initially construct your drum track. Then once you have worked out the drums you can reassemble them on to one track. So this assumes you are starting your composing from the drums, or that you are working in SONG mode and are using the PATTERN mode as a construction area to create your drum track, which you will export to the SONG mode. You will be using the sequencer’s first 8 tracks as a work area and when you have completed your work you can clean up and free those tracks for music data.
Concept: You record your basic drum groove using a single KIT on Track 1. Divide Drum Track will then analyze what you played and automatically EXTRACT the different components and split them (dissolve) to separate tracks 1-8. The idea is so that you now have separate tracks for your Kicks, snares/Handclaps, cymbals, toms, percussion etc.
 If you recorded your drum groove on Track 10, the Divide Drum Track JOB will analyze what you have played and EXTRACT the different components and split as before – but leave you with the original Phrase completely in tact on Track 10 – this can be useful when experimenting (you can keep the original, muted, while you work out ideas. Here’s how that will work.
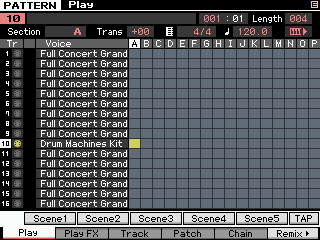
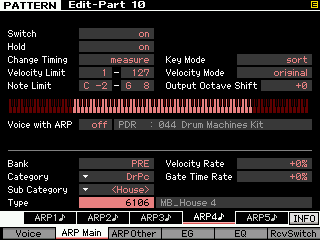
Shown next is an ARPEGGIO Drum TYPE that was recorded to Track 10, SECTION A of an otherwise blank PATTERN. Track 10 is selected.
Used in this example was DRUM ARP TYPE = #6106 “MB_House 4”
When you select the [JOB] function and press [F5] TRACK to select the “DIVIDE DRUM TRACK” Job, the data from the last Pattern Section, and Track that you highlighted will automatically be entered in the dialog box – so you are ready to execute the Job.
The result in this case will still arrive on Tracks 1-8 but the data will be separated according to the insturment type that is played in the Phrase.

Track 1 – Kick Drum
Track 3 – Snare Drum
Track 4 – Handclaps
Track 5 – Hihat
Track 6 – Percussion (click and cowbell)
Track 8 – Miscellaneous Percussion
This will allow you to do things like quantize the different components with different swing values. In general, quantize (timing correction) can be done in the sequencer either as you record or after the fact… moreover, it can be done either permanently or non-destructively. You can now shift just the snare drum behind the beat… you can swing just the high hat parts… You can remove or even redo PARTS of any of the 2300 Drum Grooves provided by Yamaha and recreate them as your own ARPEGGIO TYPES. Basically you can bring the full power of the sequencer editing jobs on each individual drum component.
Divide Drum Track will also allow you, if you wish, to keep the drums (permanently) on separate tracks, choose different kits. Or you can choose different sounds and then assemble those sounds into a custom drum kit… (we will see how that is done a little later). The possibilities are many. However, once you have edited the timing (swing) and velocity of the performance on separate tracks you can reassemble the drums to a single track (using the MIX TRACK Job).
Divide Drum Track will take your kicks and place them on tracks 1 and 2, the snare/handclap or any item that functions on the back beat and place them on 3 and 4, cymbals and other dressing on 5 and 6, toms and percussion to 7 and 8. So you can think of this JOB as a special type of EXTRACT job.
There is also a specific EXTRACT EVENT [JOB] found at [F3] EVENT, that lets you take all of one particular note (or range of notes), for example and move it to a separate phrase – which can then be ‘patched’ to a new track. This is useful for example to pull out one drum and then affect its performance data in some way and then place it back (using the MIX job). The DIVIDE DRUM TRACK Job will overwrite data in the target location. However the EXTRACT EVENT and MIX Jobs will merge the data.
Depending on your final goal, you can either leave your drums divided out on separate tracks or you can reassemble them to a single track. If you are recording to an external DAW software like Cubase via FW, for example, you can assign individual drums from within a KIT to individual FW outputs for separate audio processing.
If you are not going to need the additional tracks then you can simply skip the MIX TRACK job and use tracks 9-16 for your music. But if you require the tracks for you other music, you can create a custom kit containing just the sounds you like – assembling drums into a kit is easy enough (covered in the REFERENCE MANUAL’s section “Editing a Drum Voice” > Common Edit and Key Edit parameters (page 84, page 87).
Jobs: Extract Event, Mix Track and Mix Phrase
Extract Event
• Press [JOB]
• Press [F3] EVENT
• Select JOB 04: EXTRACT EVENT
This Job lets you define a measure region (even a single note) and remove that region of events by moving them to an empty track. The data is actually removed from the source track and placed in the target destination track. This allows you to remove all of one type of data, be it volume data, system exclusive data, note events, etc. You can isolate a snare drum assigned to note D1, extract it to an empty track; perform an edit and then place it back in with the original data using the MIX TRACK Job
Mix Track
• Press [JOB]
• Press [F5] TRACK
• Select JOB 03: MIX TRACK
This Job lets you take data from the source track and combine it with data on the destination track. It does this without deleting the source track and it merges the data with existing data on the destination (target) track. Because the source track data remains you can delete it separately or keep it to combine it with another track.
Mix Phrase (Pattern mode only)
• Press [JOB]
• Press [F4] Phrase
• Select JOB 03: MIX PHRASE
This Job lets you take data from a PATTERN mode phrase and combine it with data of another PATTERN mode phrase. You can use this to combine data even if that data is from a different PATTERN number entirely. It is non-destructive as both the source and destination phrases will remain. When combining Phrases within the same PATTERN check the Current Pattern box.
Earlier in this article we discussed the Divide Drum Track job. What it does is use the Extract function to divide drum kit notes by kind splitting them to empty tracks. You can then edit those tracks and finally recombine the data (if you wish) using the MIX TRACK or MIX PHRASE Jobs. If you EXTRACT a snare drum, for example, you can then select a special DRUM kit that is nothing but snare drums and assign that to your track. These ALL Snare Drum kits (“Acoustic Snares” and “Grouped Stereo Snares”) are useful because then by simply Note Shifting (using the PLAY FX) the data you can audition many different snare drums in rapid succession. When you find a particular snare drum you like, you can either just leave the note ‘shifted’ to that pitch or you can identify which snare that is and edit it into your own custom KIT.
There are also ALL bass drum Kits, as well, (“All Kicks” and “Dance Kicks”) which in a similar fashion can be used to try out different Kick drums in rapid succession. Depending on your final goal, you can either leave your drums divided out on separate tracks or you can reassemble them to a single track. If you are recording to a DAW software like Cubase via FW, for example, you can assign individual drums from within a KIT to individual FW outputs for separate audio processing. If you are not going to need the additional tracks then you can simply skip the MIX TRACK job and use tracks 9-16 for your music. We should mention again that the last edit JOB that you perform can be undone by selecting the JOB located at [F1] UNDO/REDO. Before executing a Job, the current data is placed in a special UNDO Edit buffer. This allows you to toggle back and forth between AFTER and BEFORE. If the JOB creates an unsatisfactory result simply UNDO it.
Experiment!