
Tagged Under
Call up the following Drum Kit in VOICE mode:
PDR: 004 (A04) Dry Standard Kit
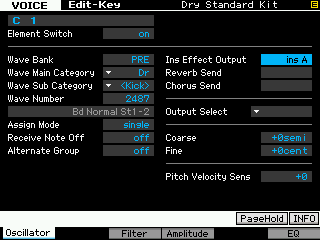
What we will do is route the kick drum that is on note C1 to the INSERTION “A” effect. INSERT “A” is already assigned to VCM EQ 501. Within a drum kit you can route each individual drum either to the System Effects (Reverb/Chorus) or to an Insertion Effect A or B
• Press [EDIT]
• Press Track Select [1] to view the ELEMENT-EDIT (Key) parameters.
• Press note C1 on the keyboard to recall the kick drum parameters
• Press [F1] OSCILLATOR
• At the top of the second column route the note to INS A (shown below)
• Press [COMMON EDIT]
• Press [F6] EFFECT
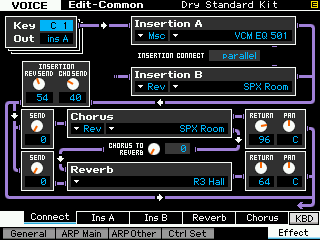
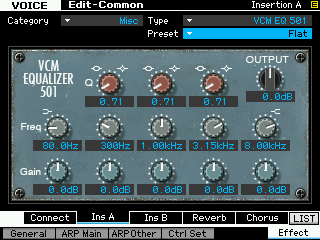
• Press [SF2] INS A to view the parameters of the VCM EQ 501
Recall the FLAT setting. Do so by highlighting the Preset parameter (upper right) and press [SF6] LIST. Now move away and re-select FLAT. This will “zero out” the EQ Gains to +0dB.
• Move the cursor down and highlight the MID band.
• Change the Frequency from 1.00kHz to 800Hz
This is what we used to refer to as the “cardboard” frequency for kick drums. Here is what I mean:
If we want to equalize a kick drum what you must ask yourself is: “What about this sound is important?” The kick drum (also called the Bass drum) is a part of the drum kit that is struck with a foot-pedal. There are two distinct parts to the sound.
1) the mallet striking the drumhead – “click”
2) the response of the wooden shell – “boom”
These are at two distinctly different frequencies. Any percussive strike is going to make a sharp spiky sound – in this case it is typically over 1kHz and can be as high as 2kHz. The response of the bass drum body (shell) itself is down low and can be 250Hz and lower down to as low as 80Hz or even lower (it depends on the drum). It helps to picture in your mind’s eye the sound in slow motion. Imagine a mallet striking the drumhead, “click”, and then imagine the drum responding “boom”.
If you need more of the good stuff… (please take notice that I didn’t say “if you need more bottom”… because I am not just interested in the bottom.
I want the click of the mallet strike to give it definition… by getting rid of the cardboard frequency, 800Hz, I should hear more bass response and more attack. Instead of boosting, try lowering the GAIN of the MID band at 800Hz, the more you lower it, the more bottom you hear and the more the attack stands out. You accomplish the same thing as if you had boosted the bass and boosted the EQ bands at the prime frequencies for the bottom and top ends of the sound.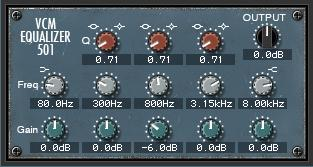
Do you feel that? As you lower 800Hz, you actually perceive it as having increased the bass. For fun, try boosting 800Hz (cardboard)! Hmmm! Hope you are having an AHA! moment.
It is a good philosophy when listening to a sound to think about not what do you need more of, but what can you remove to improve the sound. This will combat the natural urge to always boost. I am not presuming to tell you that you should never boost or that boosting the output of a frequency is bad. I’m just trying to impress upon you that in the digital world, many users are distorting their music (it is an epidemic really) simply because they never really learned about the fundamentals of audio. Each small distortion may not cause the catastrophic digital noise that obliterates all sound, but what it does is add to an overall harshness of the sound. You can avoid overloading anything if you think “less”… Less is more.
Some Things You Should Know
Equalizing sounds in a synthesizer is quite a bit different from equalizing signal coming in from a microphone from the following standpoint: The sounds in your Motif XS/XF/MOXF have already been recorded. They have already been EQ’d. They were recorded in the highest quality situation that Yamaha R&D could muster. An unbelievable amount of care has already been taken to ensure that the sounds you hear are harmonically balanced and useable within the synthesizer. Keep this fact in mind as you tweak sounds. If you find yourself radically altering the harmonic balance of a sound, perhaps you have selected the wrong sound. Perhaps there is another sound closer to what you are envisioning with your mind’s ear. When applying the VCM EQ 501 to a microphone input, keep in mind that placement of the microphone is your first control for harmonic balance. If you are using a unidirectional microphone, there is something called the “proximity effect”. The closer you are to this type of microphone pattern the more bass response you will hear. And the distance from the microphone will always make a world of difference in how the signal sounds.
The VCM EQ 501 is always found as an INSERTION EFFECT. This means you can use it on as many as eight PARTS of multi-timbral mix. I never worked in a studio that had 8 boutique EQ’s of this quality (and I’ve worked in some of the absolute best studios in the world). The VCM EQ 501 is based on the components of some of the classic top-shelf vintage EQs. Remember you will not need to equalize every instrument, however, the Motif XS/XF/MOXF gives you additionally a PART EQ for each of the 16 multi-timbral Parts of a MIXING setup. If your goal is to record to a DAW like Cubase, you can utilize the VCM EQ 501 as often as you need, because you can multi-track – which allows you to reallocate your resources as necessary via multiple passes.
PART EQ
Each channel of a MIXING setup will have its own PART EQ. This is a 3-band parametric equalizer, peaking MID-range, with the high and low bands set to shelving.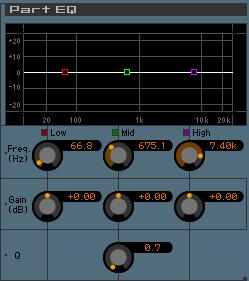
See you know what that means now! If, as I mentioned, the sounds in a synthesizer have already been meticulously equalized and recorded, why then all this available EQ? Excellent question… the answer would be to create the ensemble sound. Remember my story about my first session. What I learned was that even when you make an input sound “near perfect” by itself, that does not necessarily mean that it will work in an ensemble. It is the subtle adjustments that allow the bass to carry the bottom end and not the guitar, to allow the drummers cymbals to sparkle in the upper regions. You are looking for gaps to fill and to clear harmonic areas so things can be heard. Pan positioning also is a tool that should be mentioned – by positioning an instrument in the mix you can give it “space”. You cannot feature every sound – it is not a featured sound if every sound is featured.
VOICE MODE EQ
In Voice mode every Voice has its own 3-band EQ that can be stored within each Voice. This EQ, is a similar unit to the PART EQ described above; it has a parametric Mid-band and shelving Low and High bands. This EQ is useful when playing a sound “live” in VOICE mode. It will be stripped off when the VOICE is placed in a PART (either in Performance mode or in Song/Pattern mode). This is pretty standard. Because as we have tried to point out, when a VOICE is combined with other sounds in an ensemble you can count on needing to rethink the EQ for that sound. You reach this VOICE mode EQ on the Motif XS/XF from the main PLAY screen by pressing [F3] EG/EQ; and on the MOX/MOXF by pressing [EDIT] > [COMMON] > [F3] EQ.
ELEMENT EQ
Yes, there is even an Equalizer available for each of the 8 Elements within a VOICE. This EQ is for troubleshooting frequency problems within each Element – It is found at [F6] EQ when you drop into VOICE EDIT and then select the Element [1]-[8]… the EQ is found under [F6]. This can be configured as a 2-Band, or as a single Band parametric; or you can set it to boost the individual Element by +6, +12 or +18dB. (The Boost function uses just the amplifier portion of the Equalizer and is used to fix things that are low in volume – it is boosted across all frequencies).
MASTER EQ
The Master EQ functions as an overall equalization of the entire mixed output. It is a 5-band EQ much like the VCM but not of the same design.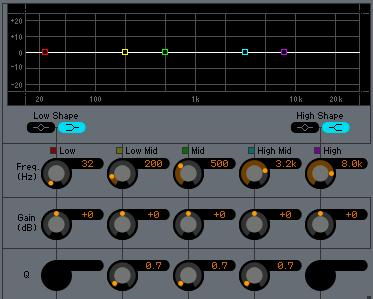 Notice that above the Low and High bands you can select the “Shape” – this selection is between a peaking type or shelving type filter band.
Summary: In summarizing the Equalization process, we must state that while there is some right and wrong, for the most part equalizing is subjective. This means it is really up to you. Used wisely EQ can help the clarity and intelligibility of your mix, and used poorly it can turn a good sound to mud. In general, EQ individual sounds to sound as good as you can make them. But remember once you place them in an ensemble their role changes and so should the equalization. The Master EQ is one that you can use to adjust the overall sound. Let’s take a look at how you might be using your synthesizer.
You will want to use the Voice mode Insertion Effect EQ (VCM EQ 501) to make a Voice sound balanced and clear. An Insertion Effect is part of the Voice itself. For the very important sounds (featured sounds) in your Mix, when using the sound in a sequence, having the VCM EQ 501 is a big advantage. Remember any 8 PARTS can recall their Dual Insertion Effects from Voice mode. You will want to treat the VCM EQ 501 as something special.
When you go to play live, you do not want to have to adjust this equalizer (as this is like editing the VOICE), you should, if at all necessary, use the Master EQ to adjust your sound for the room that you are currently playing. This is where the Master EQ is used. The Master EQ is the last thing before the outputs. (Voice EQ is your instrument – you are not going to take out a hammer and wood plane to change the timbre of your acoustic piano… you want to use the Master EQ to make adjustments for the outer environment – Master EQ compensates for the room in which you are asked to perform)!
The MASTER EQ is global for all of VOICE mode, and is available for storage in each PERFORMANCE and each MIXING setup.
The VOICE mode Master EQ settings are found in:
• Press [UTILITY]
• Press [F3] VOICE
• [SF2] MASTER EQ
(Note that this is actually a 5-band equalizer and measurements are in Hz (freq), dB (gain) and Q curve). This Master EQ will effect each and every VOICE, in addition to the aforementioned 3-band EQ and the Insertion Effect (VCM EQ 501).
In a Performance and Song/Pattern MIX the MASTER EQ is local within each setup. Each Performance or MIX is its own autonomous world. To see the Master EQ in a PERFORMANCE or MIXING setup:
• Press [EDIT]
• Press [COMMON EDIT]
• Press [F2] LEVEL/MEF
• Press [SF3] Master EQ;
The MASTER EQ will equalize all the Parts of the PERFORMANCE or MIX together.
The Equalizer affects overall output level. It increases output level when you boost and it decreases or attenuates level when you decrease. We need to mention one more item about your ear-brain and its ability to hear. We said that it can compress sound over a range of 1 trillion times the softest sound you can hear, and that its frequency response was approximately from 20Hz through to 20kHz, but this changes when the volume and temperature change. We don’t have to worry about temperature too much, but the volume level that you playback your music has a profound influence on the frequency response of your ears.
Discovered by Sir Isaac Newton and explored by two scientists, Fletcher and Munson, the Fletcher-Munson effect describes the phenomena as you lower the volume (intensity) you are less likely to perceive high and low frequencies. Story goes: When Newton was sitting under that famous apple tree pondering gravity, he noticed that as the sun went down, he could distinguish the green of the leaves for a longer time than he could tell that the apples were red. This indicated that his eyes ability to differentiate frequencies of light (color) changed at different intensities. The same is true with sound; as the overall volume is lowered you hear less at the extreme ranges. That is, you hear less lows and less highs but you continue to hear the mid-range well. This is the purpose of the Loudness Contour button on your home stereo. It adds a little extra punch to the lows and highs and is intended to only be used when you have to playback at very low volume – when using music as a backdrop for a meal or behind guests talking. Basically, when the music is not the feature – it adds a “smiley curve”, called this because the boost at the low-end and high-end makes a curve that looks like a smile. Punching it in at any other time is simply a misuse, or a lack of understanding as to what it is designed to do.
If you only want to make the overall signal output louder, don’t do it by turning up the EQ – simply turn up the main VOLUME output. (The one control that is 100% consumer safe is the VOLUME knob!) Most home hi-fi systems and car radios are balanced harmonically very poorly – and it is mainly operator error. And this is due to the fact that the average person does not understand the difference between the Volume control and the Equalizer. They only know to turn it up. The scary thing is they think this is a good sounding audio system. A friend asked me what I thought of his car stereo, I’ve learned to ask first if they really want me to answer or are they just making conversation. My years of working in the recording studio make me very unforgiving of the typical car stereo – in spite of how much you can spend on it. And please don’t ask me about the typical computer speakers…!!!
Last thing: Your studio monitors; find yourself a good pair of relatively flat studio monitors. Flat does not mean that they do not sound good, not at all. Flat means that they do not color the sound – they give you what you send in – and, trust me, that is what you want from your monitors. Nothing extra, nothing missing… just what you send in. If you are equalizing to compensate for a deficiency in your speakers, this is a bad thing for your mixes. Yamaha NS10M gained a reputation for “not lying” – giving you just what you sent in. Again, you will hear some people say “NS10M’s had no bottom”. Not true. They did not hype the bottom end. Placed at an optimum distance from the engineer (called the “sweet-spot”), they were near-field monitors, after all, the NS10M would give exactly what your mix was doing. They became a standard because of this. Today, studio monitors have built-in amplifiers allowing the design engineer to ensure that the tweeter gets exactly the right amount of power versus the woofer – separate power amplification for each. This insures that the concept of the design is heard as intended.
The typical consumer buys speakers based on comparison of volume (which is mainly its efficiency, not its quality). They will buy the loudest speaker – louder sounds good to us. But all systems have a way to control the listening volume (a big knob).
• What do the speakers sound like at equal volume?
• How is the stereo imaging?
If you are comparing speakers at a store resist the urge to be the bozo who buys the loudest speaker – ask them to adjust the volume so that you can determine how they really sound at optimum listening volume. The volume you can balance – the quality you cannot change.
It takes years to get used to listening at an appropriate volume – if you listen too loud, everything starts to sound good. If you listen too soft you get less bass and less highs. These things you must anticipate, learn, know and know how to use to your advantage. While the appropriate volume will make most musicians say, “turn it up”; it is the best listening level when trying to mix music. If it works at moderate volume it will work when you make it louder – but stuff mixed loud does not necessarily translate to lower playback volumes. I’m sure you have recordings in your collection that only sound good when played back really loud and yet you have others that seem to work at all playback levels.
Having knowledge of how your ear’s response changes with volume levels is important. Serve you well, it can, hmmm! Hope there was an “AHA! Moment” for some of you in here somewhere and that it served as a good review for you others.
Enjoy!
Bad Mister