
Tagged Under
Equalization in the Real World
I became a recording engineer the old fashioned way… I ran for coffee, setup microphones, cleaned tape machines (yes, it was the stone ages). I did an apprenticeship at a small jazz studio in New York City. The studio was affiliated with a record label and it was a very comfortable atmosphere both to learn and to record music. I got there because I needed to know how to get the sound I wanted when I recorded my band. I realized in my first recording experience as a musician that I could not express myself to the engineer. I knew what I wanted but could not speak ‘the language’. I was young, and there is nothing wrong with being young as long as you realize that you are and that you have time to learn. So that is what I did. I said to myself: “Self, you need to learn about this recording stuff if you are going to be a musician.” And that is what I did. After each session I would ask the engineer, when this happened why did you do this, and when that happened why did you do that… it was a process. Finally came the day I was “flying solo” – doing my first recording session.
It was the guitar player’s date. He showed up hours early. I knew he was serious because he had his own foot-rest and his hands were meticulously manicured. I got him a comfortable chair, setup a pair of U87 microphones – one over the tone whole and one above the nut and fret board. I spent about 5 minutes listening to him play, right there in the room, and then retired to the control room. I then went back in and adjusted my microphone positioning until I found a good distance. Notice I did not immediately go to the console’s EQ (and assume my first mic positioning was golden) – moving a microphone is always a better first solution than using an EQ. The distance from the source is a better harmonic balance than a knob on any EQ, period. I was pleased. I was getting this big, warm rich tone from that acoustic guitar. So big you felt you could walk between the strings. Oh, yeah, this was good. In walks the bass player. I set up a U47 (a favorite back in the day for acoustic bass). And I was getting a big, warm rich tone from that acoustic bass.
Now the guitar and bass started playing together. Hmmm! The big-warm-rich guitar was getting in the way of the bass. I made some adjustments to the EQ so that the guitar and bass worked together. In walked the piano player. We had a very fine piano in the studio and I had my own ‘thing’ for recording piano – it is my instrument after all. I did my ‘thing’ on the piano sound. Now the three of them started to play together, and I realized, once again, I needed to adjust the bass and the guitar to accommodate the piano. Okay. After some more minor adjustments, I was happy with the sound of the three of them.
In walked the drummer, and 40 minutes later I had a decent drum sound… Drums… need I say more? Rattles, squeeking, ringing, etc., etc. Then the flute player… I put him in the vocal booth. This allowed that I could still get clean isolation yet not have the microphone so close to the flute that it would give an unnatural sound. The isolation booth allowed the microphone to be far enough away to give the flute some airy-ness. Mic the nose or the chin of the player (or singer) – this avoids all the plosive wind puffs that can sound like a storm. You have to tell them to ignore the mic position, because they are used to being right in-the-mic because “live” it is a battle to be heard – so good mic technique goes out the window. Most people have no concept how to get the best sound from a mic – they never get beyond fighting to be heard.
Okay, a good hour and a half of setup and we are ready for a run through. This is when the big learning moment occurred – I call it the “AHA! Moment” (some say “Eureka”, same thing). They were running through the first number and it was sounding excellent – really excellent. Everything well balanced and clear – I could hear everything just like I wanted it. The learning moment came when I pressed the solo button, in turn, on each instrument. That is when it hit me. I soloed that guitar – and there was this much thinner guitar sound, nothing like the big warm rich sound I had initially. I undid the solo button and the guitar sat right in place with the other instruments. I soloed the bass – and there was this much thinner bass sound, nothing like the big warm rich sound I had initially. I undid the solo button and the bass sat right in place with the other instruments.
Wow! No way I would EQ these instruments like this as individuals – but they were perfect in the context of the ensemble. They supported each other well. And the bottomline is: that is what you are going for, the ensemble sound. Because it is a band, not a bunch of individual sounds to be heard alone. It is all about how they work together. AHA! Eureka… hurray! I had learned the first and most important lesson in recording – make the final product work. This was not “solo” instruments, this was an ensemble and the sounds should support each other in the context of the music they are making, now!
VCM Technology
The geniuses at Yamaha’s K’s Lab in Hamamatsu have created (recreated) the response and behavior of the classic Equalizers of the past. What VCM (Virtual Circuitry Modeling) does is not just mimic the device’s results (as is the case with many of the modeling devices out there)… what they have done is mathematically model the actual electronic components used in the classic equalizers of the past. The resistors and capacitors used to build these devices, their tolerances; their response to heat variation and how they were used in the actual circuitry of the devices is what has been modeled. This means that the input-output signal flow will behave the same as the original device under similar conditions. By mathematically modeling the components and the circuitry they can virtually build almost any device. The unique charm of these classic devices is what has been captured with the VCM technology.
VCM EQ 501 Parameters
A close look at the front panel of the VCM EQ 501 will reveal why it is called this: it is a 5-band EQ.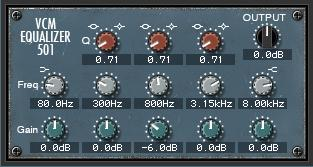
The three brown knobs on the top row are labeled “Q”. The second row of five knobs is the “Frequency” setting. The five knobs of the bottom row are the “Gain” boost or cut. In the upper right corner is the overall OUTPUT.
Q – is a term that denotes how wide a frequency umbrella each band will cover (and you thought it was a group of omnipotent beings that live in the Q-continuum); Another word for “Q” is Bandwidth. When you boost a frequency it will make a peak (looks like a mountain peak) and when you attenuate a frequency it will look like a valley. A wide setting (a low Q number, top) will cover several octaves, while a narrow setting (a high Q number, bottom) will be a very small range of frequencies.
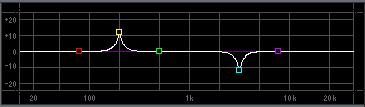 Notice the lowest band (1) and the highest band (5), do not have a “Q” control. This is because these two ranges are a type that is referred to as “shelving”.
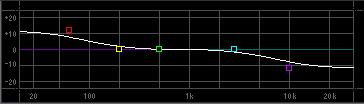
Rather than create a peak (mountain) when you increase the gain, it creates a plateau (flattens) and all frequencies below the low band are effected. In the case of the high band all frequencies above are effected. Basically they act as a HPF at the low-end and an LPF at the high-end. An HPF is a High Pass Filter – which you can take literally: it allows higher frequencies to pass and blocks the lows. And conversely, a LPF or Low Pass Filter allow the low frequencies to pass and blocks the highs.
FREQ – is frequency. And is simply, as we have explained, the center pitch of the peak or valley. And in the case of the shelving bands it is the point at which all frequencies below or above start to be boosted or cut. Frequency is measured in cycles per second, or Hertz (Hz); a parameter named after the man, Heinrich Hertz, who did groundbreaking work in this area.
GAIN – is output for that band of frequencies. If the Gain is set at 0 none of the other settings matter, as no boost or attenuation can take place. Gain is measured in dB or deciBels; Bell is Alexander Graham Bell, who did groundbreaking work in microphones, speakers, telephone, etc. dB is a ratio – a comparison of one setting to another. In general, a change of 1dB is hardly audible, 2dB change will be recognized by a majority of listeners (if they are paying attention), while a change of 3dB is clearly audible to everyone.
OUTPUT – In the upper right corner you see the OUTPUT knob. This is the overall output post the EQ. When signal first enters an EQ it passes through a filter which drops the overall level. The OUTPUT is to ensure that you can return the signal to what is considered UNITY gain – so there is not overall loss of level. An equalizer is a combination of filters and amplifiers. As we will learn, you do not always boost (at least not if you are wise), the OUTPUT can be important to give you back unity output post the signal going through the equalizer. Believe it or not, cutting (attenuating) the output gain at certain frequencies can be beneficial to a sound.
VCM EQ 501 Parameter Ranges
The Q setting (also referred to as Bandwidth) is available on the center three bands. The widest setting 0.50 through to narrow setting 16.0
The Frequency ranges are as follows:
Low (band 1) 31.5Hz ~ 2.0kHz
Low-mid (band 2) 50.0Hz ~ 20kHz
Mid (band 3) 50.0Hz ~ 20kHz
Hi-mid (band 4) 50.0Hz ~ 20kHz
High (band 5) 500Hz ~ 20kHz
The incremental steps between frequency settings are at 1/12 of an octave (as a musician you would understand this as approximately every half-step through out the music range). Without going into a discussion of Equal Temperament scaling – suffice it to say that this tuning is based on an octave being divided into twelve equal parts.
The Gain range is plus/minus 12dB for the two outer (shelving) filters and +/-18dB for the 3 peaking bands. You should resist the urge to use the Gain controls at the extreme setting – it is not that it is never necessary, it is just that plus or minus 12dB is a huge amount and plus or minus 18dB is a tremendous amount. Do not turn a knob like a guitar player… sorry for that one, but as you know, guitar players amps are built so you turn everything all the way up (to 11), don’t, this is professional audio gear. It is the very rare occasion that you need that type of severe Equalization. If you think you need that much, you might want to consider that you have selected the wrong sound.
The OUTPUT can be increased or decreased by +/-12dB.
In the upper right corner of the VCM EQ 501 you will see that you can select from several PRESETs:
Flat – a condition where all settings are neutralized (no gain or attenuation at any frequency). There are only two other presets: “Radio speaker” and “Dance BD & SN”
Typically, you cannot pre-set equalization, as it always will depend on the type of signal coming in and this can vary per session. The preset given here are special general ‘effect-type’ equalization settings that when applied to program will give the general overall feel of an old radio program or a typical dance bass drum/snare combination. The reason most tips and tricks about EQ’ing have to be taken with a grain of salt, is that it is very much based on the particular signal. EQ’ing Kick drums, for example, well each drum could have a different resonant tone, so saying that the center frequency should be “xyz” would not always be true, your mileage is going to vary. However, some general tips, based on the fact that the kick drum is a low frequency, can be made. Be prepared to use your own ears when EQ’ing!
Bad Mister