

Tagged Under
BASIC MIDI RECORDING with CUBASE
MIDI has been around since the early 1980’s and is an important pre-production and compositional tool. The single biggest advantages of working with MIDI data is the flexibility it gives us as musician/composers. And specifically the creative power it gives us as synthesizer players. We may have started our musical career with lessons on the piano, but when you own a synthesizer you wind up being self-taught on dozens of other instruments. With MIDI data and its physical controllers we are able to become drummers, guitar players, bass players, cellists, flautist, even zither players of some decent quality… that is, if we apply ourselves and take advantage of the ability to edit and perfect our musical attempts to perform these various other instruments!
In the third of the BASIC AUDIO RECORDING series, we described synchronizing the clock of the MO-XF with that of Cubase, and how this will allow the computer program to count in time with the musical divisions of time (measures and beats). In fact, our introduction to MIDI (Musical Instrument Digital Interface) was in setting up Cubase as the “master” MIDI clock and setting the MO-XF so that it will “slave” to that clock. This means it can start and stop when Cubase starts and stops, if we need it to. It will locate to the exact same measure and beat, when we need it to. And it will allow a conductor-orchestra relationship so that we all play together, in time.
_ The MOXF has a MIDI Sequencer.
_ Cubase is able to be a MIDI Sequencer.
_ Which one should I use?
The answer to this is one that can be simply a matter of choice and should be one that you explore fully. Learn to do both. Do not let anyone convince you one is better than another. A hammer is a great tool, but then again so is a screwdriver. If all you look at is the hammer, pretty soon everything starts looking like ‘a nail’. You will find that for some things it is far simpler to record to the MO-XF’s sequencer (for example, when attempting to record a PERFORMANCE as MIDI data). In the AUDIO RECORDING series we recorded a MO-XF PERFORMANCE as audio to Cubase. Recording the same thing as MIDI data is not quite as simple a process – because you are playing a single MIDI channel – yet generating four separate streams of MIDI data, on four separate MIDI channels – some of the data is generated by the notes you are actually triggering, while others are being generated by the arpeggio patterns you are controlling. To the poor recording computer – it does not know which is which, you will need to sort that out. And then you would need to reunite the MIDI data with the PART it is intended for, manually, matching the MIDI receive channel to the appropriate MIDI data. The MO-XF, quite naturally, does this automatically.
The point is, when you have acquired the skills to use both the internal and external sequencer, you will find the utmost flexibility. Yes, they can both be used simultaneously – and there may be situations where this is just what is required. But if you don’t know how to use them both, you may never find a solution when it is required. You want to be able to work so that your MIDI tracks serve their purpose. They represent the raw compositional data – a series of coded messages – that artfully represent our musical performances. They are in a state that we can correct and perfect the performance of music. You will want to think of them as a work in progress. Ultimately, when we are finally happy with our music performance, we can commit to this performance by rendering the track as an AUDIO track in the DAW (Cubase).
Once it is an audio track, we can keep the original MIDI (performance) data muted in a safe place (typically a CUBASE Project “FOLDER”). Later we will talk about how to manage your tracks – once a track has been committed to and rendered as an audio track, we can MUTE the MIDI track, drop the track data in a FOLDER track, and work with the audio. This workflow, will allow you an unlimited number of PARTS you can create with your MO-XF. You are no longer limited to just the 16 PARTS.
And the nice thing about working this way is if at some point you don’t like your AUDIO track (you fall out of love with it), because you archived the MIDI track, you have the ultimate level of UNDO. You can go back to your original data – redo it, fix it or whatever is necessary. Then you can render a new AUDIO track to replace the one that fell out of favor. In this article we will get you into recording MIDI to a computer Digital Audio Workstation (DAW). Since you are provided with Cubase AI we will use this in our example. Basically, you can use any computer based MIDI sequencer.
Basic Setup for Cubase AI
Before we get you into the MOXF6/MOXF8 Editor or the MOXF6/MOXF8 Editor VST, let’s first just understand how the hardware MO-XF works with the software Cubase AI, then later we will introduce you to the advantages of the including the Editors. As we make each connection in this setup we will attempt to explain its impact. In a situation where you are integrating external hardware with the software environment of the computer it will be important to understand just how this takes place. When you sequence in the MO-XF by itself, you have a keyboard with physical controllers that transmits to a track of the internal sequencer and that track triggers a PART of the tone generator. The situation will be exactly the same with one exception – we are going to have to transmit OUT from the MOXF to reach the track in Cubase. That track in Cubase has to transmit OUT from the computer in order to reach the PART of the MO-XF tone generator. So there is this connection that we need to break internally so we can route signal OUT to the computer and then we need to reconnect it so that the signal can complete its route to the MOXF tone generator. This connection is called the LOCAL CONTROL connection.
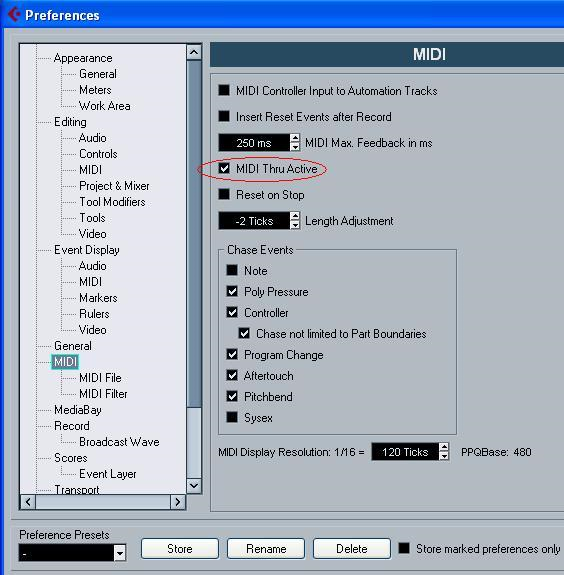
So it is very typical when working with a hardware keyboard and a software sequencer to work with LOCAL CONTROL set to OFF. This means that the keyboard and its controllers send their MIDI messages OUT via MIDI (instead of directly to the internal tone engine). The Track of the software sequencer receives those messages and “thrus” or echoes those messages back OUT via MIDI to the connected tone engine. In Cubase this ability to echo back or thru the signal is set in the program:
_ PREFERENCES… > MIDI > MIDI THRU ACTIVE (when MIDI THRU ACTIVE is checked, APPLY > OK, Cubase will be able to complete the signal flow circuit.
Setting up the MO-XF to record with an external DAW is handled in one simple operation. Yamaha built-in a simple QUICK SETUP function that will not only set the LOCAL CONTROL parameter but will set the MIDI Clock, Sequencer Control and other functions so that you don’t have to go all over the place setting things. There are six QUICK SETUPS that you can access by pressing two buttons simultaneously:
Hold [QUICK SETUP] + [1 /(A)]
The screen will read “Quick Setup 1 (DAW Rec) applied”
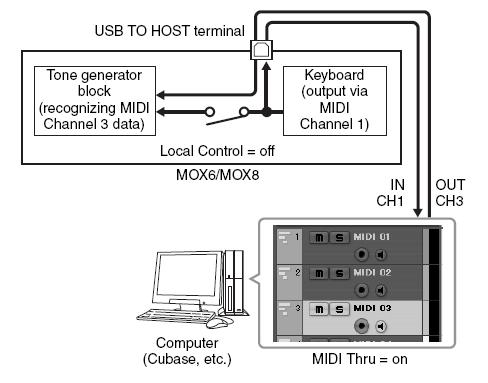
It is completely normal when this template is applied that you can no longer hear the MO-XF when you play the keys. Remember: Local Control being OFF means the keybed is no longer connected to the Tone Generator. The MIDI messages are sent to Cubase where we need to create a track in order to complete the signal flow. In the diagram below, you can see the KEYBOARD is transmitting on MIDI channel 1 – there is a broken connection between the Keyboard and the MOXF’s tone generator (this is LOCAL CONTROL turned OFF) – the MIDI signal travels via USB to the computer running Cubase. In the Cubase program you can see they are using Track 3 as the active (highlighted) track. That means that no matter what MIDI channel you transmit IN on Cubase will take that MIDI data and route it back OUT on the Channel of the TRACK. This is important. So they show the data going back to the MO-XF tone generator on MIDI channel 3 (the MIDI channel of the currently selected Track).
Quick Review of the Setup
Let’s launch Cubase and see how this works.
• Select the EMPTY Template
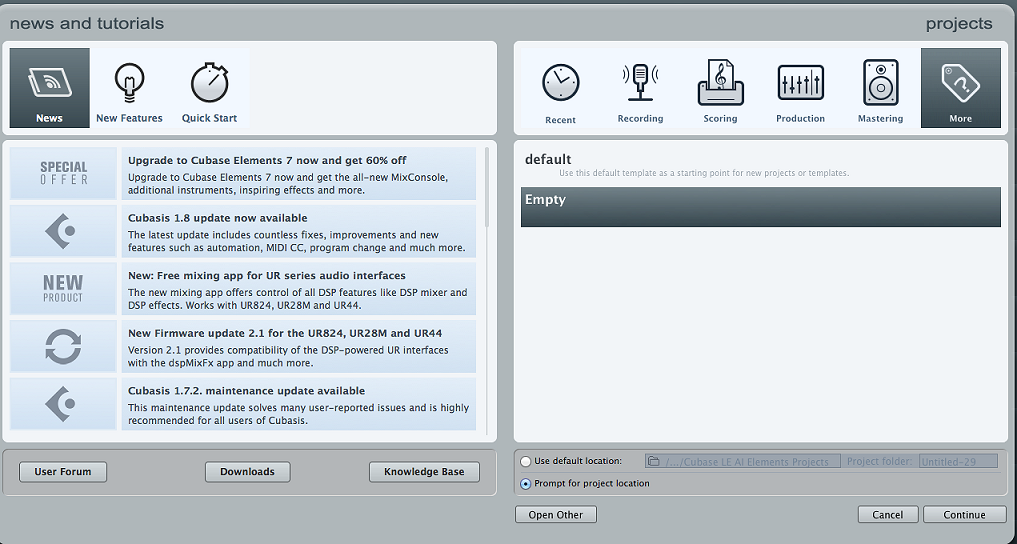
• Set a target location on your computer for this Project’s data
• Go to DEVICES (called “STUDIO” in Cubase series 9) > DEVICE SETUP (called “STUDIO SETUP” in Cubase series 9) > MIDI PORT SETUP
Macintosh: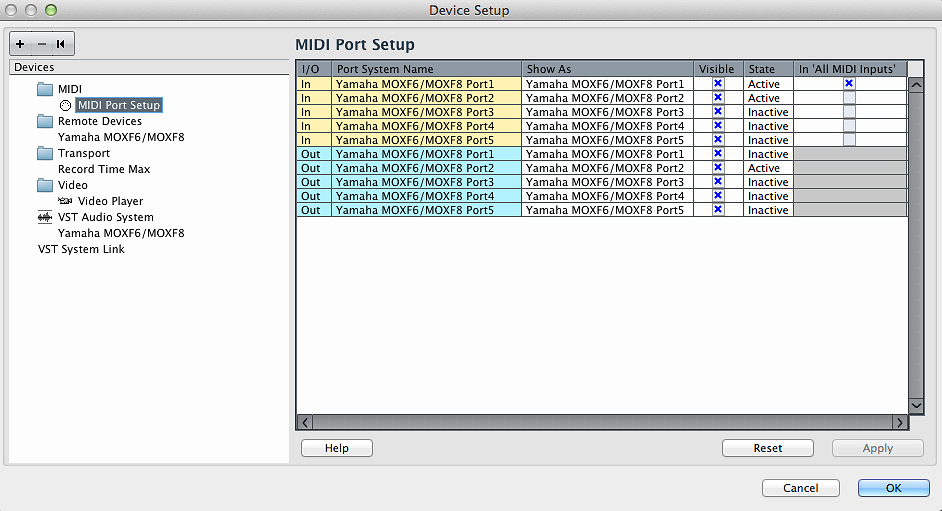
Windows: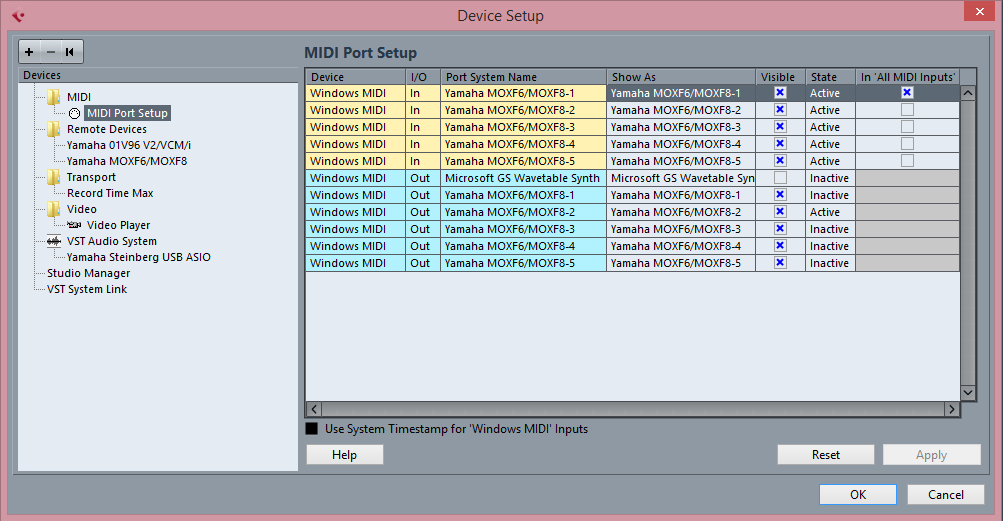
In the column marked “In ‘All MIDI Inputs'” you will mark those devices that you want to use as your controller. That is, in this case the keyboard that has the keys, and physical controls that you will manipulate to generate the MIDI messages. You do not want any other device marked in this column except those that are MIDI note and controller generating devices. On the MOXF6/MOXF8 that would be PORT 1 (Yamaha MOXF6/MOXF8-1). At times you may want to additionally select PORT 3 (Yamaha MOXF6/MOXF8-3) as this routes any MIDI device connected to the MO-XF’s MIDI IN jack. If you have another keyboard controller or an electronic drum pad controller that you wish to connect to your computer – this PORT 3 is the so-called THRU PORT – data is routed through the MO-XF directly to the computer and any track routed back on PORT 3 passes through the MO-XF and goes directly to the device connected to the MIDI OUT port.
In the REMOTE DEVICE folder you will find the Yamaha MOXF6/MOXF8
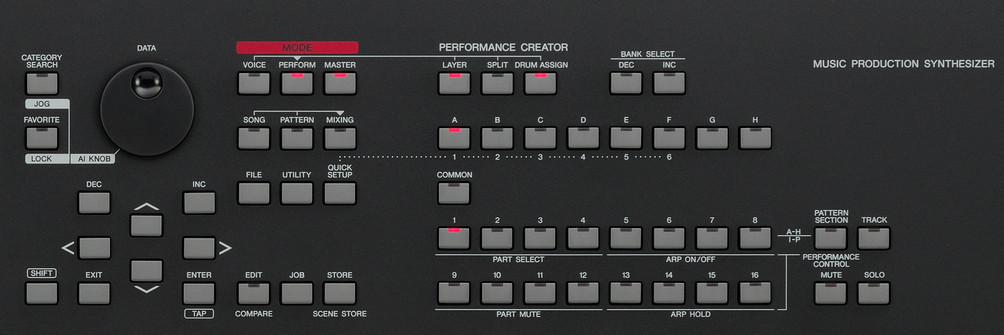
Here is where the REMOTE CONTROL functions of the MO-XF are configured. When you want to use the front panel of your MO-XF to control your DAW, you have a REMOTE layer. You gain access to this layer by pressing the [DAW REMOTE] button (notice its particular background, white) – the entire front panel is now retasked as REMOTE CONTROL functions. The Knobs, the Function/SubFunction buttons under the screen, etc., are now retasked for controlling your software. This makes working – arming tracks, muting/soloing, rewinding, playing, recording, mixing, selecting VSTi’s, editing VSTi’s etc., etc., – much easier because you do not have to move from your position in front of your keyboard!
The ports for this REMOTE parameter should be set to “Yamaha MOXF6/MOXF8-2” (port 2)
When Cubase launches it asks if you want to use the MOXF6/MOXF8 as you ASIO device – it does if you have properly installed the MOXF6/MOXF8 Remote Tools. This automatically configures the VST AUDIO SYSTEM settings – selects the driver and secures your audio routing between the MOXF6/MOXF8 hardware and the VST CONNECTIONS (Inputs/Outputs) of Cubase. If you select the option under VST AUDIO SYSTEM you can gain access to the driver via the CONTROL PANEL button in Cubase. Do not obsess over the INPUT and OUTPUT latency. This is the time it takes for data to be routed into and back out your computer.
Mostly you set this so your computer can handle the signals coming in and going out without glitching or struggling. In general, with the monitoring options you have available, you can choose to monitor the information you are currently generating direct. Direct means “zero latency”. One of the items we will discuss in some detail are the monitoring options you have when recording, when overdubbing and when mixing down. Single digit (in milliseconds) is excellent, low teens is typical, above 20ms is fairly slow. At 30ms you may want to look into optimizing your computer as this is going to be difficult to deal with.
Let’s add some MIDI tracks and discover how MIDI is routed into and back out to the MOXF
In our EMPTY Project go to:
PROJECT > ADD TRACK > MIDI > set the Count to 3 and create three MIDI tracks.
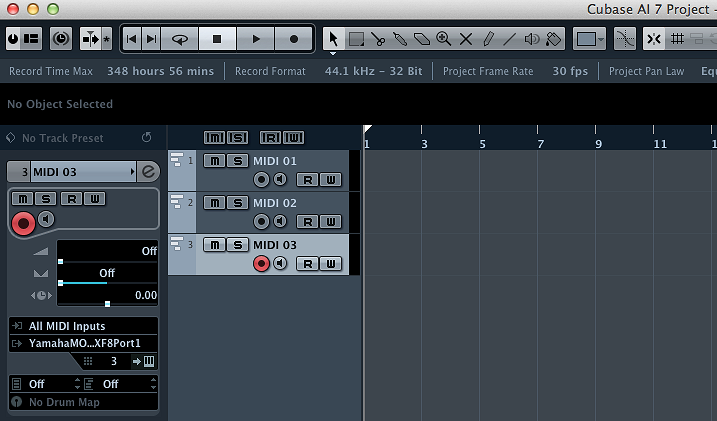
In the area called the “Track Inspector” you can see the Track’s INPUT and OUTPUT assignment. The Tracks have been given a default name “MIDI 01”, “MIDI 02” and “MIDI 03”. MIDI IN is set to “ALL MIDI INPUTS” and MIDI OUT is set to “Yamaha MOXF6/MOXF8-1” (Port 1). This is how MIDI is routed to the track and where that MIDI data is going to be directed. Also the track determines on what MIDI channel (Shown: CH= 3, each track is assigned a unique MIDI channel) that the data is going to be directed OUT on. Please recognize this, MIDI data is being re-channelized by the Cubase Track. As you select a track you will be transmitting via that track to the target MIDI tone generator (this is exactly how it works when using the internal MO-XF sequencer): When you select (highlight) a Track you are transmitting through that track, on the MIDI channel of that track to the tone generator. The only difference now is that with Cubase being the sequencer, the track is external to the MO-XF. Let’s see how this works…
Data arrives from the MO-XF to the selected track in Cubase, and no matter the incoming MIDI channel Cubase will re-direct this data on the MIDI channel as set for the track. Try this:
* Set three PARTS in a MO-XF MIXING setup.
Press [SONG] – select a blank location
Press [MIXING]
Press [F2] VOICE
Select Voices for the first three PARTS (you can use [CATEGORY SEARCH])
PART 1 = Drums
PART 2 = Bass
PART 3 = Keyboard
* As you select a Track in Cubase, because “local” is OFF, the associated PART will sound. If no MIDI track is selected you will not hear any sound (Local Control is OFF). Select Track 1, you can play the Drums; Select Track 2 you can play the Bass, Select Track 3 you can play the Keyboard. You will notice it does not matter what TRACK is selected on the MO-XF front panel… this is because no matter what MIDI channel you are sending data into Cubase, it is going to be received by the active track and re-channelized for MIDI OUTPUT. Therefore it is not necessary to change the transmit channel on your keyboard, all you need to do is select the Track in the software. With LOCAL CONTROL set to OFF in the MO-XF, the MIDI channel you transmit on is of no consequence.
Experiment recording using this setup – get comfortable with selecting (highlighting) a track in Cubase to play a particular sound. You may wish to rename the tracks – you do so by double clicking on the name “MIDI 01” and then typing in characters.
Create as many as 16 MIDI tracks –
PROJECT > ADD TRACK > MIDI > set the Count to the number of MIDI tracks you wish to create.
Each MOXF instrument PART gets a separate “MIDI Track” in Cubase. The reason for separate MIDI tracks is simply to make editing (looking at the data) easier.
SUMMARY:
What you have just seen here is how MIDI data, which are just coded messages, travel from the MOXF and arrive in Cubase. (This could be any DAW). The *active* track – that is, the currently selected track in Cubase will be responsible for what you are going to communicate with. This makes sense – you select the track that is in communication with the instrument you want to hear/record. It will also follow that if no track is selected or a track is selected that does not send MIDI data, you will not complete the circuit