

You’ll find a ZIPPED DOWNLOAD at the very bottom of the article. Unzip the .X7B File. Place the file “3 on FC SuperKnob.X7B” in a folder on your computer where you keep your Montage Files. Use “MONTAGE Connect” to bulk this PERFORMANCE from your computer to your MONTAGE’s Edit Buffer. This will allow you to play and explore it without having to overwrite anything in your MONTAGE. While in the Edit Buffer, you can explore it, study it, and if you wish edit it as you like and then STORE it.
This Performance can be morphed either directly with the Super Knob or with an FC7 plugged into the Foot Controller 2 jack (which has been set to “Super Knob”).
Super Knob position has been captured in the following SCENES (as an alternate method of recalling sounds):
SCENE 1 = Acoustic Piano
SCENE 2 = Acoustic Piano/Strings
SCENE 3 = Strings
SCENE 4 = Strings/Electric Piano
SCENE 5 = Electric Piano
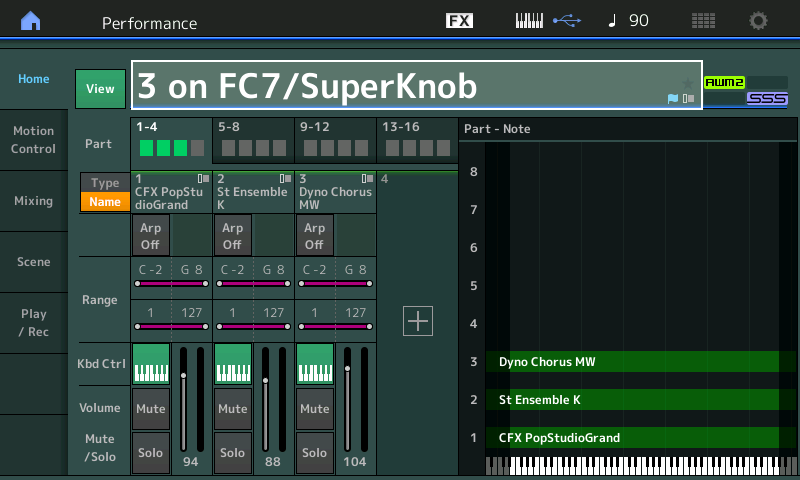
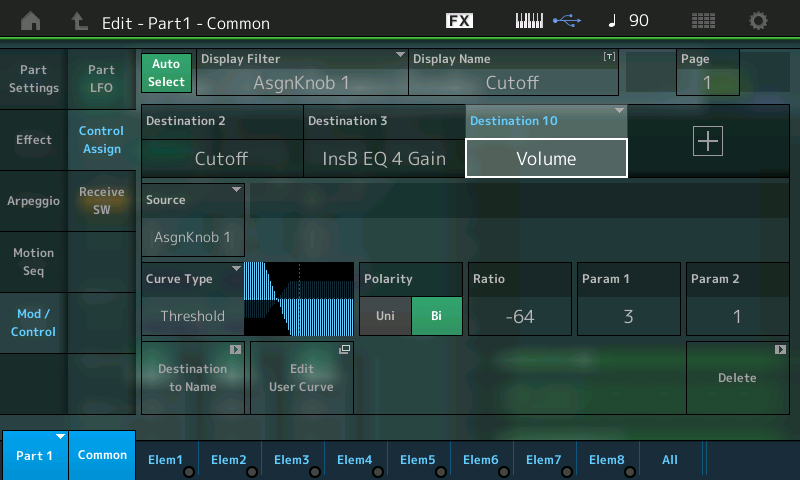
PART 1: CFX PopStudioGrand
CURVE TYPE: Threshold
POLARITY: Bi
RATIO: -64
PARAMETER 1: 3
PARAMETER 2: 1
These settings contour PART 1’s response so that it is loud initially but as you increase the AssignKnob 1, the Volume drops off to nothing. VOLUME has been assigned to the position of Assign Knob 1. As Knob 1 is increased the Acoustic Piano fades out.
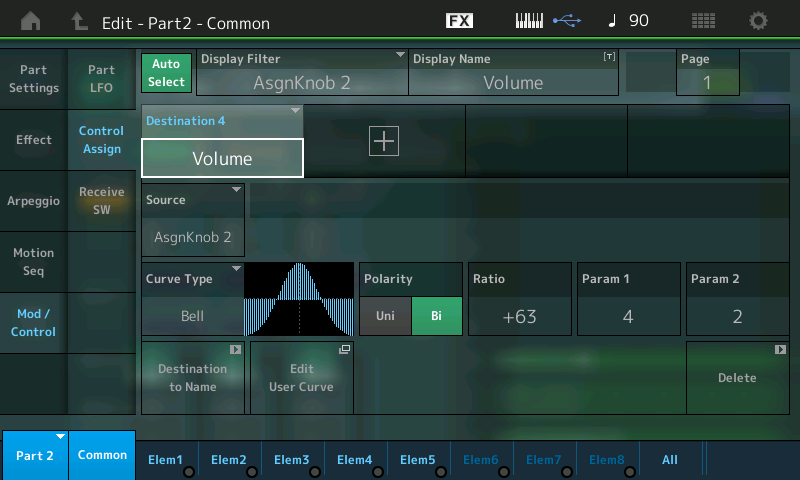
PART 2: St Ensemble K
CURVE TYPE: Bell
POLARITY: Bi
RATIO: +63
PARAMETER 1: 4
PARAMETER 2: 2
These setting are programmed so that PART 2 is silent initially, but as you increase the value of AssignKnob 2, it is loudest in the middle and drops off to nothing at maximum. VOLUME has been assigned to the position of Assign Knob 2.
PART 3: Dyno Chorus MW
CURVE TYPE: Sigmoid
POLARITY: Bi
RATIO: +63
PARAMETER 1: 0
PARAMETER 2: 3
These setting are programmed so that Part 3 is silent until you reach about 2/3 of the way through the travel of the knob. VOLUME has been assigned to the position of Assign Knob 3.

On the upper COMMON/Audio Level of the EDIT architecture is where the ‘link’ between the PART’s Assignable Knobs to the Super Knob movement is made: This means as you turn the Super Knob from minimum toward maximum you are also turning Part 1’s AssignKnob 1, Part 2’s AssignKnob 2 and Part 3’s AssignKnob 3, simultaneously. You can adjust the Curve Parameters so that you get the appropriate amount of overlap or no overlap, as you may desire. You can even create your own custom USER CURVES, if necessary. The two “PARAM” values help you shape the CURVE to your needs. Please experiment – adjusting the cross fade is a matter of taste and what you find comfortable musically speaking.
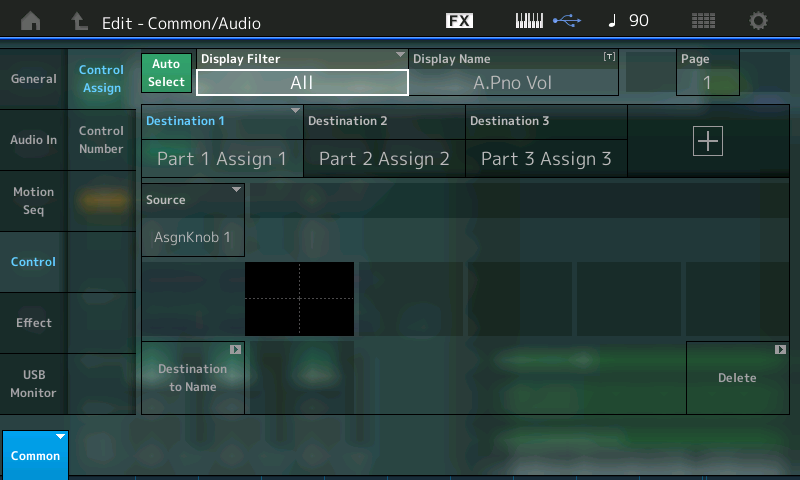
The above screenshot shows on the top COMMON/AUDIO level of editing that:
PART 1 ASSIGN 1 = Part 1’s Assignable Knob 1 is linked to the Super Knob movement. A.Pno Vol
PART 2 ASSIGN 2 = Part 2’s Assignable Knob 2 is linked to the Super Knob movement. StrBrs Volume
PART 3 ASSIGN 3 = Part 3’s Assignable Knob 3 is linked to the Super Knob movement. E.P. Volume
Notice I have labeled the Assign Knobs using the “Display Name” box, this way you know what each Assign Knob is doing. (Shown: “Destination 1” is currently selected and the Display Name = A.Pno Vol).
Ready to get started? Download the file at bottom of this article.
Want to discuss this more? Join the conversation on the Forum here.
And stay tuned to gain more skills for mastering your MONTAGE!