

The Power of Scenes
A Scene is a stored set of MIXING, SYNTHESIZER and SEQUENCER settings. This term comes to us from the Yamaha digital mixing consoles and hard disk recorders, where a “snapshot” of settings can be stored and recalled, on demand. It was originally designed to recall a set of parameters similar to how a Program Change event would recall settings on a synthesizer, except it recalled mix settings. Imagine being able to recall all fader settings, all pan positions, etc., instantaneously. Since the MONTAGE and MODX have a built-in Digital Mixer, it has been expanded here to include some synthesizer parameters, as well.
As implemented here in the Motion Control Synthesis Engine, there are eight such “snapshots” that can be taken and then recalled at the press of a button. The data is stored to the SCENE buttons in a simple gesture: hold down [SHIFT] + [SCENE] to take the ‘snapshot’. They can be a very useful part of your musical composition construction. This short article will point out how you can make the best use of this very powerful feature.
From the PERFORMANCE HOME screen, in the first column, touch SCENE to recall the Scene Memory screen (shown below). Any changes made here, on the Scene Memory screen, are automatically memorized to the current Scene number (listed across the top). This screen will serve as a record of what is stored in each location.
There are eight MEMORY Switches controlling the ten types of information that can be captured and recalled:
- Arp – the currently active “Arp Select”, 1-8. The main ArpSw must be active
- Motion Seq – the currently active “Motion Seq Select”, 1-8. The main MS Sw must be active
- Super Knob – the current position of the Super Knob.
- Super Knob Link (NEW) – which of the 8 Common Knobs are linked to Super Knob movement
- Mixing 1 – “RevSend”, “VarSend”, “Dry Level”, “Pan”, “Volume” for each of the 16 Parts
- Mixing 2 – “Cutoff”, “Resonance”, “FEG Depth”, “Mute” for each of the 16 16 Parts
- Kbd Ctrl (NEW) – the currently active Keyboard Transmit configuration
- AEG – Attack, Decay, Sustain Release of the Amplitude Envelope Generator
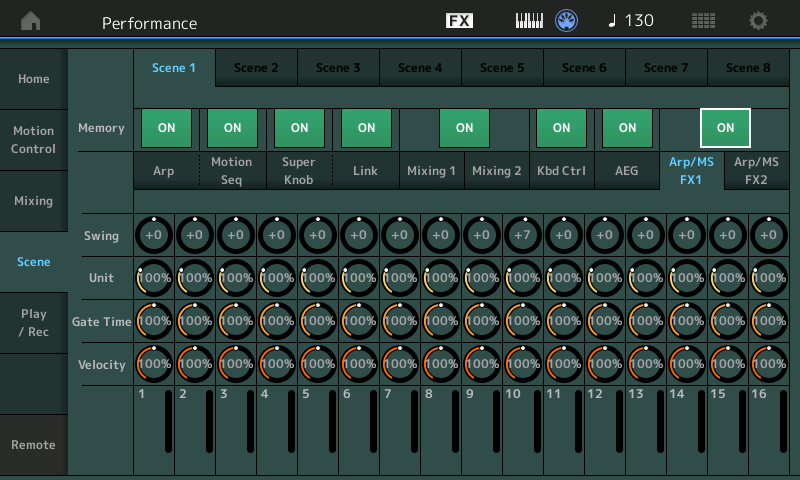
- Arp/MS FX1 – Swing Quantize, Unit Multiply, Gate Time, Velocity
- Arp/MS FX2 – Amplitude, Shape, Smooth, Random
A SCENE snapshot can remember the current status. This turns them into very powerful tools, indeed. This means you can change the entire tenor of the mix, instantly, at any time. Change the fidelity of the mix… make it sound filtered, far away, crystal clear, make it sound like it is underwater, inside out… you can break it down to a few instruments, change what Parts are set to respond and what your keyboard is set to send, and so on.
“Arp/MS FX” allow you to change the quantize settings and the swing quantize.
After registering the Scene, the SCENE button will glow for the corresponding button (Blue on the MONTAGE, red on the MODX). You can confirm what data is memorized in each SCENE by touching “Scene” in the first column on the screen. (Alternate method: [SHIFT] + [PART SELECT 4/4])
A SCENE recall is executed by simply pressing a SCENE button. One SCENE is a record of ‘what’s happening now’.
Why is a SCENE important? If you need to get back to initial conditions, simply store the initial conditions as one of your eight SCENES. It is very typical when recalling a Performance, that during your interactions with it, you are going to change a setting, move a Knob, change a slider position, alter it in some way. Perhaps you ‘open’ the Filters, or change the Attack. The last value for a parameter will remain in effect until you recall another Scene. For example, say you have a SCENE that MUTES a particular PART, that Part will remain muted until you either unmute in manually, or you recall another SCENE that that unmutes it.
It is quite normal, when playing a synthesizer, to alter settings while performing – having a Scene that returns you to your ‘start condition’ will be invaluable.
The PATTERN Function
There are 8 PATTERN SCENES. You can activate these in real-time. When you recall a Pattern Scene you have the ability to setup how the mix is set for each of these musical entities.
Some tips on using the Scene function: Technically speaking, a Scene simply takes a picture of your current settings. SCENE 1, for example, could be the condition of the MIX when you start playback. That is, the condition you want the mix to be in normally, because once you recall a Scene its parameters are applied and remain applied until you activate another SCENE. If you need to return to the basic setting you either have to recall the entire program by moving away and reselecting it, which is not always convenient if you need to return to normal during play. Once you create a Scene you can update it so that it reflects exactly what you want the condition to be when this button is pushed. There is always going to be a start condition.
How is this function useful? In certain genres of music (techno, electronica, dance, etc.) it is quite typical to bring tracks in and out via MUTE functions. It is quite typical to alter the entire mix on-the-fly by recalling filter cutoff settings that make the music sound purposefully muffled… and then, “on cue” burst back to full fidelity. Scene “snapshot” events can be creatively used – simply use your own imagination.
The Super Knob and Super Knob Link, allow you to change, literally, scores of parameter settings… far too many to mention here. In a situation where you are using multiple MULTI PART instruments, being able to determine which ones are going to be under control of the Super Knob greatly expands the capability and flexibility of the system.
Being able to instantly change the KBD CTRL Parts means you now have yet another way to seamlessly transition between instrument sounds with a single Performance. You can have a different lead sound or instrument for each musical section. Shown below, Scene 1 is active (blue). Playing the Keyboard will cause Parts 5 and 6 to sound. In Scene 2 you might activate a different Part or Parts to sound.
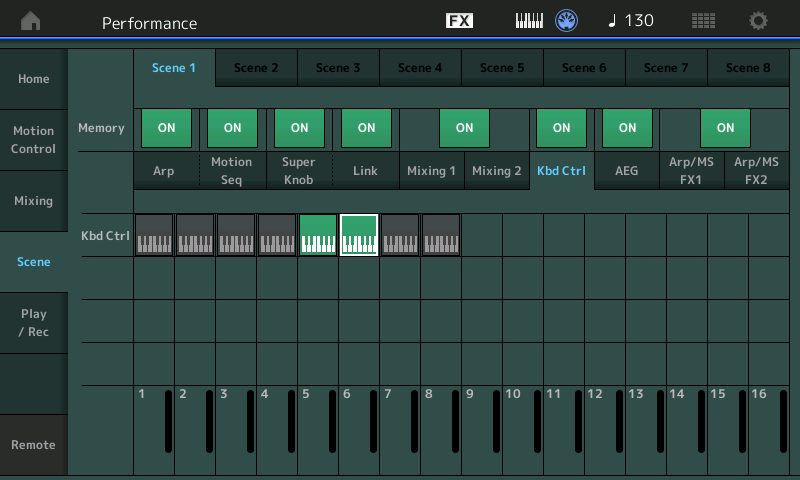
Using the KBD CTRL Memory switch means if you are holding a chord when the SCENE change is executed, the sound does NOT get cutoff, however, any additional notes will sound from the newly recalled KBD CTRL Part, or Parts. This allows you to have one lead sound during the Verse, and play an entirely different sound during the Bridge.
The eight SCENE buttons can be used to house PATTERN recordings. Each SCENE could represent a different musical section (Verse, Chorus, Bridge, Adagio, Sonata, whatever…) Not only can you control MUTES but you can now store which KBD CTRL Parts are active.
The KBD CTRL Memory does not interrupt the currently sounding Part or Parts – which makes it sonically invisible.
MUTEs disconnect the sound from going to the outputs and like a Mute on a mixing console, it is immediate and cuts off the sound, like turning off a light switch. MUTES are NOT sonically invisible. KBD CTRL works with ‘transmitting’ from the keyboard, so there is no interruption in sound, at all. All notes that are sounding when the SCENE changes will remain sounding, but all subsequent notes play from the newly activated Part(s).
Have questions or comments? Join the conversation on the Forum here.