

Tagged Under
MONTAGE brings a solid feature set to the stage. Some of the most important features include:
- Total Voice and Performance compatibility with MOTIF XS/XF and MOXF
- Single-cable USB audio and MIDI interface
- A dual synthesizer Engine (AWM2 +FM-X) with powerful onboard DSP Master
- MIDI keyboard control with eight zones.
- A/D input for processing external inputs like analog synthesizers, guitars and microphones.
- Onboard Vocoder and Envelope Follower
- Pure Analog Circuit D/A converters: MONTAGE, virtual instruments and external gear connected to the A/D input sounds amazing with powerful bass, detailed midrange and a pristine high end
There is a great article outlining navigation on MONTAGE here. This will introduce you to the user interface, the organization of Performances and other useful tips to familiarize yourself with the instrument.
CONTENT MANAGEMENT
Understanding the different MONTAGE file types is important. There are three major ones:
- User File (.X7U): This file type loads and saves Performance and any Waveform/Sample content to the User memory area in MONTAGE. Only a single User File can be loaded and it is freely editable.
- Library File (.X7L): This file types loads and saves Performance and any Waveform/Sample content to one of eight separate Library memory areas. Once loaded, Libraries cannot be edited but remain in MONTAGE even when a different User File is loaded. NOTE: Users can create a Library file from a User File by saving it as a Library File. In this case the User area is employed as place to build and modify content.
- Backup file (.X7A): This file type saves everything in MONTAGE in a single file. All User content, Library content, system settings…everything. The Backup file is the preferred format for backline as it ensures a perfect copy of MONTAGE content and set ups.
SAVING/LOADING BACKUP FILES
The Backup file is the absolute best way for musicians to “clone” their personal MONTAGE. To SAVE a Backup file:
- Insert a USB flash drive into the “TO DEVICE” port on the back of MONTAGE.
- Press [UTILITY] and touch “Contents” then “Save”.
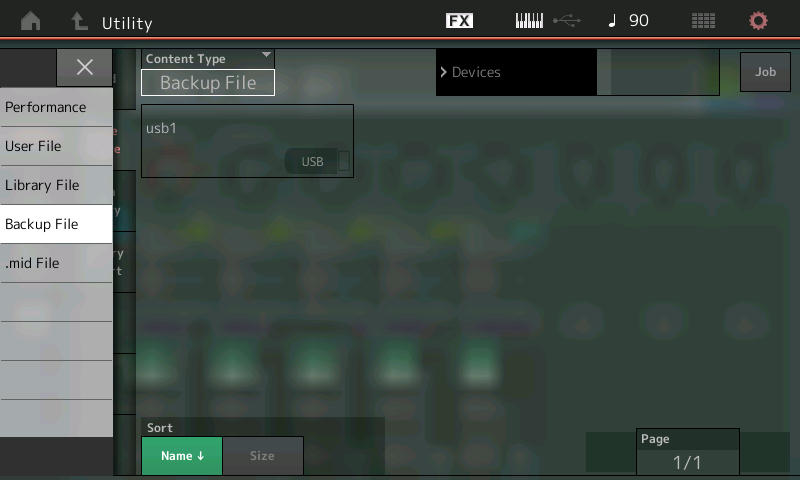
- On the menu select “Backup File”:
To LOAD a Backup file:
- Insert a USB flash drive into the “TO DEVICE” port on the back of MONTAGE with the relevant file:
- Press [UTILITY] and touch “Contents” then “Load”.
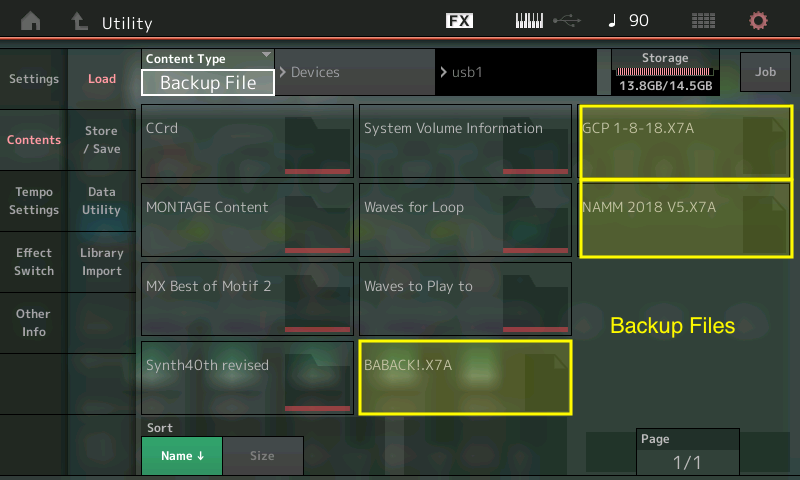
- On the menu select “Backup”.
- Find the file you wish to load. Backup files use the extension “.X7A”.
MOTIF XS/XF AND MOXF COMPATIBILITY
Beginning with OS v2.0, MONTAGE has full Voice and Performance compatibility with MOTIF XS/XF and MOXF. This means musicians who have MOTIF XS/XF and MOXF content can load their Voices and Performances directly into MONTAGE. Information on MONTAGE compatibility can be found here.
This compatibility is a great feature, but what’s even more compelling is how MONTAGE can greatly enhance legacy MOTIF XS/XF/MOXF Voice and Performance content. Check out a great article here for taking your legacy MOTIF XS/XF/MOXF content to the next level with MONTAGE. It is a process we have aptly named “MONTAGification”. With MONTAGE you can add deep realtime parameter control, enhnaced DSP, superior Pure Analog Circuit D/A conversion, the FM-X pure synthesis engine and onboard multichannel USB audio and MIDI connectivity directly to MOTIF XS/XF and MOXF Voice and Performance content. It ALL can be “MONTAGified”.
FLASH MEMORY AND ADDITIONAL PERFORMANCE CONTENT
MONTAGE contains 1.75 Gb of flash memory for additional waveform content. You can get both free and paid content at www.yamahamusicsoft.com. Some great free libraries that are available are:
- Bosendorfer 290 Imperial Sample Library
- Chick’s Mark V Sample and Performance Library (Chick Corea’s custom electric piano for MONTAGE)
- MONTAGE Xpanded Sample and Performance Library.
LIVE SETS
LIVE SETS are a great way to organize MONTAGE Performances. A LIVE SET is a collection of up to 16 Performances in a 4×4 grid. There are Preset and Library LIVE SETS that cannot be changed and User LIVE SETS that can be created and modified by the User. User LIVE SETS are easy to create and easy to organize. To add a favorite Performance to a User LIVE SET:
- Select a Performance then press and hold the [SHIFT] button and touch the [LIVE SET] button.
- The first available slot will be highlighted. Touching on any empty slot places that Performance into a User LIVE SET slot.
Here you can name the slot add a color line and set an offset volume. Check out these two articles on Performance Basics and the LIVE SET:
FIRMWARE UPDATE PROCEDURE
MONTAGE firmware updates add significant sound, control and workflow improvements. For this reason, it is important to ensure the instrument has the latest firmware version. You can always find the latest firmware here. Look for “MONTAGE OS Updater” to find the latest version along with instructions in the included “Read Me” outlining the update procedure.
IMPORTANT: Updating MONTAGE Firmware erases all User content. It’s good to get in the habit of SAVING a Backup file (see above) BEFORE updating and reload when the update is complete.
To update MONTAGE:
- Download the MONTAGE firmware file to your computer.
- Connect a USB flash drive to your computer and drop that file into the root directory of the drive (not in a folder). The file will have a name like “8N70OS_.PGM”.
- Take the USB drive from your computer and connect it to the “TO DEVICE” USB Port of MONTAGE.
- Power off MONTAGE with the USB drive connected.
- Press and hold the up [CURSOR] button and [UTILITY] button simultaneously and Power on MONTAGE:
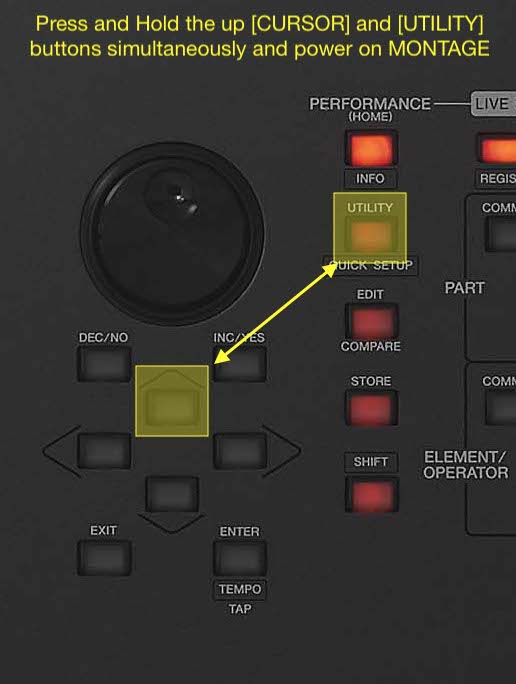
- Hold for approximately 5 seconds and the update procedure will start automatically. If for some reason it does not work try another flash drive and/or download the file again.
To check the firmware version, press the [UTILITY] button, touch “Settings” then “System”. The firmware version will be listed at the bottom of the screen: 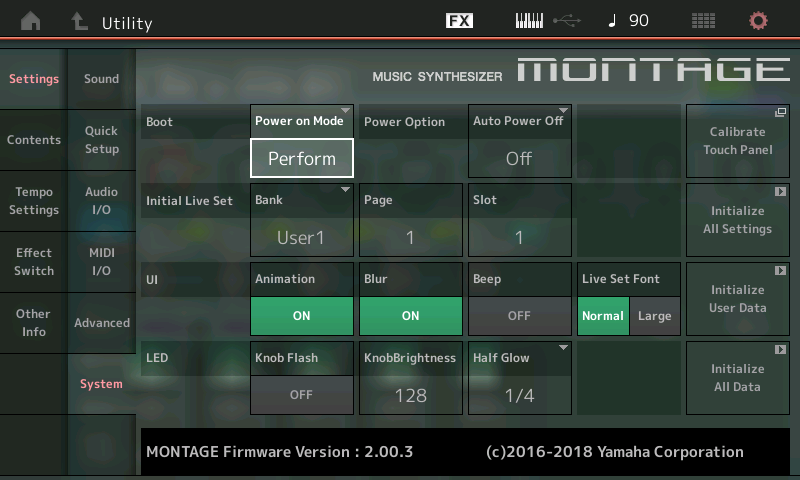
NOTE: It is important to keep MONTAGE updated to the latest OS version because new content and improvements in control and workflow are always added. If you are reading this article and want to follow along with MONTAGE make sure your instrument is using the latest firmware version!
ZONE CONTROL
Montage works great as a master keyboard controller. By default, this feature is not active. To activate it Press [UTILITY] then touch “Settings” and “Advanced”. Touch the “Zone Master” so that it is ON. Once that is engaged each Part of a Performance has Zone settings and Zone transmit. These settings are Performance specific meaning that EVERY Performance can have its own specific Zone set up.
SUPER KNOB 101 AND SCENES
The Super Knob is a macro control that can control eight assignable knobs simultaneously. Each of the assignable knobs can in turn have multiple parameters assigned as well.
The Performance “CFX + FM EP” is a good Performance to get an idea how Motion Control works. When the Super Knob is all the way to the left, all that sounds is the CFX concert grand piano. As the Super Knob is moved to the right, the FMX electric piano comes in and gradually gets louder. As the Super Knob is moved to the left, the volume of the CFX gets softer while the FMX electric piano gets louder. Finally, when the Super Knob is all the way to the right, only the FM electric piano sounds. So, CFX concert grand goes from a higher volume to zero and the FMX electric piano goes from zero to a higher volume as the Super Knob moves from left to right. These are two parameters moving in opposite ways and a basic component of Motion Control.
Other Performances are much more complex when it comes to Motion Control. With 16 control destinations per Part, thousands of possible motion combinations – and controllable destinations for both synthesis and DSP – the real time control aspects of MONTAGE are impressive.
THREE-STEP SUPER KNOB ASSIGNMENT
It’s easy to assign the Super Knob. Here’s a quick example:
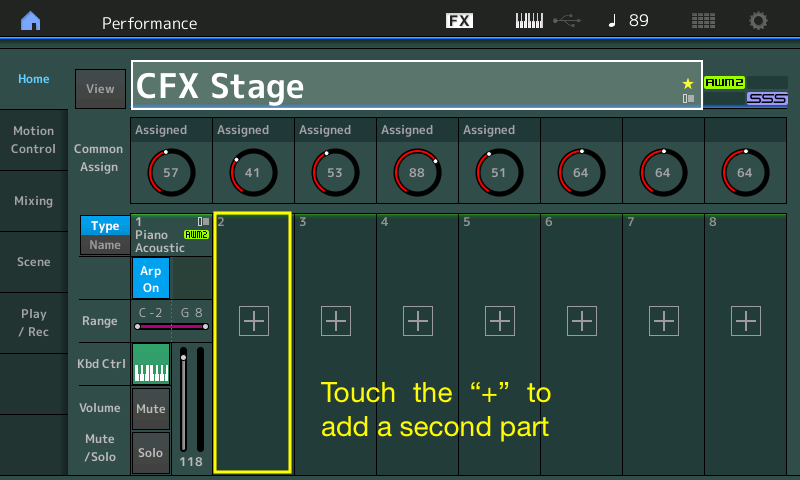
- Press [CATEGORY SEARCH] and find the Performance “CFX Stage” by pressing magnifying glass icon in the upper right hand corner of the screen. Type in “CFX Stage”, touch the name that appears and press the [PERFORMANCE (HOME)] button.
- Now add a string Part. Touch on the “+” in Part 2 of the screen. This will take you to “Part 2 – Performance Merge”. In the text search type in “Ballad Strings” and press [ENTER]. This Part should be selected (it will be highlighted). Press the [EDIT] button and touch “Part Settings” in the touch screen:
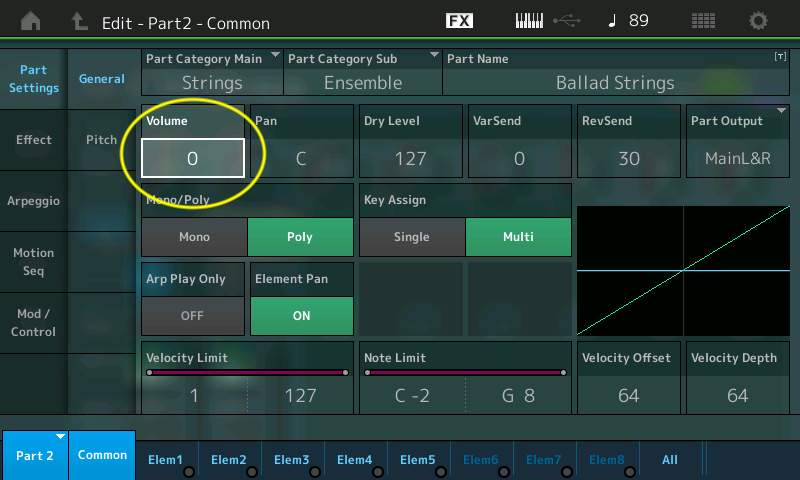
Touch the “Volume” parameter in the screen. This is an assignable parameter and whenever an assignable parameter is selected the [CONTROL ASSIGN] button will illuminate. Bring the Volume down to “0” using the DATA Wheel (or just touch the number and you can numerically enter “0”). Touch “Control Assign” and move the Super Knob: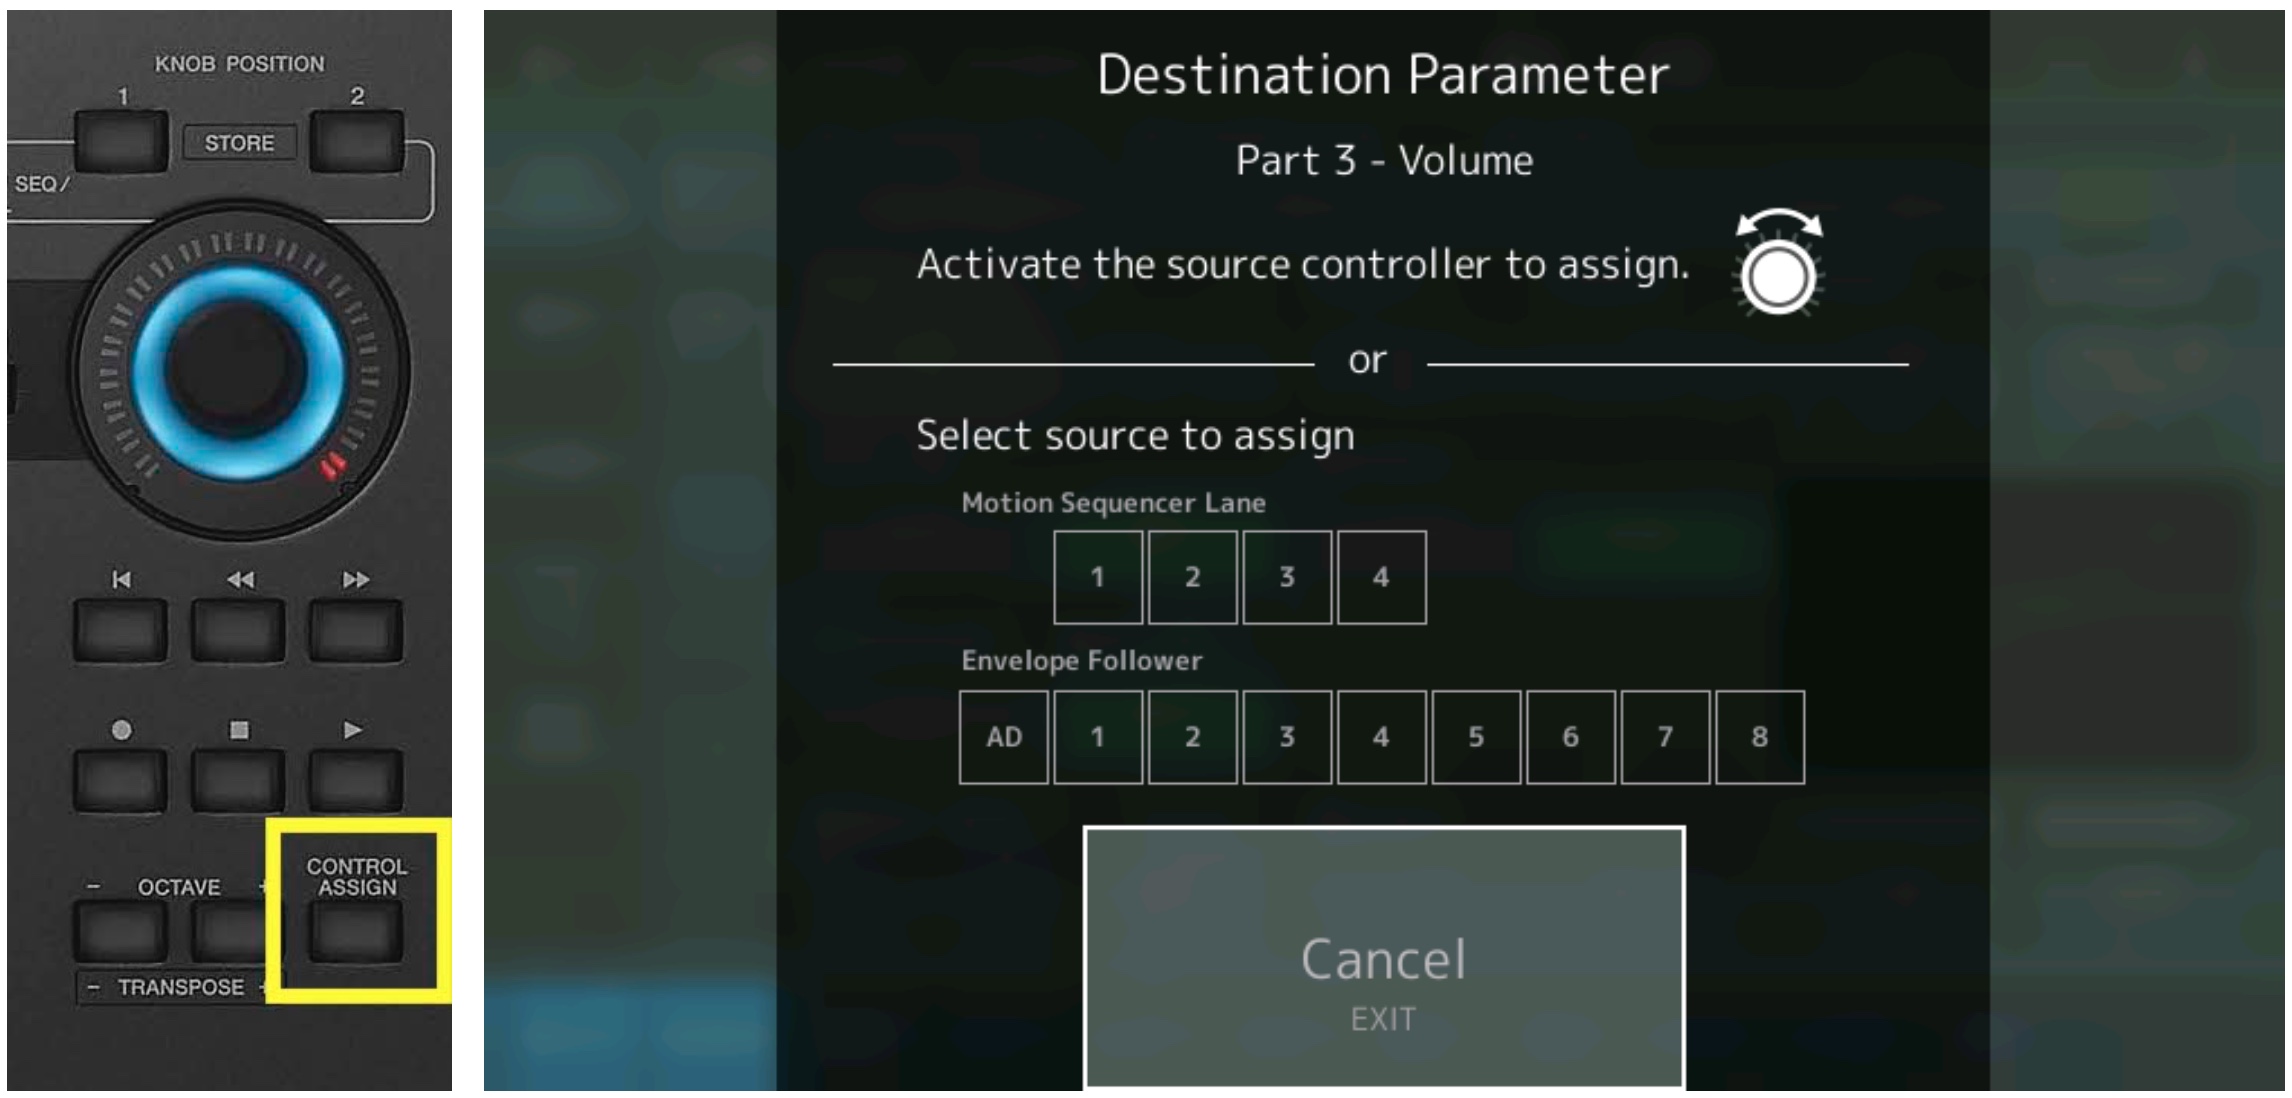
The Super Knob is now assigned to control the volume of “Ballad Strings” in Part 2. When it is all the way to the left only the CFX concert grand piano only sounds in Part 1. As the knob is moved to the right the string section will gradually increase in volume.
SCENES
You can instantly recall the location of the Super Knob by saving in a Scene. Move the Super Knob all the way to the left so you hear the piano and string layer. Press and hold the [SHIFT button and touch Scene 2: 
Now move the Super Knob to the Mid Position, Press and hold the [SHIFT] button and touch Scene 3. These Scenes will now recall the Super Knob position with the touch of a button.
BUILT-IN MULTI CHANNEL USB AUDIO AND MIDI INTERFACE
MONTAGE features an onboard USB audio and MIDI interface. This means that it connects to Mac or PC computers with a single cable, eliminating the need for a separate audio interface. Combined with the Yamaha Steinberg USB driver, a very low-latency audio and MIDI driver for Mac or PC, MONTAGE becomes a perfect front end to live virtual instrument hosts like Apple MainStage or popular DAW platforms like Cubase, Logic, Ableton Live and more.
ESSENTIAL ACCESSORIES: SUSTAIN PEDALS AND EXPRESSION PEDALS
Pedals are an important part of any keyboard set up. There are two Foot Controller expression pedal inputs, a dedicated Sustain Pedal input and an assignable switch input. There are some cool ways MONTAGE utilizes pedals:
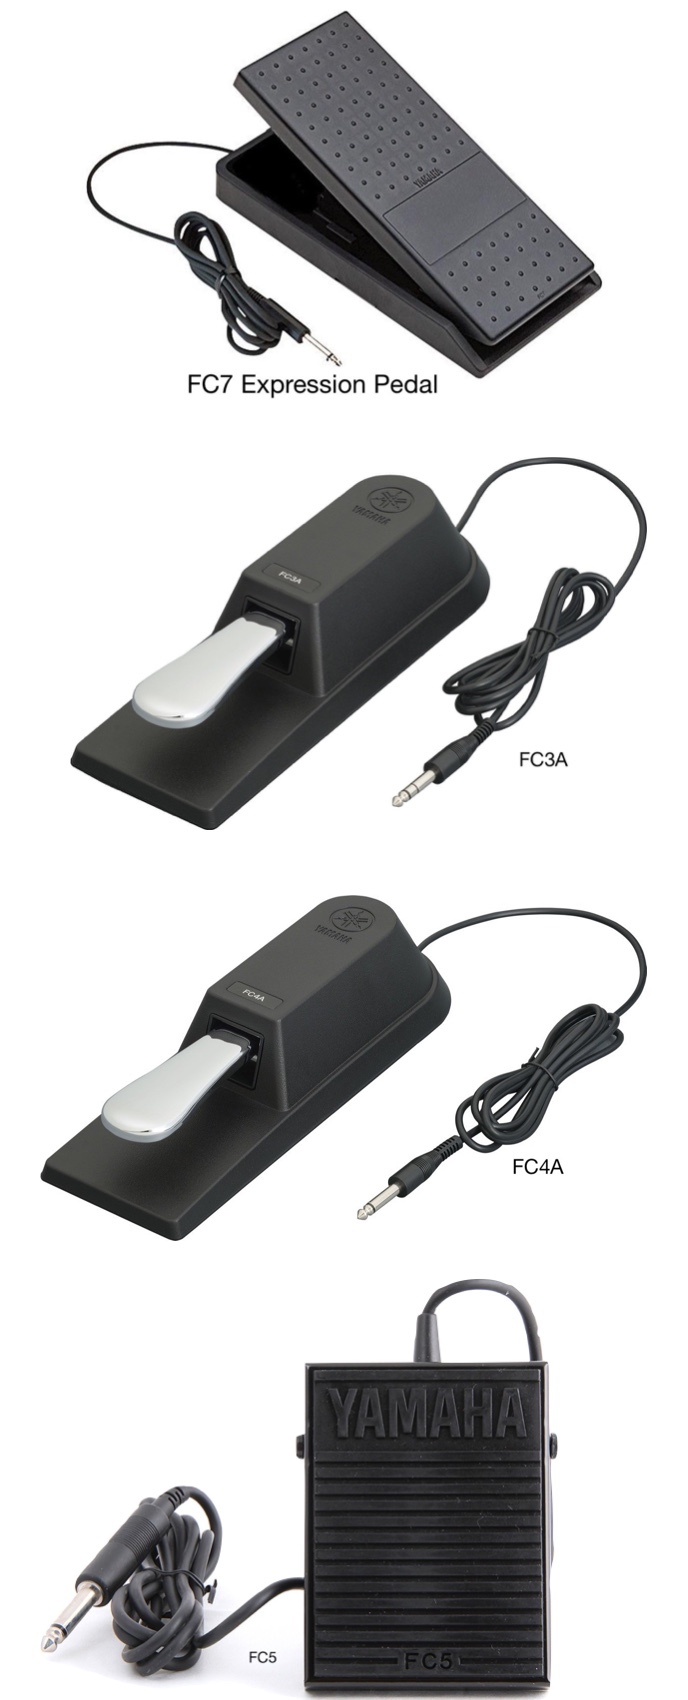
- Expression Pedal: A great design feature of MONTAGE is FC7 expression pedal control of the Super Knob. Foot Controller 2 is generally assigned to the Super Knob. This allows a keyboardist to move the Super Knob dynamically without pulling hands from the keyboard. Part fade ins, effects sends, filter sweeps and much more can be simultaneously controlled by the Super Knob, and the Super Knob motion can be controlled with the FC7. It is an essential part of the MONTAGE experience.
- Sustain: MONTAGE responds to a both continuous (FC3A) and switch (FC4A/FC5) type pedals. The benefit of the FC3A is how it interacts with piano Performances. On an acoustic concert grand piano, the sustain pedal doesn’t just turn sustain on and off; it’s gradual, allowing for half pedaling techniques. MONTAGE pianos respond in a similar way when using the FC3A pedal making it a must-have pedal for discriminating pianists and keyboardists.
- Switch Pedal: There is an assignable footswitch pedal that can be used to start and stop an arpeggio, turn an effect on/off, etc. This is an ideal use for the FC4A or FC5.
Want to share your thoughts and comments on this article? Join the conversation on the Forum here.