

Tagged Under
Closing out this introduction into programming basics and Mastering MONTAGE, we’d like to make mention of the Assignable Function buttons. These were introduced back in 2007 when the Motif ES evolved into the Motif XS. The [AF1] and [AF2] buttons had a dual role, if you will. Available within the Control Set to act as either a momentary or latching switch for those parameters requiring this type of control, but also a new performance enhancing role where they controlled the XA CONTROL or Expanded Articulation Control functions.
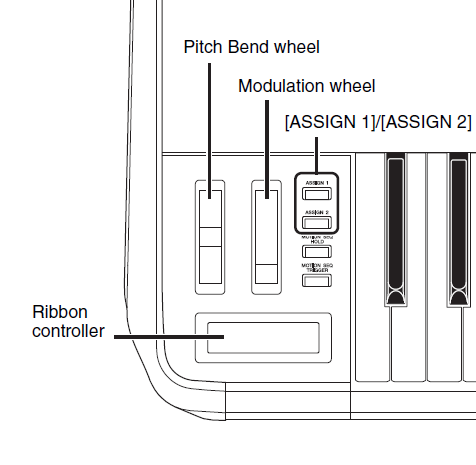 In MONTAGE, these are now referred to as Assign Switch 1 and Assign Switch 2. If you see a Part with a name including “AF1”, “AF2” or “AF1&2”, it will be referring to these two switches located just to the right of your Modulation Wheel. They can be used to send an ON or OFF message (typical switch). The switch can be momentary (works like a sustain pedal, you must hold it for it to take affect) or the switch can be latch (works like typical light switch, it stays on until pressed again). This momentary or latch behavior is programmable on a per PERFORMANCE basis so that each can react as you expect. You decide based on how you wish to perform the articulation. A good example would be some of the acoustic guitar Performances (“Steel Twin Gallery”), where the Assign Switch 1 is used as a “momentary” switch to bring in a harmonic, and Assign Switch 2 is used to articulate a muted note. A good example of “latch” would be the String Orchestra Performance “MediumLargeSection” where engaging “Assign Switch 1” changes the Element set that is playing from the bowed orchestra to a pizzacato articulation. The “latch” setting would be more appropriate for extended play.
When studying the Preset PERFORMANCES, knowing what to look for, and where to find it, concerning the Assign Switches is going to be important. They can be used within the PART setup to flip/switch any available parameter – bring in an effect, change speed of an effect parameter, etc., etc. but also can be used as a musical tool to expand your performance palette. The XA CONTROL is designed to be musically invisible. It is the way that different articulations can be recalled instantaneously and smoothly “knitted” into the sound you are performing. These functions are assigned on a per AWM2 Element basis include: Normal, Legato, Key Off, Cycle, Random, Assign Switch Off, Assign Switch 1 On, Assign Switch 2 On. (Please note: The Live Set that is used in the Mastering MONTAGE series is located here.)
Normal – the Element will sound when the Note Limit, Velocity Limit and other programmed requirements are met.
Legato – the Element will only sound when the Part is set to mono and a legato gesture is used on the keyboard. If a new key is pressed before the original is released then, and only then, will this Element sound. When this Element’s Waveform excludes the attack portion of the instrument, you can get a more natural legato phrasing result. Typically, a flute sample is recorded with the player attacking the note, making playing a legato phrase impossible with samples. The Legato XA Control feature allows the legato performing gesture to recall an entirely different flute Waveform, one that is without the attack portion of the wave (the sampled data is “offset” so the player’s attack is not included). The synth engine will “knit” this waveform into the sounding phrase. This allows more natural phrasing when attempting to play fluid woodwind or horn sounds, and can be used to great affect on lead sounds like electric guitar and solo string sounds, as well.
Key Off – the Element will only sound when the Key is released or the sustain pedal is released. Used to recreate the sound after the release of the mechanism. In a piano it is used to recreate the noise of the hammers and the reengaging of the felts. Noise that happens on release can be “knitted” onto the currently sounding Elements with this XA Control.
Cycle – the Element can be set to a “Element Group” number, Elements with the same Group number will interact. Instead of all being triggered simultaneously, you can set the Elements to sound one after the other. Grouping Elements can create a situation where it cycles between the groups.
Random – the Element behavior is like Cycle but this time the Elements within the Group will be selected randomly rather than in numerical order.
Assign Switch Off – the Element will only sound if the condition of both Assign Switches is OFF.
Assign Switch 1 On – the Element will only sound when this Switch is active.
Assign Switch 2 On – the Element will only sound when this Switch is active.
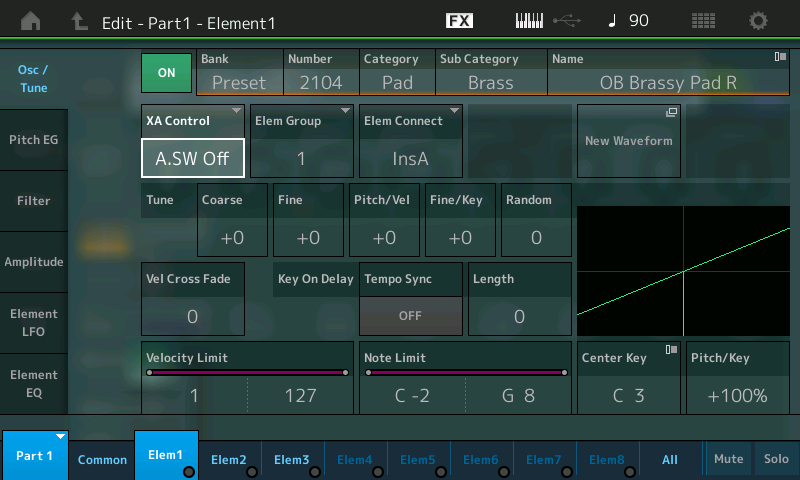
– Press [EDIT].
– Press [PART SELECT 1/1].
– Select Element 1 for Editing by either touching “1” along the bottom of the screen or by pressing the ELEMENT [1] button on the right front panel.
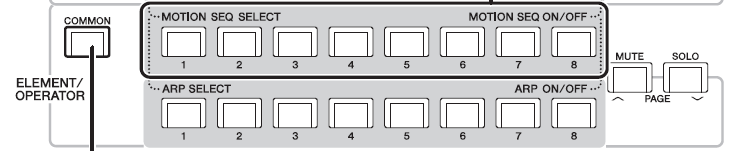 – The next to bottom row of buttons are ELEMENT/OPERATOR SELECT 1-8 when you are in EDIT.
– The bottom row of buttons are ELEMENT/OPERATOR MUTE/UNMUTE 1-8.
Think Outside the Box
The Assign Switches can be used to switch not only between Elements within a PART, but in fact, between entire PARTS of a PERFORMANCES. In other words, if you have a multi- Element String Part, you could set the XA CONTROL function so that it only sounded with both ASSIGN SWITCHES were OFF. When you engage Assign Switch 1, you could program a Brass Part to play. This means that while playing the Strings, simply pressing Assign Switch 1 would change the next keys you play to Brass. This is a musically invisible change – no notes get cut off – no glitches because it is musically invisible to the ear.
The Assign Switches can be set as Momentary or Latch for the PART. This is found on the upper “Common/Audio” level of the program. The example shown below is from the PERFORMANCE “88 Key Case Hard” Electric Piano PART:
– Press [EDIT].
– Press the upper [COMMON] button.
– Select “General” in the first column in the screen:
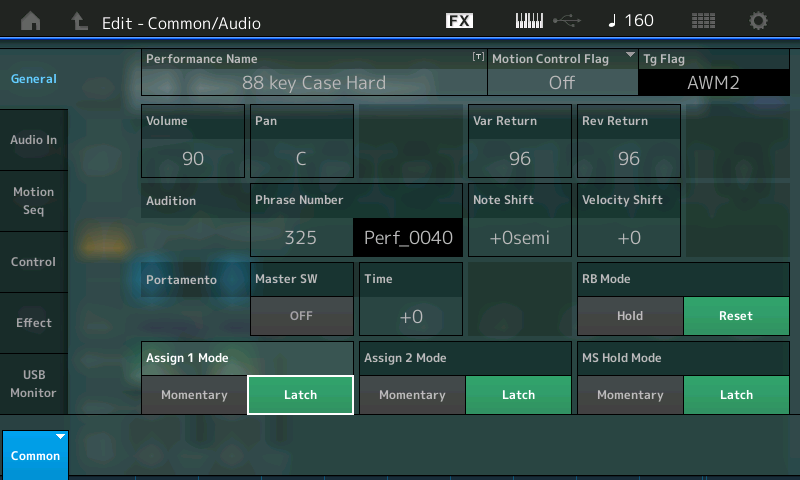
Momentary and Latch can be selected for each of the assignable buttons.
In addition to the dedicated XA CONTROL, the Assign Switches can be used as a SOURCE in a PART’s “Mod/Control” assignment box. The can flip an Insert Effect parameter from one condition to another which is useful for activating effects in real time. When assigned in the Control Set the Assign Switch will glow, indicating that something is assigned to the Switch. In order to hunt down and discover what exactly is assigned to a particular Switch, the Montage’s AUTO SELECT feature can be useful. The Display Filter allows you to view what is assigned to a specific controller – you can either manually set the Display Filter to view a particular controller or you can activate the AUTO SELECT (green) box which will let you touch the control to change the view:
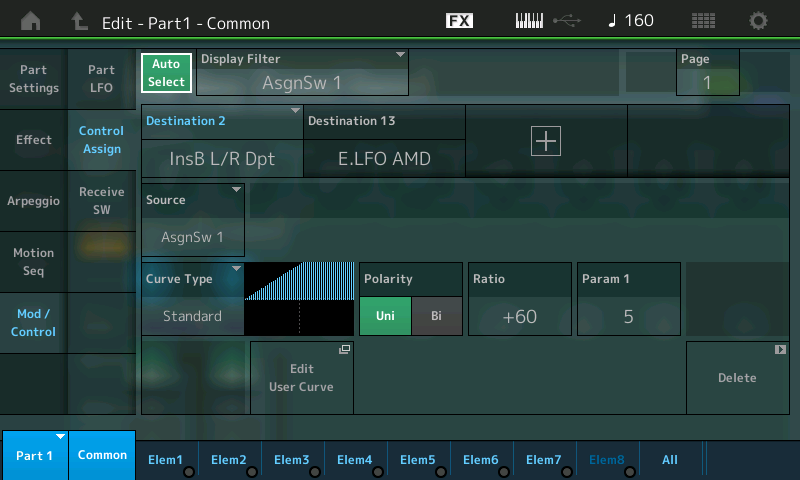
In the screenshot above the Display Filter is set to limit the controller assignment view to just those things assigned to AsgnSw 1. What this is saying is that for this particular PART, Assign Switch 1 is being used to control INSERT EFFECT B’s “Left/Right Pan Depth” by taking it from current setting to maximum (Off to On). On this particular Electric Piano Part this is used to bring in the AUTO PAN Left/Right movement – a typical use case of OFF to ON status.
Also by moving the highlight to the Destination 13 box, we can view the other Assign Switch 1 Destination:
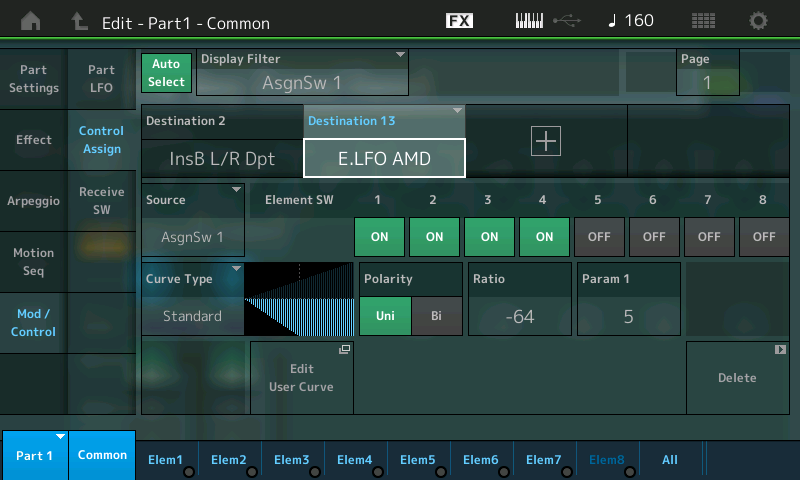
Here it is assigned to change the Element Low Frequency Oscillator responsible for Amplitude Modulation Depth from current state to OFF for Elements 1, 2, 3 and 4.
If you have any questions or comments about this article or series, please join us to discuss them on the Forum here.
Catch up on the previous article in the series – “Mastering MONTAGE 12: Motion Sequence“.
This wraps up this series – but stay tuned for more articles on the possibilities in sound with MONTAGE!