

Welcome! If this is your first encounter with the Yamaha MODX, this short guide can help you find your way around. You are about to experience the MODX, Motion Control Synthesis Engine, based on the milestone MONTAGE Music Synthesizer. Not only are these Synthesizers new in concept, but they offer a new level of sonic possibility. Let’s get started!
You’ll want to experience the MODX under the following conditions: through a quality stereo sound system and with the optional FC7 expression pedal and an FC3A sustain pedal.
Connect a Yamaha FC7 pedal to the Foot Controller 2 jack, and the FC3A to the dedicated Sustain Pedal jack on the MODX back panel. The FC7 pedal is essential to fully experience the Motion Control Synthesis Engine in action. The Foot Controller becomes an extra hand. The stereo speaker system allows the sound to animate, swirl and surround the player in the high definition sound. The pedal allows you to move the “Super Knob” with your foot – this means as a performer, you can change multiple parameters while keeping both hands on the keyboard. This is an important part of the full experience of Motion Control. And as you’ll hear, the Super Knob can be tasked with simultaneously changing scores of parameters resulting in a depth of control you’ve likely not encountered on any Synthesizer.
Finding Performances
The MODX boots up in what is called a “LIVE SET” – which looks like a grid of 16 titles:
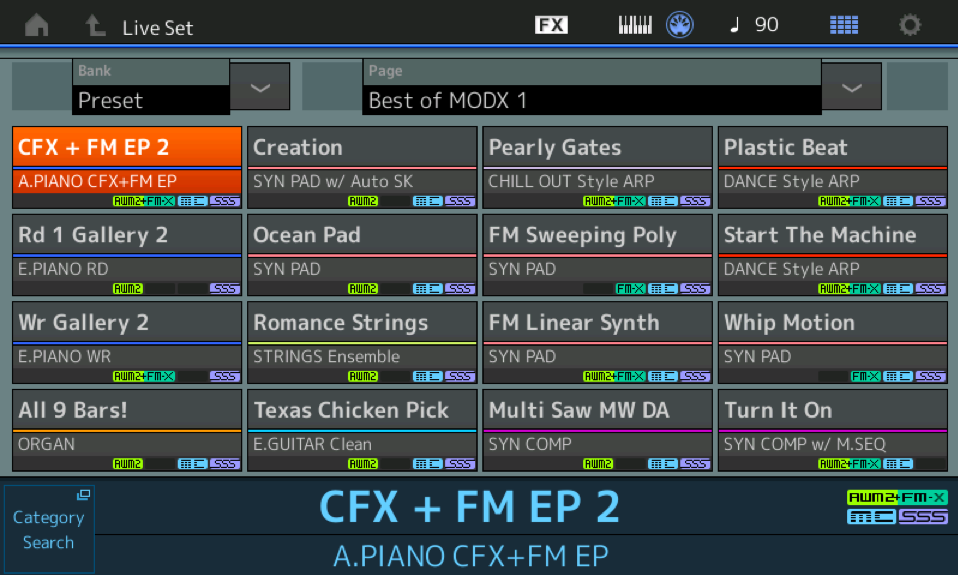
Basically, this is exactly like a “set list”, reading left to right – a way to quickly access different programs.
The “Bank” = Preset, the “Page” = Best of MODX 1.
In the MODX screen, touch the Down Cursor arrow located just to the right of the Page name, “Best of MODX 1”, to view the next Page of 16 Performances. There are 16 Preset Pages offering a variety of Performances.
Preset “Live Set” Pages:
- Best of MODX 1
- Best of MODX 2
- Spiralizer + Synth
- Motion Synth
- FM
- Motion Control
- Keyboard 1
- Keyboard 2
- Organ
- Synth 1
- Synth 2
- Synth 3
- Orchestra
- Guitar/Bass
- Chromatic Perc./Drums & Perc.
- Live Set Page 16 (currently blank)
To move between the programmed Performances, you can use the touch screen; or, you can use the hardware front panel [Cursor Arrow] buttons; or, you can use the hardware front panel increment [INC/YES] and decrement [DEC/NO] buttons; or, you can use an optional (assignable) Foot Switch programmed to advance through your list. The currently selected item will appear in orange and its Name will be repeated in large font at the bottom center of the LIVE SET screen. Get comfortable with several methods of changing Performances.
With over 2000 Factory Preset Performances onboard, trying out sounds can be a daunting task. This Preset “LIVE SET” Bank organizes some 240 of the Factory Presets into a kind of “best of” listing, grouped by kind, and can be used to quickly find and try out a variety of different types of programs. Some are familiar “bread & butter” instruments, like pianos, organs, strings and brass. Some are intriguing other worldly Synth Pad sounds, like “Wax and Wane” from the “Synth 1” Page and “Pearly Gates” from the “Best of MODX 1” Page. Still others are musical soundscapes/mini-compositions with musical Sections accessed by the red SCENE buttons, like “Plastic Beat” from “Best of MODX 1” and “DJ MONTAGE” from “Synth 3”. And still others offer several versions of an instrument sound stored within one Performance – examples would be, “Rd 1 Gallery” and “Wr Gallery” in the “Best of MODX 1” Live Set. They represent a virtual history of the different Rhodes (felt hammer, rubber hammer, upgraded preamp, Dyno-my-Rhodes) and Wurlitzer electric pianos. While “8 Amps and a TC” from the “GUITAR/BASS” Page, plugs a Telecaster-type guitar into eight different Amp and Effect combinations. Use the red SCENE [1-4]/[5-8] buttons to select 8 completely different treatments of the instrument (or simply press the [AUDITION] button).
Take your time, explore!
MODX features a complete arsenal of boutique level Effects and Equalizers. Each of the PARTs within a Keyboard Control (KDB CTRL) Performance can have its own set of Insertion Effects, which can be adjusted in real-time as you perform. Listen for the depth of control as you interact with MODX. Listen as sounds move forward and then split off left and right into the stereo panorama! Listen for the interplay between channels – for example, the positioning of the String Orchestra sections, left to right in front of you in “Romantic Strings” from the “Best of MODX 1”, and in the “Seattle Sections” found on the “Orchestra” Page.
There are simply too many Performances to try out in one sitting (and you wouldn’t want it any other way!) If you played each Factory MODX sound for one minute you’d need more than 36 hours to try them all. Use the “Live Set” to quickly get an idea of what is available.
To effectively use the Live Sets, recognize each screen, (called a PAGE), features access to 16 Performance programs. When onstage you can use a Foot Switch to advance through ‘set list’ – allowing you to keep both hands on the keyboard. The Preset “Live Sets” are grouped conveniently to give you a good wide variety of Performances to try out. You can create eight Banks of your own customized USER “Live Sets” (some 2048 setups) which then can be moved into your own Libraries.
For more on getting around please see the article on “MODX Navigation Tips” in the LEARN Section on YamahaSynth.com website.
Live Set Tour
Let’s start with “CFX + FM EP 2”. It is in the upper left corner of the LIVE SET grid on the “Best of MODX 1” Page. When selected, the slot containing its name will appear orange. Once you have selected a Performance program on the grid press the button labeled [PERFORMANCE (HOME)] or touch the “home” icon in the upper left corner of the screen. The HOME button is used to direct the screen to show you the data contained in the selected program. Pressing this [PERFORMANCE (HOME)] button repeatedly will toggle between two different HOME screens views; each providing vital information about the currently selected Performance.
It can show you current KNOB assignments, or give you a split screen showing the Key mapping of the various PARTs making up the Performance:
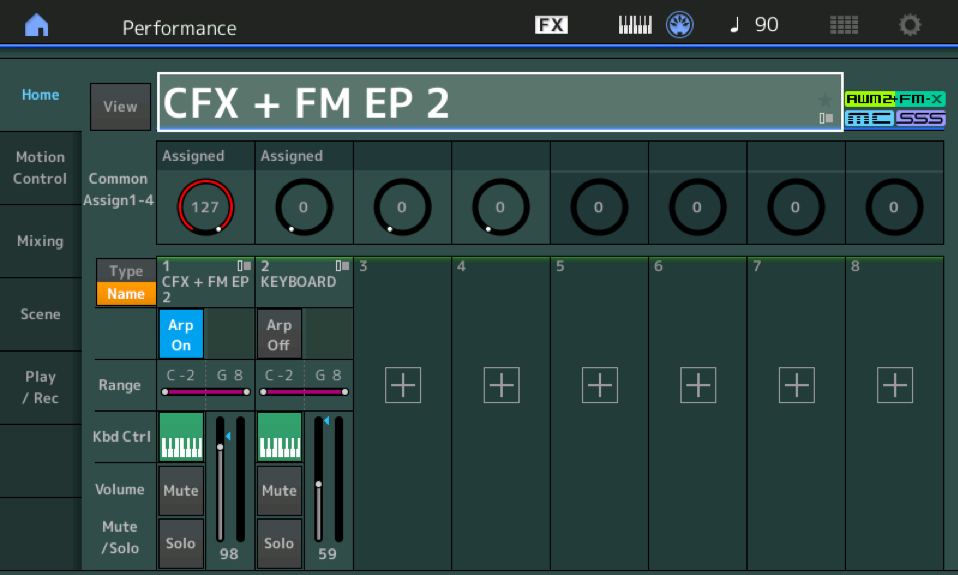
Main HOME screen (above) – shows the Knob icons and the eight PART Slots available for KBD CTRL:
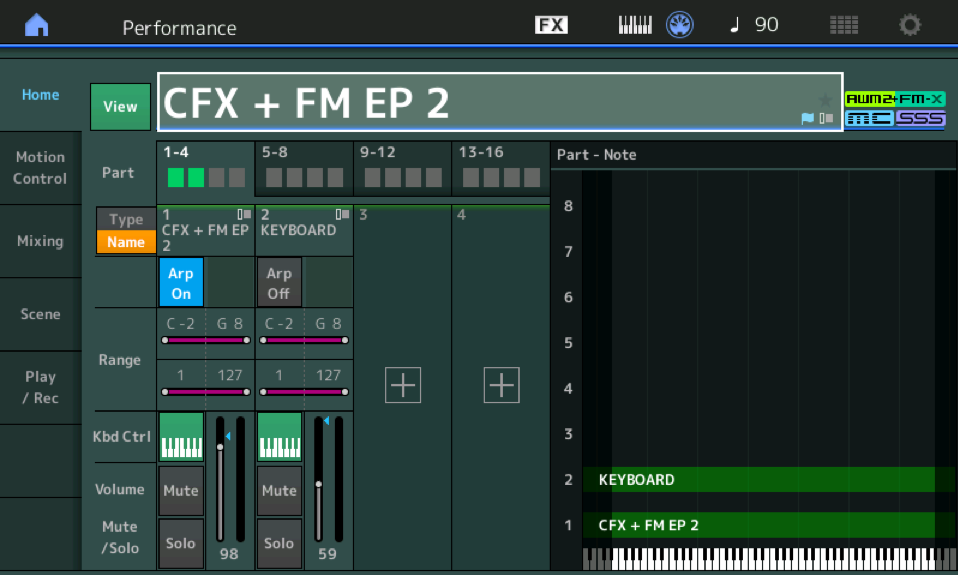
Toggle the [PERFORMANCE (HOME)] button to the “VIEW” HOME screen which shows a split screen that reveals key range and velocity mapping on the right side.
Moving the cursor around the screen will reveal different features. Each vertical slot represents a “PART” – which can be an entire instrument sound or a component building block. A slot with a “+” sign is currently empty.
“CFX +FM EP 2” is an Acoustic Piano and a DX7-style Electric Piano, showing the two major technologies of the MODX: sample playback (AWM2) technology and Frequency Modulation (FM-X) synthesis, linked by Motion Control. With the FC7 pedal in the heel down position you are playing an acoustic piano, and as you move the pedal towards toe down position you crossfade; bringing in the FM-X electric piano sound and ultimately fading out the acoustic piano. The FC7 is moving the Super Knob, simultaneously turning the acoustic piano down as it fades in the electric piano. The FC7 foot pedal allows you to keep both hands on the keyboard as you adjust the balance between the two instruments. Please note: The Foot Controller must “grab” or “hook” the position of the Super Knob (red indicator located around the rotary encoder) to take over control. This allows a sound to be recalled with a specific Knob value, then you can go “grab” control of it with the pedal.
MOTION CONTROL Concept: As the Super Knob is moved from minimum to maximum you are simultaneously controlling multiple parameters within the synth Parts. This basic concept needs to be understood because it is the key to ‘what’s new’ about Motion Control – this can be expanded to include all your synth PARTS simultaneously, changing literally scores of parameter details within the Parts. The Super Knob, on the upper level of the synth engine, has eight Assignable Knobs (COMMON), and each individual Part has eight Assignable Knobs of its own. Selected parameters from any of the multiple Parts can be linked to the movement of the Super Knob via a vast user programmable Control Matrix. This means a single gesture can dramatically change the resulting musical sound in ways previously unavailable in music synthesizers. And all of this can be accomplished via the Super Knob (and “hands-free” – if you have that FC7 Foot Controller connected)!
You can return at any time to the LIVE SET grid by simply pressing the [LIVE SET] button.
Auditioning the Performance
You can use the “Live Set” as an easy way to find a “best of” listing of the Factory Preset Performances. But you’ll also want to learn to explore and find your own favorite Performances. The LIVE SET programs are just the tip of the iceberg – there are almost 2000 more Preset Performances!
Once you are comfortable moving between the [LIVE SET] grid screens and the selected Performance’s [HOME] screen, you’ll want to familiarize yourself with the [AUDITION] function.
Each of the Factory Performances has an Audition phrase associated with it. The Audition phrase is MIDI data stored in the MODX internal memory that plays back through the current Performance at the tempo stored within the program. The phrase can be a few seconds to almost a minute of music. The point is, in almost every instance it is a real-time musical performance that shows off what the original programmer had in mind for this sound. In other words, it shows you what you can do, in real-time, playing this Performance. This can be an excellent way to discover the hidden ‘magic’ within each Performance. Later, you will learn to create your own Audition Phrases.
Let’s try it:
- Recall “CFX + FM EP 2” the first sound listed on the “Best of MODX 1” Page, of the Preset “LIVE SET”.
- Touch “CFX + FM EP 2” on the LIVE SET grid and then press [PERFORMANCE (HOME)] so we can see the activity meters on the Part slots.
From the [HOME] screen:
- Press the [AUDITION] button.
- Listen and observe the front panel…
Because it is streaming MIDI data, the front panel will animate, repeating each move made by the performer. A short phrase plays, the Super Knob moves, the Assign 1/2 switches next to the MW, illuminating on cue, changing the effects being applied, all in response to the recorded MIDI messages – faithfully reproducing every nuance of the original performance. Hear and observe as the sound morphs from acoustic piano to both sounds together, then to electric piano alone, followed by both together, then back to acoustic piano…
The Audition phrase will repeat and continue to cycle, if you do nothing to prevent it. You can press the [AUDITION] button again to STOP playback or you can simply advance to another Performance and let it play on. You can stop it at any time and when you do you will be able to play that sound in its current state.
As mentioned, the LIVE SET Bank is only the very tip of the iceberg – you’ll want to find Performances efficiently on your own. Enter the [CATEGORY] Search function.
Searching Performances by Category
To use the built-in CATEGORY SEARCH and find specific Performances:
- Press [CATEGORY].
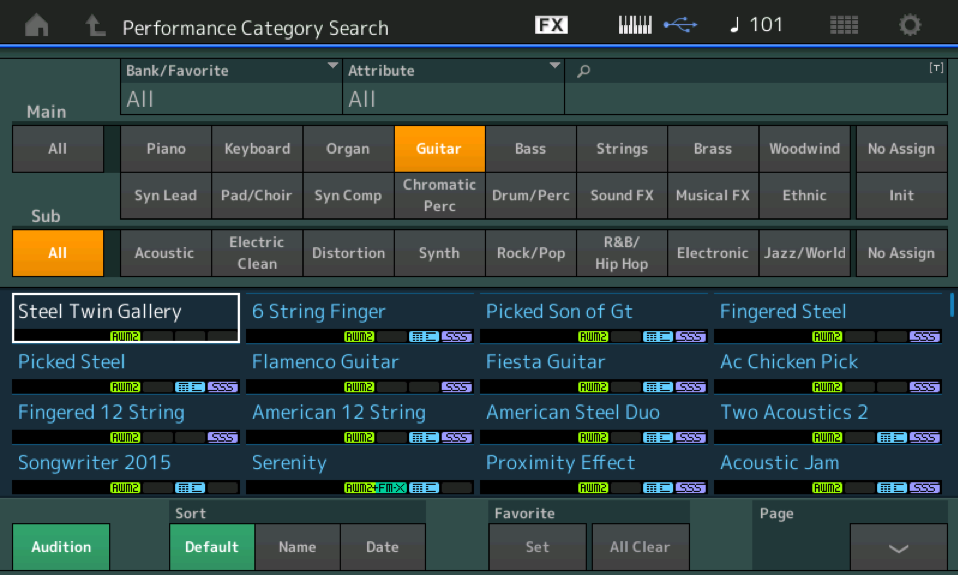
- The “Performance Category Search” appears. The very top line of the screen will always tell you where you are.
- This function allows you to find Performances quickly and efficiently.
Try it!
Say you’re looking for an acoustic guitar sound:
- In the screen under the “Main” heading touch [Guitar].
- Then narrow the search by providing the “Sub” Category [Acoustic]:
- Touch an individual Performance name on the bottom half of the screen to select/hear that Performance.
- Play your selection.
- Press the [AUDITION] button – notice in the lower left corner you can activate the AUDITION function right from the PERFORMANCE CATEGORY SEARCH screen. You can leave it active – while you select various Performances.
- Listen and observe.
- Press the [HOME] button to see the information concerning this program.
You can understand listening to these guitars why we recommend a high-quality stereo sound system. The attention to the smallest detail in the sound – finger noise, the appropriate amount of fret noise on the “Flamenco Guitar”, pitch scoops, dead notes, hammer-one, etc. Again, you find a “Gallery”, try “Steel Twin Gallery”… return to the [HOME] screen. Observe that you are hearing two measures each of four different treatments of the Steel String Guitar. The red SCENE buttons, [1]-[4], are recalling mix volumes so that you are hearing and odd/even pair of Parts, each for two bars. The Super Knob is manipulating the Sends to the “Tempo Cross Delay” Effect. Stop the AUDITION at any time to play a specific Guitar setup. Manually recall the setups with the [SCENE] buttons, 1-4. The [ASSIGN 1] and [ASSIGN 2] buttons, are set to ‘momentary’. Press and hold to switch guitar articulations (Assign 1 = harmonic; Assign 2 = Mute).
Try finding a horn section, from the [HOME] screen:
- Press [CATEGORY].
- Touch Main = “Brass”.
- Touch Sub = “Ensemble”.
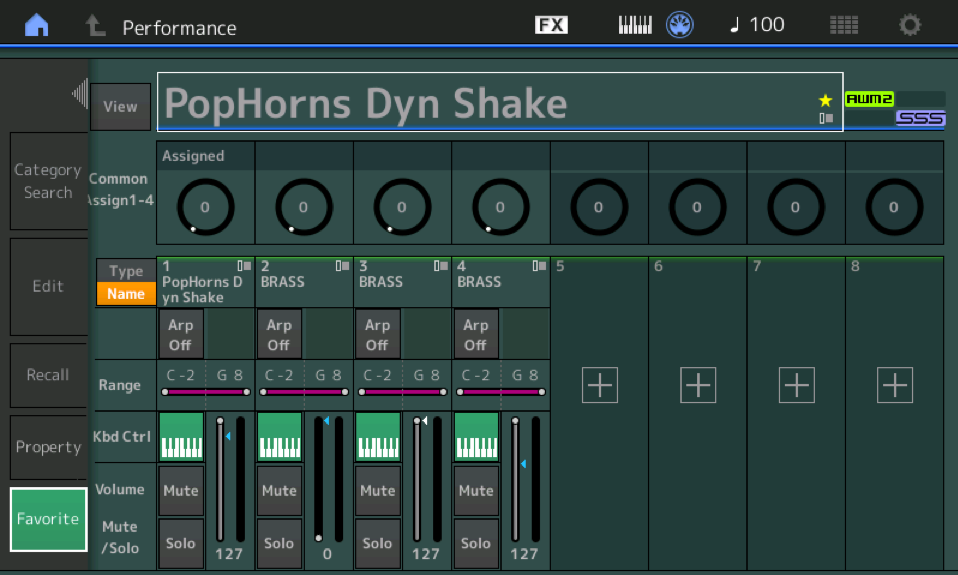
- Select “PopHorns Dyn Shake”.
- Press [HOME] and play the Performance.
- Press the [AUDITION].
- Listen and observe.
For more information about getting the most out of the CATEGORY Search function please see the following article:
“Mastering MODX: Using Category Search“
Mark Your Favorites
When you encounter a Performance you enjoy, you can mark it as a “Favorite”. This makes it much easier to find it later. By marking a “Favorite” you can group those you gravitate to for each Main/Sub Category – by additionally marking them as a “Favorite” you will quickly be able to access them in the future. It is like making a custom bank. Here’s how:
- On the [PERFORMANCE (HOME)] screen, tap the Performance title box to view a pop-in menu with multiple options.
- Touch “Favorite” (shown below):
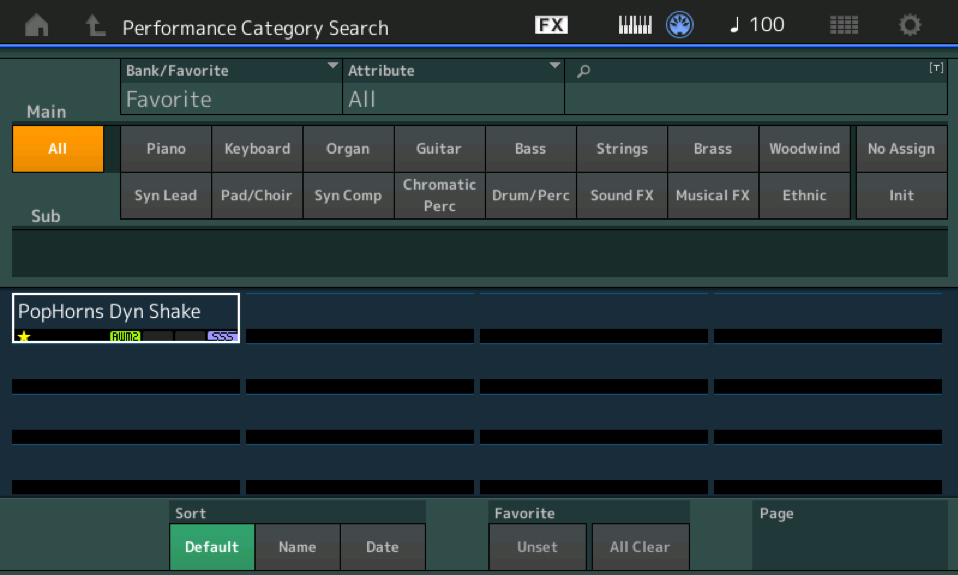
The Favorite box will turn green (active) and a yellow star icon will appear in the title box indicating you have added this program as one of your “Favorites”. The yellow star will now accompany your Favorite selection whenever it appears. You can now find your Favorite Performances quickly – from the HOME screen, press the [CATEGORY] button twice to select the search Bank: FAVORITE:
While you are initially trying out the MODX, don’t be afraid to mark those you enjoy as a Favorite – this makes it so much easier to find later. Initially, you may not fully appreciate just how many programs are in MODX, so it is a very good idea to use this feature. There really is no limit on how many you can mark as FAVORITE, and you can, of course, change your mind at any time about what is marked as a Favorite. By marking your Performances as Favorite, they join this Search Category and will continue to be refined by the MAIN and SUB Category items. For example, when you want to find your FAVORITE > BRASS > ENSEMBLE Performances – you can! And it is just as quick as that on the Search screen.
Make a Quick Beat by Adding Drums
From the HOME screen, press [CATEGORY].
Find an instrument sound you would like to work with… For this example, let’s use “CFX + FM EP 2” .
To add a Rhythm Pattern, press the [RHYTHM PATTERN] button, located to the left of the screen directly below the Super Knob.
You are taken to a screen where you can “search” for a Drum Kit (shown below):
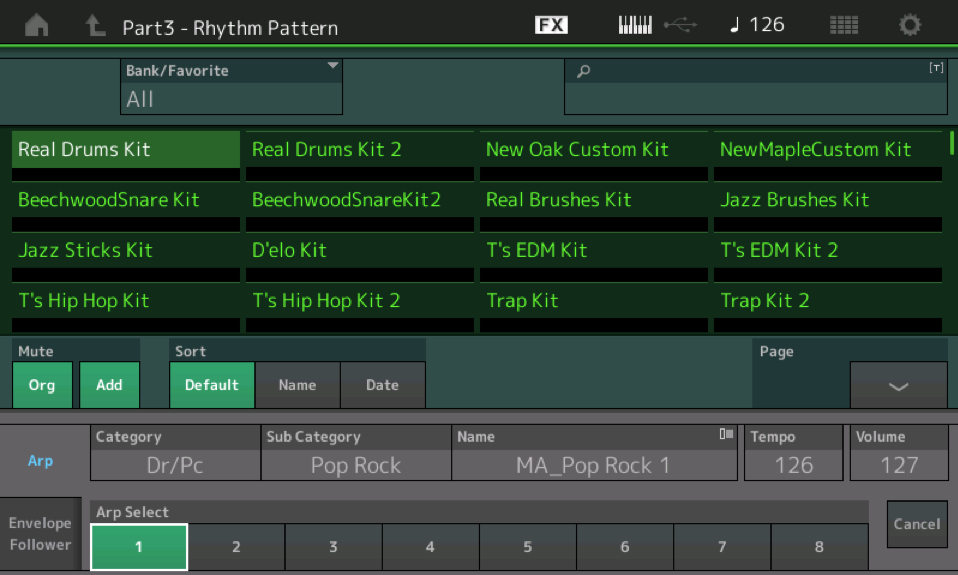 Because we started with a two-Part Performance (CFX + FM EP 2) the “search” is “PART 3 – Rhythm Pattern”.
Each Drum Kit will have several Arp Phrases stored with it. You can access them using the ARP SELECT 1-8 boxes that appear along the bottom of the screen. When you select a Drum Kit, the Arp phrases are automatically assigned, the Arp is automatically set to HOLD. Sliders 1, 2 and 3 will allow you to mix the CFX, the FM-EP and the Drum Kit volumes, respectively. You can set the Tempo and Volume right here on the screen.
KEY-ON START: You can select a Drum Kit, then trigger the Keyboard to start the ARP.
You can use the transports [STOP] button if you wish to stop the rhythm pattern. Each Kit has an appropriate set of Arp Phrases associated with it. Later you can refine your search for a particular Arp Type, but to get going quickly – simply select a Kit and use the ARP SELECT 1-8 boxes to switch the phrase at the top of the next measure. The screen shows you the selected ARP Phrase Name on the “ARP” line. If you touch the ARP “NAME” box, a pop-in menu will appear allowing you to search for a specific type of ARP. Using the now familiar Category Search grid screen, now in purple (for Arp Phrases).
The Sliders will give you PART Volume Control so you can mix the instrument program you are playing versus the Drum Kit Part you are adding. You can strike a balance and then quickly, return to the [HOME] screen and press the RECORD button to engage the MODX Performance Recorder. Document your idea directly to memory. The data will be placed in the MODX SONG FOLDER and can be exported, via USB, to your computer using the free MONTAGE CONNECT software Utility. You can literally, drag n drop your recording into your favorite DAW as a .MID file. Then begin to expand on your original idea.
Want to share your questions, comments and thoughts about this lesson from Bad Mister? Join the conversation on the Forum here.