If I create an INIT Normal AWM2 performance and load CFX Stage into Part 1.
Then Performance Home, Edit, Effect and put a Chorus (or any effect) on VAR.
Then go to Part 1, Edit, Effect and set Var Send to 0, the chorus is still there.
What am I missing here? How do I control the Var on individual parts?
I've had this issue before and just ended up turning off the Var effect. I'd like to understand it now. 🙂
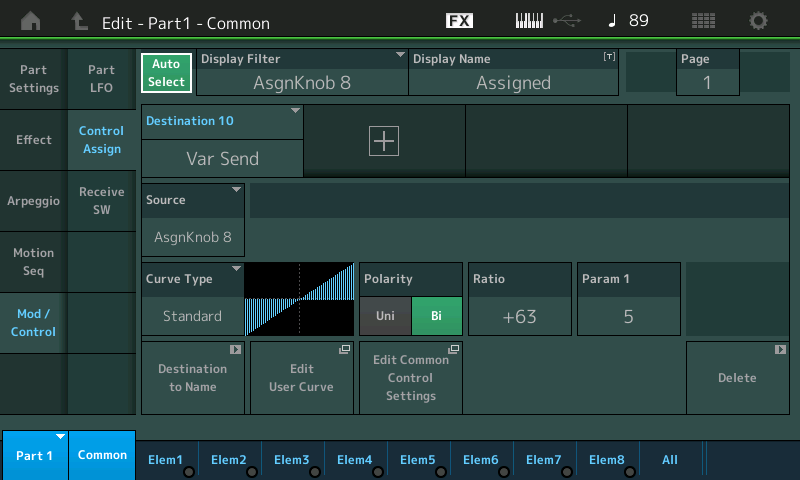
By selecting the “CFX Stage” you have also selected (and inherited) the original programmer’s Controller assignments. They are very much apart of the synth sound itself. In the original “CFX Stage” Part Assign Knob 8 is assigned to offset the “Var Send”
In the original sound I believe they use a second Reverb in the Variation Block, since most of the acoustic piano Knob programming is around finding a room size/acoustic environment for the piano. The Super Knob is changing the listener’s position in relation to the piano.
When you changed the start point to “Init Normal AWM2”, and then replaced the init sound with “CFX Stage” you opted for a different set of System Effects. Instead of “HD Hall” and “SPX Hall”, you are set with “Rev-X Hall” and No Effect.
When you make a change to the Variation Effect Type, that action does not change the Knob Assignment responsible for feeding the Variation Effect (Var Send)... those you inherited with the CFX Stage. The original programming had a real time control over Sending signal to whatever becomes the Variation Effect Type.
What to do: to gain an understanding... Let’s look at the original “CFX Stage” Performance
_ Navigate to the Part’s Control Assignment.
Select Part 1 by tapping the Part 1 “Type/Name“ box in the screen. A pop-in menu appears
Select “Edit” in the pop-in menu
Touch “Mod/Control” > “Control Assign”
There are four possible PAGES in the Control Assign area - each with four possible Control Source/Destination Sets
Set the “Display Filter” = All
You want to get comfortable looking through these various assignments. You are looking for the “Destination” = VAR SEND (found on Page 3)
This Control Set is responsible for offsetting the Variation Send. Highlight it.
If you assign something to control the Send amount...(other than the dedicated Variation Send Knob, you would do so when you want to manipulate the Send amount while you are performing).
When you highlight “Destination 10” Var Send
You will discover that the “Source” (physical controller) Part 1 “Assign Knob 8” is controlling the Var Send using “Bi” as “Polarity“ (this means the programmer is allowing you to increase and/or decrease from the initial setting).

If you tap the box “Edit Common Control Settings” you will be taken (shortcut) to where this is linked to the Common Assign Knob
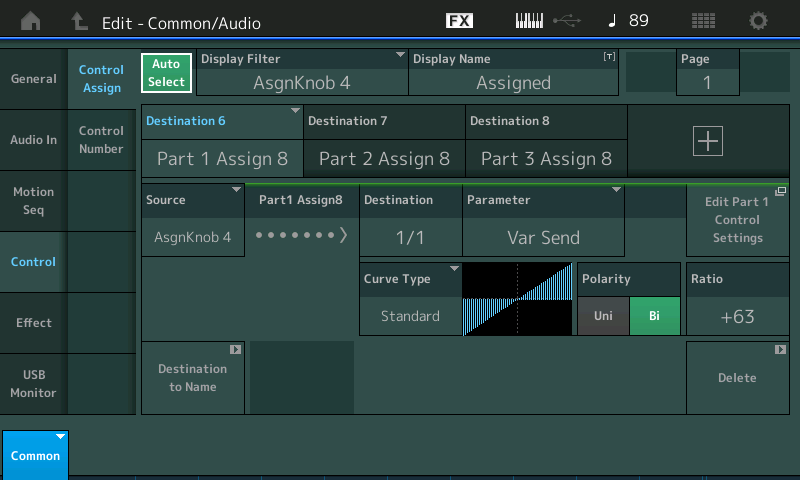
You will discover that Common Assign Knob 4 is to control Part 1’s AssignKnob8

What this means is: Turning the Super Knob will manipulate Common Assign Knob 4, which, in turn manipulates Part 1‘s Assign Knob 8
Because the Super Knob is at 12 o’clock when this program is recalled you can understand the Bi Polarity setting as allowing the player to add or subtract from the room ambience.
You can return to the Part 1, Control Assign by tapping the shortcut box labeled "Edit Part 1 Control Settings"
Those “shortcut” boxes (wormholes) allow you to quickly jump between the Common and the Part levels of the Control Assignments. Common effects or can effect all Parts, Part is an individual Part slot separate from all others.
Originally, on the MODX acoustic piano programs, moving your FC7 in Foot Controller 2, controls the Super Knob which is changing things with the System Effects. When auditioning the piano you can move the pedal which is going to change the size and feeling of distance from the piano. You may not ‘perform’ this movement as much as you use it to find a comfortable position (setting) that you like and leave it there. Example, when playing “live” often, if the room is reverberant you can use less effects, if you’re in a room with rugs on the walls and floor, you’ll want to add more ‘room sound’.
So rather than making this change on the mixer, it was assigned to a Part Assign Knob, which is linked to a Common Assign Knob, that moves along with Super Knob position. This allows hands-free Control.
This all sounds very complicated, but that is what is happening. If you think about it from the “mother of invention” point-of-view... Here’s how it got here:
__ you ask yourself: how can I control effects while I’m playing with both hands on the keys. Sure you can move the dedicated Var Send Knob... but what if.... you wanted to do it with your foot instead.
This assigning a second (third, fourth, etc) controller to a parameter Destination, is what makes the Controller matrix what it is. It is like having dozens of hands... taken an assignment at a time, you can construct control over different aspects of the sound as you dream them up. Each of the 16 Parts has 16 Control Sets, the Performance Common has 16 Control Sets. Multiple Sources can be assigned to Control a Destination, multiple Destination can be assigned a Source Controller. And each Control Set has a way to customize the application of data. It is more surgical than your typical 0-127 full control, you design or scale each to the precise musical application you require.
What you can do:
Recommended, when you change the System Effect Type, always review what Controller may be already assigned to manipulate that Effect block or manipulate Sends to that Effect block. You must look at each Part you add (merge) to your new Performance.
Here’s how:
On the CONTROL ASSIGN screen, use the “Display Filter” = All to recall the PAGEs of Control Assignments.
Use the “Auto Select” option (green is active) — this allows you to move a control (Source) and recall every thing assigned to it.
You changed the Variation Effect - it, the “CFX Stage“, was set to respond so that the VarSend could be increased (clockwise) or decreased (counterclockwise) by Part Assign Knob 8... only over a specific range.
The range from minimum-to-maximum can be determined, so that when your pedal (or Knob) is heel-down the Effect is at the minimum you determine is musically right... and when your pedal (or Knob) is toe-down the Effect Send is at the maximum that you determine is right.
Please realize minimum does NOT have to be 0, and maximum does not have to be 127. This is what we mean by a “musical range” of Control.
Say you select a Delay, you may want minimum to 0 or some value just above 0.
The whole idea of assigning an alternate controller is to define the exact musical range of control for that particular item.
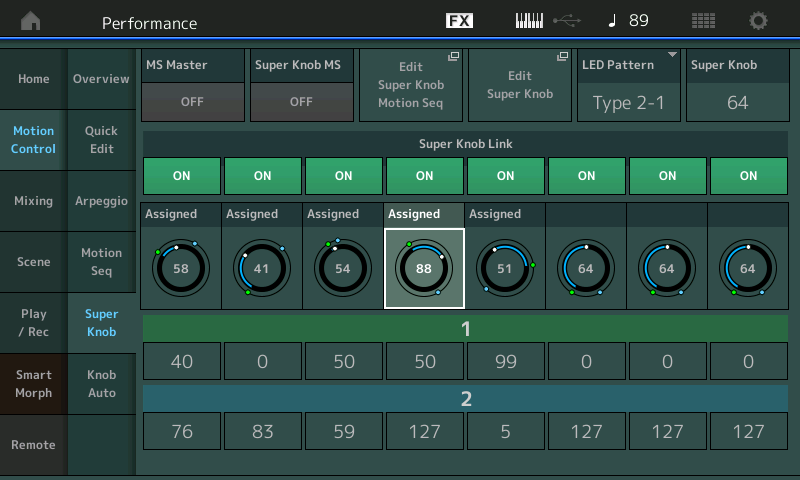
To see how the Super Knob is linked and is controlling the 8 Common Assign Knobs --- From the "CFX Stage" HOME screen touch "Motion Control" > "Super Knob"

You can see (highlighted) Common Assign Knob 4 is set to a value of 88 when the Super Knob is at 12 o'clock... the minimum value it can reach is 50 and the maximum value it can reach is 127... This was determined by the programmer as to how much and how little were to be allowed by movement of the Super Knob. This is why you cannot reach 0, the 'minimum' is set elsewhere.
Motion Control Assignments
A similar thing happens with assigning Volume. Of course, the Slider controls Part Volume, but sometimes you’ll notice that moving the Slider to 0 does not silence the Part or that the Slider is already at 0 yet the Part is sounding. This is because the original programmer has placed an alternate method to *perform* Volume control (hands free) in real-time.
To fully understand this... the “CFX + FM EP” sounds as an acoustic piano when initially called up, the output volume of the FM electric piano has been assigned to the Knob system. The role of the Sliders is now secondary to the real time control assigned within the programming. They wanted a way to bring the electric piano in and fade the acoustic piano out, hands-free, with a single gesture!
You can DELETE any Control Assignment right on the Control Assign screen by simply tapping the DELETE box in the lower right corner.
In general, the “Polarity“ is “Uni” or “Bi”. Simply: minimum to maximum is “Uni“ direction (there and back). “Bi”, as mentioned, let’s you pivot above and/or below the original setting.
Thank you!!!!
