

If you purchased a MONTAGE and have not downloaded your free copy of SampleRobot for MONTAGE, you are missing out! This is a GREAT tool that allows you to easily create your own custom sample sets. In this article I’ll show you how easy it is to sample an external MIDI device using MONTAGE and SampleRobot.
SampleRobot automates the process of sampling in a very cool way and greatly speeds up the process of creating playable instruments. It’s an amazing tool and the best part is, the MONTAGE edition is free!
There are some things to consider when sampling audio sources and some tasks are easier than others. Before diving into the SampleRobot for MONTAGE sampling session a few thoughts:
- When creating playable instruments, it’s easier to sample simpler waveforms that don’t have a lot of changes happening over time. Sounds like organ tones, drums and percussion, bass, leads, pads, etc., that don’t have large swells in volume (amplitude) or timbre (filter) over time are easier to manage when creating new sounds, and when you bring them over to MONTAGE you will be able to use its powerful synthesis engine and effects to create lots of different variations using the waveforms you create with SampleRobot. Finding zero crossings, or points where the waveform cross the zero place between positive or negative, is easier with simpler waveforms and you will avoid the “wamp-wamp” sound of loop points not set at a zero crossing. Fortunately, SampleRobot has a good audio looping feature.
- Sounds with long attack and release envelopes are more difficult to sample. For this reason, I created a sound on reface CS with no attack or release but a good amount of Decay and Sustain. Again, I can introduce those envelope changes using MONTAGE.
- Sounds with large dynamic ranges, timbral and envelope changes are more difficult to sample. For example, sampling a grand piano sound from another synth might be a challenge due to the range and variation of tone and dynamics. With that said SampleRobot can sample multiple velocities as part of the automation and you can do quite a lot with its editing tools.
- I generally get rid of any reverb or delay effects when sampling unless there is some reason to have it in the waveform. You will be able to add effects in MONTAGE after the sampling process.
- Check out the SampleRobot User Manual, especially the appendix on page 68 called “Tips and Tricks for daily work with SampleRobot”. The sections about working with multi samples, looping samples and editing markers offer some good points. There are also some good articles on sampling from Musicradar, Ask.Audio and Sound on Sound.
- EXPERIMENT with SampleRobot and see what you can do! It’s really easy to use and the Project Wizard is a huge time saver. If you don’t like something no worries: resample it and try again!
- At the end of the session you will be able to export a User or Library file over to MONTAGE containing your Performance. At this time you can only save a single Performance in the User or Library file exported from SampleRobot, so if you would like to create your own sample libraries with multiple Performances I highly recommend acquiring the John Melas MONTAGE Complete Pack and his MONTAGE Waveform editor. You can fully edit MONTAGE and easily create and manager you User and Library files with these tools.
- Finally if you like SampleRobot you should upgrade to the full version. The full version allows you to export to multiple formats, have access to many free waveforms and much more!
Okay…it’s time to sample something!
Setup
For this session I am sampling a synth bass sound from reface CS I created called “EphEmBass” (reface CS sound available here on Soundmondo). There are two ways you can connect MONTAGE and reface to the computer:
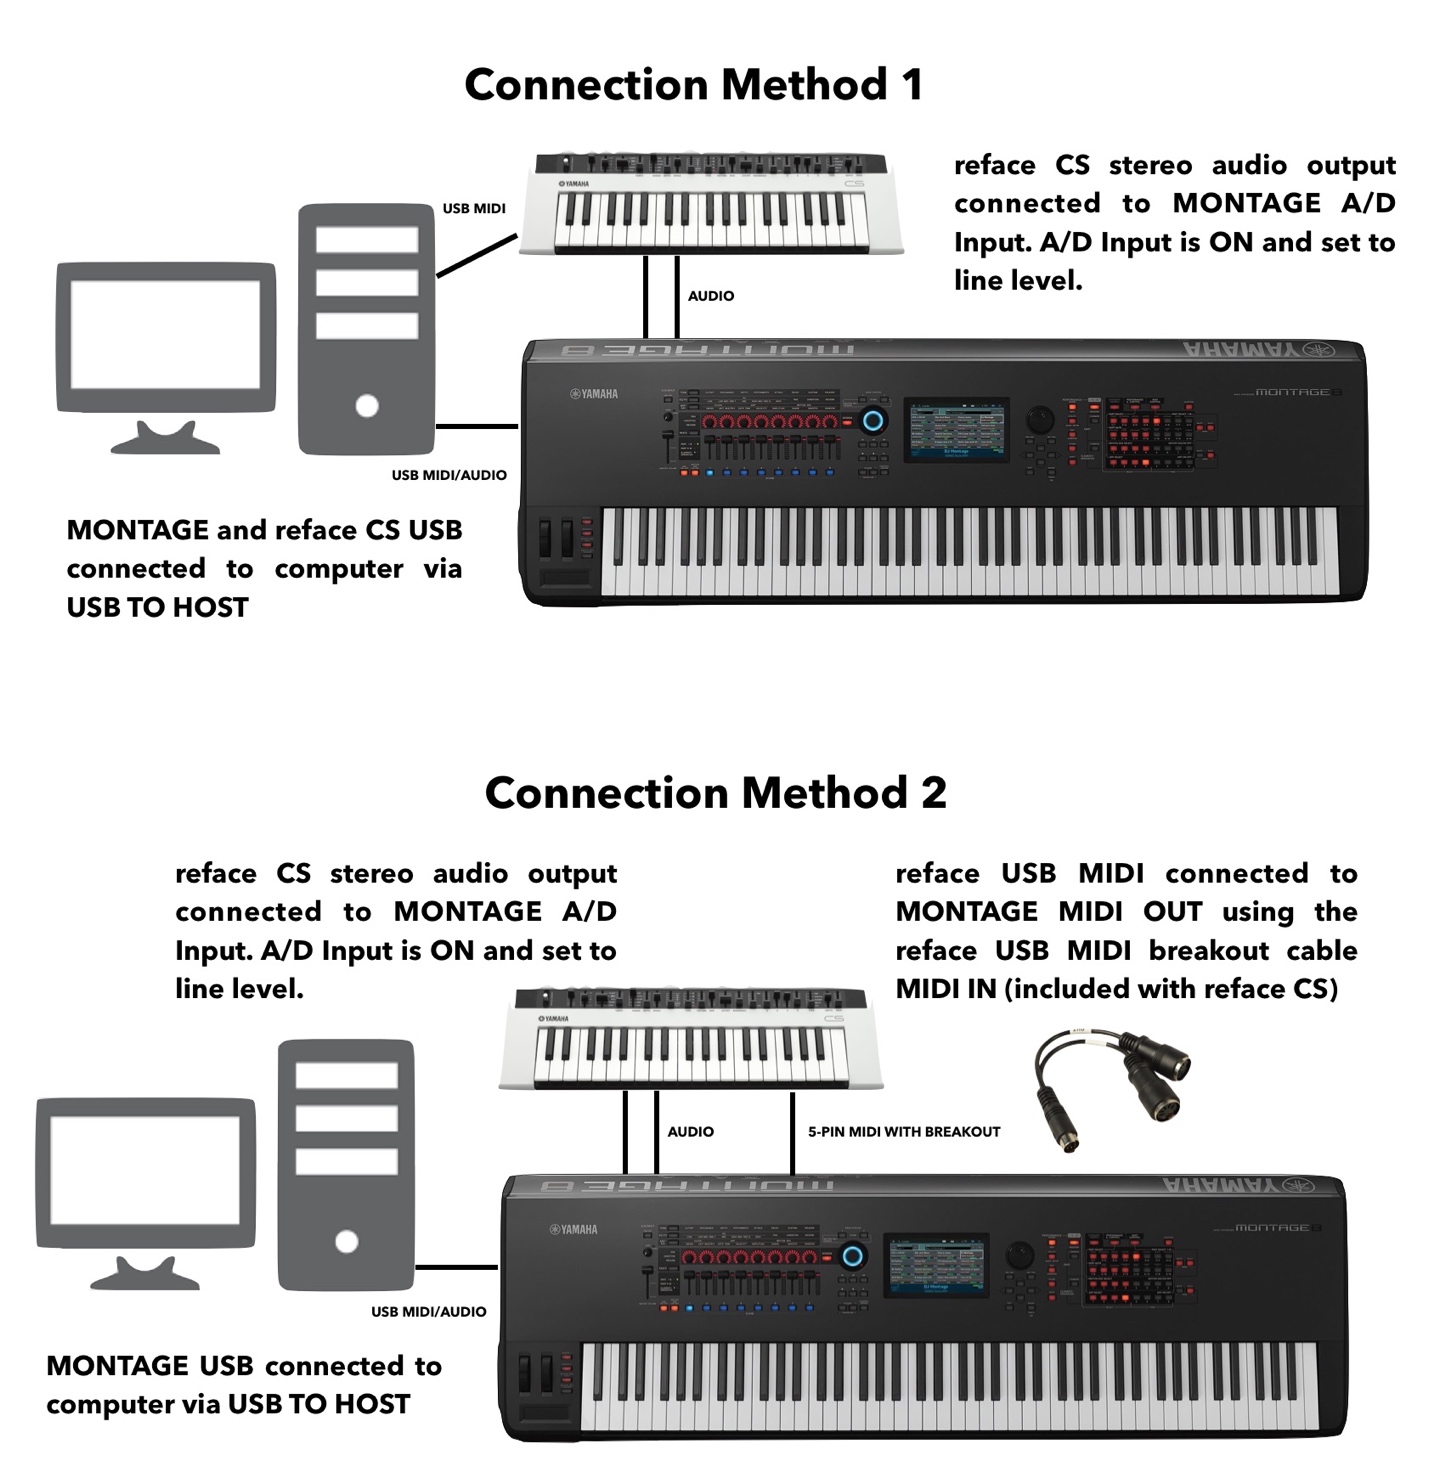 Connection 1: Both MONTAGE and reface CS connected to the computer with USB. The difference between the connection is MONTAGE transmits both audio and MIDI through its connection and reface only sends MIDI. There are two drivers for this purpose
MONTAGE: The Yamaha Steinberg USB driver (a dual audio and MIDI driver) for your operating system located here.
reface CS: The Yamaha USB MIDI driver (for MIDI devices with USB MIDI only) located here.
Connection 2: There is a second way to connect both MONTAGE and reface to the computer. You can connect reface CS with a standard MIDI cable using the breakout cable that comes with reface. In that configuration you need to connect MONTAGE and select MONTAGE PORT 3 as the MIDI receive device in SampleRobot. (Want to understand how MIDI settings in MONTAGE work? Go here).
If you wanted to sample a different MIDI device that only has standard MIDI you can use this connection method.
In this article I’m using Connection 1.
Sampling Session
Some serious thought went into the user experience of SampleRobot. As soon as you launch the program it is ready for action with the Project Wizard:

Christian Halten, the developer of SampleRobot, is a composer and sound designer who really understands the importance of fast and efficient workflow (Check out my interview with Christian at Superbooth18) The Project Wizard is an example of this workflow.
In the screen shot above you have a quick checklist to make sure your system is ready for sampling verifying MIDI and audio connections, levels and MIDI channels. Once that is set you simply move through the Project Wizard by clicking “Next”.
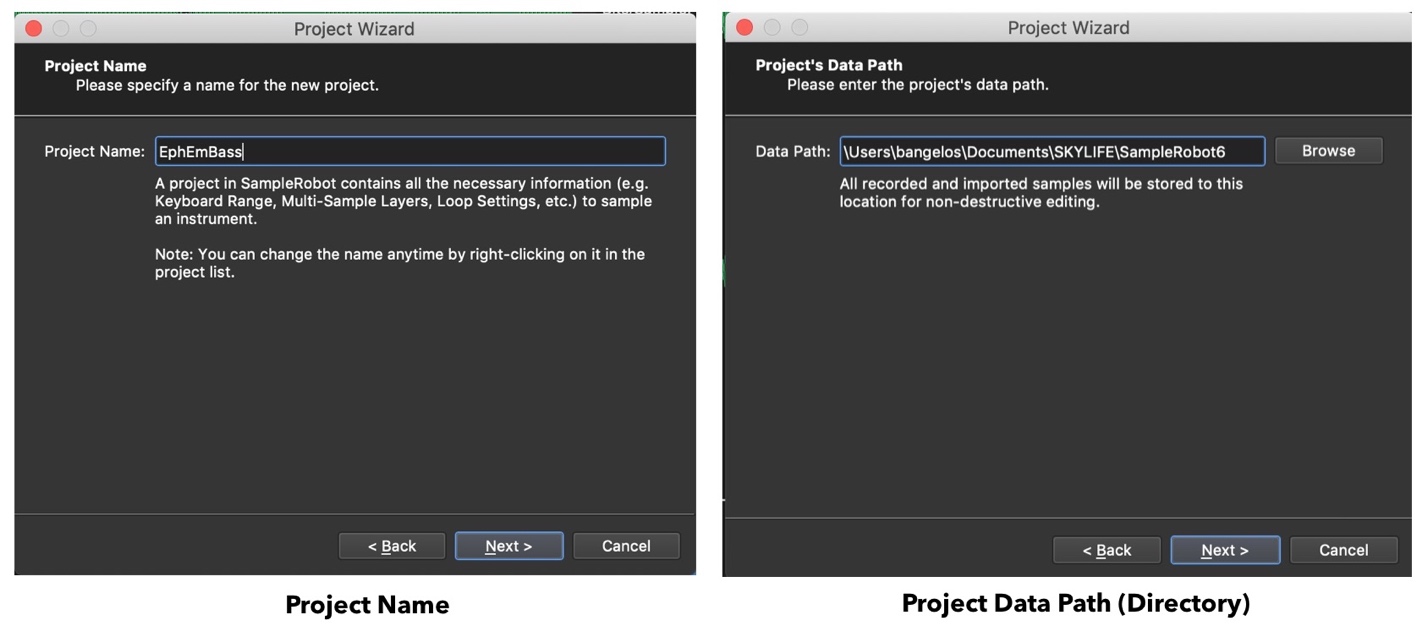
Moving along you are asked some general set up questions. You first are asked to name your project and set its location on your hard drive:
 Next the Project Wizard asks you to choose your audio interface, sample rate and bit resolution. In the screens below I’ve chosen MONTAGE as my audio interface and 44.1 Khz/16-bit as my sample rate:
 After you have determined the audio properties you will set Recording Mode and MIDI Out Device. Since I’m are using a MIDI device (as opposed to a device like a pre-MIDI analog synthesizer or an acoustic instrument) I’m going to select Automatic Recording mode and the reface CS as my MIDI device:
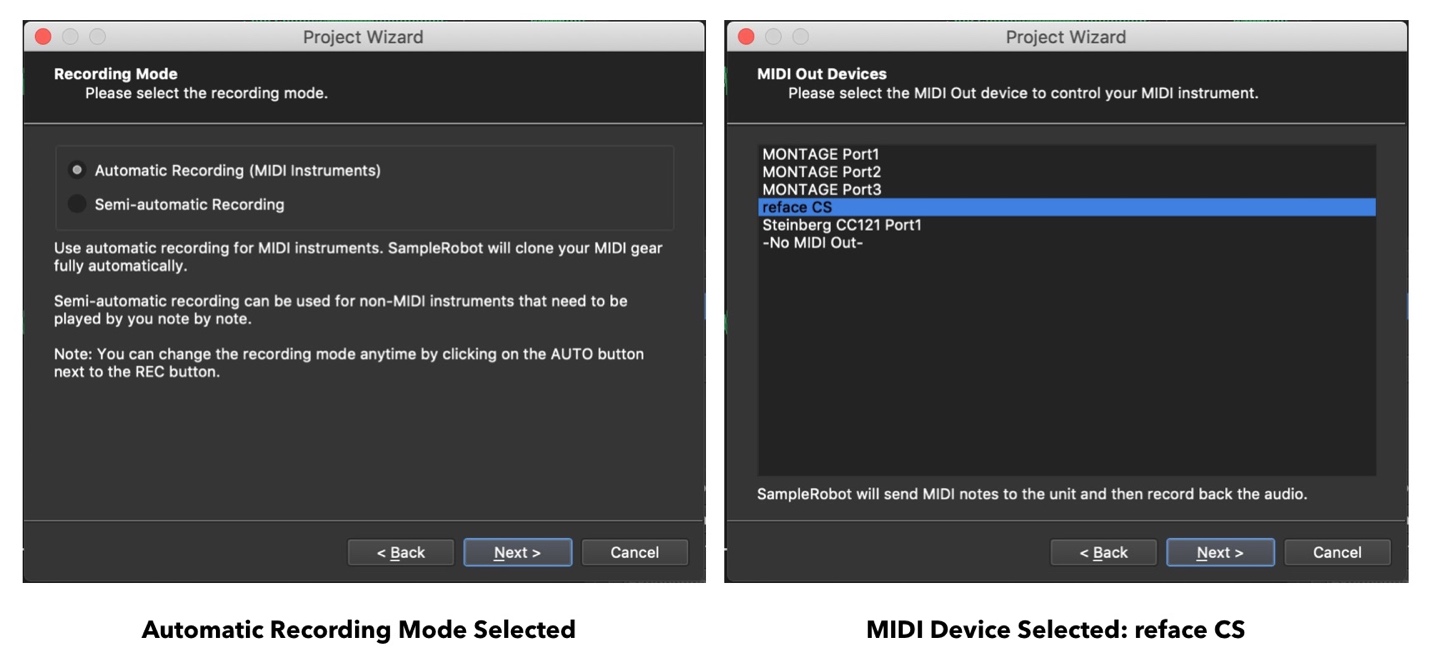 Notice that in each window you have a solid description of what is happening with any selection you make. For example, the difference between Automatic and Semi-automatic recording is defined. The next steps:
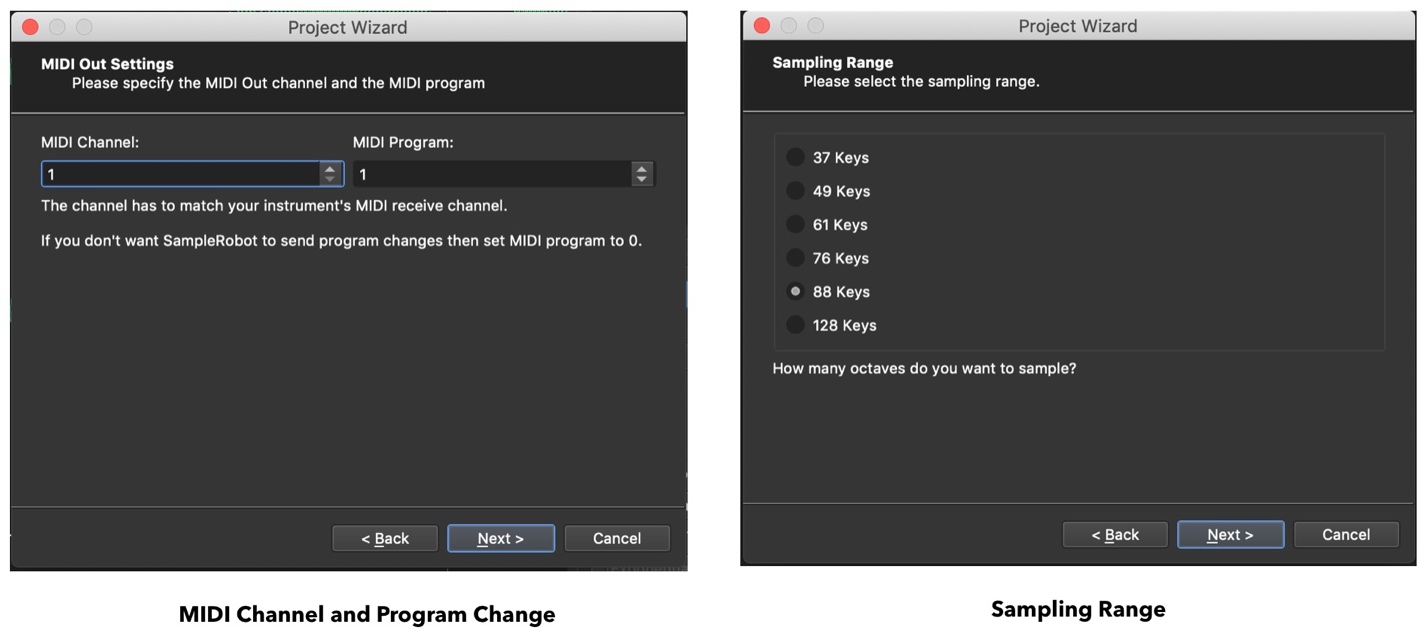
- MIDI Channel/MIDI Program Change: Specify the devices channel and if you wish to send a Program Change.
- Sampling Range: The number of octaves you wish to sample.
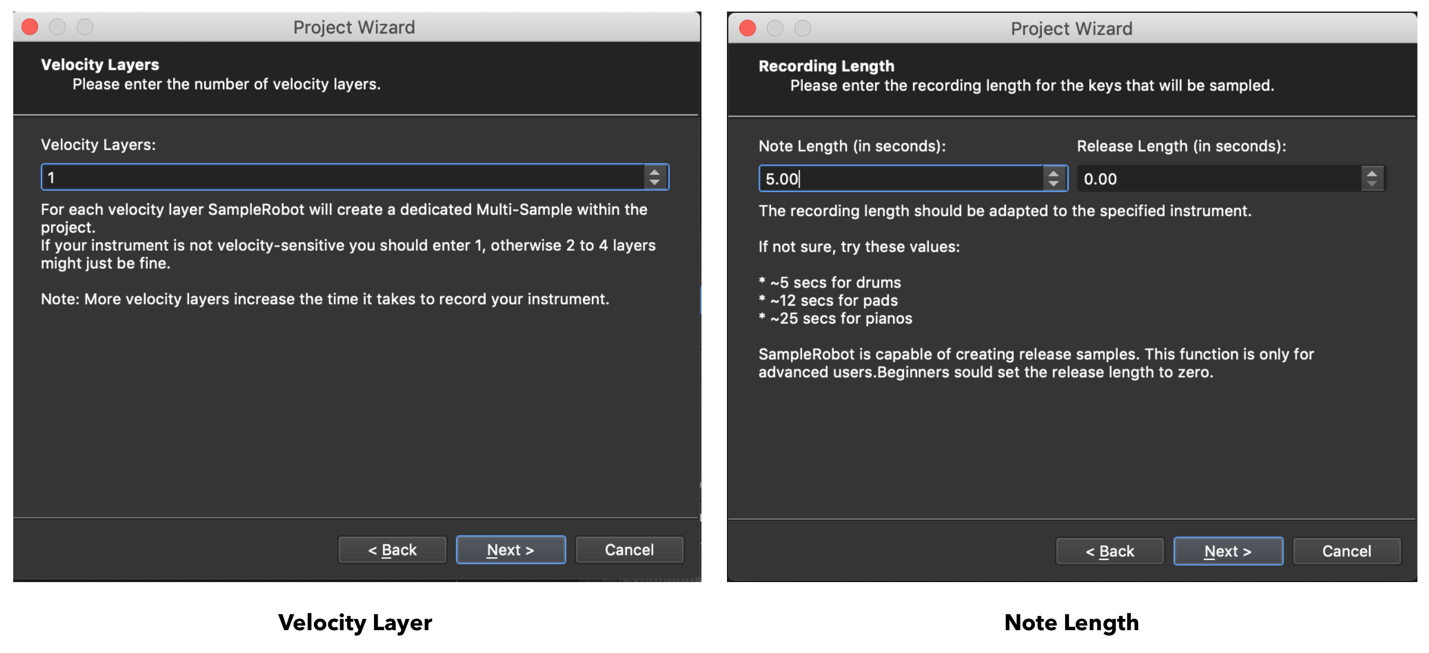
- Velocity Layers: The number of velocity layers per note along with some hints.
- Note Length: The length of the samples along with hints for different types of instrument
- AutoLoop On/Off: With AutoLoop on SampleRobot will find amplitude zero crossings to create a suitable loop and offers some tips to get the best results. In this case I have selected ON. Additionally you will be guided to select the Auto Loop Mode. Again, hints are given to guide your choices with some waveform examples and where you’d like to set your loop point. My choices are given below:
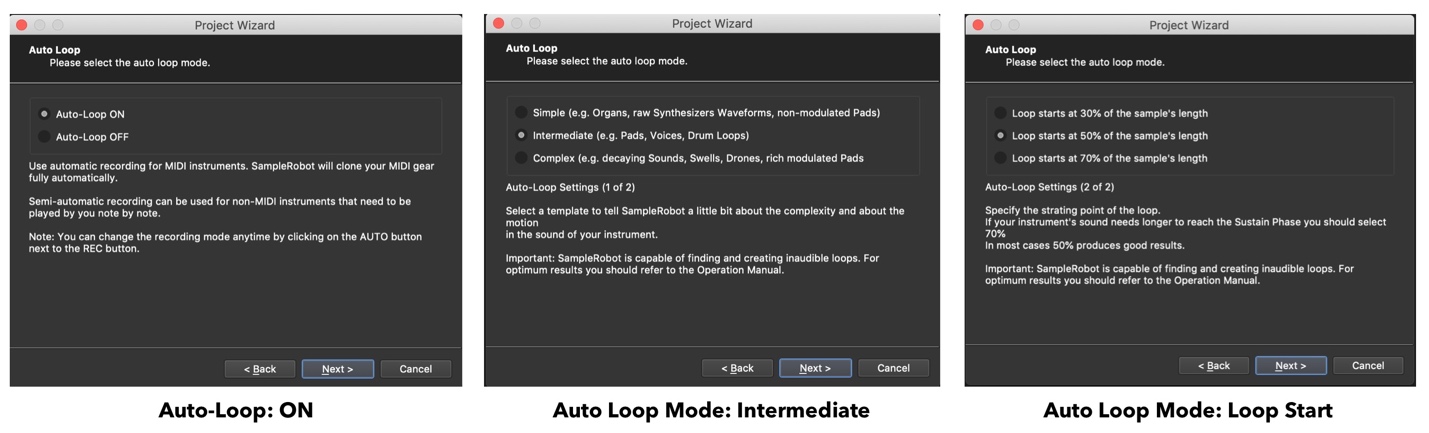
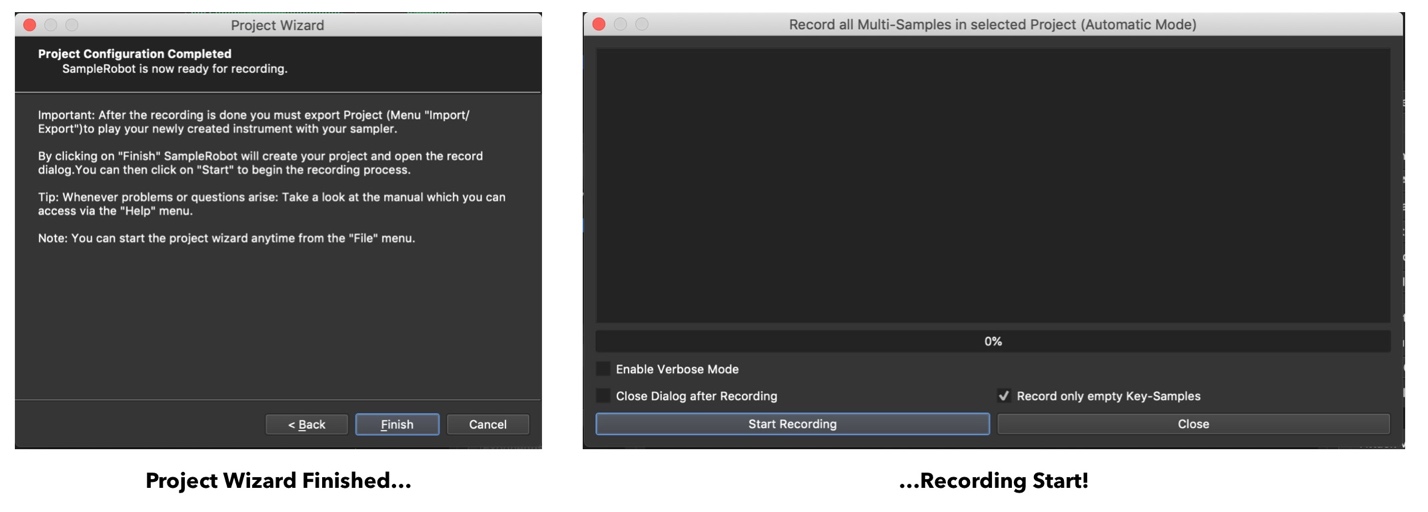
Try a few different ones and see what results work best for you! I found that for this reface CS sound the above choices worked great! After that the Project Wizard is complete and you are ready to begin your sampling session:
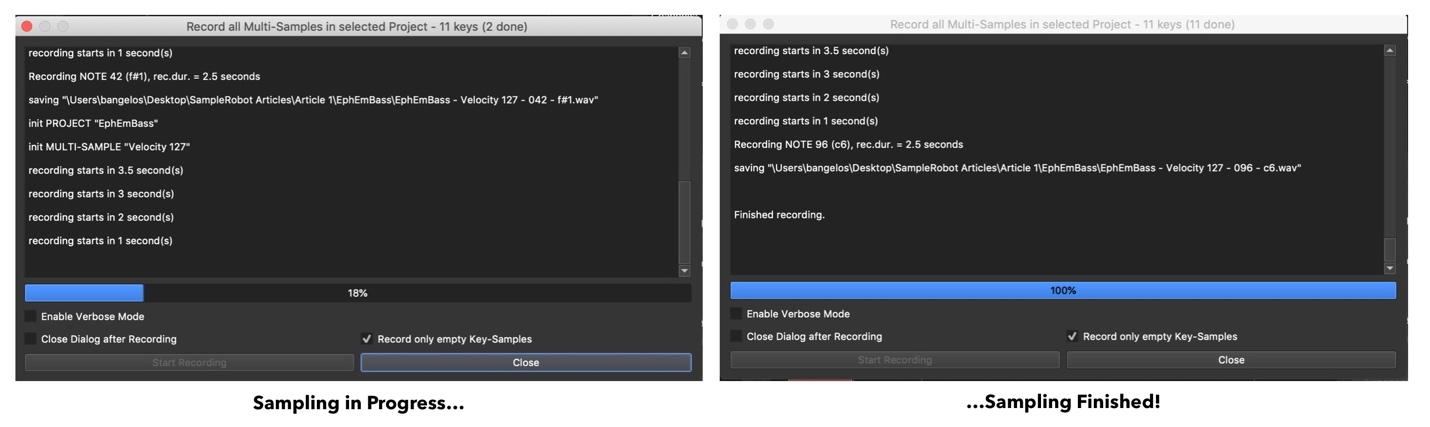
 Since I am only recording one velocity level every 6 half steps the entire process to sample this sound over the entire 88-note range is just under 2 minutes. If I had to do this exactly process manually it would take MUCH longer!
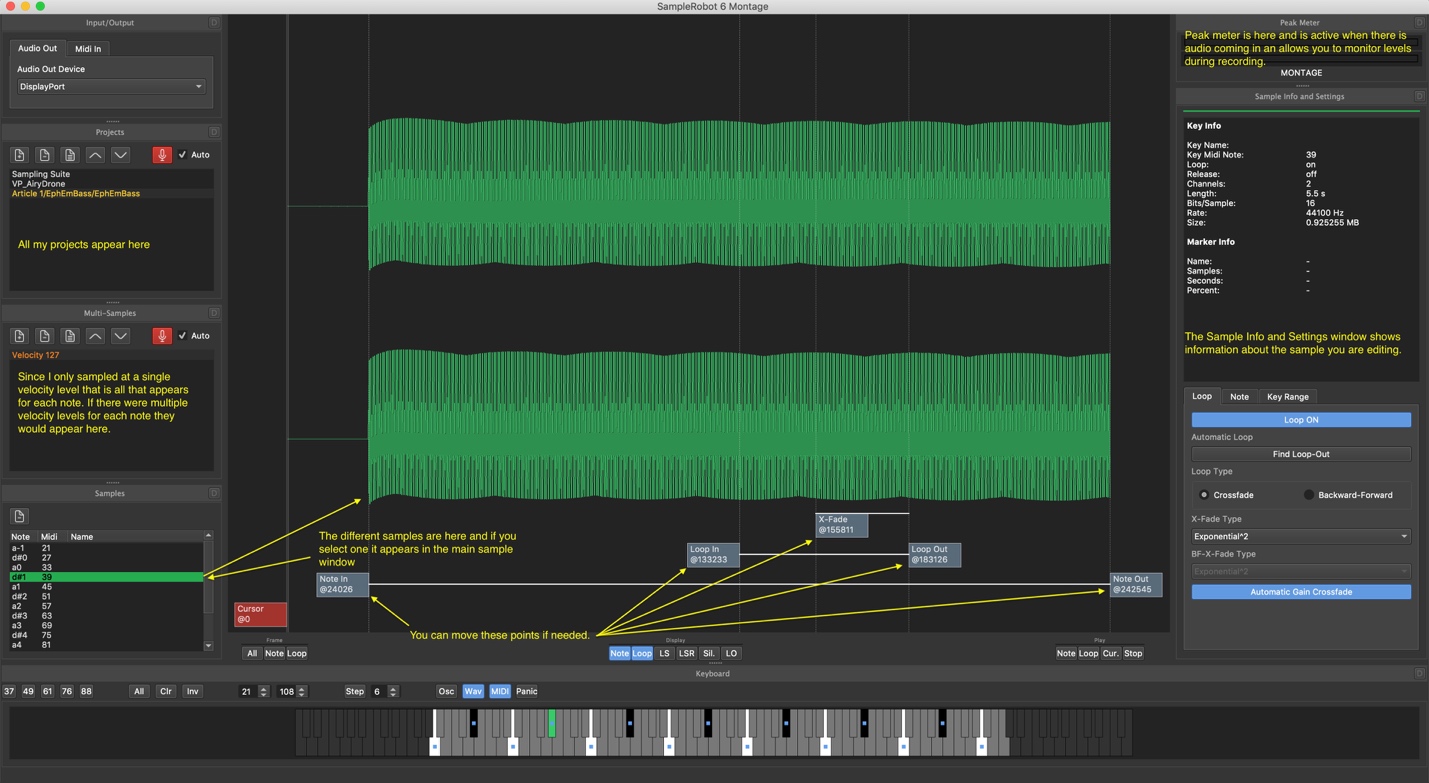
 With my recording finished I can now take a look at the samples, edit loop points and do some basic tasks like normalization and other gain adjustments. Take a look at the SampleRobot edit window (my comments in yellow):
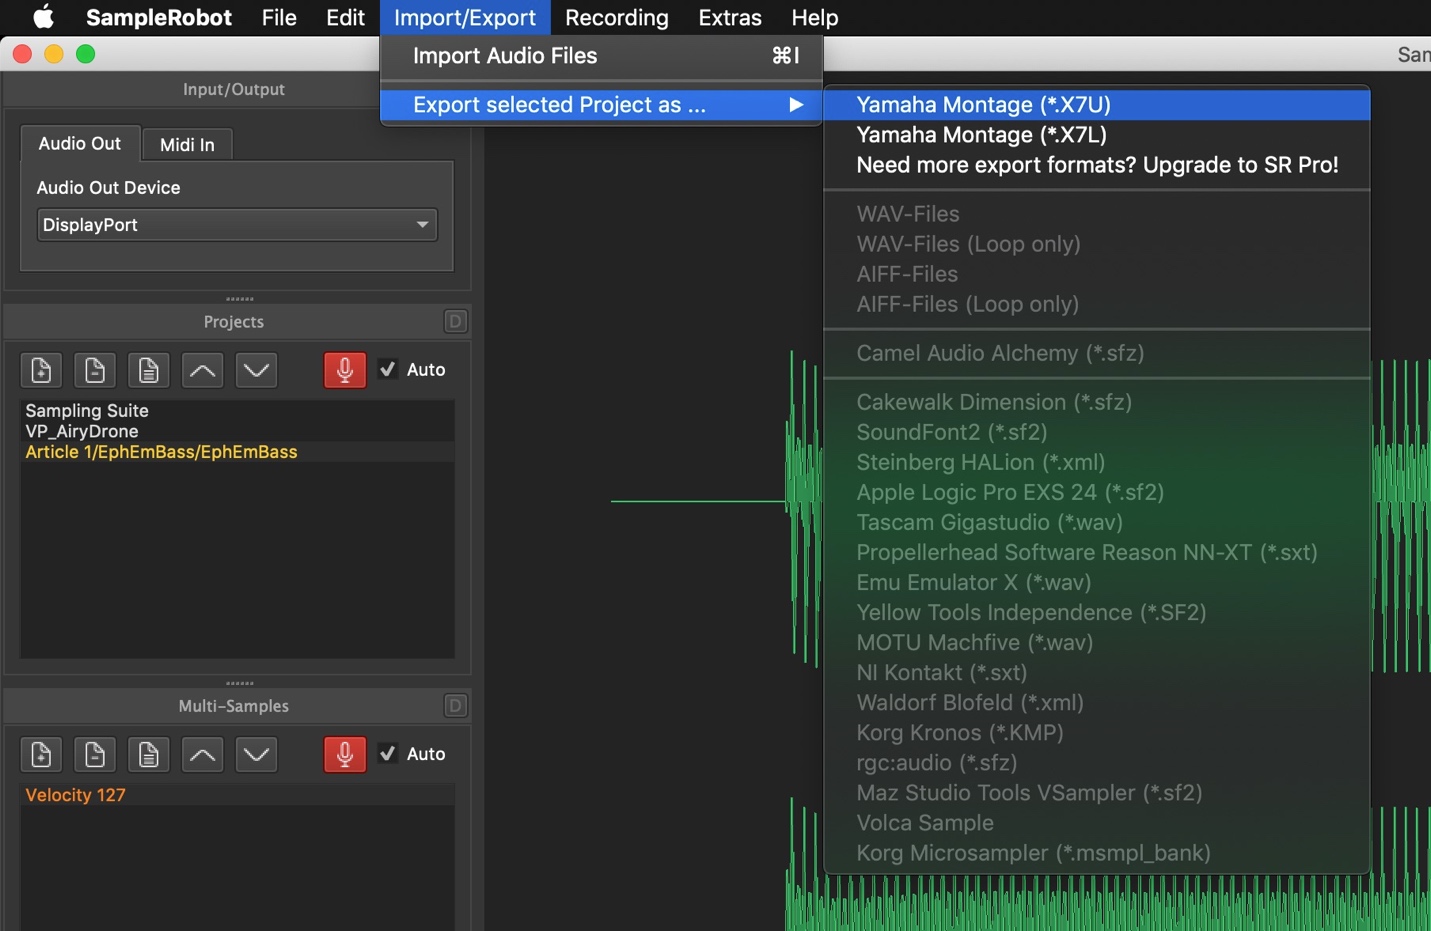
Once you have things the way you want you will want to export your project as a User (.X7U) or Library (.X7L) file. I recommend saving it as a User file. I use User files as my workspace where I load things in to try out, edit, etc. I use Library files for things that I always want to have in MONTAGE (like the Bosendorfer Imperial 290, the KApro CS80 library (all available here) or some of my favorite stuff from Easy Sounds). I saved this out as a MONTAGE User file by selecting “Import/Export” from the file menu, selecting “Export selected Project as…” and choosing “Yamaha Montage (*.X7U):
I saved this file as “EphEmbass.X7U”, dropped it on to a USB flash. Below is essentially what happens next: Load into MONTAGE, find the Performance “EphEmBass” and start creating some new sounds!
Want to hear some of the Performances I made using this this waveform? Just download the file below:
I managed to create 8 Performances using only this sound created with SampleRobot. Since the waveforms for this sound came from a reface CS synth bass sound these are all synth sounds with different filters, effects, Super Knob control and envelopes. The result are some pretty aggressive synth sounds, all single Part Performances and most with just a single Element:
- EphEmBass MeanWah: Single Element, VCM Phaser and Multi FX Distortion. The Super Knob controls the Wah of the Multi FX and Filter (LPF24A)
- EphEmBass 2: Single Element. A simple synth bass, mono with portamento. This is just a basic sound with no reverb. VCM EQ and G Chorus. Super Knob opens the filter.
- EphEmBass Mod Oddity: Single Element. The Dynamic Flanger and Auto Pad give this some interesting motion. Super Knob assigned to filter a LFO of the Dynamic Flanger.
- EphEmBass Razor Pad: Two Elements give this pad a bit of fatness from detuning them. One element has LPF24A (Analog style 24 dB per octave low pass filter) the other HPF24D (digital 24 dB per octave high pass filter) and adds to the morph that happens with the Super Knob.
- EphEmFilterPad: Two Elements, one with a LPF24A filter, the other with a Dual HPF. The dual filters are really cool because of the distance parameter. As you move the filter you get two resonant peaks..so cool! The system effects give the delay and reverb and insert effects are G Chorus VCM EQ. Reverb send and cutoff are applied to Super Knob.
- EphEmOctaGrowl: Two Elements, one is engaged an octave lower with ASSIGN 1 button. VCM Touch Wah and Uni Comp Up add to the growl. Control Delay, HD Hall are System effects and the Master effect is the Ring Modulator. The Super Knob increases effect parameters and distorts the sound as you move it.
- EphEmBassMorphoFlex: Single Element…This sound is all about the Motion Sequence set to pan, the Ring Modulator on the Master effect, HD Hall reverb, delay and the Tempo Spiralizer all set to the Super Knob. Basic dry bass sound that morphs into something really different.
- EphEmCrushedBitLead: The Bit Crusher insertion effect and Multi FX assigned to Super Knob make this a cool cutting lead sound. This one has three Elements note shifted by an octave and a fifth respectively.
I consider these Performances starting points to give you some idea of the places you can go with SampleRobot and MONTAGE. If you want to create your own sound libraries, you’ll find SampleRobot to be an indispensable tool.
Want to share your thoughts/comments? Join the conversation on the Forum here.