

Tagged Under
If you have not done so already, please see the SETUP article for your computer type first. It will cover the basics of setting up the Motif XF with your computer via FireWire. This article will concern the option FW16E (FireWire Expansion board).
Normally, the 16 Internal Motif XF Parts are assigned to the main Left and Right outputs. OUTPUT SELECT = L&R
However, when you are working with an external DAW, like Cubase for example, you may want to assign Parts to their own discreet audio bus. This will allow you to record each PART to their own audio track.
Bus: A vehicle for moving one or more passengers from point A to point B via a specific route.
In audio a bus is a vehicle for moving audio signal from one point to another along a specific path. Multiple signals can be routed on any bus, or the bus can be for an individual signal. It depends on your goal.
By default all PARTS are routed on the main “L&R” stereo bus.
All 16 internal PARTS, the A/D INPUT PART and the FW INPUT PART are all assigned to ride the bus route: “L&R”
It may at times be convenient for you to isolate a PART on its own bus, or you may decide to send several PARTS together on a specific bus – the goal so you can record them to their own track. In this case, you may want to route your vocal mic (plugged into the A/D INPUT on the Motif XF back panel) on a discreet bus, isolating it from the other sounds, to its own track in your DAW (Cubase).
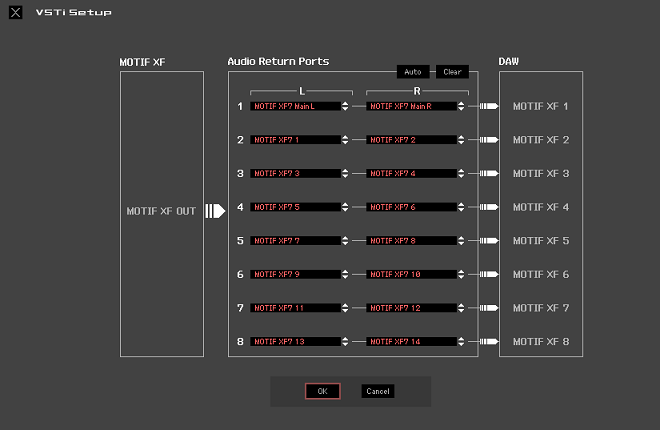
The Motif XF Editor VST provides you with 8 simultaneous Stereo Bus Outputs. That is what we will cover here. Even if you are using the light version of Cubase (AI) you can route 8 simultaneous stereo sends from the XF to your computer. (In later more advanced articles we will delve into how you can configure the outputs in even more flexible routing scenarios – but for most users the 8 Stereo buses is a good start).
The Bus Routes
Within a SONG MIXING or PATTERN MIXING program you can see the OUTPUT SELECT assignment for your PARTS as follows:
- Press [MIXING]
- Press [EDIT]
- Press a numbered button [1]-[16] to select a PART
- Press [F1] VOICE
- Press [SF2] OUTPUT
- Highlight the OUTPUT SELECT parameter Press [F6] LIST to view a listing of the possible output buses to which the PART can be routed.
The “L&R” options refers to both the analog main outputs and the FW digital stereo bus.
The “asL&R” option refers to the analog (only) Assignable Outputs on the back panel of the XF
These are followed by seven odd/even pairs of FireWire buses:
FW1&2
FW3&4
FW5&6
FW7&8
FW9&10
FW11&12
FW13&14
Then you have the individual “asL” (analog only) assignable Left and the “asR” (analog only) assignable Right
Then each of the fourteen assignable FW buses as Mono sends:
FW1
FW2
FW3
FW4
FW5
FW6
FW7
FW8
FW9
FW10
FW11
FW12
FW13
FW14
In a case where a Drum Kit Voice is assigned to a PART, you may see the OUTPUT SELECT option “drum” appear. What this signifies is, you have selected to have the Motif XF respect the individual KEY OUTPUT Assignments you made within the currently selected Kit. Each Drum KEY can be routed to any of the FW buses as you may require. We’ll get to that in a later article.
To see how this OUTPUT SELECT routing works:
Set OUTPUT SELECT = FW1&2

What you have done is re-route the PART’s signal on a different path. It no longer will travel through the SYSTEM Effect (so the Reverb and Chorus processors are not accessed), it no longer travels through the MASTER EFFECT, nor does it go through the MASTER EQ. You have re-routed it so that it goes on its own discreet path toward the computer via the stereo FW bus route “FW1&2”. Right now, it is the only passenger on that bus. It does, however, go to the FW1&2 output with the INSERTION EFFECTS assigned to the PART.
This means you can use your powerful Motif XF Insert Effects on your PART and you can record with them – because they are hardware there will be no latency issues or delay in hearing what you are getting. This is not LOW LATENCY – this is NO LATENCY – because you monitor the effects direct (prior to the signal going to the recorder)! This means you can use a powerful VCM Compressor and the VCM EQ501, or any two INSERTION EFFECTS.
How Signal Arrives in the Computer
In Cubase, you need to create an INPUT connection that will receive the signal we just routed OUT of the Motif XF. There are two ways to have this signal routed to Cubase.
1) Via the “VST CONNECTIONS INPUTS” setup for Cubase:
Go to DEVICES > VST CONNECTIONS > INPUT
– – or – –
2) Via the “Motif XF Editor VST“ running inside Cubase:
Go to DEVICES > VST INSTRUMENTS > EXTERNAL > Motif XF VST
These two routing scenarios are mutually exclusive. You route signal from the Motif XF either one way or the other but a single source can never be routed simultaneously via both. Once the signal is routed via one scenario it will become unavailable via the other. That is, if you setup to RETURN audio to the computer via the Motif XF VST routing scenario, then the VST CONNETIONS INPUT tab will show “NOT CONNECTED” and vice versa, when you route signal via the VST CONNECTIONS INPUT tab the RETURNS via the Motif XF VST will appear unassigned. This is not difficult to understand when you think about it as a connection for RETURNING audio from the Motif XF to Cubase… it has to be routed in one doorway or the other. This is a situation where it cannot be both.
Why would you route one way over the other? Does it make a difference?
Yes it makes a difference in terms of the options you have to process the signal. In the “Motif XF VST” routing scenario, you are able to monitor the audio return as “virtual audio” signal. What this means is rather than printing and actual AUDIO TRACK, we are monitoring the audio return as it will sound when we render it. This is the same routing as soft-synth VSTi return audio to the DAW. You monitor via a “virtual” audio lane which allows you to process the signal with plug-in effects prior to rendering the signal as a permanent (real) audio track. The “virtual audio” track means we are listening to “what-you-hear-is-what-you-will-get” when you actually render the waveform (Export Audio Mixdown). It also allows you to use such Cubase features as FREEZE and EXPORT AUDIO MIXDOWN which are usually reserved for software synthesizers and recorded audio tracks – the Motif XF becomes an external VSTi with all the rights and privileges of all VSTi (with one exception: Because the Motif XF is hardware when it renders its audio it is done old school, in real time!)
Using the Motif XF VST has many advantages, as you will see as we go along. It not only allows more flexibility when routing and processing signal in the computer environment, but when it comes to integrating the Motif XF into the computer, you will wonder how any can work without it. The Editor remembers every edit, every tweak, and will give you access to every Voice in every Library you own (without having to go and LOAD FILES in the usual manner).
Of course, if you are not doing any additional processing you may opt to just route the PARTS of your Motif XF manually as necessary directly to audio tracks – without creating virtual audio signals. It is really a matter of choice. We recommend you experiment with each routing situation so later you can make a decision about what works for you. You should know both because there will be times when each is appropriate.
1)VST CONNECTIONS > INPUT:
This first method requires you setup manually the Cubase INPUT (to receive the signal routed OUT of the XF). You can create either MONO or STEREO Inputs, as you may require.
Go to DEVICES (called “Studio” in Cubase series 9) > VST CONNECTIONS > INPUT
Here you can “ADD BUS” > MONO or STEREO Set the AUDIO DEVICE to “Yamaha Steinberg FW”
Set the DEVICE PORT to “Motif XF 1” for Mono, or “Motif XF 1 / Motif XF 2 for Stereo.
Next you need to create an AUDIO Track on the main Cubase screen.
Go to PROJECT > ADD AUDIO TRACK > MONO or STEREO
Assign the INPUT to that audio track to the bus you just created.
You have routed the PART to the Motif XF’s “FireWire” OUTPUT
You have created an INPUT to receive the OUTPUT of the Motif XF – that input is received via the Yamaha Steinberg FW ASIO bus.
You have created a TRACK that is using that audio bus as its source
2)Motif XF Editor VST
This method requires you setup the EDITOR VST which will handle all the routing from the XF to Cubase. In other words, you would not use the VST CONNECTION page as outlined above, instead all decisions about the OUTPUT routing of the XF and the connection to the Cubase INPUT is handled inside the Motif XF Editor VST.
Launch the Motif XF VST: Go to DEVICE > VST INSTRUMENTS > Click in the first empty space in the “instrument rack” > EXTERNAL > Motif XF VST
You will be asked if you wish to create a MIDI track for the data that is going to be route through the Motif XF VST. Confirm this, by clicking OK. You will create a new MIDI track for each PART that you want to record. You DO NOT, necessarily, launch another instance of the Motif XF VST (you only have one Motif XF, presumably). Note: In order to launch a second (External VST) instance, a second Motif XF VST, you would need to “FREEZE” the data from the first instance of the VST). Each Motif XF VST is 16 PART multi-timbral and allows/requires as many as 16 MIDI Tracks.
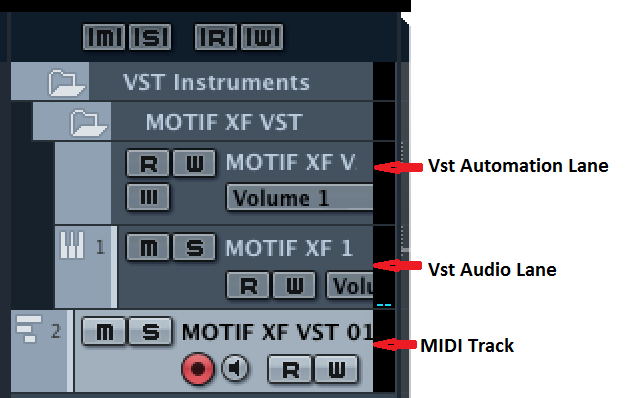 You will see a “VST INSTRUMENTS” folder which will contain your “AUTOMATION LANE”, and “AUDIO LANE”, followed by the MIDI Track assigned to CHANNEL 1. You would add a new MIDI Track for each PART you wish to record.
The Track’s MIDI OUT should target the “Motif XF VST – MIDI In”.
Using the Motif XF VST routing scenario will mean that your audio is still “virtual” – in order to render an actual audio waveform, you must set the measure Markers for the region of measures you would like to work with, then go to FILE > EXPORT > “AUDIO MIXDOWN” – this will create an actual AUDIO TRACK (with Waveform).