Notifications
Clear all
Topic starter
I had the EQ FX for the knobs selected, because I needed to reduce the amount of reverb for one scene. It appears that the knob settings for the EQ and FX, which includes the pan position and reverb time, cannot be saved within a scene. I would appreciate any comments on this, and thank you in advance.
Posted : 14/06/2017 7:58 pm

According to the reference manual, if you have the "Mixing 1" scene category turned ON (to save - aka "memorize switch") then this should give you:
Reverb Send - Adjusts the Reverb Send level of each Part in the selected Scene.
Variation Send - Adjusts the Variation Send level of each Part in the selected Scene.
Dry Level - Determines the level of the unprocessed (dry) sound for each Part in the selected Scene
Pan - Determines the stereo pan position for each Part in the selected Scene.
Volume (PART Volume) - Determines the volumes of each Part in the selected Scene.
These are PER PART - so each PART gets its own control and each part is numbered next to the level indicator grey bar and above the keyboard control on/off icon.
Reference manual page 50.
EQ settings are not available in scene (true EQ - not what you've listed, meaning bands of frequencies to boost or trim) although you could use superknob to affect EQ and save, in each scene, a superknob position. Effect ("FX") parameters are not available to scenes. Again, if you want scenes to change effect parameters - you'll need to do this indirectly by using saved superknob positions to affect FX parameters according to one setting (super knob position) or the other.
The specific items you've called out (pan position, reverb -- well, amount, not necessarily "time") are available as settings which scenes do save as long as you have the "memorize switch" set to ON. Before you start to understand what the memorize switches do, just turn them all ON for now. That's a sledge-hammer approach that someone else may (and they would have a valid point) disagree with.
Posted : 14/06/2017 11:55 pm
Topic starter
Thank you for your reply. The actual problem I am trying to solve is as follows: There is a terrific piano performance, Acoustic Piano DA, that I am using as a sound for part of another performance. Well, the reverb amount is great for the first part of the performance, I wanted to reduce the reverb send amount when switching to the scene using the acoustic piano DA. I do not want to change the reverb used for the performance.
I went into the acoustic piano DA sound to reduce the amount of sound level to the reverb. However, it is already set at zero. I am totally confused as to why the sound still has reverb when the reverb send level for the part is set to Zero. I'm totally at a loss to understand how this can happen, when it works perfectly on other sounds.
This was a problem I hope to alleviate; however, the only way I can do it is to manually turn the knob 8 for the reverb amount when I switch the scene to the acoustic piano DA. This is rather cumbersome.
If there is any insight you have into this matter, it would be highly appreciated. Thanks again for your original response.
Posted : 15/06/2017 12:37 am

I went into the acoustic piano DA sound to reduce the amount of sound level to the reverb. However, it is already set at zero. I am totally confused as to why the sound still has reverb when the reverb send level for the part is set to Zero. I'm totally at a loss to understand how this can happen, when it works perfectly on other sounds.
When you run into a situation where either a Send amount or even the Volume level is set to zero, yet there still is the Effect send, or still Volume audible, you can bet that instead of using the common Control Change controllable parameter (cc91 Reverb, or cc7 Volume), the control over Reverb Send (or control over the Volume) has been assigned to a different control device for real time performance control. It is under "direct" parameter control of an assignable controller.
Here's how to track it down in the "Acoustic Piano DA" Performance:
Press [EDIT]
Press [PART SELECT 1]
Press the lower [COMMON] button or make sure "Common" in the lower left of the screen is blue (selected)
Touch "Mod/Control" > "Control Assign"
Set the DISPLAY FILTER = "All"
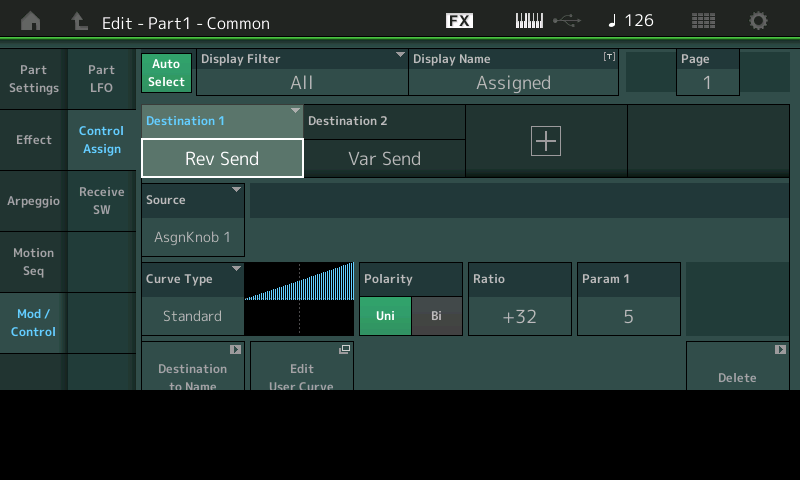
This will allow the screen to recall all assignments for this Part... four Destinations are shown per PAGE... There can be 16 Destinations, max, per Part.
You're looking for "REVERB SEND".
You can bet that when the "Rev Send" on the Mixer is not in control of the level, that it has been assigned instead to either an AssignKnob or other physical controller. In this case you'll see that it is assigned to "AssignKnob 1". Please recognize in more complex Performances the REV SEND may appear more than once - as there is no rule against having multiple control devices controlling the same parameter.
If you would rather use the mixer setting for REVERB SEND (which can be controlled by cc91) and which can be memorized in a Scene, you can simply press the "Delete" box in the lower right corner of the Controller box for that Destination. By Deleting this assignment, the Reverb Send as seen in the Part and on the Mixer can be automated by the Scene. But you must release it from the Direct control assignment first... and you do this at the source.
I have no problem with the "sledgehammer approach" of turning all the Scene option to On, as long as you realize what a can of worms "snapshot" automation can become, especially when you start taking snapshots, and then wish to update certain things about a Scene. In fact, there is actually no need to activate the ON Switches in the SCENE area, as they automatically activated when you STORE a SCENE to one of the buttons. For example, all MIXER settings are stored normally when you STORE your PERFORMANCE... any change to the Stored condition that has occurred when you capture the SCENE will automatically ACTIVATE that ON switch.
So if you have changed the Volume or the Reverb Send amount from its stored conditions, then execute the SCENE capture, the SWITCH for the MIXER settings will automatically turn ON. You can use the SLEDGEHAMMER but it is not at all necessary, as the Scenes work automatically to Save your settings.
As you familiarize yourself with what can and what cannot be captured, and the ways to capture what you need, you'll begin to understand your own best workflow...
The more you use the Scenes the better equipped you'll become about exactly how to make the best use of the function. I believe it happens when you realize what it takes to update your already captured Scenes. But you'll need to discover this for yourself.
Posted : 15/06/2017 1:08 am
There's a few places to set reverb to "zero":
1) Each PART has an effects chain. Two effects per PART (Insertion Effects, InsA/InsB) - make sure you understand what the PART-level story is. This is not related to "reverb" or "variation" send. They distinct entities which can be turned ON/OFF or, if you edit the InsA / InsB parameters - you can change the Wet/Dry ratio to change the amount/"depth" of the effects.
2) Each Performance has a master/system effects section. The Variation and Reverb are considered "system effects". The Master Effect is ... well, what it is. So you have two different classifications of effects - but both affect all PARTs potentially instead of being PER PART. System effects you CAN change the amount on a PER PART basis. The Master effects you cannot - they're forced on all PARTs equally.
a) System Effects - these are Variation and Reverb. These are only two effects - the "Variation" effect can be set to one effect. The "Reverb" can be set to one effect. Whichever effect you choose is shared by all PARTs. Each part you can "send" a little, or a lot to the system effects. This changes the "depth" of applying the system effects to each PART.
b) Master Effect - this is an effect which will be spread across all PARTs whether you like it or not. If you don't like it - turn master effects to OFF or set to Thru.
3) Keep in mind all values above can be offset by motion control (a destination changing reverb send, etc controlled by some source)
Scenes deal with how much signal is sent to the system effects (variation and reverb). However, reverb can be inside the insertion effect(s). Or reverb can be inside the master effect.
You need to look in more than one place to find out what the effects story is.
You CAN re-arrange effects so that you end up with scene control.
a) Change the effects so variation and reverb (system effects) are used exclusively and do what you want in terms of turning effects up/down/on/off
b) Use superknob to change PART insertion effects - then use superknob position (saved in scene) to control
c) User superknob to change Performance master effects - then use superknob position (saved in scene) to control
d) User superknob to change Performance reverb/variation parameters - then use superknob position (saved in scene) to control
e) Double check your Mod/Control settings both in the global (Performance level) assignable knobs and PART level.
If you look at the mixer and take look at what turning knob 8 does (with assignable knobs set to [EQ/FX]) you'll see that it's changing the master effects reverb send.
But the real kicker here for Acoustic DA are the assignable knob settings. If you've checked everything (that makes sense for reverb) and are still pulling your hair out - look at the motion control stuff. Meaning your mod wheel, aftertouch, assignable knobs, ribbon, etc. somehow changing the reverb setting. Because Acoustic DA has assignable knob 1 mapped to reverb send. And turning superknob fully counter-clockwise will make this value zero. The default is for superknob to be not at zero - thus OFFSETTING your reverb send value to something other than what you see when you look at the screens.
This brings up my request to push some button so you can see the OFFSET values instead of programmed values in all boxes - would help identify "oh, some control is changing this parameter". Although not what I previously asked for (because not as helpful) - maybe a compromise would be IF the destination parameter is already a destination that you select - flash the [CONTROL ASSIGN] button. Currently, the [CONTROL ASSIGN] button will illuminate if you CAN assign the destination parameter to a source. It may be at least marginally more helpful to flash the LED if the parameter has already been assigned to a source. That way you could think "ok, I need to go hunt down the source because this can be offset behind my back, although I don't see if it is or is not offset right just yet."
At any rate, do this:
1) EDIT your Acoustic DA part
2) Make sure the knobs are not set to [EQ/FX] - so press the [ASSIGN] button next to superknob
3) Go to menu "Mod/Control" -> "Control Assign"
4) Make sure the "Auto Select" button is greenish-blue instead of grey.
5) Spin assignable knob 1 (this is PART X, Assign 1 - where "X" is the part where your Acoustic DA lives).
Notice you see reverb send as the parameter destination. You can delete this if you don't like it, or leave it alone I'm just helping you explore here.
6) Press [PERFORMANCE] (HOME)
7) Press [EDIT] - this will edit performance globals
8) Go to menu "Control" -> "Control Assign"
9) Make sure "Auto Select" is still blue/green (on)
10) Spin the assignable knobs, starting with 1 ... through 8. Look at the destinations. If you see a destination as "Part X Assign 1" where "X" is your Acoustic DA part, then this means superknob spinning will change the reverb send for that part. This may not be want you want. If you do see this, then be aware this is the "sneaky" path for reverb send to be something different than what you programmed it be without the superknob invoked offset.
There's lots of ways to change this behavior:
a) With new firmware you can "unlink" superknob from spinning a global assignable knob. So you could stop the control that way
b) You could have deleted the destination you don't like in the PART
c) You could, using scenes, make sure you save the superknob position - and save it (for all scenes) at a setting where superknob "zeros out" all parameters. This may not be possible for all situations - since it's just as likely that all superknob positions offset some parameters. But for the parameter you want to zero out, you can force superknob to that position. For the default Acoustic DA performance, this would mean saving a new user performance which sets superknob to position 0 (full counter clockwise) and also saves this position for all scenes you want a zero reverb offset.
Note - you could just use superknob itself as a way to decrease and increase reverb instead of using anything else if superknob is not over-loaded with controlling other things.
MOTION CONTROL VS MOTION SEQUENCE (my view)
Since "motion" is thrown around a lot - it may not be clear what is meant by these terms. I use them to mean that "motion control" is the non-automated offsets you can apply to parameters. They are manually controlled by moving controllers like ribbons, mod wheels, assignable knobs, super knob, etc. You can "map" a controller to a parameter going through a "curve" - so there's fairly fancy things that can be done depending on the position of a controller. There is no timing involved in motion control - it's "all the time". So if you move a controller, it will always feed into a curve and spit out an offset. So timing is "instant".
I use "motion sequence" to mean applying offsets to parameters in an automated manner that involves time. The automation is time based. The timing can be based off of tempo, an internal clock, or other more specialized things. Instead of a controller feeding into the curve (like motion control), TIME feeds into the curve. At each "tick" of time, you can define any value you want to feed into the curve (same type of curve used for motion control). The mechanism for defining what value you pass along to the curve is called a "pulse". Motion sequences involve "lanes" (MS Lane) which are just different collections of pulses. You can feed curves one lane or a different lane. Each lane can be one or more pulses (and these pulses define what to dump into curve). Think of a pulse as a virtual mod wheel that can be set to anything from 0 to 127. There's more - lanes can have multiple "cycles" which can be different patterns of pulses. And each cycle has two patterns of pulses (A and B) you can scale in different ways - but only get two shapes per cycle.
Super knob automation is related to motion sequence because you setup a specialized "lane" that has superknob as its destination.
This reverb send offset is purely motion control as there is no MS Lane / time element here. No superknob automation.
Motion sequences are usually associated with things that change over time and have some kind of "organic"/"living" feel to them.
Posted : 15/06/2017 1:45 am
This brings up my request to push some button so you can see the OFFSET values instead of programmed values in all boxes - would help identify "oh, some control is changing this parameter". Although not what I previously asked for (because not as helpful) - maybe a compromise would be IF the destination parameter is already a destination that you select - flash the [CONTROL ASSIGN] button. Currently, the [CONTROL ASSIGN] button will illuminate if you CAN assign the destination parameter to a source. It may be at least marginally more helpful to flash the LED if the parameter has already been assigned to a source. That way you could think "ok, I need to go hunt down the source because this can be offset behind my back, although I don't see if it is or is not offset right just yet."
Really not necessary, as the EDIT/COMPARE feature is always available to see what the STORED value was. And since assigning a parameter a control destination using the illuminated [CONTROL ASSIGN] button automatically takes you to the CONTROL ASSIGNMENT area where it will be very apparent what is assigned to what...
There's lots of ways to change this behavior:
a) With new firmware you can "unlink" superknob from spinning a global assignable knob. So you could stop the control that way
b) You could have deleted the destination you don't like in the PART
c) You could, using scenes, make sure you save the superknob position - and save it (for all scenes) at a setting where superknob "zeros out" all parameters. This may not be possible for all situations - since it's just as likely that all superknob positions offset some parameters. But for the parameter you want to zero out, you can force superknob to that position. For the default Acoustic DA performance, this would mean saving a new user performance which sets superknob to position 0 (full counter clockwise) and also saves this position for all scenes you want a zero reverb offset.
Er, perhaps not... Unlinking the assignment from the SUPER KNOB (on the Common/Audio level) does not solve the issue completely. Yes it stops the COMMON level from affecting the REVERB SEND. But when the PART 1 is selected, the AsgnKnob1 is still assigned to control the Reverb Send amount (which will still override the Mixer setting). Besides if the "PART 1 ASSIGN 1" happened to be doing something else you would eliminate that as well (not the case in this particular Performance but it certainly could). It is probably best to use (b) - Delete the DESTINATION within the PART - it is where the assignment initially takes place. Doing it elsewhere can throw other babies, unnecessarily, out with the bath water, while not fixing the assignment at its origin.
And If you use the SCENE to memorize your Reverb Send settings, (as you try to explain) - other things may be affected. I think it is best to find the SOURCE and eliminate the issue at that SOURCE (pun fully intended). The SOURCE being the PART assignment to REVERB SEND which is, as I pointed out, controlled by PART AsgnKnob1.
Posted : 15/06/2017 10:46 am
EDIT/COMPARE doesn't help me illuminate offsets of parameters. The context is that I'm looking at the reverb send setting ("Edit - Part1 - Common" screen, "Part Settings" -> "General"). If I press EDIT/COMPARE - I don't see anything different if I turn superknob which changes the offset of reverb send to offset values vs. not turning the knob. Reverb Send always shows the non-offset value here (the programmed value). EDIT/COMPARE is only useful to me if I change the programmed value of reverb send in the edit buffer and want to see what the last stored performance set this parameter to.
Control Assignment works reverse of what I'm looking for. It allows for you to take any parameter with that can be assigned as a destination and allows for you to instantly jump to the destination (linking to a source) Mod/Control screen by moving some controller - so it allows for easy assigning. Am I missing something? Maybe I am. I just don't see either EDIT/COMPARE or Control Assign as useful for giving clues as to what is assigned to what. I have to dig through all the Mod/Control->Control Assign sources to fish out the assignments. I'm saying when I'm looking at the parameters (NOT destinations, NOT sources, NOT Control Assign screen) - the screens where the non-offset default / programmed values are - it would help to have some clue that a parameter is linked to a controller. Which I cannot seem to tease out a way to actuate using any of the methods you've suggested. I didn't see anything in the new features documentation that would align with this.
... and about fishing out the assignments: I know how to do this. I can map out a preset and figure out the assignments that were made. But offsets by controllers, partially due to lack of visibility, is the last thing on the list. I first start with the programmed (non offset) values first to see what's going on. The suggestion I've made is for efficiency - so I could, while I was looking at settings - have an indicator that started flashing (draws attention) that there's a controller linked here so there may be a hidden offset. It's limited in utility since I have to tap on the parameter to see the flash - I'd rather have the more complex press-some-button-see-the-offset-value suggestion go through - but this one is pretty "dead simple" and plays nicely with the existing indicator. So I would think there's a higher chance of seeing it happen. Of course, maybe there's already some equivalent feature I'm just not seeing yet - I'm open to learning.
As far as unlinking superknob - it's an option. Assignable knobs that are not assigned to superknob store their position to whatever value you set them to - so you have to take care of this yourself (program correctly). But it's an option to allow using superknob for something else, leaving the assignment of assignable knob (if you still wanted to twist this to turn up/down reverb), and not have to set the superknob to a specific value to make sure reverb send is offset to 0. Like anything else - you have to know what you're doing and some options have less fuss than others - but it's an option nonetheless.
I make no recommendation of what to do - since there's so many ways to skin this cat. What the user elects to pick depends on what they want the controls to still do. There's less bias for this performance perhaps - but a more general case which includes the organ and all of its controls - users may have specific expectations and take a more surgical approach picking some method that best fits what they want.
i guess I left off - d) you can change the curve for PART 1's destination of Rev Send (source Assign 1) as "Standard" type, Polarity = Bi, Ratio=+63 (or to your depth extremes), Param 1=4. This places the cross-over point (0 value) for Reverb Send offset at around 40. So with the superknob in its default position of 40, you get no reverb. This is similar to setting/storing superknob to 0 and using the default curve. This option modifies the response while the superknob default suggestion modifies the other end - the controller's default setting.
There's more options for "d)" then just that.
e) Sometimes I "notch out" using a user curve just one value where superknob places the default - so I get a performance entry "reset/default" value - while still maintaining a knob movement that fits some different curve if I move it left/right of the reset value.
f) Or, knowing 40 is the default - you could assign a user curve of 0-40 inputs will output 0 and 41-127 will be a ramp (linear curve type) which outputs a slope from 1-127. Would be easiest to "eat up" inputs #1-7 with zero values then set the level (output) of 8 to 127. Spelled out (In 1=0 / Out1=0 ; In 2=1 / Out2=0; In3=2 / Out3=0 ; In4=3 / Out4=0 ; In5 = 4 / Out5=0; In6=5 / Out6=0 ; In7=40 / Out7=0 ; In8=127 / Out8=127) this will handle the curve between 41 and 127 for you and default will be "0" for the curve's response of the superknob at the default "40" position.
This also takes knowing what the assignable knob response will be to superknob - so you have to know how to map that out.
It's good to point out that there are "ripple effects" of messing with superknob positions, unlinking, etc. Since a global assign knob can cascade to many other things - you have to map out what the global assign knob connects to if you do this sort of thing. The overview for this would be the [SHIFT]+[PERFORMANCE] (INFO) screen. You can just turn on the green (assignable) indicator and turn off the rest to see how the assignable knob may be affecting different parts.
Some things are easier than others - but they all lead to the same destination - with different "spins" on what the controllers are left doing - or not doing.
Posted : 15/06/2017 12:26 pm
EDIT/COMPARE doesn't help me illuminate offsets of parameters. The context is that I'm looking at the reverb send setting ("Edit - Part1 - Common" screen, "Part Settings" -> "General"). If I press EDIT/COMPARE - I don't see anything different if I turn superknob which changes the offset of reverb send to offset values vs. not turning the knob. Reverb Send always shows the non-offset value here (the programmed value). EDIT/COMPARE is only useful to me if I change the programmed value of reverb send in the edit buffer and want to see what the last stored performance set this parameter to.
I didn't think the issue was "offset parameters" but more that the original poster wanted realtime control over Reverb.
When setting up an alternate control over something like Reverb Send, or any such parameter, typically, you would dial-in the minimum and maximum range of control so that when manipulating the assigned Source controller, the parameter moves exactly the range you wish when you engage that physical control. The range of movement is determined by the Curve, Ratio, and Parameter 1/2 settings and/or the direction and range of the Super Knobs influence over an AsgnKnob.
Please see the Mastering Montage series on assigning parameters and setting the range of control. Seeing the readout is not necessary because you set the minimum and maximum, by ear, when making the Controller Box setup and/or setting range of SK influence.
Storing Reverb Send settings as snapshot is probably easiest handled by deleting the "offset method", and snapshotting the direct values as on the Mixer. In which case, the EDIT/COMPARE function is absolutely the method to compare. Once you determine you have enough Reverb, you take the snapshot.
So again, deleting the control assignment would return you to normal control of the Reverb Send (cc91)... in which case changing the Reverb Send manually would definitely benefit from the EDIT/COMPARE button, which would show you where you started from and how far you've changed the value. Those comparisons are best done prior to performing and setting a Scene snapshot.
_ it would help to have some clue that a parameter is linked to a controller. Which I cannot seem to tease out a way to actuate using any of the methods you've suggested. I didn't see anything in the new features documentation that would align with this.
Since that wasn't the question here no need to bring that into this discussion. The architecture does tend to err on the side of the programmer versus the person trying to decipher what a programmer did. I find this the proper balance.
If you are curious about whether or not a parameter is linked to a Controller, don't look at the parameter. While I understand your thought process to think "reverse design" rather than "design". But I agree with the engineer's decision to to make assigning a parameter to a controller the quick and easy thing to do.
Highlight the parameter
Press the [CONTROL ASSIGN] button
Touch your desired Controller
You are taken to the screen that lets you setup that controller.
Given there are some 40 Source Control options and 251 potential Destination parameters, the current method seems to make sense from a practical standpoint on creating Performance. Reverse design type exploration could probably best be handled in a computer based Editor. I don't see how a flashing button would help, given the sheer number of things that can be assigned. Flashing would tell me what? That another controller is also assigned? I can see that in the Controller Box.
_Currently if you want to see everything assigned to the Ribbon in a PART, activate the green Auto Select option and touch the Ribbon.
_If you want see how many Sources are set to control Rev Send... simply look through the 16 possible Destinations for the Part. If "REV SEND" appears four times as a Destination, highlight each in turn to discover the Source Control.
_If you want to view all 16 potential Source/Destination setups, set the DISPLAY FILTER = All they will be displayed four to a PAGE, four possible PAGES per PART.
Posted : 16/06/2017 12:33 am
I didn't think the issue was "offset parameters" but more that the original poster wanted realtime control over Reverb.
We both converged on the same assumption - that the OP probably failed to see that reverb was being offset by a control (assignable knob) which was prevent the OP from realizing how, despite checking that programmed values were "0" - reverb was still applied until they squelched all reverb at the master return level.
It was therefore my suggestion, to help guide users, that something be done to improve the visibility of parameter offsets - something to help this and future users from overlooking the concept of parameter offsets. It's not the first case of this. If this is needed or not is subjective. Other advanced users have asked for a similar feature - and certainly those users still learning the ropes could use additional in-system guidance. There's always room for improvement and my suggestion may not be the best method.
There's another class of user - one that's frustrated that the keyboard seems to have a "ghost in the machine" that doesn't take the time to try to figure out what's "wrong" and returns the keyboard because it's doing something "wrong" - not realizing that, if they came to this forum, they could receive help and guidance to learn why motion control is involved and not a ghost or bug.
Posted : 16/06/2017 9:51 am
Can only be concerned with how to work the system as it is. If and when a change to how it works arrives then we will be concerned with how it works in the new system. There are undoubtedly scores of different ways it could work. I can only be concerned with explaining how it currently works.
The fact that someone moves the PB Wheel with no reaction, and doesn't think to look if something is preventing it from bending pitch, is not a fault, necessarily, of the operating system. From the programming side of things you definitely "know" when you have assigned (biased) the control over a parameter to an alternate controller. You do so precisely because you desire to have full control over the application to that Part or Element/Operator with your selected controller.
If, as another example, you wish to dynamically change the amount of String volume versus Piano volume during performing, if both sounds are on the same channel (same Part) moving cc7 or cc11 would useless... but biasing the control over the Level of the String Element/Operators would accomplish the goal. Knowing that volume levels can be controlled several different ways is a fundamental. CC messages are the sledgehammer, direct assignments is the fine sculpting tool.
You do not make this deeper level of programming by accident, it is definitely fine with purpose in mind. Once it is clear that each Part is a complex item... yes, there is an overall (sledgehammer) MIDI control message, but each of the 8 Elements or 8 Operators has its own directly accessible level control.
The cc10 Pan message can affect the entire channel, but Yamaha synths usually give you a method to Pan at the individual Element level of the architecture; the overall Pan on the mixer does not reflect always what you've elected to control directly because cc10 does not have this kind of focused direction.
Yes there is another class of user, but they will either revel in the complexity or be overwhelmed by the flexibility- those who believe there is something wrong hopefully will ask about it and learn about it... because there is nothing "wrong", it's actually a huge feature!
Posted : 19/06/2017 8:48 pm
Every once and a while something I suggest, which is treated as unnecessary, agrees with enough other (forum) user feedback/outside sources of feedback/or designer's own checklist of futures that eventually the feature makes its way into Montage.
My general form of help has a section of what to do in the here-and-now (to users/OP), some commentary on how there are pitfalls (to users/OP and Yamaha), and suggested ways to alleviate some of the pitfalls (to Yamaha). I present the suggestions as a wish without expectation (take or leave). And then there is the philosophical as follows.
"Wrong" is not my perception, certainly. How these users respond is a function of their patience and available support. All users have the support provided by the keyboard itself with diminishing levels of support from other sources. So the degree that you can reinforce the "front-line" of support - the device itself - I believe the better positioned the product is for all levels of users. Discussion of Betamax would be too "chicken little" - but there are examples which back up the importance of more than just providing "huge features". There's also nothing "wrong" with suggestions to take huge features and provide an eco-system enhancing the user experience (efficiency, menu traverse economy, "click" optimization, etc) and helping to bridge gaps between power users and novices (ease of use, self-documenting, etc). Deep and elegant.
Posted : 19/06/2017 9:39 pm
