Notifications
Clear all
MONTAGE Series Synthesizers
7
Posts
3
Users
0
Likes
2,471
Views
Topic starter
i'm always looking for an easy method as to route (spread) the usb stereo audio channels with one click over usb1&2 usb3&4 etc.....Is there a way? Today i'm storing the performance twice, one time with usbmain and the other time with audio parts spread over usb1&2 etc...
Posted : 09/02/2020 10:47 am

The following is from the “Mastering MONTAGE: Audio Rec on DAW - Part 1”
It describes the factory default Quick Setup Template
Press [SHIFT] + [UTILITY] to launch the Quick Setup screen > tap “Audio Rec on DAWL
This will instantly apply the changes as described below
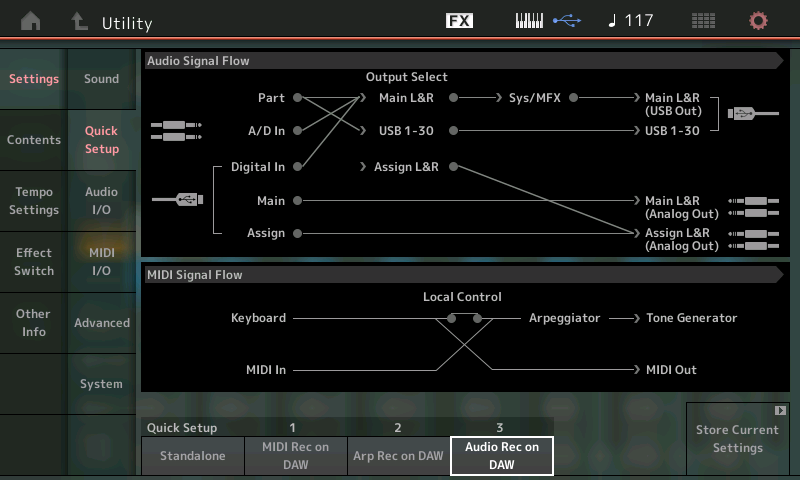
Using the "Audio Rec on DAW" Template
This Template is specifically designed to route Parts of the current Performance to specific audio Output buses. It is really just a starting point. Be prepared to make changes to this as you go. What we'll learn here will prepare you to make these assignments as your project requires. It will allow us to send audio on any of MONTAGE's audio buses (MainL/R or any of the 30 assignables) to the computer.
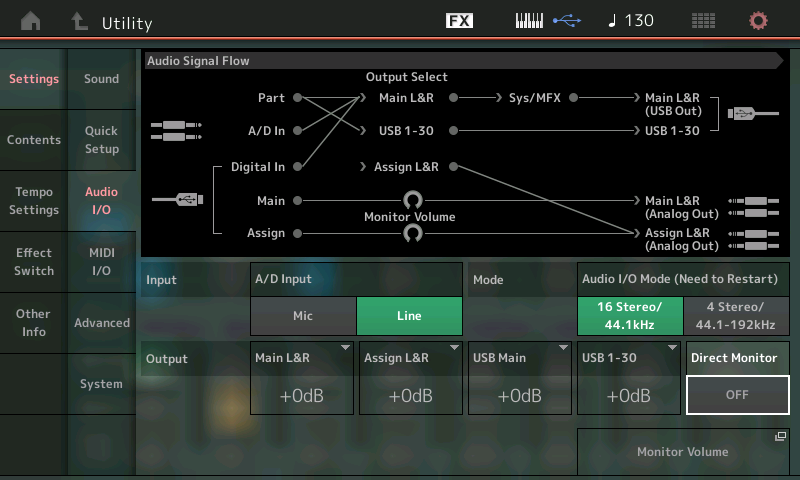
An audio "bus" simply is a means to transport audio from one place to another along a specific route. One or more passengers (signals) can be assigned to ride any bus we choose to the designated destination. In the signal flow chart above, you can see that "PART", the "A/D In" and the "Digital In" (USB) are being routed with Output Select set to "Main L&R" and are being 'bused' to the "Main L&R USB Out" (DAW - Cubase). The PART (any of them) can also be routed to any of the 30 assignable USB outputs. This allows discreet recording on your DAW. When you want to take separate output on a single sound, or drum, you can route it to a single USB bus isolating it for special processing.
The default assignments in this factory Template are as follows:
PART 1 - Main L&R
PART 2 - USB 1&2
PART 3 - USB 3&4
PART 4 - USB 5&6
PART 5 - USB 7&8
PART 6 - USB 9&10
PART 7 - USB 11&12
PART 8 - USB 13&14
PART 9 - USB 15&16
PART 10 - USB 17&18
PART 11 - USB 19&20
PART 12 - USB 21&22
PART 13 - USB 23&24
PART 14 - USB 25&26
PART 15 - USB 27&28
PART 16 - USB 29&30
A Template sets up a specific routing scenario. It is important to understand exactly what it is doing, because you will need to make the final routing decisions and you are expected to customize the default routing to suit your immediate requirements. We will use this template to do the first example - a simple stereo record using a single Part Performance. We will use the sound in PART 1 which defaults to the Main L&R Output. Next we'll learn why this particular template will not work for all audio recording needs (again, you are expected to customize the settings as you require). Then we'll learn to solve routing issue by ensuring that the selected output is properly routed and there is corresponding input in the DAW to receive it. This is a per Part decision.
Please see the articles referring to the “Audio Rec on DAW” Template:
Mastering MONTAGE: Audio Rec on DAW — Part 1
Mastering MONTAGE: Audio Rec on DAW — Part 2
Posted : 09/02/2020 12:20 pm

One general suggestion: Change 'Audio Rec on Daw' to 'Set Routing Audio according Template'.
I don't think it's a bad idea to make the template feature more clear what's going on. So many think these are modes that the keyboard is set to. Not true. If you load a Performance - then any changes made by templates are "blown away" and the Performance's settings are read in no matter how you set the template in a previous operation (sort of). Particularly for the USB audio routing that's handled by this "Audio Rec On DAW" template. Some settings are system-wide and are not changed when you load a Performance because Performances do not have system settings inside them. So those sort of settings in the templates do "persist" when loading new Performances.
... on the other hand, "Audio Rec on DAW" doesn't just set audio routing. "Audio Rec on DAW" also sets Local Control=ON, Direct Monitor=OFF, and ARP MIDI Out=OFF. So "Set Routing Audio according Template" is not only too long to fit - but is not necessarily accurate either. I still totally agree that this system is confusing and better naming or better GUI handling would help guide the user through what's really going on.
With respect to storing templates - I'm not sure (off the cuff) how to help you there. I can say that my own work with templates seemed to show bugs in implementation. I haven't tested recently (there have been a few firmware releases since my report) - but I can say that I didn't receive any feedback (positive or negative) on if this was a bug or intended functionality.
What I was seeing was that when I setup a custom template - the template worked fine with my custom changes until I power cycled Montage. After a power cycle - my custom template was gone.
Posted : 10/02/2020 8:15 am
Thanks both of you for your suggestions but the Template is named “Audio Rec on DAW” because it makes the critical setting to make it possible to record audio to a DAW. Together with the other two Quick Setup Templates (MIDI Rec on DAW and Arp Rec on DAW) cover the three most commonly used functions.
These 3 templates are programmable and contain no bugs!
If you restructure what Quick Setup #1, #2 or #3 are set to store, it is highly recommended that you rename it to suit what you have setup appropriately — at that point you can call it whatever you desire. The three items that are the defaults are carefully thought out to cover the three most likely scenarios needed by the novice. There are 2 for MIDI (with and without the Arpeggiators involved) and one for Audio. If you only record Audio, you can customize your settings with three that address different Audio configurations.
Please, once you study them a bit more closely, (and hopefully, then realize they actually contain no bugs) ...you will begin to see that these Quick Setup templates become apart of your current ‘system’ settings. This means they are stored to each subsequent User File you make.
They DO NOT reset on power cycle!
They can however, be reset by loading in a User File that contains the factory defaults or a different set of Templates. In order to update older files you need to load the USER Bank data, immediately recreate your Templates and then rewrite that file. In actual use however, you might have a User Bank that you can load when starting a new Project... it would contain your preferences for an Init Project. (Highly recommended).
System settings are stored to your User File (.X7U in MONTAGE, .X8U in the MODX). System settings are Not Transferred to Libraries. They remain in memory until you change them or you overwrite them.
Many folks, like you, misunderstand what tapping a Quick Setup box does: maybe this will help: It is not a Mode you put the instrument in. Tapping the Quick Setup #1 “MIDI Rec on DAW” for example, instantly makes the critical settings necessary to Record what you play on the MONTAGE/MODX to travel Out via USB-MIDI to a connected DAW on your computer. If you record to a hardware sequencer, for example, you might want to customize the Quick Setup’s “MIDI I/O” setting to reflect “MIDI” instead of the default “USB”.
The “Stanalone” option returns all the system settings to factory defaults (for playing the instrument without an external connection via USB for MIDI or Audio.
FACTORY DEFAULTS FOR QUICK SETUP #1: MIDI RECORD ON DAW
MIDI I/O = USB
LOCAL CONTROL = Off
ARP MIDI OUT = Off
MIDI SYNC = MIDI
CLOCK OUT = On
REC/TRANS SEQ CONTROL = On/On
CONTROLLER RESET = Reset
GLOBAL ASSIGN (FS/SK/SCENE) = Arp Sw, 95, 92
FACTORY DEFAULTS FOR QUICK SETUP #2: ARP RECORD ON DAW
MIDI I/O = USB
LOCAL CONTROL = Off
ARP MIDI OUT = On
MIDI SYNC = MIDI
CLOCK OUT = On
REC/TRANS SEQ CONTROL = On/On
CONTROLLER RESET = Reset
GLOBAL ASSIGN (FS/SK/SCENE) = Arp Sw, 95, 92
Please visit the LEARN area of this site for details on using and customizing the three Quick Setup templates. It will, hopefully, make clear to you the roles of these Templates. They simply execute the individual settings you would have to make, manually. It is not a Mode, it simply makes the settings you would need to know to make if you were setting up to do a specific task. If you are thinking it puts it in a Mode, it does not. It simply executes the changes to the settings listed.
For example, the “Audio Rec on DAW” as mentioned above, changes the audio Output Select so each of the Parts occupies its own stereo Output pair. Obviously done because this would be the template that saves the most time when you want to create complete stem audio recordings of each of your 16 Parts.
Since I find, I hardly ever use that configuration, I’ve customized my own Audio Record to reflect how I most often work. I, typically, work with Direct Monitor = On and all 16 Parts routed to “MainL&R”. I mute the Cubase Audio Track during Record — I opt to monitor what I play direct (zero latency), and I typically only take individual Audio Outputs on Parts I am expressly going to process further with plug-in Effects.
My MIDI and Arp Rec templates reflect my preference for “Super Knob CC” = Off, and “Scene CC” = Off, so that they send System Exclusive data (which I record to its own separate a Track).
You should also customize the templates to serve you. Take you time, develop a workflow that works for you, then customize your system so that it works with you! Your new template gets stored in all subsequent User Files. And it survives power cycles (but does not survive you overwriting it by loading a file with a different set of Quick Setup templates) — that is likely what you’ve done, Jason...
Say that you never (ever) use Arp Record... you might consider creating a different Quick Setup #2 — one that better serves your workflow. Do so by first executing “Standalone” (return all settings to factory default) then make/build all of your Utility Mode and your Performance Routing settings as you desire... then execute the Quick Setup “Store Current Settings” function to write your new settings into Quick Setup #2 — be sure to Rename it to whatever helps you remember why you made the template.
The “Store Current Settings” box is located just to the right of the three Quick Setup Templates.
Tap that box, then select Quick Setup #1, #2 or #3 to overwrite... rename it. You new name will appear for that template.
_ See MONTAGE Reference Manual page 22 for how Internal Memory stores data and where it get written. See page 166 for Quick Setup details.
_ See MODX Reference Manual page 23 for how Internal Memory stores data and where it gets written. See page 188 for Quick Setup details.
Hope that helps.
Posted : 10/02/2020 10:38 am
Topic starter
Thanks great info.-
Would be nice as to change the menu 'Audio to Daw' menu in f.e.: 'Set part audio routings according template'. 'Audio to Daw' is more or less meaningless and leads to difficulties of understanding as you might have seen with my example.
But thanks again for your efforts to make it transparent, i appreciate.
Posted : 10/02/2020 1:43 pm
Please, once you study them a bit more closely, (and hopefully, then realize they actually contain no bugs) ...you will begin to see that these Quick Setup templates become apart of your current ‘system’ settings. This means they are stored to each subsequent User File you make.
With the version of firmware I had at the time, I did a controlled experiment. No loading of user files. Just modifying the user template - seeing it worked. Power cycle. Template gone.
I reported this previously in this forum without any response / discussion - perhaps it's been fixed in recent firmware. I can retest and give feedback. If everything works as expected/explained - then I can "close" this. If not, then perhaps there can be more exchange/guidance to help resolve on either side. Either way, I'll open a new thread for that.
Posted : 10/02/2020 3:31 pm
These Quick Setup templates have been in the MONTAGE since its release and are adapted for these newer synths from the Motif XS/XF and MOX/MOXF which had similar customizable Quick Setup templates that worked for the mLAN/FW and USB-MIDI/Audio connectivity of those previous instruments to DAW and external recorders. (There were actually six Quick Setup templates in the MOXF). They are not new; they work and have been working (as described) in these products since their release and the concept dates back more than a full decade in the Yamaha Synth products (2007). They are customizable and you can store your configuration in the system settings.
Again: If you think of them as a Mode then you are thinking about them incorrectly. They are ‘executable’ immediately by tapping the associated box. So if you are expecting to power down and back up to the same settings, again, you are thinking about them incorrectly. The are executable by tapping that box associated with Quick Setups #1, #2, or #3.
In general, the instrument will attempt to boot up in a playable condition, you would execute these Setup templates when you decided to connect to a DAW or external record device. They strictly act as a shortcut (this is why you don’t see which one is currently active by looking at the option boxes... tapping an option box immediately sends the stored settings. Again, it is not a Mode. I remember you couldn’t quite get your head around the fact the current selection does nor remain illuminated... which is why I repeat ‘it is not a Mode’.
((You cannot have the instrument power On with Local Control = Off. Or with Direct Monitor = Off. You can argue all you want on this point, but logic rules, the instrument should power on ready to play. You should not have to figure out how to get it to make sound)).
The Quick Setup templates are designed, specifically, for use when you connect with a DAW but don’t think because you don’t use a DAW that they are ‘more or less meaningless’ — that’s a particularly narrow view, as for those who do use DAW software, they are extremely useful time savers, in spite of your temporary confusion.
I highly recommend understanding each of the settings made by the template prior to using it. Knowing each of the settings it makes, and learning to make them each time before recording to Cubase, makes you appreciate just what a time saver the template is.
I recommend NOT using a template until you are clear about how to execute the setup, manually. Then you can intelligently make adjustments to these Quick Setup templates. I found I like my Super Knob and Scene buttons to send Sysex (CC = Off), so my templates prepare my instrument for what they transmit Out via MIDI.
Thanks for the question (and speculation).
Posted : 10/02/2020 5:19 pm
