I'm hoping someone can help me figure this out. I've been playing around with an Organ preset called "Rock Hard" and I can't seem to figure out how the sound it routed in such a way that if I common Variation effect "Small Stereo" or even just turn down the VarSend on PART1 to "0", there is No Sound! I can't seem to figure out a way to disable the Var effect and have the PART make any sound in that Performance..!?
Anyone know the answer to this?
This is happening because PART 1's "Dry Level" is set to 0. Therefore, the "wet" (system effects) signal is the only one that passes on through to the master output.
Two ways to get to this.
FIRST WAY:
1) [PERFORMANCE] (HOME) button
2) Touch PART 1, then choose "Edit" on touch screen
3) Make sure bottom-left square next to "Part 1" blue square says "Common". If not, press this square.
4) Choose "Edit - Part1 - Common" menu: "Part Settings" -> "General"
5) 2nd line, 3rd parameter from the left - "Dry Level" is set to 0 (full off). 127 would be full on. Note that the variation effects are "hot" compared to the dry signal - so maybe setting this to 127 is fine.
SECOND WAY:
1) [PERFORMANCE] (HOME) button
2) Far left of touch screen, press the "Mixing" menu tab
3) 1st column is PART 1. Notice there is a dial for "Dry Level" below Var Send and above Pan. Touch the PART 1 "Dry Level" dial and move the DATA DIAL (jog wheel) clockwise to increase. Or you can press the "Dry Level" dial again on the touchscreen to enter in a value on the on-screen keypad.
... note that the best "schematic" I've found for the signal chain is from this document:
http://files.keyfax.com/PDFs/Motif_rackFX.pdf

... so notice that the sound has the sends for system effects (Variation and Reverb) in one path and the dry level in parallel. Then the "wet" (variation+reverb) signal and "dry" signal both get mixed back before sent to the master stage.
One quick side note - "chorus" was the old name for "variation". Earlier keyboards didn't have as many effects in the "chorus" section as today. As more and more effect types (other than chorus) were added - now this system effect is called "variation".
The general flow, however, still applies.
Also note that both variation and "dry level" both are coming from elements passing through the insertion effects. So "dry level" is not completely dry since this signal has the insertion effects. It really means the "no system effect, but with insertion effects" path.
This image is not meant to apply completely to Montage. JUST the portion that outlines what the "dry level" is and how it relates to the signal chain going back to the insertion effects.
You can probably best understand the signal routing by looking in the MONTAGE itself.
The definition of “Dry Level” — Determines the level of the dry (unprocessed) sound.
This is in contrast to signal that has been dipped into the pool of effects, which is referred to as the “Wet” signal.
From the HOME screen:
Press [EDIT]
On the upper Common/Audio level of the Performance, if you touch “Effect” > “Routing”
You can see an overview signal flow through this Performance. Signal travels, generally, left to right. Arrows help you understand where the signal can go.
You will see on this top level... the individual Parts (16 Synth Parts and the Audio Inputs) arrive and travel through the "shared effects" -- ie, the Variation, the Reverb, The Master FX, and the Master EQ.
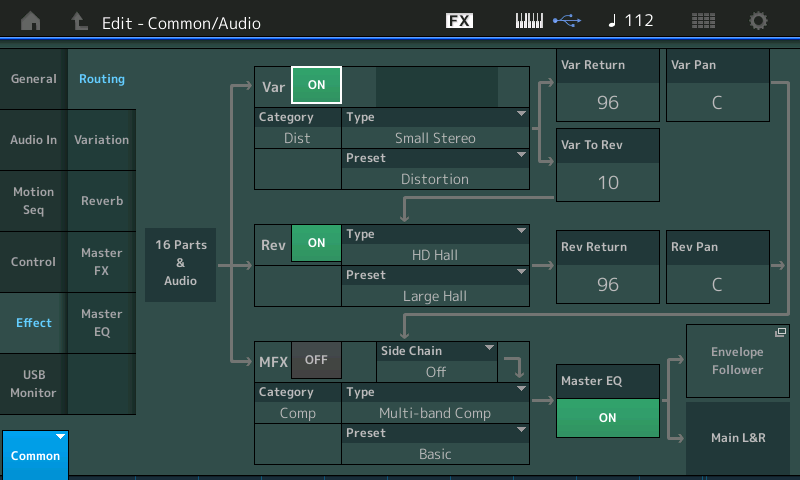
“Rock Hard” is Tone Wheel (B3) Organ where the programmer is using the Variation processor as a third Insertion Effect. Here's how that is done":
Background:
For many years Yamaha referred to the two System Effects as “Reverb“ and “Chorus“ — as these were the two processors familiar and mandated by GM protocol. “System“ because all channels have access to these processor blocks by the familiar Send/Return scheme found in mixing consoles.
Before GM, those long time Yamaha users may remember, the two System Effects were “Reverb“ and “Variation“. We have returned to using these names. As Yamaha is a leader in signal processing gear and live sound consoles, calling the second processor simply a “Chorus” was no longer sufficient. The second processor was expanded to include all kinds of effect types... but still principally dedicated to Time Delay effects that went from very short to large... Phasers, Flangers, Chorus, and multiple repeats, Echoes...
It was called "Variation" because in products like the SY85, TG500, et al, you could feed it as a System Effect — via the Part Send amount — or you could defeat the Dry Level and send 100% of the Part signal through it... this is how the INSERTION EFFECTS work — basically “inline” with the instrument signal. Doing so, for all intents and purposes, gave you an additional Insertion Effect.
Insertion is a personal Effect, System is a shared Effect
An Insertion Effect is considered apart of the instrument itself. The signal of the instrument is literally inserted into the effect — any balancing, if any, is done inside the Effect Type you’ve selected. Only the one source instrument uses an Insert Effect. It’s the musicians *personal* effect. No one else plugs into your personal effect - it is yours and yours alone. You can assign individual real-time controllers to directly control parameters within a Part’s Insertion Effects.
While the System Effects work on a Send/Return system like on a mixer. All channels on the mixer have an opportunity to send some portion of their signal to the ‘communal/shared’ effect. The Return from that “pool” effect represents the combined/composite signal of all the sounds that you have sent in. However, usually only a portion of each signal is sent to the System effect — most of the signal passes straight on to the main output, un-effected (Dry Level).
The Variation Effect was called that because by setting the Dry Level to 0, you could route 100% of the instrument signal through the assigned Effect — exactly like the routing scenario of the Insertion Effect. As we did in the good old days, the programmer here on “Rock Hard” is taking advantage of reducing the Dry Level signal path to 0 so that 100% of the instrument sound goes through the processor (just like in the Insertion Effect scenario)... treating it as a third Insertion Effect.
Making a Scene -- How you can customize the use of this Routing
Along with the System Effect Send levels from each Part, the Dry level from each Part is a storable function in the Performance SCENEs.
Therefore you can set a balance between “Var Send“ and “Dry Level“ — because the original programmer has setup to use this routing function, you can customize control over the depth of this “third Insertion Effect” using the Scene Memory
From the HOME screen
Touch “Scene” in the first column
The top of the screen will indicate the currently active Scene (as does the blue Scene button)
The MEMORY switch for “Mixing1/Mixing2” if set ON and then you touch "Mixing 1" Here you can store, per Scene, the Var Send and the Dry Level settings.
Changes you make on this Scene Memory screen are instantly stored.
A MEMORY SWITCH must be ON before you will see its parameters. Once visible their settings is stored in the current Scene.
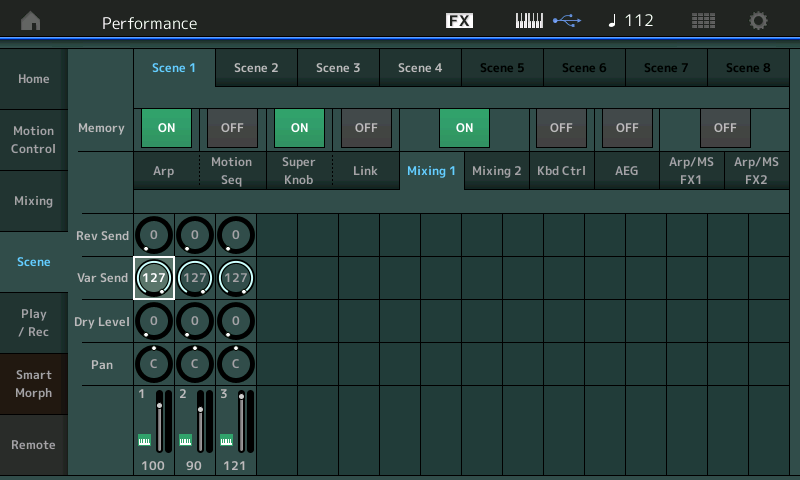
Extra Credit: Effect Routing
Press [EDIT]
Select "PART 1" > touch "Effect" > Routing
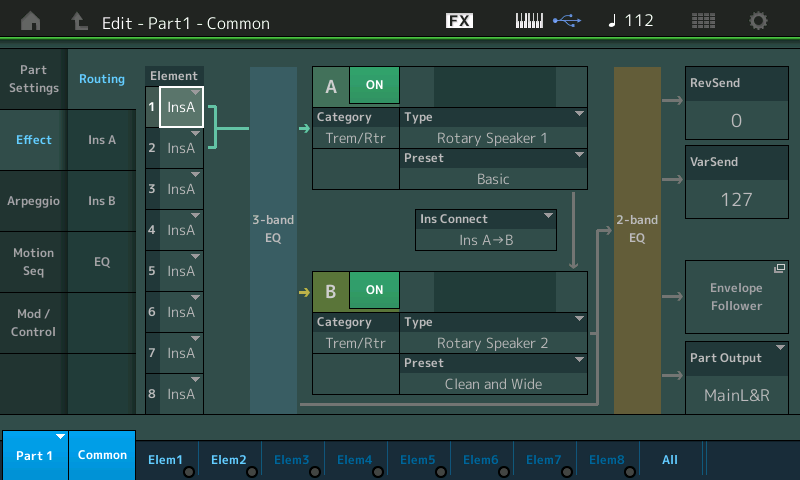
Insertion Effect A - “Rotary Speaker 1“
Insertion Effect B - “Rotary Speaker 2“
Using two Rotary Speaker Types, You can see that Part 1 is the B3 Sound - it has 2 Elements. Element 1 level 100; Element 2 level is 0... only brought in when AsSw1 is pressed.
The Effect Routing for Part 1 sends either of these Elements first through the Part’s 3-band EQ to InsA then to InsB... then you can see the options for where you signal can go. After the InsB block the signal travels through the 2-band EQ... then here, you have options...
Rev Send = 0
Var Send = 127
You can send the audio of this Part to the Envelope Follower to create an amplitude shape for something else (It is not necessary for this signal to audible in order to use it as a modifier)
You can send the audio of this Part to the “Part Output”
The Dry Level is signal that arrives at the Part Output (it can do so without ever going to the Rev Send or the Var Send)
The Dry Level normally is fed directly to the Main L/R Output.
Because the Dry Level is 0, audio from this Part must travel Out via the reverb or Variation Sends in order to get to the Main Outputs
In the screenshot below... the upper COMMON Effect > Routing screen shows what happens to the Rev and Var Sends (16 PARTs + AD) — remember they are considered apart of the instrument they are assigned to...

You can follow how the signal travels and finally reaches the Main L/R outputs. You can see the VAR RETURN and REV RETURN (these are the composite Wet System signals)
Everybody goes through the Master FX and the Master EQ
On the MIXING screen you can see (far right) where the System Effect Returns arrive back just prior to the Main outputs.
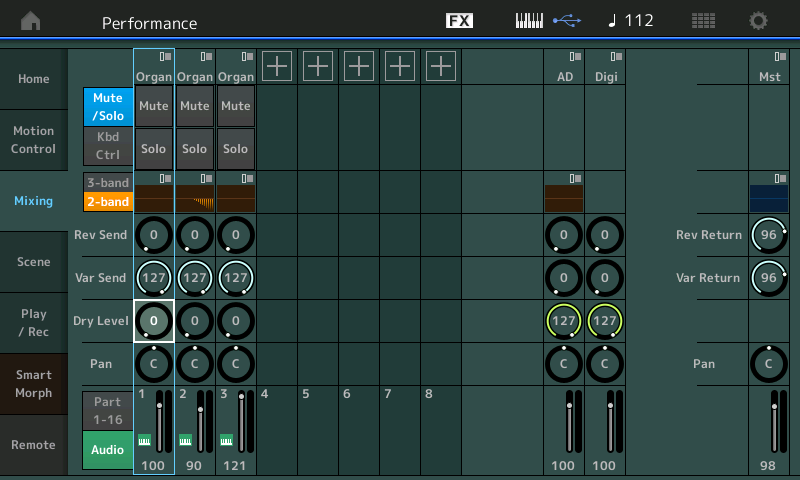
If you look into the Super Knob controlled parameters - Remember the Super Knob can command the 8 Common Assign Knobs. When this sound is first recalled:
Common Assign Knob 6 will do "Rev RevTime"
Common Assign Knob 7 will control "Var DstDrv" and "Var DstTone"
Common Assign Knob 8 will control turning the Variation down (as you turn the Knob up).
They can be ganged together - but in this instance only Knobs 7 and 8 of the Assigned Common Knobs are moving in response to the Super Knob.
Work Common Assign Knobs 6, 7 and 8 directly and with the Super Knob to become familiar with what they are doing.
AsSw1 brings in the second Element and the 'overdriven' character increases.
AsSw2 brings in Part 2 which is a percussion Element
Part 3 is also a single Element which is the whirring noise of the Rotary Speaker (mix to taste).
I would have preferred to show a block diagram of the signal chain using Montage documents - but didn't find anything that included the "Dry Level" detail - so I had to dig back in time to find something that gave a best fit picture.
The existing effects picture available in the reference manual (similar to the Motif XF effects tutorial picture) doesn't show the "Dry Level" detail. There's not a Montage Effects tutorial standalone like Motif - so maybe an update that shows "Dry Level" would be good. The music production guide, which was referenced in an earlier request for an effects tutorial, doesn't detail "Dry Level" either.
Wow, I knew it was going to be something really simple starring me in the face. Thanks so much for the detailed explanations!!
The thing I like most about this is that it is per PART & not per Performance! 😉
