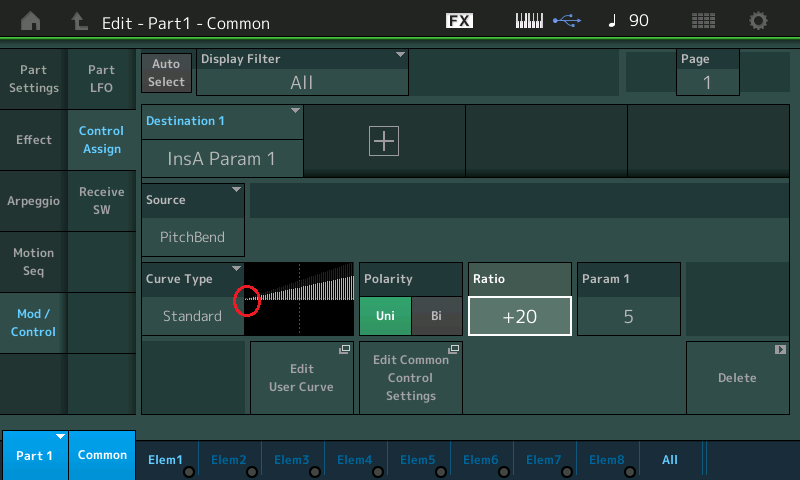
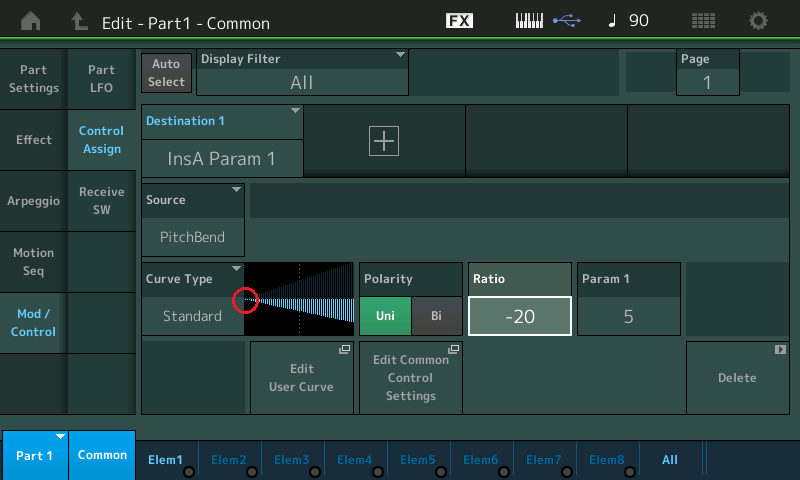
I wanted to set up a control curve to be just like the Standard curve except with the pivot point controlled by the Ratio parameter (red circle) on the right instead of on the left. Mirror imaged, in other words.
I looked all around, but I didn’t find a preset that would do this. Did I just miss it? Do I have to set up a User Curve to do this?
Concerning the Standard (linear) Curve: The “pivot point”, as you call it represents the parameter value at the start (minimum) of the controller, the Ratio is a representation of where it winds up at the end (maximum) of the controller as compared to the start point. A Ratio always being a relationship between two values… in this case where you end up when the controller is max compared to the starting value, Controller at minimum.
Let’s use a couple of examples that may help make this clearer.
Let’s use your first screenshot above — say the target “Destination” is Part “Volume”.
The red circle (left side) represents the current Part Volume (whatever is the stored value).
And for this example, let’s assign MW as the controller “Source”.
The Standard Curve creates a ramp that means as you apply the controller you are set to increase the value.
The right edge of the graphic represents the value (for the Volume) at Controller maximum (MW all the way up)
Ratio: the larger the value, the larger the difference compared to the start volume.
_If the stored Part “Volume” is 0 and the Ratio is positive, you are increasing volume from silence toward a maximum (theoretical maximum is reached when the graphic’s line reaches the ceiling (Ratio must be +32 to reach maximum)) values +33-63 simply reach the ceiling earlier in the movement of the controller… as we’ll see.
_If the start Part Volume is stored at 64 and the Ratio is positive you will be able to increase the Volume from 64 and back with the assigned controller.
_If that stored start Part Volume is 127 and the Ratio is positive, you will be unable to increase the Volume. You can’t get louder than maximum 127.
In this example above, we have biased the Part Volume to the position of the MW. By setting the start Part Volume to 0, the output level of the sound is now determined by how far the MW is raised. If the Ratio is a small positive value you will only be able to turn it up to the max allowed by the Ratio (the difference between stored value and the applied value). As you raise the Ratio value, precisely at +32 it reaches the ‘ceiling’ (maximum). If you continue to increase the Ratio toward +63, you will notice that you reach maximum volume when the MW is precisely halfway to the top. Move the settings - it visually will show you.
The Part Volume (whose value is not shown on the graphic) is represented by the point on the graphic’s left side, you refer to as the ‘pivot point’… it is representing the current stored value of the Destination parameter.
You can understand that if the stored Part Volume is 127, then you cannot expect the sound to get any louder. An up ramp is useless.
If you want to reverse the movement, this is where the negative values for Ratio come into play…
If the stored Part Volume = 127 (you can only turn down from there — the down ramp is the only one that makes sense).
Ratio must be a negative value if the parameter is already at maximum, a -20 setting (as shown in the second screenshot) would allow advancing the MW to turn down the Part Volume (but not all the way). Increase the negative value to allow lower output levels.
Ratio will always be the difference between start (stored) value and the change when the controller is applied.
The stored/start value is always the value of the selected Destination parameter.
Let’s change the Destination to “Pan”.
Now the Standard Curve as set in screenshot 1, would work to change Pan position.
If the Part was stored in the “C” (center) position, applying the linear curve would allow you to move the position from center to right and back to center.
If the Part was stored in the “C”, and you applied the negative Curve as shown in your second screenshot, you would be able to move the position from center to left and back with the assigned controller.
Enter BiPolarity… In a situation like Pan you might want to be able to move in either direction so the “pivot point” - er, the stored/start point is represented in the center of the graphic - the Center will be achieved when the controller is somewhere between minimum and maximum of the controllers movement.
The BiPolar function can be used with Volume when you want a stored value to be recalled, initially, yet have the ability to turn up and/or down from that start point.
Ratio +/- determines ‘how far’ you able to move above and/or below that stored start point… and how much controller is required to get the movement.
So basically, one is the gas pedal the other is a brake, you cannot have the gas pedal stop the car, nor can the brake make it go… the “Ratio” is always going to represent the difference between the value at the finish of movement to the value at the stored (start) point. The “pivot point” is always going to represent the stored start value as represented in the target parameter. The Ratio cannot change the start point… it role is fixed to how much change. While the “pivot point” is always the value at the start.
Other than changing what you see in the graphic, what response are you trying to get… on what parameter / with what controller?
y-axis is the vertical axis; which indicates the operation value of the controller set in “Destination”. The parameter value being controlled
x-axis the horizontal axis, indicates the parameter value set in “Source”. The amount being applied by the controller.
Dogleg is as close as I can get with standard curves.
Polarity: Uni
Ratio: +32
Param 1: 0
Param 2: 0
You can get a more perfect reverse ramp by using user curves.
I think overall it would increase usability to add a "reverse" option on standard curves similar to what is done with MSeq pulses.
Thanks, Bad Mister.
Every now and then I manage to massively confuse myself to the point where I come up with ideas that seem to make sense even though they actually don't. This was one of those times, and your response totally cleared up my confusion.
Thanks…


