Notifications
Clear all
MONTAGE Series Synthesizers
33
Posts
4
Users
0
Likes
4,222
Views
Topic starter
I'm having trouble understanding how to use the the 3.0 pattern sequencer. I recorded a drum loop, 4 bars, and want to add other instruments. When I add a piano, and go to play and record the piano with the drums, the keyboard triggers the drums too. If I mute the drums, I don't hear the recorded part I want to add piano to. Is there a video tutorial anywhere? I've looked on YouTube to no avail. Thanks.
Posted : 17/10/2019 1:28 pm

The KBD CTRL (Keyboard Control) icon *links* Parts to play simultaneously. If you don’t want your second Part (piano) selection to sound along with your first (drums) you need to turn KBD CTRL Off on the newly added Part. By unlinking it, it will be able to be played individually. This has been true even before the 3.00 update. All KBD CTRL Parts are linked and are accessible simultaneously, any Part not linked by KBD CTRL is selectable and playable individually. That’s what you want.
Only use the KBD CTRL function when you want to physically control them simultaneously with the keyboard.
If you are recording a Part at a time you may wish to activate the “KBD CTRL LOCK”... This is found by touching “FX” at the very top center of the screen... KBD CTRL LOCK = ON only allows the currently selected Part to play.
There are several tutorial articles on the new Pattern feature right here on the site.
Posted : 17/10/2019 1:44 pm
Topic starter
Thank you SO much, Mister Bad! I am just beginning to scratch the surface with this instrument. It is truly amazing! Needless to say, I need a lot of help.
I've browsed the tutorial articles, but there is so much I still don't comprehend about nomenclature, etc. I'm a 66 year old worship musician, and I'm being tasked with becoming a leader/one-man band along with my wife, who is a vocalist. She's an experienced professional singer, and has little time for my amateur experimentation, so I need to get this thing mastered!
Thanks again for your quick response.:D
Posted : 17/10/2019 2:22 pm
Topic starter
Again, in the pattern sequencer, is there an easy way to undo a part you just recorded? Say you put down a drum part, and rehearse, then record a high hat, but mess it up.
Posted : 19/10/2019 2:17 pm
The ERASE function = [SHIFT] + keys you want to Erase. While in RECORD, as your Pattern cycles around, if you want to remove a drum or drums you can hold [SHIFT] + the offending KEY or KEYS to remove its data from the phrase. This is a real-time erase feature. Continue to hold to control how much of the entered data is erased:
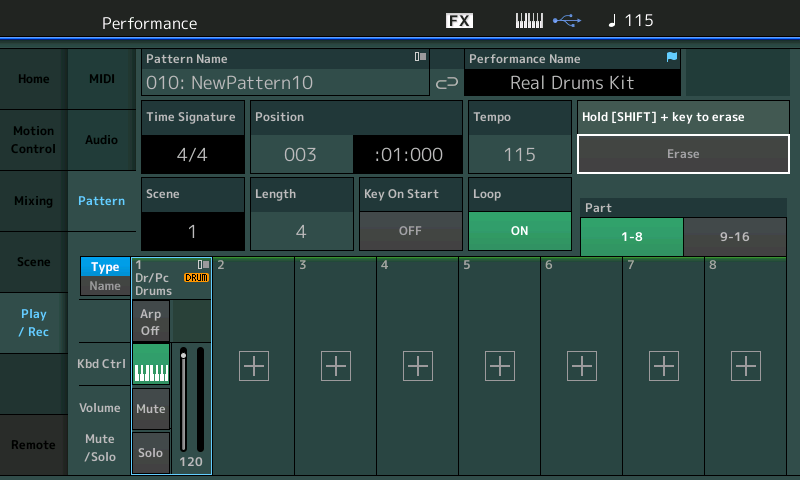
Alternate Method: You can tap the box that has the word “Erase”, it will turn green (active). While it is active holding down the keys will remove the events. Let the Pattern cycle around once while holding F#1, G#1 and A#1 to remove the Hihats.
Deactivate “Erase” by tapping the box, again, it returns to grey (inactive).
Please see the following article:
Rehearse and Erase Functions
Posted : 19/10/2019 2:52 pm
Topic starter
Interesting. So if you record a loop phrase with an instrument, you have to hold each key you played? How do you erase and redo an entire 8 bar phrase, for example? I’m guessing the article will explain.
Also, if you can point me to an article that will explain how to bring the pattern sequencer loops into Logic Pro, in order to edit and mix.
Thanks again for all your help!
Posted : 19/10/2019 4:15 pm
Interesting. So if you record a loop phrase with an instrument, you have to hold each key you played?
Don't be so negative/pessimistic. No, you don’t *have to* — do so because that is the best way to do what you asked, which was to erase a messed up Hihat part.
How do you erase and redo an entire 8 bar phrase, for example?
Once you have recorded data to the Pattern Sequencer and data exists.... the next time you press Record the “Record Type” option appears. Select “Replace” — this is the best way to erase the entire Track by replacing it.
If you want to erase the entire 16 Track Pattern: Touch “Edit/Job” > select “Track” > “Clear” set the dialog box to clear the entire Track or All. You can even clear all Scenes of the Pattern. Different functions depending on what you need to do.
Also, if you can point me to an article that will explain how to bring the pattern sequencer loops into Logic Pro, in order to edit and mix.
Any data recorded to the MONTAGE as a MIDI Song or to a Pattern Scene can be exported as a Standard MIDI File (.mid format). This is universal file format that can be loaded into any DAW (including Logic Pro).
Each Pattern Scene can be separately exported as a .mid file. Or you can create a linear “Chain” (which instructs the Scenes in which order and at which measure to change). A “Chain” can be Converted to a linear Song, which can then be exported by tapping the “Save as .mid File” box.
This will write the data to a USB stick connected to the USB “TO DEVICE” port.
Alternatively, you can import Songs or Pattern Chains directly to your computer via a USB connection using the MONTAGE CONNECT computer utility... MONTAGE CONNECT is a free download, and allows you to import Songs or Pattern Chains directly to your computer... you can run MONTAGE CONNECT as a AU plug-in in Logic Pro — this will allow you to setup so Logic automatically captures your MONTAGE Performance settings and you can import Songs/Pattern Chains directly into Logic (drag n drop).
Please see the following article:
Connecting MONTAGE and Logic Pro X
Posted : 19/10/2019 4:48 pm
Topic starter
Great info. I’m much obliged for your help!
Posted : 19/10/2019 7:37 pm
Topic starter
Thanks again for helping a newbie- I am now trying my best to figure out how to put together patterns I’ve created.
I have created three patterns I would like to use in a song. An intro of 4 bars, a main section of 8 bars that needs to loop for 64 bars, and a bridge consisting of 12 bars. When I go to the Chain section, I do not see how to add them. Each one was saved with the STORE function and has a distinct pattern name- 001 Intro, 006 Bridge, etc. What am I missing?
Posted : 29/10/2019 3:19 pm
You are missing that each Pattern 001 thru 128 has 8 Scenes. In order to use the PATTERN CHAIN feature all your Scenes need to be in the same Pattern.
To create a Chain you would need to use Scene 1, 2 and 3 etc., etc of Pattern 001
Each Scene 1-8 is recallable via the blue Scene buttons 1 through 8
Each Scene can be from 1 measure to 256 measures in Length.
Each Scene has 16 Tracks. And they use the same Performance.
If the Scenes exist within the same Pattern you can easily Chain them.
The Chain lets you tell each Scene when to begin play. The left column is the Measure number, the right column is which Scene, 1-8
If you used Scene 1 from Pattern 001, Scene 1 of Pattern 006, etc., you can still assemble them into a linear Song, if you used the same instrumentation for each Pattern. But you will not be able to use Chain feature.
You would convert each to the same linear Song starting at a specific measure...using the “Put Phrase” (to Song) Job... designed to move individual Pattern Phrases into a linear Song, Track-by-Track.
Let us know.
Posted : 29/10/2019 3:32 pm
Topic starter
Thanks! Just to confirm, I should set up a performance with all of the instruments I plan to use, record a pattern, hit the blue Scene 2 button, record the next pattern, and so on. Then when I go to Chain, they will be available to add as Scenes? So scene 1 can be the intro, with, let’s say, just a keyboard part recorded, but all of the instruments there, and scene 2 the main verse, with more instruments being used, etc.? If so, it sounds like I will need to re-record each part of the song I’ve already done, in different scenes.
Posted : 30/10/2019 12:42 am
Topic starter
Okay, I'm making progress now. Not a huge problem, but I've managed to link Pattern scenes to make a song. However, when I choose Convert to Song, it will display and I cannot add a name there. Each time I modify the Chain and Convert to Song, it will just go up in number, I'm at 019 now on the same song.
Another question:
I've added a bit of percussion to my Scene 1, which is the main body of the song, but the Hi-hat is too prominent. If I lower the volume in the scene, and re-create the Song in the Chain, the volume goes back to 100% for that instrument. Any way to fix this without re-recording the whole part? I could re-do it in another Scene, but if I keep this up, I'll run out of Scenes for the song as there are only 16.
Thanks again!
Posted : 02/11/2019 1:17 pm
Thanks! Just to confirm, I should set up a performance with all of the instruments I plan to use, record a pattern, hit the blue Scene 2 button, record the next pattern, and so on. Then when I go to Chain, they will be available to add as Scenes? So scene 1 can be the intro, with, let’s say, just a keyboard part recorded, but all of the instruments there, and scene 2 the main verse, with more instruments being used, etc.? If so, it sounds like I will need to re-record each part of the song I’ve already done, in different scenes.
There is no one way to work. What follows will be general outline of how a typical pop song could be recorded and assembled using the Scenes, the Chain and finally, converted to a linear Song (finished).
“Put the Band Together Before You Go to the Studio”
While it is generally a good idea to assemble the sounds you are going to use before recording, it is not an iron clad rule. You could start with just a Preset Performance, and add Parts later.
But no matter how you assemble them they maintain their Track and Part location through all Scenes. If you put Drums on Track 8, it will be on Track 8 for all 8 Scenes of this Pattern.
What assembling several instruments ahead of time does allow is non-stop recording. Current situation, you must stop the sequencer to add new Parts, but if you already have a drum Kit, Bass, keyboard and lead sound assembled in the Performance you can move from Record Track to Record Track, instrument to instrument, without hitting the Stop button.
For this example, recall the new Factory Preset “Out West”. Let’s start by looking at the selection of instruments:

Notice that the green KBD CTRL icon selects Part 1, the other seven Parts of this Performance do not sound when you play the keys initially. They are non-linked, and each Part contains one instrument sound, individually selectable. You can *select* a sound by tapping its TYPE/NAME box in the screen, or via your favorite method...
Recall each in turn and play each one so you can identify “the band”.
Track 1 is the Wurlitzer electric piano which is the lead instrument
Track 2 is. The Distortion Gtr
Track 3 is the Clean Gtr
Track 4 is the Combo Organ
Track 5 is the Warm Pad
Track 6 is Electric Bass
Track 7 is the Sound Fx
Track 8 is Drum Kit
SCENE 1 __ 4 Measures __ Tracks 2, 7, 8
SCENE 2 __ 4 Measures __ Tracks 2, 6, 8
SCENE 3 __ 8 Measures __ Tracks 2, 4, 6, 8
SCENE 4 __ 8 Measures __ Tracks 2, 4, 6, 7, 8
SCENE 5 __ 8 Measures __ Tracks 2, 3, 4, 6, 8
SCENE 6 __ 8 Measures __ Tracks 3, 5, 6, 7, 8
SCENE 7 __ 8 Measures __ Tracks 2, 3, 4, 6, 7, 8
SCENE 8 __ 8 Measures __ Tracks 2, 3, 6
Scene 1 serves as the introduction. It was recorded by setting the “Length” = 4, one track at a time. The order is always up to you, but imagine the electric guitar riff, then the kick drum groove, and the percussion hit. Once these three tracks were completed, you can imagine STOP was pressed and then Scene 1 was played back. You typically verify your work before continuing with the next musical section.
Satisfied, the author pressed Scene 2, set the “Length” again to 4 Measures and began recording.. scene 2 serves as the verse. The bass line comes in, joins the drums and guitar.. the drums go to a backbeat groove. Once these three tracks were completed, STOP... playback.
Press Scene 3, set the “Length” to 8 Measures and began recording. Here there is a drum groove, the bass, the electric guitar, and the combo organ
And so on, until each of the 8 Sections were completed.
The CHAIN was created and it was converted to a linear Song. It was after it was converted to a Song, that the Wurli Electric Piano on TRACK 1 was added as the lead melody/solo instrument. You can hear how it extends through different Scene changes...

Recall the Performance: “Out West”
Press [CATEGORY] > type in: Out West - in the box with the magnifying glass, and select it...
From the HOME screen:
Press the [AUDITION] button
Playing the Audition you will be able to see/hear how this was constructed... although the data is not loaded to the Pattern you can see see the Scene buttons outline the musical sections, and the Super Knob controls the Wurli Part effects, especially in Scene 6...(the 'spacey' Interlude)
You can follow along as it plays... the Scene lights will illustrate the different steps of the Chain... so you can still see how it was constructed, assembled, and performed.
The demo was created by Scott Plunkett (musician/programmer extraordinaire). The Chain does not use Scene 5 (it may have been shortened for installation as an Audition Phrase. Any linear Song can be used to create your own Audition Phrases that can be associated with a UserPerformance.
Hope that helps.

Posted : 03/11/2019 2:04 am
Topic starter
Great info! Thank you. I’ll experiment with that.
Posted : 03/11/2019 2:52 am

Another question:
I've added a bit of percussion to my Scene 1, which is the main body of the song, but the Hi-hat is too prominent. If I lower the volume in the scene, and re-create the Song in the Chain, the volume goes back to 100% for that instrument. Any way to fix this without re-recording the whole part? I could re-do it in another Scene, but if I keep this up, I'll run out of Scenes for the song as there are only 16.
If changing the "volume" for a track works - then you can change the velocity of a track to accomplish the same thing. Go into "Play FX" (Play FX 2 tab) and look at the "Velocity Rate" and "Velocity Offset" settings for the drum/percussion track. You can play and dial in the values here to your liking - then commit these changes to the track itself by using the "Note" -> "Velocity" menu and set the measure(s) for each scene for each track you want to modify the velocity settings for. This is one way.
Posted : 03/11/2019 4:54 am
Page 1 / 3
Next
