Hi!
I have general questions about workflow in MODX. I working in my studio and using MODX for sound design. Bought this synth one week ago and really loving it already. Nice and powerful engines for making HQ sounds. Anyway, after few days of working I was confused about some workflow processes.
1. COPY/PASTE or STORE/LOAD. Often In parts I use the same compressors or another inserts with similar settings. I adjust the parameters for each FX manually now. Is it possible copy FX settings from one part and insert it to the same FX in another pert? Better, If this can be stored for future use. The same for every element's EQs, PEGs and etc.
2. UNDO. Is it possible do step-by-step undo for FX parameters in FX setup page for every part? The same for every element's EQs, PEGs and etc. By the way, I was really confused when inserted ARP into part and can't deleted it after....
3. This question for community, I guess. Often I making complex and dynamic sounds that have from 2 to 3(or 4) parts. MODX has limitation in MIDI channels to 16. So, If I using 3 or 4 complex sounds at the same time I exceed 16 channels quickly. And I need more for the complete song. What is best practice in channel utilisation? What you do, guys, if 16 channels not enough?
P. S. If Yamaha would to integrate fully functional hardware sequencer it would kill Korg Krome workstation 😉
Sincerely,
Alex
I'm not sure if any/all/some/none of these questions can accept "software assist" as part of the answer. There's more software you can buy which may ease programming which covers #1 and #2. If you need to limit the scope to what can be done on-board the instrument - there are a different set of answers and limitations.
1. COPY/PASTE or STORE/LOAD. Often In parts I use the same compressors or another inserts with similar settings. I adjust the parameters for each FX manually now. Is it possible copy FX settings from one part and insert it to the same FX in another pert? Better, If this can be stored for future use. The same for every element's EQs, PEGs and etc.
On-board MODX doesn't have a way to copy select parameters from one PART to another. You also cannot leverage "param with PART" since FX or PEG or other things are not part of what you can opt-in/out of when recalling a PART into a slot.
Using software assist - there are enhanced cut/paste options for various sections of parameters. Reference the John Melas tools.
2. UNDO. Is it possible do step-by-step undo for FX parameters in FX setup page for every part? The same for every element's EQs, PEGs and etc. By the way, I was really confused when inserted ARP into part and can't deleted it after....
On-board MODX, there is no step-wise undo. There's a way to back out everything and restore the original Performance as last [STORE]'d - but not really a way to do what computers commonly have mapped to Ctrl-Z.
Using software assist - you can be editing a Performance and, since you're in computer-land, press Ctrl-Z and take advantage of undo.
3. This question for community, I guess. Often I making complex and dynamic sounds that have from 2 to 3(or 4) parts. MODX has limitation in MIDI channels to 16. So, If I using 3 or 4 complex sounds at the same time I exceed 16 channels quickly. And I need more for the complete song. What is best practice in channel utilisation? What you do, guys, if 16 channels not enough?
When I run out of channels - I find a way around it. Usually I get rid of PARTs and boil down my Performance until everything fits. Throwing overboard the least important sounds if necessary. I play this thing live - so I have no other option than to use the devices within the limitations of what they can do instantaneously. The game is different for the producers - or for non-live recording. You can render to audio using the instrument in a sort of "bounce" configuration. Where PARTs are recorded, up to 16 at a time, to audio - then repeat this process and mix together the audio tracks.
When I have something that is going to be a "stacked deck" - lots of sounds - my limit isn't 16, it's 8. Since I control live, from the local keyboard, everything that's happening. And with a "stacked deck" of approaching 8 - I can say that hardly any (if any) will be multi-PART sounds. I'll try to stick with a single PART for each unique sound I'm dealing with.
We do not use the instrument in the same way - fairly wildly different - so my input is not very applicable to you.
Jason, thank you for explanation.
I have another question. Where I can found CC mapping info? For example, is is possible automate EQ Mid Freq in Part -> Common -> Effect -> 3 band EQ?
1. COPY/PASTE or STORE/LOAD. Often In parts I use the same compressors or another inserts with similar settings. I adjust the parameters for each FX manually now. Is it possible copy FX settings from one part and insert it to the same FX in another pert? Better, If this can be stored for future use. The same for every element's EQs, PEGs and etc.
If you study some of the Multi Part (single instrument) Performances, you will discover that the workflow in such instruments is to build up from Part 1. “CFX Concert” is a four Part, 18 Element acoustic piano. By constructing the sound first as a single Part... the programmer would be, in effect, creating a template for the other Elements and Parts as they build the acoustic piano. The basic Envelopes, Filters, Effects, etc. that would be shared in the instrument throughout, are created in Part 1... then by copying that first Element to Element 2, they have all those settings... lastly change the Waveform — it inherits the Envelopes, Filters, Effects, etc., etc.
At some point, the programmer decides how many velocity switches will take place... and can COPY either the Element settings to the next Element (while in Element Edit: press [SHIFT] + [ EDIT]) or they can COPY the entire Part (while in Part Edit: press [SHIFT] + [EDIT]). This is a good basic workflow when building a multiple Part Performance that is a single instrument or is a section of similar instruments.
However, there is no one type of Performance. The design concept of the instrument is such that a Performance can be used as 16 separate instruments (as one would use putting together a 16-Part Multi-timbral sequence—traditional GM-style sequencing: one Part/one Channel/one Track); it also can be used as a Multi-Part instrument where the player is controlling from 1 to 8 Parts simultaneously, where some or all of the Parts are under control of an Arpeggiator; it also can be setup as a combination of sequenced Parts, multiple played and arpeggiated Parts... it’s flexible, by design.
This is troubling for some, but at the end of the day, allows the user to go in the direction that satisfies them. If you are building separate instruments, please recognize that if you are going to use multiple Parts to create one instrument, the Parts will likely share things like Envelopes (PEG, FEG, AEG), they will likely share Insertion Effect setup/routing, etc. you can simply program Part 1 and use it as your “Template” for the other Parts... COPY your Template Element, then change the Source Waveform. When you have used the eight Elements, and are ready to expand beyond this, you can COPY the entire PART... then make the changes, as necessary.
System Effects, Master Effects apply to all segments of the Performance so no COPYING is necessary once you setup the Reverb, Variation, and whatever you choose for the Master Effect. Of course, there are times when you want to duplicate previous programming in a new creation...
For surgical Copy and Paste... which comes in very handy when “borrowing” from the experts (or borrowing from your own previous work)... highly recommended are the John Melas Tools (the Performance Editor allows you to highlight a parameter setting, like an AEG, if you right click on it you can select to COPY it... highlight the Destination, right click and PASTE it.
If your goal is deeper ‘sound design’, you owe it to yourself to explore the John Melas Tools for MODX. Next level stuff!!!
I highly recommend using the front panel and getting very familiar with it. Only when you get a sense of navigating the hardware will you even have a clue about what is possible in the software. Once you can find your way around the firmware, finding your way around the software is a breeze.
2. UNDO. Is it possible do step-by-step undo for FX parameters in FX setup page for every part? The same for every element's EQs, PEGs and etc. By the way, I was really confused when inserted ARP into part and can't deleted it after....
When you are assigning an Effect to a Part, many, if not all, Effect Types have a Preset = Basic. This serves as the defacto starting point for the Effect. There is no itemized listing of changes you’ve made which can be reversed (undone)... again, we can highly recommend the computer software for that type of function.
You’ll need to describe a bit more about your confusion with the Arp assignment... Arps can be assigned in two places.
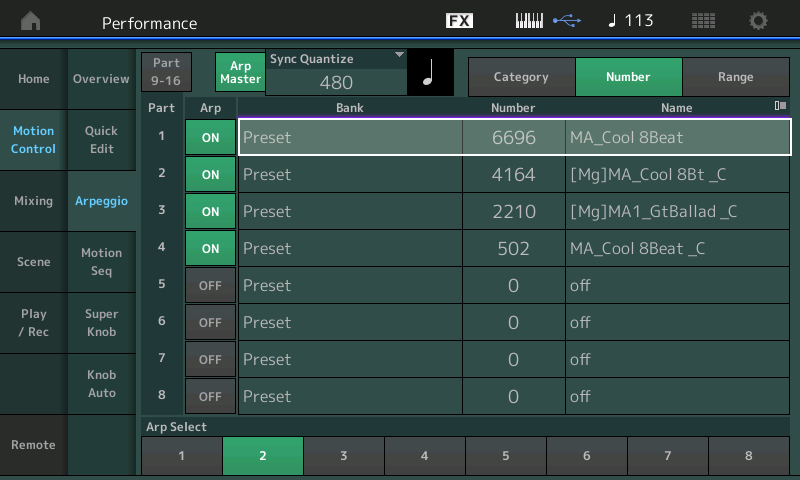
You have an Arpeggio screen that shows you eight Parts at once... there are 8 Arp Select options... Arp Select 1 could be a Verse, Arp Select 2 could be the chorus, Arp Select 3 could be the solo section, etc., etc. Each Part assigned an Arp Phrase for Arp Select 1 will be shown. This is the Common view.
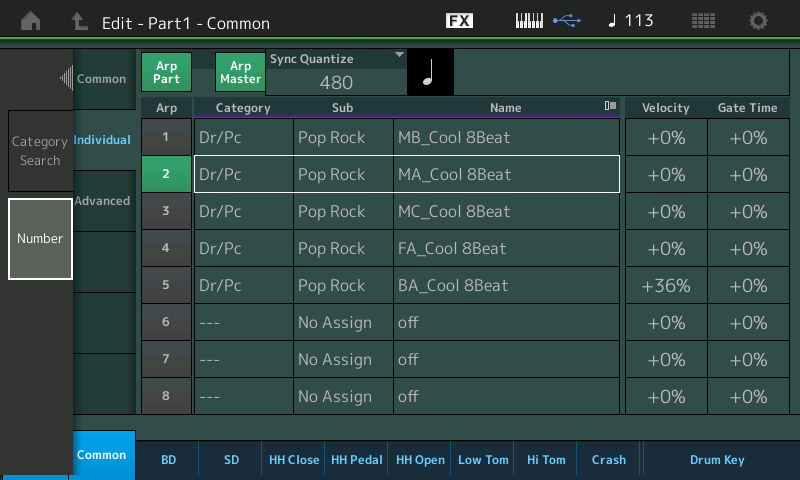
You have another Arpeggio screen within the Part, where you can see what a Part is assigned to do for each Arp Select 1-8. This is the Part view.
You can set the Arpeggio item to OFF. There are 10,239 Arp Phrases (currently). Arps can be searched by Name/Category, or you can select them by Number: Off, 1-10,239. When OFF appears the Arp you set will be removed.
3. This question for community, I guess. Often I making complex and dynamic sounds that have from 2 to 3(or 4) parts. MODX has limitation in MIDI channels to 16. So, If I using 3 or 4 complex sounds at the same time I exceed 16 channels quickly. And I need more for the complete song. What is best practice in channel utilisation? What you do, guys, if 16 channels not enough?
There is no one way to work. For some, MIDI is the end goal... for others MIDI is but a step on the road to the end goal. If you take MIDI Sequences to the stage, the MODX Play/Rec function will allow you take your 16 Part Sequences with you to the stage. 128 Songs can be stored in the MODX “Song” Folder. If you are building a more traditional finished product, you probably are using a DAW to render audio from your MIDI tracks. The end goal here would be distributing the music beyond just those who happen to own a MODX!
In this second workflow, MIDI is used to initially assemble data in a format that allows you to “change your mind” (about instrumentation, tempo, even about the notes you’ve played...) then once all corrections are made you can render the data to audio. Commit.
If you require more than 16 MIDI Parts there are two solutions that come to mind... upgrade your DAW so that you can open multiple instances of your hardware synth (using the FREEZE or similar function), or get a second MODX.
I’m kidding about the “DJ-solution” of getting two playback devices but, if you are using a DAW like Cubase Pro, you can setup the MODX as a VSTi using the External Instrument feature. This allows you to route MIDI from a Cubase MIDI track to the MODX hardware, the routing allows the external hardware to Return audio to Cubase via a “virtual Audio Lane”. Like any software VSTi, it can be heard via this Audio Lane — no Audio is actually recorded. You monitor VSTi in a “what-you-hear-is-what-you-will-get” once you Export Audio Mixdown...
You actually render audio in a separate operation. This allows you to process your ‘virtual’ audio with plug-in effects (which will be applied when Mixdown finally occurs). Once you’ve completed 16 Parts you can execute the FREEZE function... this renders temporary audio files of your MIDI data, and then Mutes the original MIDI tracks (which you keep in case you “change your mind”... ).
Now you can launch another instance of your MODX VST, and create another 16 Parts, and so on... because the data is being played from the Freeze files, the MODX hardware is available for another 16 Parts.
Of course, in between, you could develop a workflow that is a combination of manually rendering audio of the Parts you have completed. It will depend on how much you lean on “changing your mind”... remember you can always keep your original MIDI tracks (as your ultimate UNDO)... But committing Parts to Audio Tracks can be done at anytime, thus freeing your MODX hardware to take on more duties.
For those that take Sequences to the gig... the MODX Play/Rec feature can play either MIDI or Audio files... so if your DAW Project was 93 MODX MIDI Tracks you could mix it down to a stereo .wav File and take that to the gig.
Hope that helps. Remember, there is no one way to work...
Bad Mister, thank you for detailed explanation. Probably I thought like you explained. Especially about midi channels. Should freeze tracks and create new GM/Multi for second part of the song,I guess. You confirmed my thoughts about this.
I'm not a stage player. I'm working in studio. But, anyway thank you! 🙂
What about John Melas Tools, I didn't know about this.Thank you for information. Googled and downloaded already.
Anyway question about UNDO still opened. For example. If I added ARP for a Part is it possible delete this?
What about Cubase Pro.... This is my headache in past. I began from version 7 and stopped use it from 8.5. And I had few serious reasons fro this. First is user support. Got problem with MIDI editor in Cubase Pro 8.5. When double clicking by midi region in sequencer MIDI editor doesn't appears. Absolutely. I asked few times about this problem in Cubase forum. Asked this question few times about 6 month! (six!!!). No one from support team answered! I had another problems with Cubase 8.5 Pro also. Asked about this. No one from support answered! Of course, I tried to reinstall Cubase 8.5 pro few times when I tried to decide problem with MIDI editor. But, this actions didn't help me.
Another important and sensitive point to me is workflow. Automation for example. In Studio One, if I want automate this or that, I can drag and drop this parameter to the lane from top left corner. And I don't spending my time for looking for the appropriate CC from the looong list of parameters like in Cubase.
Third is GUI. Yes, yes. GUI. In S1 I can tune color, color tone and contrast exactly to my eyes. And this is give me inspiration. Of course, I'm not a maniac. Anyway, I changing color tone at least one time in year. In Cubase I see the same "like a mouse skin" grey color always. And I can't change it, except contrast. This is kills all my inspiration in music 🙂
So, when Studio One v. 4 was released, I leaved Cubase immediately. Because I find that S1 much and much better. To me at least. I mean three important points described above.
Honestly, I'm afraid already Cubase Pro, firstly because of terrible support. May be support thinks that "the rescue of drowning, the work of the drowning". I don't know. Anyway, don't want return back, to this nightmare 🙂
Sincerely,
Alex
Anyway question about UNDO still opened. For example. If I added ARP for a Part is it possible delete this?
Hmmm! Thought I answered this. There are two places you can assign an Arpeggio. The “Motion Control” > “Arpeggio” screen from the HOME screen; and the Part’s own “Arpeggio” > “Individual” screen.
You simply can set the Arp On to Arp Off. Or you can tap the Name /Number and set this to Off (Data Dial counterclockwise, or value = 0... )
The way you remove it is to highlight the Arp Name and using the Data Dial Set it to “Off”. Or you can set the view to "Number", and set the Number = 0 (Off) same as dialing OFF.
Shown below the screen where you view the COMMON assignment for all Parts for a given Arp Select
Alternate method: on the Part’s “Arpeggio” > “Individual” screen tap the Arp you entered to see the pop-in menu... touch “Number” > enter 0 > touch “Done”.
Shown below the screen for the individual PART assignment - where you can tap the NAME to highlight it, the pop-in appears, tap NUMBER and set it to 0 (OFF)
These are very easy things — which in any device or program can easily be missed because you just don’t see it right away (they are in the Manual, but who reads that stuff). The same is true of some of the things you obviously missed in Cubase... once you know where and how to access them, it’s so easy you wonder why you didn’t see it before.
The best way to have gotten an answer from Steinberg is not the Forum (unfortunately), but via your MySteinberg Account. You can ask and get answers via this method as a licensed owner of the program. Forums can be hit or miss - does someone even see your question. When you send an email via your Account, you are guaranteed someone is going to deal with the issue (it may not be perfect, but it is the preferred way to get the most direct help with Cubase). The reason they may not find your post on a Forum is because they are all occupied helping MySteinberg queries... Sorry, you had a bad experience but each of the issues you state are very similar to missing the setting = OFF for the Arpeggio Assignment in MODX (its hiding in plain sight).
The MIDI Editor (well, that's not an exact Cubase term) but if you mean the List Editor (shows events), the Key Editor (shows piano roll), the Score Editor (notation) or the Drum Editor (icon events)... these are all "MIDI Editors" And are found easily under the MIDI pulldown... Knowing where to look is everything!
In Cubase I see the same "like a mouse skin" grey color always. And I can't change it, except contrast. This is kills all my inspiration in music 🙂
And you obviously missed some very, very basic things in Cubase.... See attached below... "mouse skin grey" ...only if you are boring... or don't know where to look. Yikes!
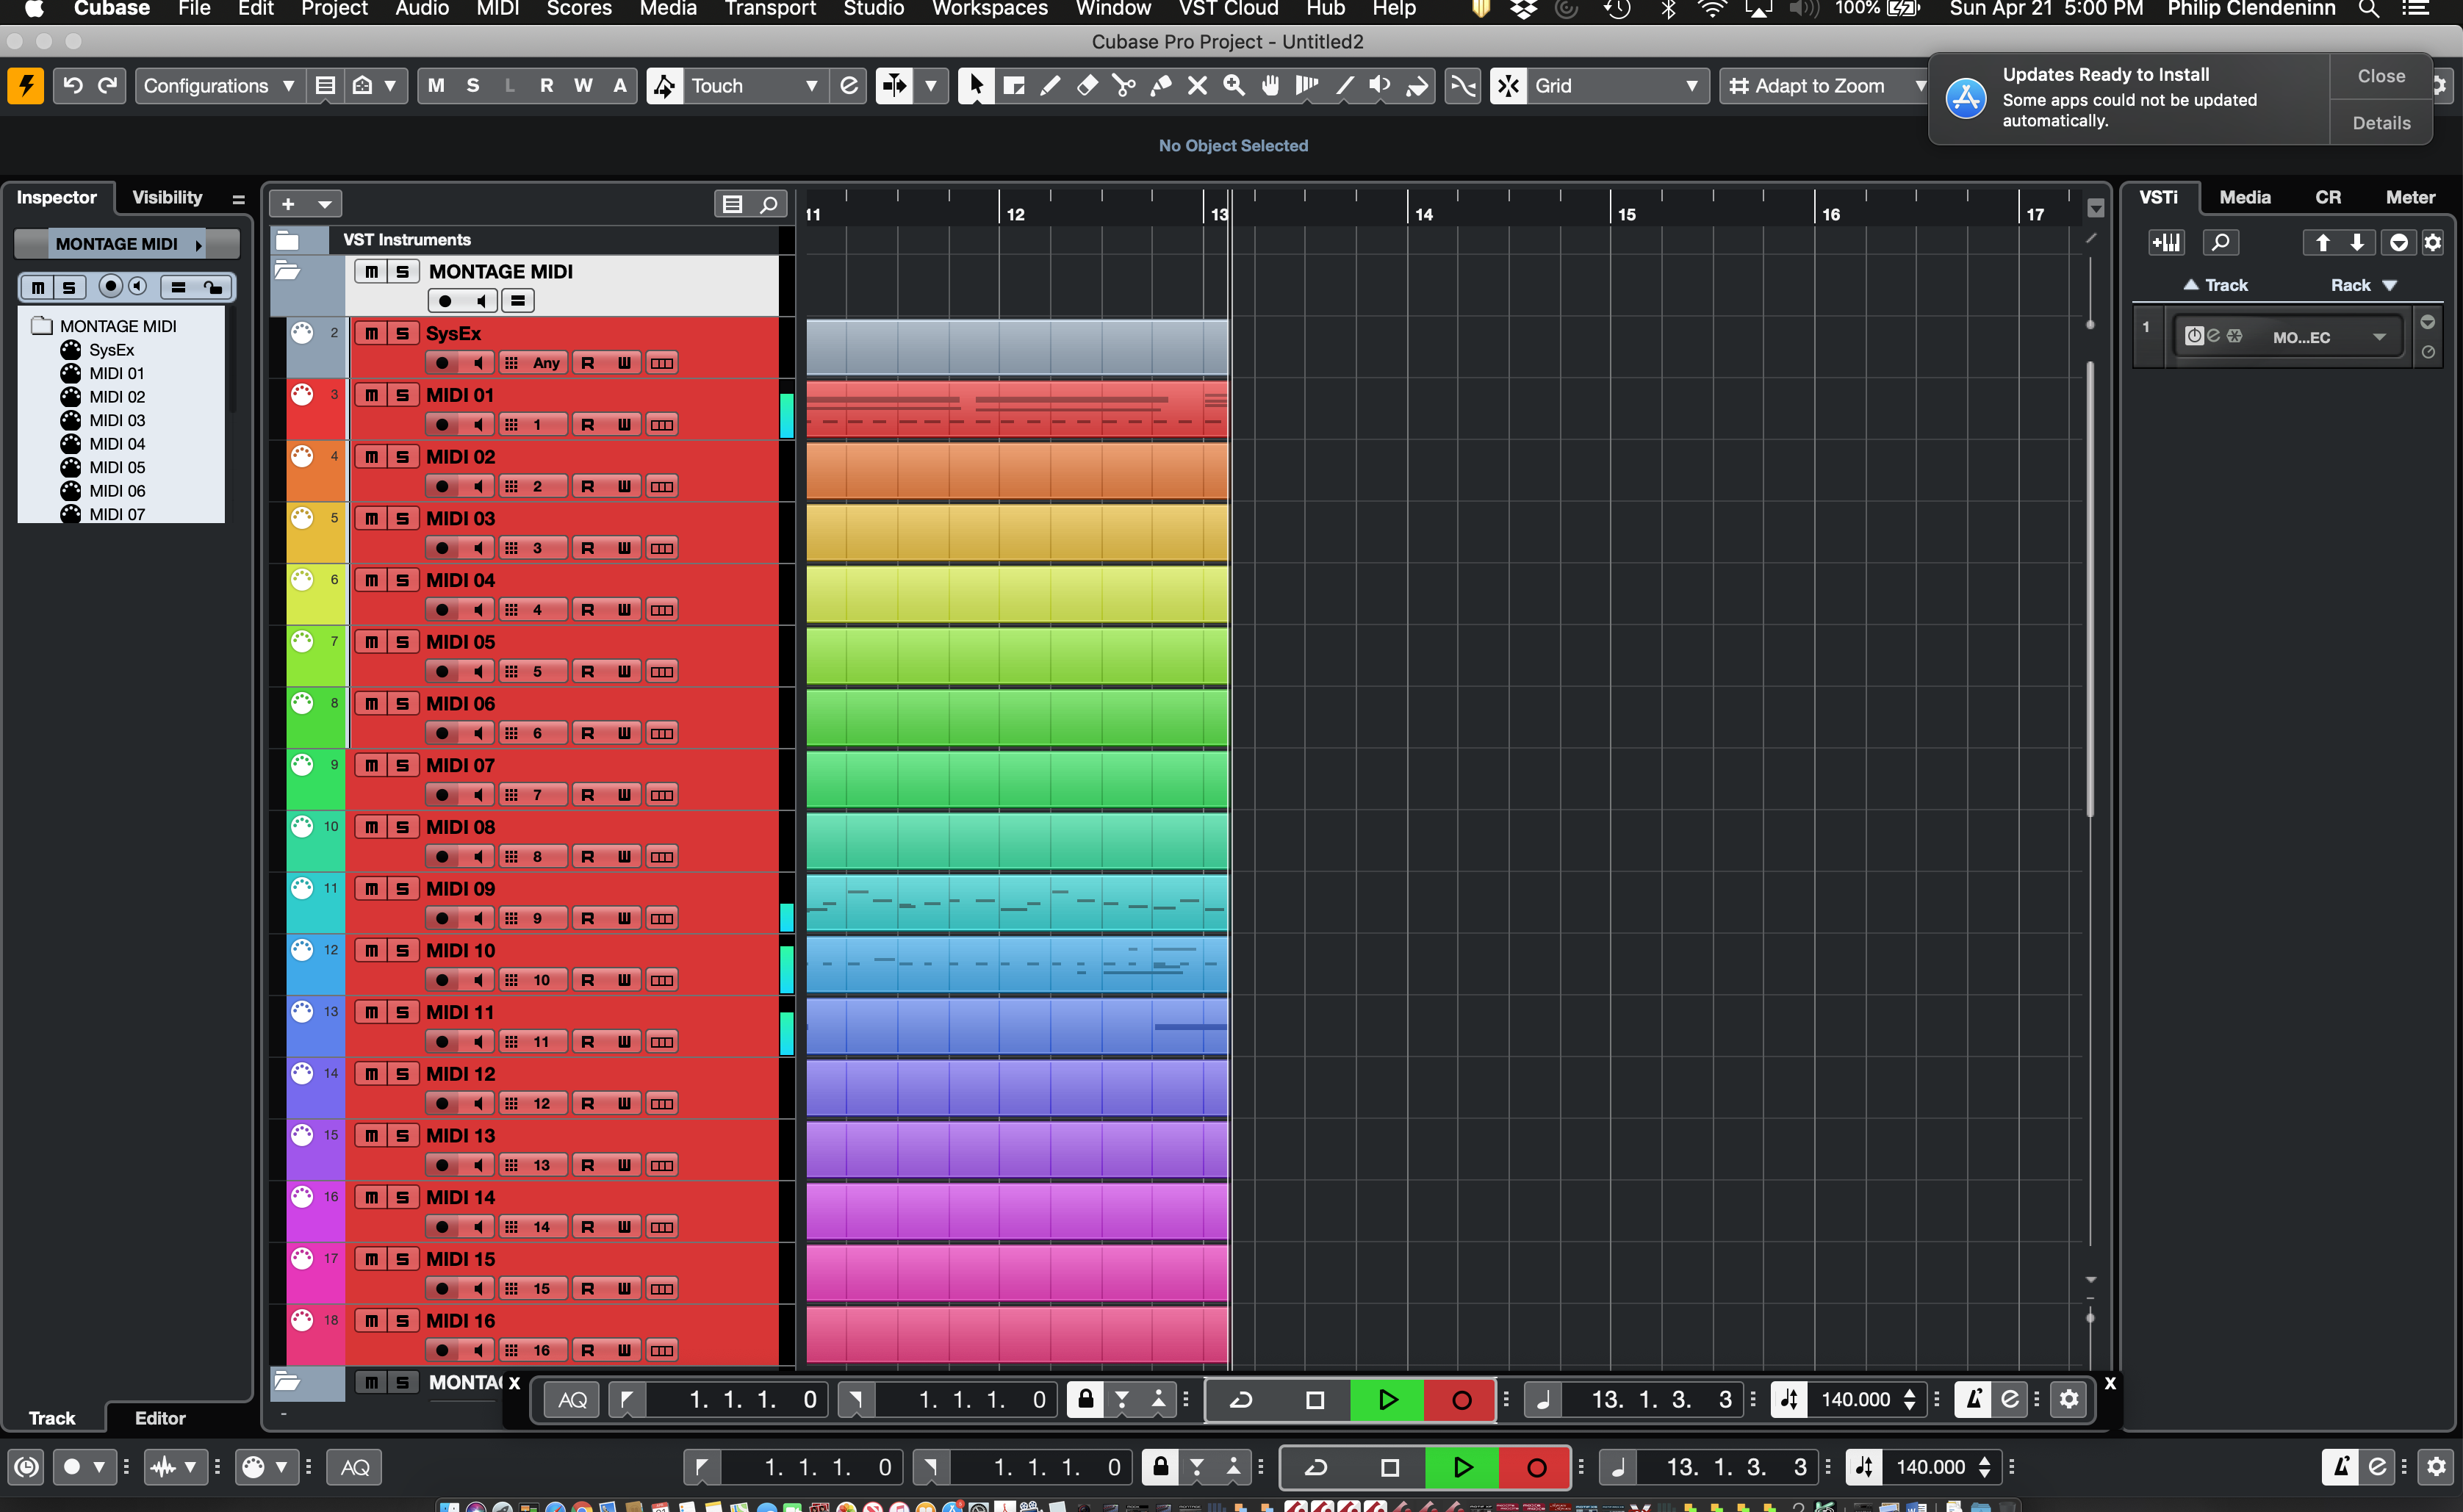
But it matters not, please use whatever DAW you are comfortable with...
Bad Mister, thank you for detailed answer and for your patience. Appreciating it.
What about UNDO. Understood. Question is closed.
What about Cubase. I tried change DAW's color (I talking about 8.5 version now) And I didn't found how to do that. This question was asked on the Steinberg forum also. And was ignored. What about sending e-mail to support team. Where this e-mail placed? I didn't found it. I wrote e-mail to distributors also. But doesn't received any answer. I was really confused about Steinberg support.
I really can't understand why I should send request to distributor and not to Stenberg's support team directly? Why? Steinberg don't value their users? So, I don't see any reason support Steinberg with money buying their product. Because I know that if something will happen Steinberg never helps me.
BM's picture for color seemed to be weighted towards the track color. Maybe the background color is different from default - but not obvious like red. At any rate, to change the interface color (not just tracks), you would go under the "File" menu, then "Preferences", then "User Interface". There are 3 categories of settings there: "Color Schemes", "Custom Colors", and "Track Type Default Colors". The "Color Schemes" menu lets you quickly change the the background color of everything (including the ruler, editor area background, project background, and focus color) at once. There are presets or you can pick your custom color. When you pick any of these colors - preset or custom - all 4 of these colors (ruler through focus) are changed to sensible contrasting colors that complement. If you want to pick each in a more custom manner (not let Cubase decide complementary colors), then you can pick the "Custom Colors" menu which gives you freedom to set each of these 4 colors to your liking - although your color choices are inherited from the "Color Scheme" setting. Looking at the video, I learn that your choices are limited by the top-level color you choose. Not sure if you can willy-nilly pick different colors or the inheritance is required as inferred in the video. The button that reads "Auto" seems to indicate this could be some other value and not be set to auto. I haven't looked into this too much. I think, at this point, the amount of color customization even with the inheritance offers more than you were aware of and probably covers your needs.
I do not have the "Pro" version - these color choices are available in the free version shipped with MODX.
Here's a video:
https://www.youtube.com/watch?v=Od9brKdkLOg
What I do not see in the free version (compared to the video) is the MixConsole colors. But I believe your beef is more with the colors we can change no matter the version.
Follow up - I did a search on Cubase background color and found:
The manual shows that you can pick a color outside the "auto" inherited value if you press/hold the "Alt" key - then you can mouse-click on any color that's already in the interface and that color will be selected (or variation available on that color). I was able to have an "Auto" color of red - which didn't allow straying from red shades - but then "Alt"/mouse clicked on a blue color which let me pick colors that were contrasting/wildly different.
If you want more choices - just throw up some track colors on the interface that represent your custom colors for the background colors and you can get wild/funky, using the "Alt" trick, if you do not want to have the various colors related (inherited).

So although the video seems to lead one to believe that related colors is the end-of-the-road, the manual shows a way out to get more customized colors.
If you want an even finer-toothed comb, there are other menus under "Preferences" other than the ones summarized here that offer color options. Some of this is covered in referenced video - but I believe there may be a few other places where color options are available.
... and yet another example (MODX/Montage colors).

Process:
1) Took screen capture of MODX screen available online
2) Used MS Paint (Windows) to see colors of different GUI elements. Colors were presented in RGB or HSL - while cubase uses HSB (Hue Saturation Brightness) to enter colors
3) Used online color converter between RGB to HSB needed by Cubase
4) Added custom colors for tracks - which allowed any arbitrary HSB - used 4 different colors from MODX
5) Added 4 Audio tracks and colored each with one of the 4 MODX colors
6) Chose preferences and changed different colors - used ALT+Mouse-Click to select colors on GUI - using the track colors I had previously added
What about Cubase. I tried change DAW's color (I talking about 8.5 version now) And I didn't found how to do that.
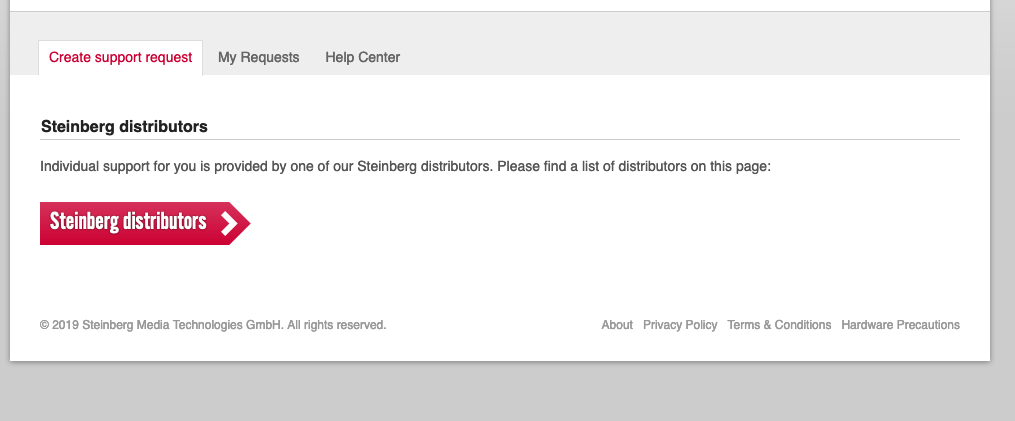
To contact Steinberg you go to Steinberg.net and click on the link “MySteinberg”
Log In to your Account.
What about Cubase. I tried change DAW's color (I talking about 8.5 version now) And I didn't found how to do that.
To contact Steinberg you go to Steinberg.net and click on the link “MySteinberg”
Log In to your Account.
Bad Mister, I did it. Logged and didn't found any support e-mail. I published two screenshots above in this topic.
What about Cubase colouring. Thank you guys. You're really good and positive community and doing the best for members. Thank you for detailed explanation.
Few posts above I asked another question about CC mapping. For example, is is possible automate EQ Mid Freq in Part -> Common -> Effect -> 3 band EQ? What parameter in DAW corresponds to it?
CC information is in the Data List. Most of the CC information, however, you can glean from MODX itself since they can be mapped. The data list has the defaults.
https://usa.yamaha.com/products/music_production/synthesizers/modx/downloads.html
Choose data list
Page 184 has the CCs for controllers and also receive CCs (Bank Select, Modulation, Portamento, etc).
CC 71 and 74 (Resonance, Cutoff) are the "EQ" related ones. But there is not a CC for controlling specific bands of specific EQs. If you want to control parameters - you can, as one example, assign them to superknob using [CONTROL ASSIGN] then move superknob with its CC which is factory initialized to 95 but can be user modified.
Jason, data list this is exactly what I looked for. Thank you!
While an EQ combines a Filter and an Amplifier, a Filter is not an EQ... perhaps that’s why it was placed in quotation marks.
The Super Knob can be assigned to control the Master EQ directly, and indirectly control a Part Assign Knob assigned to control a parameter within the Part’s Insertion Effect EQ.
Extra Credit
Study the Guitar Performance “Proximity Effect” you can see how the Super Knob is controlling a couple of bands of the EQ... as you move farther from a sound source there is a change in your perception of frequencies. Highs are less focused and low frequencies are more diffuse.
Also the “CFX Concert” has control over EQ... as you change Super Knob you are adjusting the acoustics of the virtual room ...
When you *select* a Part, you have immediate access to the Part’s EQ via the left front panel Quick Edit Knobs.
Low, Mid F, Mid, and High. No assignment is necessary if you need to tweak a sound - simply *select* the Part, Select the “EQ” row.
