Notifications
Clear all
MODX/MODX+ Series Synthesizers
5
Posts
3
Users
0
Likes
1,079
Views
Topic starter
Hi guys,
I have questions about controlling my MODX with an external controller, in my case Ableton Live 10. I'd like to externally change a few parameters and I'm not sure how to.
1. What are the CC channels for controlling PART Volume, Mute and Solo within a Performance?
2. Is it at all possible to control the Common FX knobs parameters (so Tone, EG/FX, EQ and ARP/MS and their sub parameters) externally as well via CC? Which channels would that be?
3. If no. 2 is not possible is there a way to assign those common controls to the Super Knob? You'd probably have to find those parameters first to assign them to the 8 Assign Knobs (which are then all controlled by the Super Knob as far as I've unterstood). But where can I find them?
If any of you have any idea about my questions I'd be really happy about an answer! This thing is devouring my nerves ... argh! ?
Best wishes,
Martin
Posted : 17/07/2021 7:23 pm
Well first, there's no such thing as a CC channel. Any CC can be sent over any of the 16 channels.
To your first question, in Multi mode, since each Part corresponds to its like MIDI channel (Part 1 = MIDI channel 1, Part 2 = MIDI channel 2, etc.) Part volume is CC 7, sent over whichever channel corresponds to the Part you're trying to adjust. Mute and Solo don't have standard MIDI CCs, so my guess is that, if they can be controlled by MIDI at all, it would be via system exclusive. (Or perhaps by using system exclusive to change the Scene which in turn could alter the status of Mute/Solo?) Similarly, I don't think you can use MIDI to control a knob, but you can use MIDI to control the same thing the knob is set to control. Again, more likely to be sysex than CC. I think. But I'm sure someone will be along before too long who has more knowledge of this than I do. 😉
Posted : 17/07/2021 7:58 pm

Hi guys,
I have questions about controlling my MODX with an external controller, in my case Ableton Live 10. I'd like to externally change a few parameters and I'm not sure how to.
1. What are the CC channels for controlling PART Volume, Mute and Solo within a Performance?
2. Is it at all possible to control the Common FX knobs parameters (so Tone, EG/FX, EQ and ARP/MS and their sub parameters) externally as well via CC? Which channels would that be?
3. If no. 2 is not possible is there a way to assign those common controls to the Super Knob? You'd probably have to find those parameters first to assign them to the 8 Assign Knobs (which are then all controlled by the Super Knob as far as I've unterstood). But where can I find them?If any of you have any idea about my questions I'd be really happy about an answer! This thing is devouring my nerves ... argh! ?
Best wishes,
Martin
Hi Martin,
First, there are no such things as “CC channels”. A Control Change (cc) message is a Channel message. Each channel has its own messages.
Second, Ableton Live is not a “controller” it is a DAW software. Huge difference…
A Controller is typically a Knob, Slider, Switch, or Pedal.
Controllers are designed to help the performer during the execution of playing the keyboard, for example, cc64 is the channel’s Control Change message to apply the Sustain pedal function for data responding to the MIDI Channel you send it on. CC7 is the channel’s Control Change message to apply Volume change for the Part responding to the MIDI Channel in question and can implemented by moving the corresponding Slider.
You don’t need to make these cc# assignments — (some have fixed numbers) and those that are assignable default to CC numbers shown in each Performance as follows:
From the Performance HOME screen:
Press [EDIT]
Touch “Control” in the first column > touch “Control Number”
Here you can review those physical Controllers that can be assigned on a per Performance basis. The number shown determines what cc number is generated when you engage the physical Knob, Switch, or device. These devices are used to perform music on the MODX
You will also find a shortcut link to those Controllers that are global (FS Assign, Super Knob CC, and Scene Select CC). These Controllers are designed specifically for controlling the MODX synthesizer tone engine.
A Remote Control device is how you refer to controllers that involve a DAW software. The Remote Control function is communication between the DAW software you are using (Ableton Live) and the front panel of your MODX (Be sure your MODX is utilizing the latest firmware — as the Remote Control functions for DAW were added in a firmware update.
MODX OS v2.5 adds DAW control of Cubase, Logic, Ableton Live & ProTools. You can use MODX physical controls and screen to control your DAW transport, track status (select/mute/solo), effects and virtual instrument plug-ins. There’s also a hybrid mode allowing simultaneous MODX editing along with DAW transport control.
When you tap “Remote” in the lower left corner of the MODX HOME screen, you launch the DAW Remote Control function.
You now can control all the functions of your DAW software using the hardware of the MODX front panel. This includes using the front panel Stop, Start, Record, Play, Fast Forward, Rewind, Return to Top (Transport Controls), as well as customizing your control surface to suit your needs.
This includes all Volumes (not just the volumes of the MODX’s MIDI and Audio Tracks, but any and all MIDI and Audio Tracks in your DAW.
The Ableton Live Tracks will each have their own dedicated Slider for Volume for example — even if you have 50 Tracks you can have a Slider for each in groupings of four 1-4, 5-8, 9-12, 13-16, 17-20, 21-24, etc., etc., etc., the Track Names will show up in your MODX screen.
SETUP: The communication between the MODX and Ableton Live is done on an entirely separate MIDI Port from the MODX’s own Controller and music messages. The Ableton Live Remote Control functions will utilize USB Port #2. This keeps messages meant as remote control messages for your DAW separated from those specifically for the MODX Tone Generator (Port 1).
While in REMOTE mode, the front panel is re-tasked — tap “Settings” and select “Ableton Live” as your DAW
In Ableton you must setup the Remote Control Surface ports to utilize “Mackie Control” protocol… Using the Yamaha Steinberg USB Driver’s MIDI Port #2.
This is a standard Control protocol designed for communication with DAW functions via MIDI.
You will be able to Control the volume of all your Ableton Live MIDI and Audio Tracks, you will be able to MUTE and SOLO, control Sends, etc., etc., etc.
Please see the LEARN area of this site for more details on using the MODX Remote Control function to work with your DAW.
Take your time … the MODX is way more powerful than you think!
Link for more information:
Tech Talk Live: MODX DAW Remote
As to questions 2 and 3…
The Common FX (Tone, EG/FX, EQ and ARP/MS and their sub parameters) — These are referred to in the MODX as the “QUICK EDIT” functions.
From the HOME screen, touch “Motion Control” > “Quick Edit”
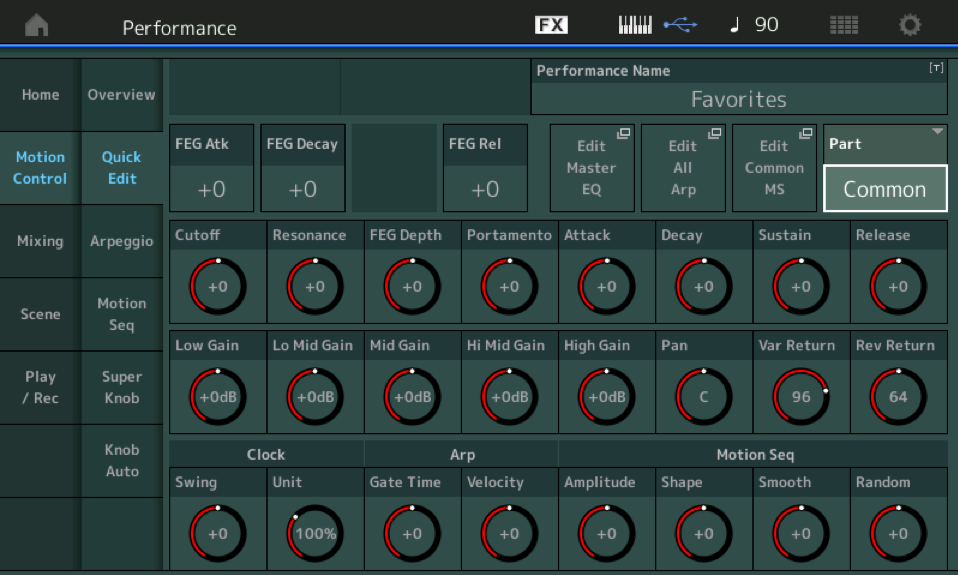
When “Common” is the selected PART you are going to be addressing all Parts (in common) — this would need to be transmitted on each and every channel.
Translation: let’s take “Cutoff” this Knob actually generates a CC74 message, which when “Common” is the designation will output cc74 on each of the MIDI Channels that the MODX is currently transmitting Out.
If “Part 1” is the designation then this Knob will send cc74 Out on MIDI Channel 1
To fully understand what is happening we must first state that this Knob is not a specific FILTER that you are changing. A cc74 message will address any and all Filters set to receive it. A typical 8 Element Normal AWM2 Part has 8 Filters, turning this Knob or receiving cc74 by this Part, will change the Cutoff Frequency of each of the 8 assigned Filters. If the Part has no Filters assigned, this “Quick Edit” Cutoff Knob will do nothing. What it does is offset the currently assigned filter cutoff frequency of all active filters in the designated Part.
Using the MODX’s massive Control Assign matrix, you can decide not only which Filters respond to an Assignable Knob, but by *how much* and in which *direction* the change is applied, on a per filter basis. The Assign Knobs allow you to be very specific, while the Quick Edit parameter Knob are for general (quick) editing.
Here’s another example… there is an “Attack” Knob among the “Quick Edit” function Knobs. Set to control the Amplitude Envelope Generator’s Attack… say you have a Part with 8 Elements, and you want to adjust the Attack for a slow rise on the first chord, but then be able to articulate a quick run immediately afterwards. Having 8 separate AEG Attacks that need to be adjusted could be a nightmare if you needed to do each one separately (having 8 attack parameters is clearly an advantage in the creation of the initial sound — but would be a disadvantage if you couldn't adjust them all together when performing.
The ‘Quick Edit’ Knobs let’s you offset all 8 filters or all 8 attacks with one quick move. The Quick Edit Knob controls are clearly for performing.
When editing deeply — say you have a 56 Element String Orchestra Performance, having individual control of each Elements Attack, Decay, Sustain, and Release is awesome (when programming) — and having a way to quickly change them all together is awesome (when performing). The MODX gives you a way to do both!
Moving the CUTOFF KNOB here would affect all PARTS in common. If you select an individual PART, however, the parameters are going to address just that one PART.
By selecting the [TONE] row you have access to: Cutoff, Resonance, Pan, and Portamento:
If you select the [EG/FX] row: Attack, Decay, Release, Rev Return.
If you select the [EQ] row from the HOME screen the Knobs will indicate: Low Gain, Mid Freq, Mid Gain, High Gain.
If you select the [ARP/MS] row will show the ARP Play FX Offsets: Swing, Gate Time; and the Motion Sequence Offsets: Amplitude, Shape.
For more information on the Quick Edit functions please see the following:
Mastering MODX: Navigation Tips
Think of the “Quick Edit” as the snorkel level editing.
Think of the Part’s Control Assign matrix as your Scuba level editing.
Each Part has its own Edit parameters, each Element within each Part has its own Edit parameters. Let’s take an AWM2 (sample-based) sound as an example…
Select a Part
Drop into [EDIT]
Along the bottom of the screen is access to each Element. Active Elements show in bright blue
You can navigate and look at all the various parameters for each Element.
As you explore, say you look at the Element 1, Filter screens
As you move the cursor highlight around in the screen, the [CONTROL ASSIGN] button will begin to glow whenever you land on a parameter that can assigned to a Controller.
Press the button — move a Controller — you have made the assignment.
You ask, where would you find the parameters… but don’t say specifically what you are looking for…
There are some 251 Assignable parameter Destinations… they are listed in the DATA LIST (pdf).
But knowing that each Part can have 16 Control Sets… means as you get an idea, you can customize control over it.
A Control Set = a Source (control) and a Destination (parameter).
It includes settings to apply the Control to the Parameter change.
The Control Assign Knob matrix (each Part has 8 Knob) can be used to not only assign control over a parameter but you get to customize how much, and in what direction or directions that control goes. When a Part’s Assign Knob is linked to the Super Knob, it is done through one of 8 Common Assign Knobs which are linked to Super Knob movement.
Each of the 16 Parts has 8 assignable Knobs
The Super Knob has 8 assignable Knobs
Highly recommended: the series of articles on the Super Knob to fully grasp this concept. Turning the Super Knob can change scores of parameters. Each the precise distance and direction you desire. A single gesture can perform scores of changes each to your specification. Much like in a modular synth, you make your assignments one at a time… as you construct your sound.
Hope that helps.
Posted : 18/07/2021 9:16 am
Topic starter
Thank you very much, that did help my understanding a lot already!
Can you also tell me something about my questions no. 2 and 3? Is there a way to control these parameters the way I described it?
Thanks in advance guys ?
Posted : 18/07/2021 9:54 am
Asked and answered above.
Posted : 18/07/2021 11:19 am
