Notifications
Clear all

Topic starter
Hi all, when I play modx and record midi in Cubase, for each note I play, multiple overlapping notes are recorded in midi track
In cubase track I select "modx-1" as input (not "every midi input"), modx is connected with usb cable using Yamaha driver
Its quite annoying, I have to "clean" manually after each recording, what's wrong with my setup?
Thanks!
Posted : 27/02/2022 7:21 pm

Hi all, when I play modx and record midi in Cubase, for each note I play, multiple overlapping notes are recorded in midi track
In cubase track I select "modx-1" as input (not "every midi input"), modx is connected with usb cable using Yamaha driver
Its quite annoying, I have to "clean" manually after each recording, what's wrong with my setup?
Thanks!
It's incorrect. But we think you know that. You will need to tell us a bit more about how you have things setup. So far you have told us you are using Cubase - but not which Cubase or which version number on what type of computer. You have told us you are connected via USB (good) and that you have installed a driver, although you say the "Yamaha Driver" we will assume that you mean the "Yamaha Steinberg USB Driver" for your computer type and operating system. (There is a "Yamaha USB-MIDI Driver" that is inappropriate for the MODX)
There reason we are being so picky about all of this, it is because it is these small little details that actually lead to the solution.
You have a Cubase MIDI Track set to receive MIDI on "Yamaha MODX-1 Port 1" - excellent - not "All MIDI In" - fine, you have correctly defined the MIDI arriving into your MIDI Track. But that is not the issue. You are getting "multiple overlapping notes" - which means you have a setup or routing issue... and it is on what is being sent back to the MODX after it is recorded into Cubase...
__ You do not mention that LOCAL CONTROL = OFF --- Turning Local Control Off in the MODX means that it only sends MIDI messages OUT via MIDI, the local connection between the MODX keyboard and the MODX tone generator is broken. MIDI messages must travel OUT via MIDI and be THRU'd back to the MODX via USB
__ You do not mention what the MIDI OUT is assigned to, nor what MIDI Channel Cubase is set to send the data back to the MODX on. Or how many Tracks you have setup...
It is these details that will solve your issue.
Before we get into solving it - it really would help to tell us, are you using Cubase AI version 'n', or are you using Cubase Pro version 'n'... this will greatly affect your options.
In your MODX what are you trying to record... a Single Part Performance? a Multi Part Performance? How many Parts? To how many Tracks?
Let us know.
Guess 1:
If you have not setup properly, you can be recording multiple Parts to a Cubase Tracks, each Track records all incoming MIDI channels, but if improperly setup each Track will "channelize" the data to a single MIDI Channel and you are getting chaos when you playback.
Guess 2:
There are Arpeggios active in what you are attempting to record and either you are not setup to record them or you are recording them but you are forgetting to turn OFF the ARP ON/OFF button when you playback (in such a case, the Arpeggios will start playing again, on top of what you recorded, a different kind of chaos but chaos nonetheless.
We can help sort this out for you but we really need a bit of information about your setup in order to be helpful.
Let us know
Posted : 27/02/2022 7:42 pm
Topic starter
Thank you BadMister for quick and detailed reply
Some additional information:
- PC with Windows 10, Cubase 11 AI (license included when I purchased the MODX)
- I will check driver version (cant remember at the moment)
- local control is OFF
- I created a new performance and started adding parts, and in Cubase I added new tracks with their midi Channel to control respective Part/Sound in the MODX performance
- my workflow is: in Cubase I add a new midi track, set input to Modx-1 and output to Modx-1 too, set midi channel (eg. Channel 1) and I setup Part 1 in the performance
- next I add Part 2 / midi channel 2 / track 2 and so on
- so far I have 13 parts / tracks but the issue showed from the beginning (when I had a single track and single Part in the performance)
- my idea is to work with a single performance for the entire song, grabbing different parts (with different midi channels) as I need them (drums, bass, Pad and so on). I want drums? I play tack 1 / Channel 1 / Part 1. I want pads? I play track 2 and so on
Just and additional information: the overlapping notes are perfectly overlapping, I noticed that when I tried to delete one note in the cubase editor: there were 6/7 additional notes "under" the top one. I also noticed the issue during playback, since synth sounds had a strage "detuned" effect and also sounded much louder, because of the multiple overlapping notes playing at the same time
Thanks for help!
Posted : 27/02/2022 9:57 pm
Thanks for the details... it will help in customizing our answer for you...
What follows is a basic outline on how to go about learning to use the MODX with a DAW like Cubase AI 11
We are confident that you have the correct driver because you would not be able to record ANYTHING without it. Take your time - this is a full outline of how to get started
MODX MIDI Recording to Cubase AI 11
I highly recommend — while learning to use this setup — to begin with SINGLE Part instruments. What this means is set your selection option to limit you to recording one MODX Part to each Cubase MIDI Track... starting with “MIDI 01” and continuing toward “MIDI 16”.
And once you are comfortable with the logistics of this operation, then and only then, proceed to adding Multi Part instruments to your recordings setup skills and/or audio rendering. I ask you to trust me on this.
Why Single Part recording, initially?
Mainly because the workflow is familiar and similar to what you maybe previously used to... this will get you to a certain ‘comfort zone’. And when you do move to more complex recording setups, (those that include Multi-Parts or Arpeggios) you will be able to appreciate why certain setting must change. When playing Multi Part instruments, your workflow may need to change depending on how your multiple Parts are interacting with each other - remember there are some new things possible between multiple Part instrument sounds are are NEW and DIFFERENT from any synth you may have previously encountered or attempted to record — and it will be better understood after conquering the straight “One Part to One Track on One Channel” recording methodology. Here goes.....
Initial MODX setup
From HOME
Press [CATEGORY]
Set “Bank/Favorite” = All
Set “Attribute” = All
Select “Init”
Select “Multi/GM”
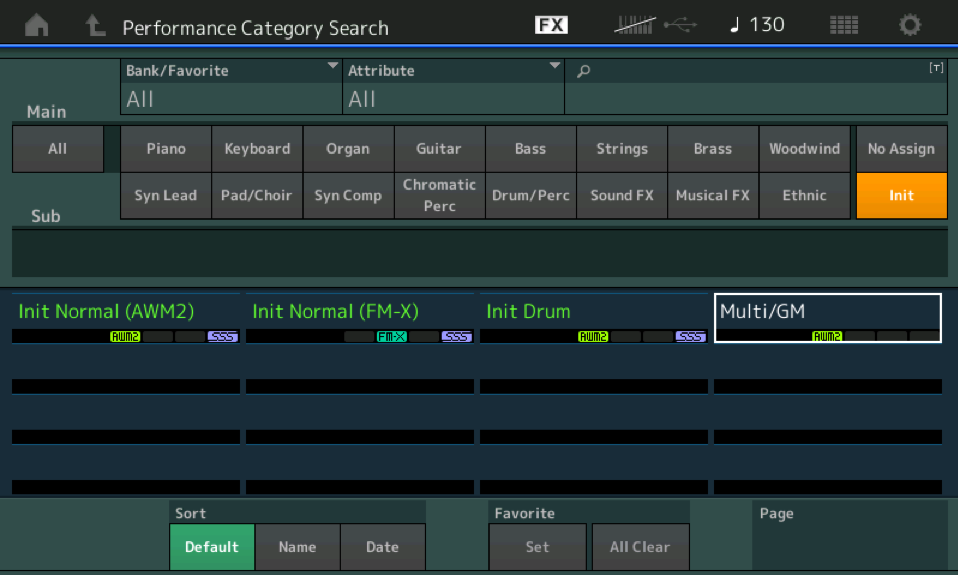
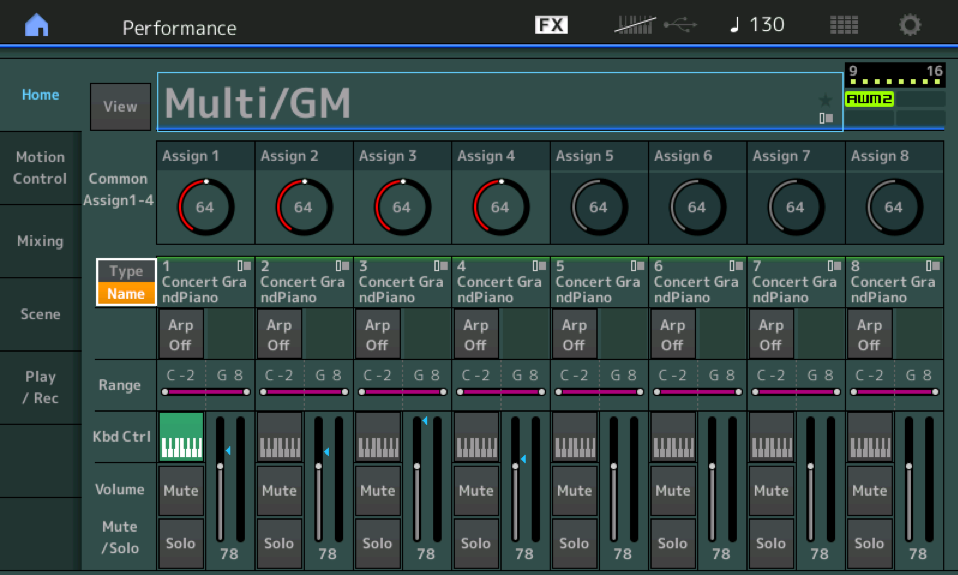
This places a “placeholder” instrument in each Part, 1-16 which you will replace, one-by-one with instruments of your selection.
Notice the initial setup has KBD CTL set to Part 1 (alone)
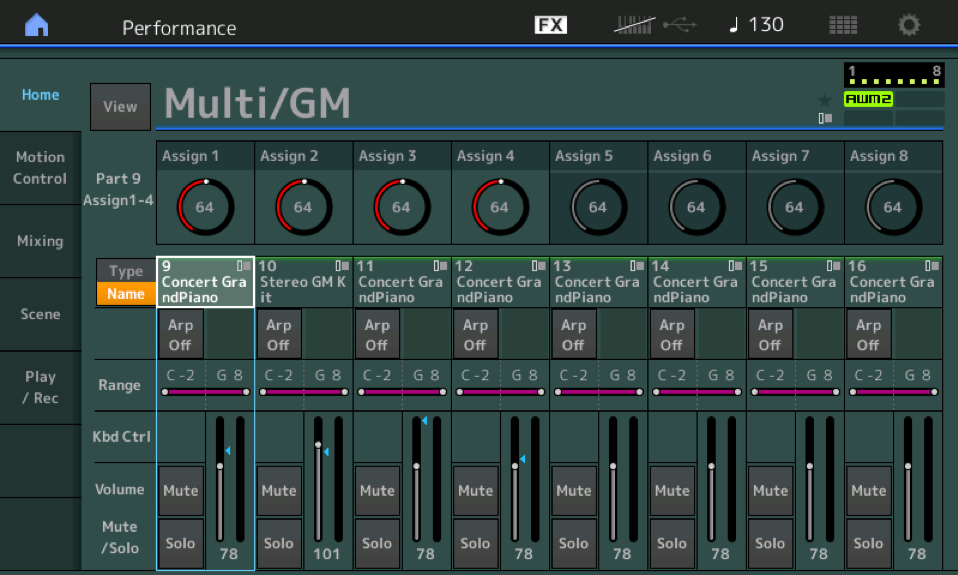
To view PARTS 9-16: Press [SHIFT] + Slider Select [1-4] to select Part 9. Check it out below:
If you touch the "TYPE/NAME" box for Part 1 a pop-in menu will appear with "Category Search" - This will launch the "Part 1 - Category Search"
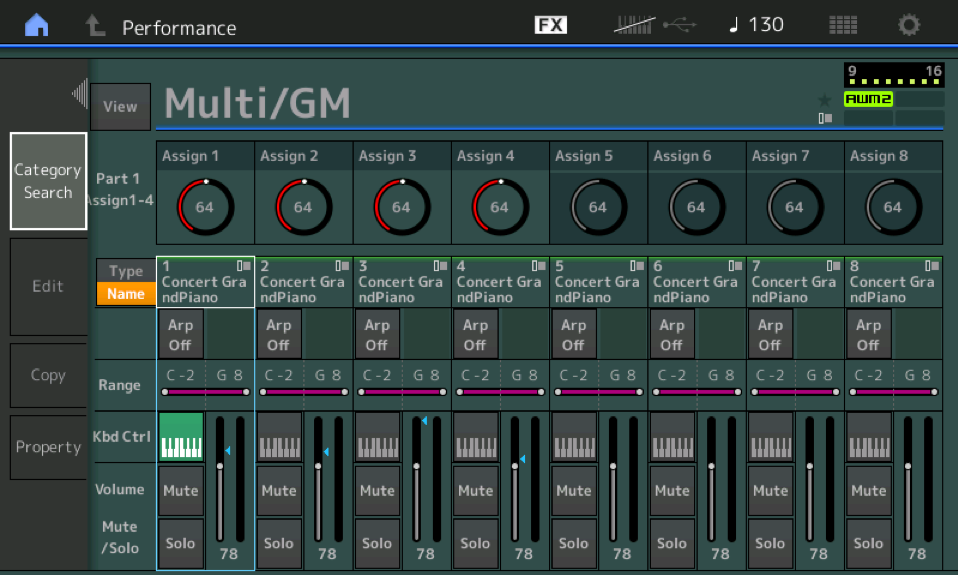
An alternate method of launching "Part 1 - Category Search" would be to first select the PART, then hold [SHIFT] + [CATEGORY]
Workflow Enhancement: KBD CTRL LOCK
I recommend activating the KBD CTRL LOCK = ON — this will allow an individual Part to play only when you select it, directly. When you want to interact with Part 2, simply select Part 2, only Part 2 will sound. Select Part 3, only Part 3 will sound and so on.
Here's how to set the KBD CTRL LOCK:
Touch “FX” at the very top center of the screen - this is a shortcut to the Utility screen where you can bypass effects, and set the condition for the KBD CTRL LOCK.
Set the KBD CTRL LOCK = On
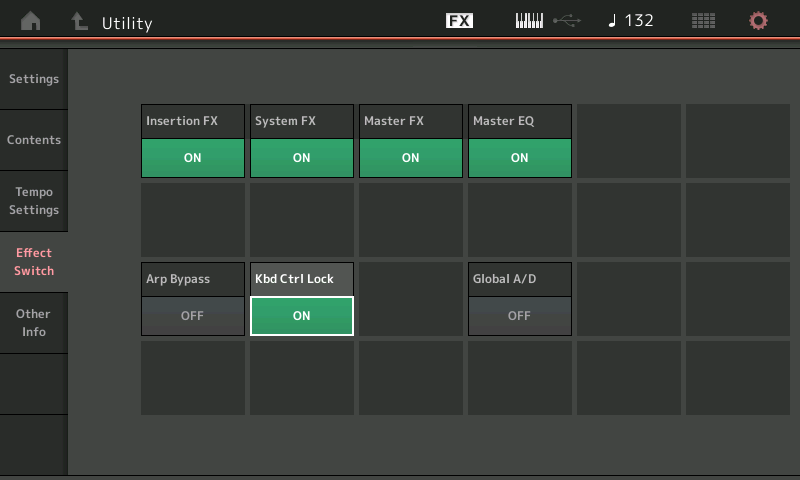
Press [EXIT] to return to your work.
Using the “Part Category Search”
You will create a New Performance by *replacing* each Part, one after the other.
We want to limit our search to the hundreds of Single Part (green) listings in the Category Search engine.
__ Select a Part
__ If you tap the “Type/Name” box in the screen by Part 1, a pop-in menu will appear, you can tap “Category Search” to launch “Part 1 - Category Search”.
__ Set the “Bank/Favorite” = All, Set the “Attribute” = Single
This will refine the Search to just those programs that are full instruments and occupy a single Performance slot. Making a selection will *replace* the placeholder “Concert GrandPiano” with your selection.
Select Part 2 and make a selection, and so on...
With this setup you will be able to move from Part to Part adding a new instrument to each Part.
You can set LOCAL CONTROL on the MODX = OFF
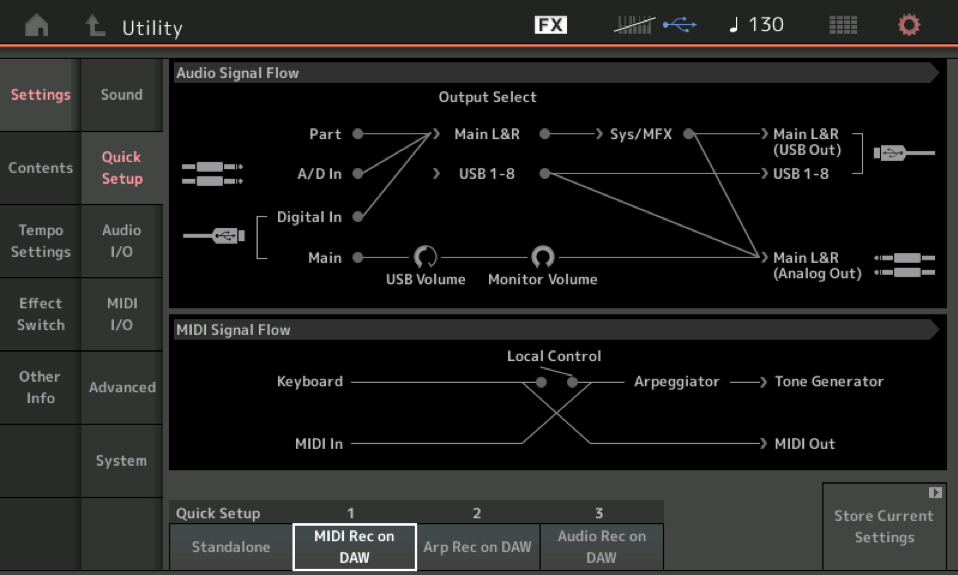
(An alternate method would have you selecting the MODX “Quick Setup #1” — “MIDI Rec On DAW” this will set Local Control = Off... (shown above)
You can see when the LOCAL CONTROL Switch is OFF (the connection is broken - you can actually tap the connection in the graphic to turn it ON and OFF) the KEYBOARD no longer has a direct path to the TONE GENERATOR. The KEYBOARD signal heads to the MIDI OUT (which goes to the currently selected Cubase AI MIDI Track) which THRUs the data back to the MODX -- arriving at the MIDI IN which can reach the ARPEGGIATOR and finally the TONE GENERATOR>
When LOCAL CONTROL is OFF, you will hear and be able to communicate with a MODX PART by selecting it on the MODX and activating (selecting) the corresponding MIDI Track in Cubase... You must activate a Track in Cubase to determine what you will hear -- the signal must travel to the MIDI Track and be routed back on a specific MIDI Channel to the MODX.
In the Track Inspector each MIDI Track has a MIDI IN = MODX-1, a MIDI OUT = MODX-1, and the OUT CH (the channel on which Cubase will send this data back to the MODX. Make sure that Channel matches the PART number of the Part you are playing in Cubase... When you want to hear PART 1 - select it in Cubase and select the track that is set to Output data on Channel 1.
Select Part 1 on the MODX.
Highlight MIDI 01 Track in Cubase AI... you should now be able to play and hear the instrument you selected for Part 1
Begin recording your tracks — the Part number will correspond with the MIDI OUT channel set for the currently select Cubase MIDI Track.
Get used to the basic stuff.
Practice things like punching in and out, copying and pasting, basic editing. There is a Steinberg Cubase YouTube Channel with plenty of the basic operations outlined in detail.
Once you are comfortable with Muting, soloing, punching in and basic editing, then see if you can start to transfer some of the edited Parts to Audio Tracks... the idea is to master the workflow from MIDI to Editing to Rendering Audio... before diving in the deeper end of the pool. There are some things that your MODX can do that can only be recorded as AUDIO...
Let us know.
Extra Credit:
We showed you how to turn the KBD CTRL LOCK = ON. It defaults to Part 1 (as that is where they anticipate you will place your lead instrument).
To defeat the KBD CTRL LOCK you simply have to tap any KBD CTRL icon -
I believe what was happening to you was you were adding PARTs to your Performance and each time you did the KBD CTRL icon would come on - adding to the number of PARTS you were playing simultaneously (and the number of MIDI channels you were transmitting on, simultaneously). By using the KBD CTRL LOCK - we are insuring that you are able to communicate with just one PART (one Single Part) at a time.
Let us know how this works out for you. Take your time. If you get stuck - post back here.
We highly recommend you experiment with the logistics and navigation - it is more important to learn the workflow before getting into being creative... record a composition that is easy for you to execute (and one you really will not care about if you make an error) . In other words, don't try to write a new composition while you are learning the logistics of navigating the Sequencer. Doing one thing at a time usually works best. Learning and creating something new can be difficult... however, if you focus on learning the logistics first - then after you have learned the basics - it is so much easier to be creative!
Hope that helps.
Posted : 27/02/2022 11:03 pm

You see 8 overlapping notes because Parts 1-8 are each sending on a different MIDI channel and you are telling MODX to send them all at once by grouping them using Keyboard Control (the piano keyboard icon on each Part 1-8).
You can address this in multiple ways but I would turn OFF Kbd Ctrl for all Parts 2-8. When no part is selected only the 1st Part will send MIDI. Any other single MIDI channel will transmit when selecting the Part (2-16). You can select a Part by touching the vertical rectangle for the Part on the home screen.
The other way to get here is to filter the MIDI track on Cubase to only document a single Channel (instead of All). You may want to set this up regardless so you don't have to fiddle with what track to arm. Or it would be fine to record all channels to a single track.
Or you could set MODX to single Channel MIDI mode. This would not be the best overall, but a way.
Options.
Posted : 27/02/2022 11:06 pm
Topic starter
Thanks all for detailed information, the problem was KBD CTRL ON in parts 1-8
I turned off KBD CTRL on single parts, and everything worked fine: next time I will turn it off from the beginning when recording midi on a multi-part performance (deleting overlapping note in the editor is quite frustrating!)
I assumed KBD CTRL would only work with local control ON, but I was wrong 😀
Posted : 05/03/2022 3:02 pm
