Notifications
Clear all
Topic starter
Continue your learning with the second lesson on FM-X from Bad Mister here.
Use this discussion string to share your thoughts/comments and ask questions.
And if you haven't had a chance to study Part I - check it out now.
And Part 3 is now available here.
So happy learning!
Posted : 27/03/2017 3:30 pm

Thank you Cassie for the announcement and Phil for this new great FM-X article.
Posted : 27/03/2017 4:33 pm

great, thank you, I understand everthing except "AssignKnob 6: EG LEVEL (Envelope Generator Level offset)". Could you please elaborate on that? How is "decreasing and increasing the amplitude envelope" any different from decreasing and increasing the volume? And I can´t say I understand any of "If you wanted to create an artful noise, a "spit" or some kind of chaotic noise at the attack of a sound, you would raise the "EG Level" (Knob 6) and lower the "OP1 Decay" (Knob 7), you could dramatically change the timbre of that chaotic noise by increasing the Modulator Frequency (Knob 1)."
Posted : 28/03/2017 8:32 pm

How is "decreasing and increasing the amplitude envelope" any different from decreasing and increasing the volume?
And that is the reason for the discussion. It is different, albeit related to what we perceive as volume.
Amplitude is not just a fancy word for volume - they cannot always be used interchangeably. Amplitude measures the Output strength. Yes, that *can* mean more volume, but in our discussion in the article we are trying to differentiate between Modulator (where a change in Amplitude is not audible directly as volume output, but has an influence on timbre/tone/character) and Carrier (which is directly heard as a change in volume).
Amplitude change on the Carrier = volume change
Amplitude change of the Modulator = timbre change
On that very AEG screen is the parameter labeled "LEVEL". That is a separate parameter that is the output level of the currently selected Operator. We were adjusting the EG LEVEL of the Modulator. (Envelope is the shape - how long it lasts. If the Modulator Decays before the Carrier you will hear that. If the Modulator envelope is longer than the Carrier, than the timbre change will occur throughout the duration of the sound.
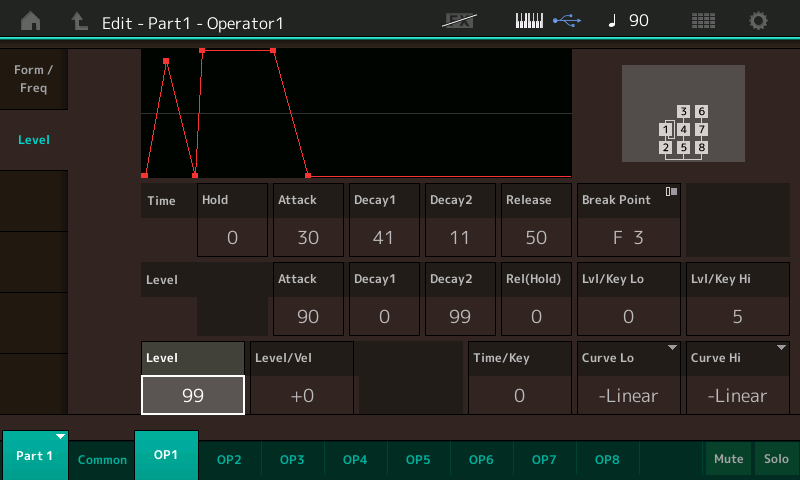
If you follow the basic concept of the Modulator being analogous to the left hand adding vibrato to a violin performance (inaudible alone), while the Carrier is the right hand string-bow. We are increasing the intensity of the vibrato. In this case it is not volume at all, it is the intensity of the oscillator (operator) responsible for timbre change. So while OFFSETTING the Amplitude Envelope Generator output of a Modulator intensifies the timbre change in the overall sound, it isn't a change in volume necessarily. It may seem slightly louder to us because as frequencies go from low to high, our ears hear best in the middle ranges. But the Modulator is not heard directly. It's influence on the Carrier (the Operator we do hear) is what we hear. Navigate to this screen: shown is the Carrier OP2...
The LEVEL parameter on the screen is the Operator Level controlled by a corresponding FADER. The Faders control that Level directly. Along the bottom of the screen you can move back and forth between OP1 (Modulator) and OP2 (Carrier).
Slide the Faders 1 and 2 to engage the Modulator and Carrier, respectively. Then move Assign Knob 6. It should be really, really clear how it is different from changing volume (LEVEL). And that was the point of that experiment.
"If you wanted to create an artful noise, a "spit" or some kind of chaotic noise at the attack of a sound, you would raise the "EG Level" (Knob 6) and lower the "OP1 Decay" (Knob 7), you could dramatically change the timbre of that chaotic noise by increasing the Modulator Frequency (Knob 1)."
Set your PART 1 Assign Knobs as shown

Assign Knobs 6 and 7 are our focus. EG LEVEL of Modulator, OP1 DECAY of Modulator
Turn Assign Knob 7 up to hear that the length of timbre change is longer as you go higher
Turn Assign Knob 6 up to hear that the timbre gets brighter, and finally very edgy.
With both 6 and 7 at 127, start to lower Knob 7, this will shorten the length of time that the Modulator is influencing the Carrier. Listen as the "harmonic chaos" get shorter and shorter compared to the overall length of the sound. If ever you need to but a "blip", a bit of "spit" on the front of a brass sound, a percussive "click" on the front of a sound, you create a large timbre change with a very short DECAY.
Move Assign Knob 7 up and down while Assign 6 is maxed out... until it is clear to your ear that that buzzy brittle sound is over modulation caused by the amplitude of the Modulator being so high. And as you lower (or quicken, shorten) the DECAY, the more it is concentrated at the ATTACK portion only. Immediate chaos, that decays into the OP2 tone alone.
Finally with Assign Knob 7 all the way down start to slowly lower Assign Knob 6, until you should hear just the Carrier (Sine wave)
Assign Knob 6 = 106 (EG Level)
Assign Knob 7 = 34 (OP1 Decay)
Is a good amount of "spit" on the front of the sound (at the attack).
Assign Knob 6 = 106 (EG Level)
Assign Knob 7 = 11 (OP1 Decay)
makes a nice 'snappy' attack bass tone
Hope that helps. It helps to move the settings and then analyze what you hear. On paper you might think Amplitude always is Volume, in practice, it depends on where it is applied.
Posted : 28/03/2017 11:42 pm
I shouldn´t have said volume, I meant level. I was wondering what the difference between "EG level offset" and the level of an operator is. Playing around with it, I still don´t hear a difference. When knob 6 is down, the influence of the modulator is gone, just like when turning its level down. When knob 6 is all the way up the level of the modulator seems to go higher than 99 because the sound gets more bright and distorted than when deleting that knob assignment and just fading up to 99. But other than that, "EG level offset", to my ears, only changes the level and nothing else. But I´ll experiment some more with it...
As far as yout example "Assign Knobs 6 and 7 are our focus. EG LEVEL of Modulator, OP1 DECAY of Modulator":
Knob 7 does not only have operator 1 AEG Decay assigned to it but also OP AEG release for both operators. It is my impression that when knob 6 is at 0, I do not hear any timbre change, the only thing I hear when turning up kob 7 is a longer release on operator 2, the carrier. In fact, when I turn off OP AEG release for operator 2, knob 7 does not do anything at all when knob 6 is at 0.
Posted : 31/03/2017 7:29 am
I shouldn´t have said volume, I meant level.
That's a key point. I think you are hearing exactly what is happening but need clarification on this difference: The EG Level Offset and the total level of the Operator... They both are interdependent but the difference is a key point.
The AEG or Amplitude Envelope Generator will affect the overall level output of the Operator (whether it is acting as timbre change or audible signal), and yes, so does the parameter called Level. The difference is the "Envelope" - thing.
The concept is an envelope shapes or contours the level change. So it is that simple and that complex. "the difference between 'EG level offset' and the level of the operator" is they are the same but the EG Level offset is changing multiple parameters that affect what happens and 'how long' it takes to happen. So a change in level with a time factor built in. And in the next few installments you will get to play with the two Decay Time and Decay Level parameters that this parameter is referring to.
So if Level is "always" meaning at all times, then level with an "envelope" will be able to change intensity over time. It could be dramatic, it can be subtle - as you will see. But the EG Level Offset represents multiple parameters (and includes what happens during the note being held and sounding). When we get to the actual AEG settings within the Operator you will see and hear how you can setup detailed shapes for the Modulator's influence.
Increasing the Level increases the influence of the Modulator on the Carrier, and the EG Level Offset is responsible for applying and shaping that influence. And you can change them independently. They are two parameters that can be used to mold the Modulator's influence on the Carrier.
Example: you can setup the Modulator's envelope so that it attacks twice. So say the EG LEVEL is up high so we get a buzzsaw type chaotic noise when the Modulator is applied. And we want that to attack twice so the Carrier is heard immediately, with two rather sharp peaks of buzzsaw in rapid succession.
Turning the Operator Level up and down will change how much of that double buzz we hear. True. That is clear.
But adjusting the EG LEVEL Offset will change not only how much buzz we hear but it will alter the amount of time between the two peaks of buzz!
Envelope is the shape of application.
The example in the current installment, the Modulator's shape is a percussive blip... stick with the series and we'll get a bit deeper into the actual Time and Levels of the AEG within each Operator! That is the main difference between an FM Operator and the typical analog Oscillator... each Operator has its own AEG! So you can very much shape when and how it influences the total result over time!!!
If you are getting that much in Part 2, hang in there, you are right on track. Thanks for the question.
Posted : 31/03/2017 1:21 pm
thanx, looking forward to the next lesson!
Posted : 31/03/2017 1:50 pm
Here's something you can try to make the point clear:
Set the P3 PART 1 Assign Knobs as shown below:
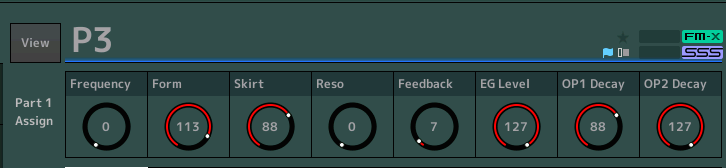
EG LEVEL is 127 - creating the buzzy sound (over modulation)
OP1 DECAY is 88 - allowing for a fairly prominent repeat of buzz
OP2 DECAY is 127 - is the Carrier - we are ensuring that we have time to hear the Modulator envelope do its thing.
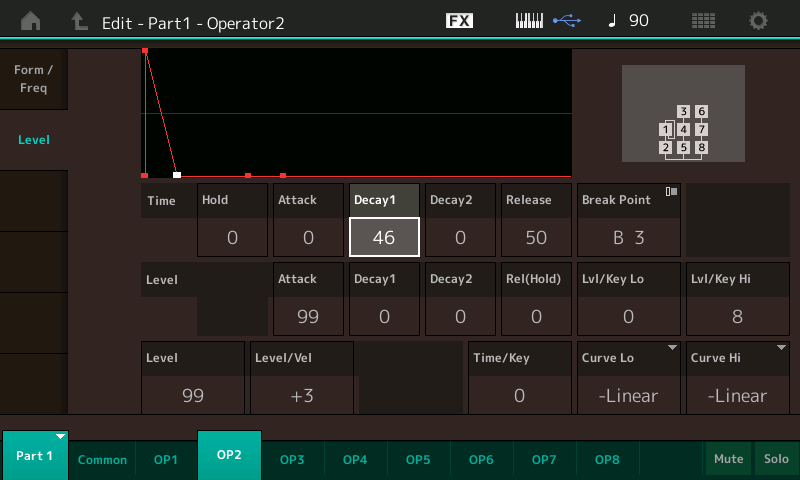
Now let's navigate to the Modulator's AEG where I've created that double peak of buzz...
Press [EDIT]
Touch "OP1" along the bottom of the screen
Touch "Level" in the first column
Set the AEG "Time" and "Level" settings to create this envelope (for demonstration purposes):
(Your Part ASSIGN Knobs are still active while viewing this screen)
Now you will hear a huge difference when slowly reducing Assign Knob 6 (EG Level), re-striking the key as you reduce it, notice how the time between buzzy spikes increases as you lower the "EG LEVEL"... and as you reach low values you have also reduced the Modulator's influence, to virtually nothing.
Next, return EG LEVEL (AsgnKnob 6) to 127 and slowly reduce the OP1 "Level" ( ...you can use the FADER or you can highlight "LEVEL" and use the Data Dial...) Now you can hear that just lowering the Operator LEVEL does not change the time between buzzy spikes, it simply reduces the influence of the Modulator. The distance between the spikes remains the same for all settings of the Level, as it reduces the Modulator's influence to nothing.
Hope that helps.
Posted : 31/03/2017 3:29 pm


I still have a question about AsgnKnob 6 (EG LEVEL). I had thought that OP AEG Offset would raise and lower the height of the red curve. It seems to do that. But, as you said, it also alters the timing of the curve.
This leaves me puzzled about what the OP AEG Offset parameter actually does. It would be helpful if you could give us a very specific description of how it alters the red curve, and whether the red curve is the only thing it alters.
Thanks.
Posted : 01/04/2017 1:50 am
TIME should be thought of as how long it takes to get somewhere. 0 is immediate, and 99 is a long time.
TIME in the red graph is the distance from the left border. As you increase Time the representative dot moves farther to the right.
LEVEL is the nort-south axis and represents amplitude.
LEVEL in the graph is distance from the bottom border. As you increase Level the representative dot moves farther up.
OP AEG Offset, allows you to adjust the eight possible Operator's AEGs simultaneously. Unlike an analog synth where mostly all oscillators share just one envelope generator, an FM Operator includes its own AEG complete with Time/Level Settings. You have a control box matrix to apply this Offset parameter - to facilitate quick, broad changes. In the matrix here, each Operator has a Switch so you can opt-in or opt-out on offsetting its particular shape; additionally each Operator has a Rate (amount and direction of change). When you experiment with the OP1's +7 setting, you are checking the depth of application of this Offset. In the example only the Modulator (OP1) is effected... (enough to follow for now).
The simple explanation would be: when you apply an OP AEG Offset, adjusting the LEVEL will necessary adjust the length of time it takes to get there. Move your cursor to highlight LEVEL "Decay 1" (currently 0), as you raise that value the faster the second spike occurs... obviously: the shorter the distance the envelope has to travel. We are both shortening the drop from the first peak, and the distance to the next peak.
The first Level (90) = spike 1
If we now raise Level Decay 1 (0) the distance from that dot to the next Level (99) gets shorter, and therefore we reach the destination quicker.
The OP AEG Offset allows for ease of controlling sound while performing. If the DX7 was complicated it was because FM has so much control, and when performing you don't want to 'have to' drop in and edit each Operator individually; these offsets give us a way to make all the complex details underneath quickly and easily accessible... and we can scale and shape the results.
The advantage of detailed control is it makes for sounds with great complexity, the disadvantage would be if you can't find a way gang some of those parameters together in a meaningful way, it's not as intuitive to perform with it. It will allow you to setup a range of movement or a range of change that you can make available while performing this sound.
And for me, this is the important part of "programming" or tweaking - adjusting the sound so that it is expressive for YOU to play it in the musical context that you've chosen.
Posted : 01/04/2017 4:12 pm

... since we're covering this parameter, which does have the special operator sw / operator rate feature - I can plug a suggestion I made around these:
https://www.yamahasynth.com/forum/useability-of-fm-synthesis#reply-13565
For control assign destinations and FM-X: Looking at the options like Op Freq (EDIT: and Op AEG EG) - how the operators have "operator rate" values which can be positive or negative. It would be nice to have this flexibility for other parameters such as level (EDIT: and LFO speed, Pan, Cutoff, Resonance, ...) and others as well. Since there are only a few handfuls of destinations available - it would be nice to be able to extend this flexibility to other destination parameters.
Side note (not FM related) I didn't notice this until FM-X and Op Freq - so also AWM2 elements could also benefit from this as well.
Posted : 01/04/2017 6:58 pm
very cool. and I really like that performance without the double attack, it sounds like Kraftwerks "the model" 🙂
Posted : 02/04/2017 6:14 pm
The double attack was just an easy way to demonstrate the TIME function involved in the Envelope Offset... certainly not to improve the sound :-
Posted : 02/04/2017 8:01 pm
Thanks, Bad Mister. I tried the experiments you suggested, and I think I understand now. But I want to verify that understanding.
I had thought that with regard to the AEG the Montage would move along the Time (i.e. horizontal) axis from left to right at some constant speed, picking up Level values as it went along and applying them to the sound. From what you just told me, what I now think I understand is that the Montage moves along the red line at some constant speed, which is why varying the level can affect the timing. Do I have that right?
Also, does the OP AEG Offset affect all of the levels of the amplitude envelope? And if so, does it just move the whole red curve up and down without altering its shape, or does it move the anchor points in some more proportional manner with respect to each other?
Posted : 03/04/2017 1:25 am
Yamaha's documentation has been inconsistent with respect to the envelope parameters. I say this because the DX7 series, for example, document the same parameter as a "RATE" (R1, R2, etc). Reference https://homepages.abdn.ac.uk/mth192/pages/dx7/manuals/dx7IId-man.pdf - page 51 (R1, R2, R3, R4). While other synths with the same interpretation of the parameter label this as "time" such as Montage, FS1R, etc.
The truth is that it's a slight hybrid and Yamaha doesn't see fit to offer much insight here as either the request isn't seen as having validity or this is considered to be wrapped too much in intellectual property to divulge, or some combination.
I say this because if your distance (delta between adjacent levels) is zero, then any rate would take also zero time to traverse through the segment (attack, decay1, decay2, release). Staying with rate - if we think of this as a car - then level is analogous to the car's position, "distance" or the difference between previous and current level (along the EG) would be analogous to the car's distance between two locations (such as miles) - and the "rate" would be distance/time - (level2-level1/time) for the keyboard or Miles/Hour for the car.
With the car, if our location (which is analogous to level in the keyboard) was the same location - then it wouldn't matter what rate the car is travelling - it would take zero time to traverse from one position to the same position.
For the keyboard, this would mean if the level is the same between two adjacent sections (say level of attack to level of decay 1) is the same - then it would take zero time to make it through this section. However, we know if we set the level of Attack the same as the level of Decay 1 and increase or decrease the "time" between these two levels - it takes longer than zero time to go between these points. It takes more or less time depending on what we set the "time" value to. If this was PURELY rate - then it would always take 0 time.
However, if you think of the "time" values more as rates - then you can see how the time it takes to go between two different levels would increase or decrease depending on the difference between the two level values.
Some of this is captured in the following references:
https://github.com/google/music-synthesizer-for-android/blob/master/wiki/Dx7Envelope.wiki
https://groups.google.com/forum/#!topic/music-synthesizer-for-android/QD2KGEj7QIk
Which I've referenced before. The github link includes an envelope simulator that shows non-zero time between adjacent points when the level is the same as the last. So study of the code can reveal some detail - the Wiki and message board discussion doesn't seem to focus on this anomaly when referencing "rate".
The general guidance would be to think in bigger picture terms and the "time" values more as rates unless you need precision as another user has needed for his application (matching decay rates with another synth for a library he was creating).
Posted : 03/04/2017 2:36 am
Page 1 / 2
Next
