Notifications
Clear all

Topic starter
The Level Velocity Sensitivity Offset parameter of a Voice is described on page 79 of the XF Reference Manual.
I have read the description of this parameter a large number of times in the past hour, and I can't make any sense out of it. I also tried experimenting with it (using Vibraphone, USR1 B08), and couldn't figure out what it does.
Can someone explain what this parameter does?
Thanks…
Posted : 09/02/2015 2:26 am

Sure, happy to... Once again forgive the length, but again, this is not a "how's the soup?" question.
Thank you for the question.
VOICE: Vibraphone, USR1 B08... from the Factory Set...
Level Velocity Sensitivity Offset: within the Voice architecture
From VOICE mode
Press [EDIT]
Press [1] to view Element 1 parameters
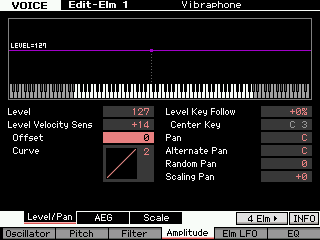
Press [F4] AMPLITUDE
Press [SF1] LEVEL/PAN
"Level Velocity Sensitivity" is the parameter responsible for interpreting the speed at which a key is depressed and turning that into an output result. It can be best understood as a DEPTH parameter, because it has to do with 'how much' is to be applied to get a desired result. It's range can be set positive or negative. When Level Velocity Sensitivity = 0 the Element will not respond to velocity at all, but output will be fixed at the Element's LEVEL setting (top).
First, lets talk about the "normal" (positive response) and then we can discuss the unusual. It is normal for a musical instrument to increase in volume as more effort is used to hammer, strike, pluck, blow or bow it. Also it is true that as you increase that effort the richer the sound is in harmonics (high frequency content). Velocity Sensitivity can be directed toward each of the three major building blocks: OSCILLATOR, FILTER, AMPLIFIER... To have an influence on pitch, timbre, and/or loudness.
The standard "linear" velocity curve (normal) would be for each increment of effort you increase the key-on velocity, 1-127, there will be increase in the MIDI Output level, 1-127. Say you played something and the velocity you used or the velocity of the recorded MIDI data did not give you enough audio output, the Level Velocity Sensitivity Offset allows you to increase the output result (or if you lower it, decrease the output result).
Toggle through the CURVE parameter and understand each one - as to the degree of ease or difficulty you experience in increasing Output (volume, in this case) per velocity Input. Curve "2" is linear. For each unit increase in velocity there is a unit increase in volume output. Low velocities are soft, high velocities are loud.

The graph in the screen would place 0 in the lower left corner of the box.
Input effort (Key-On velocity) is the x-axis left to right
Output result (Amplitude in the case) is the y-axis bottom to top
If you press a key with a velocity of 47, the Note generated would be at a volume of 47.
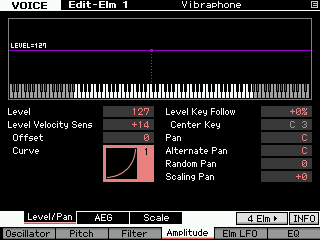
When the CURVE is set "3" (referred to as "soft" ) understand the graphic as showing how easy it is to increase Output per Input effort. The graphic is not linear but rises initially with less effort.
If you press a key with a velocity of 47, the output volume would be significantly higher than 47.

Suggestion: to hear clearly these results Mute Element 2 - you do so by turning Off LED #10
Then make Element 1 full range: respond to all incoming velocities - this will help you understand the parameters better.
Press [1] to select Element 1
Press [F1] OSCILLATOR
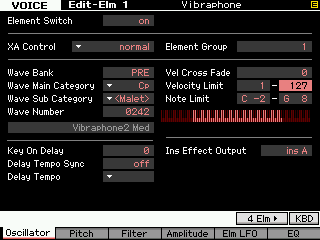
Set the VELOCITY LIMIT so the an Element covers all velocity inputs 1-127 ( as you can see, Element 1 was set to respond up to 117, 118 and above was the domain of only Element 2.
Try CURVE 1 (Hard) understand how it takes more effort to make this Element loud now. The line in the graph travels farther on the Input axis before it rises along the Output axis - more effort to get loud.
CURVES 4 and 0, are hybrid curves that are initially difficult and then easy, and initially easy and then difficult, respectively. These are sometimes called the "wide" curves.
When LEVEL VELOCITY SENSITIVITY = +32 on its scale from -64 thru +63, you have "true linear" response.
"True Linear" response is just a setting, it does not mean that it will feel right, this is what you are adjusting to your particular playing style, for *this* particular sound. You are playing on a set of piano-style keys, you are trying to make them 'feel' like you are playing, in this case, a Vibraphone (it's sci-fi, it's not real) there is no CORRECT way it should feel... how it feels to you, the response you get for input, will be your personal opinion and therefore CORRECT, for you! Make sense.
Experiment 1:
Level = 127
Level Velocity Sensitivity = +32
Offset = 0
Curve = 2
As you change OFFSET, Notice it gets easier to get Output from a key strike. Until at Offset = 127, it is impossible to be quiet at all. The softest key strike results in this Element reproducing full output.
If you do the same thing with CURVE set to the "3" (easy) setting, you'll now notice that when Offset is increased from 0, by the time you reach an Offset of 64 you have already reached maximum output. Increasing effort beyond a velocity input of 64 has no increase in output level. It becomes extremely easy to reach full output.
If you now do the same experiment, change the Offset, but this time start with CURVE 1. Feel how the response is initially hard and as you increase the Offset value it is easier to reach maximum output.
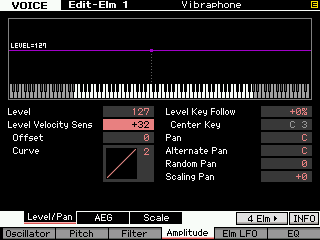
Experiment 2:
Level = 127
Level Velocity Sensitivity = +63
Offset = 0
Curve = 2

At this setting (Level Velocity Sens at the +63 maximum) notice this is far from being "linear" in response. In fact, only when you apply an Input of maximum effort do you get a note at all. For all low velocities the Element doesn't output sound, only when Input is extreme does this setting allow any Output. This would be useful for setting velocity curves where an Element only arrives at particular playing velocities... Imagine another Element that would sound in response to increased input and then disappear at extremely high velocities... This would be one way to setup sonic cross fades between Element contributions with a Voice.
Move the cursor to highlight OFFSET and vary it as before and you play the keyboard at various velocities. This time vary the Offset but your observations will be vastly different. The settings for Level Velocity Sensitivity (depth) and the Offset determine the real response curve for this Element.
All values above linear (+32) that is, an Level Velocity Sensitivity of +33 or greater, means that no output at all is produced from extremely low velocity inputs... And by the time you offset +63 only an extreme high velocity input produces an output. The original Element setting for Level Velocity Sensitivity was +14. This is the value the original programmer felt delivered enough Output (result) for a low velocity strike... If you continue to strike a key with low velocity as you raise this parameter, you will notice the sound getting softer as the Sensitivity increases, it results in a wider response curve.
You can see now why I suggested you work with just a single Element set to full velocity range... Had you not done this you would not be able to observe this behavior properly. In this particular Voice the programmer choose to simply do a velocity switch using the VELOCITY LIMIT parameters: Element 1 (1-117) and Element 2 (118-127).
As you increase the OFFSET value in this second experiment observe how low velocities behave, as you increase it 16... 32... 64... 96...
Summary: each Element has its own customizable response to Velocity. And this is the type of thing that makes for incredible details within the way Voices behave. We've been looking at the Amplifier (amplitude envelope generator) block, this same type of control over velocity is repeated in the Pitch and Filter blocks... Per Element. While there are some instrument emulations that can benefit from velocity applied to Pitch, a vast majority make use of velocity sensitivity applied to the Elements Filter. Each of the Elements has its own Filter, and sensitivity response to velocity (for Cutoff Frequency and Resonance)
Okay so how tedious is it to get all 8 Elements adjusted and behaving as you desire... Well, you can really get into this, however there is an upper level (a common level) of programming, also; an overal Velocity Sensitivity Depth and Offset. This is found as a Part parameter (Performance, Song and Pattern) and after you have a Voice and are working blending it with other instrument sounds, you have a similar Velocity Sensitivity Depth and Offset for Output level (amplitude) for the PARTs response to Velocity coming from the keyboard or coming in via Midi or from a sequencer track. You will also find another velocity offset specifically for arpeggio phrases (just FYI).
You start to see the attention to detail that can be brought to each component within each Voice.
Hope that helps. Thanks for the question.
Posted : 09/02/2015 1:44 pm
Topic starter
I checked, and what I posted here earlier today was wrong. Will repost when I get it right.
Posted : 15/02/2015 9:11 pm
Perhaps you were referring to the Velocity Sensitivity Depth and Offset parameters... which are PART parameters found in the modes where a Voice can be placed in an ensemble; ie, Performance, Song Mixing, Pattern Mixing. This can be used to change how a Voice assigned in a particular Part responds to incoming velocity messages from the Keyboard or in via MIDI, or from a track of the sequencer. This enables the user to customize the response without having to destructively change the original Voice.
If you change the Velocity Sensitivity, as I described in the previous post (programming at the Voice level), it changes the VOICE itself... therefore, every other Mix or Performance that uses that Voice is also changed. These PART parameter offsets, on the other hand, only affect the individual instance of the sound, because they are PART parameters. Make sense?
Posted : 16/02/2015 6:55 pm
Topic starter
Thanks so much for the long and detailed explanation.
After thinking about it for a while I came to what may be an accurate understanding of what you said. This understanding is embodied in the image below. Each square in the image is a graph with velocity horizontal (0 – 127) and amplitude vertical (0 – 127), based on Curve 2 (linear).

Did I get it right? These curves don't look quite right to me, or that useful, so I'm hoping there's something wrong with what I figured out.
(Here's the spreadsheet I used to generate the image, in case you’re interested.)
Posted : 17/02/2015 1:26 am
You are working too hard... The Editor shows you all the graphs you would need to fully understand any setting. I'm still unclear which you are talking about, the individual Voice parameter for destructively editing a Voice, or the velocity curve adjustments that can be applied non-destructively via the Part parameters.
VELOCITY CURVE applied via PART parameters
Please see the "Yamaha Motif XF Editor Standalone/VST"
Place it in SONG or PATTERN mode
Click on any Part 1-16... Use the Vibraphone, if you wish...
Bring the EDIT overlay into play
Click on the GENERAL option
See the "Note / Velocity Limit" area
Here you will see the Velocity Curve along with the DEPTH and OFFSET parameters.
This is found in your Motif XF
Press [MIXING]
Press [EDIT]
Select the Part 1-16
Press [F1] VOICE
Press [SF3] OTHER
The standard "linear" velocity curve (normal) would be for each increment of effort you increase the key-on velocity 1-127, there will be increase in the MIDI Output 1-127. Say you played something and the velocity you used or the velocity of the recorded MIDI data did not give you enough audio output, the Level Velocity Sensitivity Offset allows you to increase the output result (or if you lower it, decrease the output result).
The graphic shows 0 in the lower left corner of the box.
Input effort (Key-On velocity) is the x-axis left to right
Output result (Amplitude in the case) is the y-axis bottom to top
A setting where both the DEPTH and OFFSET = 64 results in no change to the Voice's currently programmed input/output response.
_ If you increase just the DEPTH to 127, notice how visually it will now take half the effort (input) to reach maximum output. The y-axis reaches maximum (top) when the input (effort) reaches 64 (halfway). You should hear the Vibraphone Waveform switch to a more metallic sound easier (with less effort).
_ If you decrease DEPTH below 64, notice how visually you will not be able to reach maximum output any longer.
Reset the DEPTH to 64 and experiment with OFFSET
_ If you increase just the OFFSET toward 127, notice how it take little or no effort to reach maximum output.
_ if you decrease the OFFSET below 64, notice how visually you will not not be able to reach maximum output any longer.
Now try this:
Set the DEPTH = 108
Set the OFFSET = 21
See how for very low velocities you will not get much Vibraphone, but after a point the velocity curve is steep towards maximum...
If DEPTH = 127 and OFFSET = 0, you will get virtually no Vibraphone until you reach a velocity of 64... You see how this can tend to be great for cross fading... By creating a Voice that worked opposite this behavior.
The Velocity Sensitivity DEPTH and OFFSET parameters work to change the output result to incoming velocity (without having to destructively change the MIDI Event data contained in a track, or destructively editing the original Voice itself). You must "play the keys" with varying strength to experience the sonic difference. How much effort it takes to get that metallic overtone from the Vibraphone Waveform in the Voice you mentioned.
Remember: changing the Velocity Sensitivity can change dramatically the performance of MIDI data... Particularly in Voices that depend on velocity switches within the Waveform (like the Vibraphone Voice you referenced in your original post).
Posted : 17/02/2015 4:16 am
Topic starter
You are working too hard...
I don’t know any other way… 🙂
I’m actually a software developer masquerading as a musician. So I have my own unique approach, which I understand may not always serve me well as I explore a machine designed for musicians.
The Editor shows you all the graphs you would need to fully understand any setting. I'm still unclear which you are talking about, the individual Voice parameter for destructively editing a Voice, or the velocity curve adjustments that can be applied non-destructively via the Part parameters.
I was talking about the Amplitude settings described on page 79 of the Reference Manual. I assume that’s what you’re referring to by “destructively editing a Voice.” This is the place that a graphic display of the effects of the Level Velocity Sens and Offset parameters on the amplitude would be helpful. It's what I was trying to figure out by producing the image in my previous post. I'm still curious whether you think my image is an accurate representation of how these parameters work.
Please see the "Yamaha Motif XF Editor Standalone/VST"
…
This is found in your Motif XF
…
Exactly what I needed!
Apparently there are three different ways to alter a Voice:
- Edit the Voice in Voice Mode.
- Edit the Part parameters for the Voice in a Performance/Song/Pattern.
- Create a Mixing Voice in a Song/Pattern and make changes to it.
I’m left wondering which to use, and when. Can you say something about the tradeoffs?
And thanks again…
Posted : 17/02/2015 8:09 pm
_ Edit the Voice in Voice Mode.
_ Edit the Part parameters for the Voice in a Performance/Song/Pattern.
_ Create a Mixing Voice in a Song/Pattern and make changes to it.
_ Editing the VOICE in VOICE mode is destructive. Here is what that means, let's say the VOICE in question is located in USER 1:001(A01), if you edit the Velocity Curves of the Elements of this Voice and then STORE it, every instance where this Voice is used within the XF has been Edited. Say it is used in five different Performances, and ten different Songs, and twelve different Patterns... They all just got changed to reflect your edits. That is what we call a destructive change. It may, in fact, be what you want, but then again ...it may not!
_ By editing the PART parameters, you are simply applying Offsets to the stored Voice in Voice mode. Part parameters are non-destructive because changing them in one Performance only changes the behavior of this sound in that one Performance, all four of the other Performances, all ten of the Songs, and all twelve of the Patterns, in our example, remain as they were. We call this non-destructive.
_ The MIXING VOICE allows you to destructively edit the Voice but you store a *new* version of it that remains "local" to the Song Mixing or Pattern Mixing program for which you create it. There are 16 Mixing Voice locations per Song and per Pattern, a maximum of 256 Mixing Voices total. Only "Normal" (non-Drum Kit) Voices can be stored in these Mixing Voice locations. The Mixing Voice can also be offset further by Part parameters. The Mixing Voice can be copied to a regular normal USER bank location, if and when you wish to use it in another Song, Pattern, or if you'd like to use it in a Performance Part.
Extra Credit
When using Cubase's Sound Browser, you can archive your edits as individual VOICEs by using the Save as VST PRESET function found in the Editor VST. They can be sorted by Category, even ranked for your own purposes and even placed in Folders of your own groupings. You can archive your edits as entire MIXING programs, (this will include every Mixing setting, including your custom Mixing Voices made specifically for the current Song or Pattern it originated in). *Mixing Voices cannot be archived individually from one of the 256 MIX VOICE bank locations - you must store it to a normal USER location moving it from its exclusive "local" spot, and placing it among the 'general population'.
The advantage of archiving all of your Edited Voices, your purchased Libraries and your Mixing setups is that you will not have to hunt through a half dozen USB sticks or countless individual .X3A files when you want to recall a Voice or entire Mix... You can simple have the Sound Browser recall them in seconds. Also since the data is bulked from the computer via MIDI, it takes only seconds to find and audition any of your data. And you do not have to LOAD the data using the FILE routine.
This gives you instant access to every Voice, every Mixing program you ever purchased or created by editing or from scratch... The data is transferred to the XF's Edit Buffer where you can instantly play it, further edit it... then direct it to any appropriate internal location. This includes Voices that require Flash Board Waveforms and Samples, because that data is already in place, you are simply moving the Voice data or Mixing data which includes *where* to find the Waveforms and Samples to make the Voices sound properly.
Your Flash Board is simply an extension of the internal Wave ROM... so once you install data to your Waveform List, you don't have to worry about Voices that you recall finding their data... That info is what gets recalled. It is a very elegant system. You can store literally thousands and thousands of Voices and Mixing setups using this methodology. Every time you create a Voice, or edit a Voice by changing its velocity curve or its assigned Insertion Effects you may consider archiving it to the Sound Browser.
Posted : 17/02/2015 9:15 pm
Topic starter
Great stuff as usual. Thanks!
Using the Amplitude settings described on page 79 of the Reference Manual, is it possible to create a velocity sensitivity curve like this?

Given the "extra credit" capabilities of Cubase you mentioned, it sounds to me like the Melas software wouldn't add any additional abilities that I might need. Am I right about that?
Posted : 20/02/2015 2:40 am
See Experiment #1 in my first post. I mention specifically setting the CURVE to 3 (Soft) and increasing the OFFSET... by the time you reach 64, any increase in effort yields no more output... Just like your graph.
It is better to "feel" this than to see it.
The graph you show is what would be considered a SOFT curve... which means it takes very little effort to reach maximum output... And beyond a certain point increasing effort yields no more increase in the output level.
"Effort" or Velocity input, is the x-axis (left-to-right).
"Output" or Level, is the y-axis (bottom-to-top).
Given the "extra credit" capabilities of Cubase you mentioned, it sounds to me like the Melas software wouldn't add any additional abilities that I might need. Am I right about that?
Not sure what it is you need. The Melas software is invaluable when it comes to customizing your own library files, managing waveforms and samples, etc. The Sound Browser is entirely different in that helps organize and gives quick access to every Voice and every Mixing setup you create. I would not be without both.
If I need to assemble a Motif XF LIBRARY file (defined as 512 Voices, 32 Drum Kits, 512 Performances, 128 Mixing setups, 128 Master Programs, 256 Arpeggios) I would not attempt this without the Melas software. The Total Librarian and Waveform Editor are essential.
Where would I get the Voices and Mixing setups from? The Sound Browser... Instead of loading individual data from the scores of individual .X3A files I've amassed, the Sound Browser has every Voice I've come across in the Motif-era (categorized and ranked), it also contains every MIXING setup for every sequence I've played.
They compliment each other extremely well. I, personally, could not live without them (I could, because I know the operations of the XF via the front panel... But I also know just how valuable these tools are in making it EASY!
Posted : 20/02/2015 4:33 am
Topic starter
I've been working through some more of this in that same Vibraphone voice.
The experiments work just the way you said when I do them with Element 1. But they don't seem to work when I try them with Element 2.
In particular, this one doesn't seem to work at all:
Experiment 1:
Level = 127
Level Velocity Sensitivity = +32
Offset = 0
Curve = 2As you change OFFSET, Notice it gets easier to get Output from a key strike.
Until at Offset = 127, it is impossible to be quiet at all. The softest key strike
results in this Element reproducing full output.
When I set the Element 2 OFFSET to 127, the loudness of the note still varies with how hard I hit the key.
Is there something special about Element 2?
Posted : 02/05/2015 3:16 am
Back early in this thread I made the following suggestion when attempting to understand Element 1's behavior:
Suggestion: to hear clearly these results Mute Element 2 - you do so by turning Off LED #10
Then make Element 1 full range: respond to all incoming velocities - this will help you understand the parameters better.
The reason I did was because, yes, Element 2 is, indeed, different! I assume you have now re activated Element 2; so that Element 1 plays the lower velocities, 1 - 117, while Element 2 plays only those velocities higher than 118 - 127. Is that correct?
Given that short range of function (Element 2 can only respond to velocities from 118 and above) I'm unclear on what your experiment of Offsetting is supposed to do, or what you expect to happen. By having the VELOCITY RANGE = 118-127, quite naturally soft strikes do nothing at all to Element 2.
When working with 2 or more Elements you must become aware of their Note Range and Velocity Range. Try setting the PITCH of Element 2 up an octave +12semitones. This way it will be absolutely clear when you exceed 118, and when the setting you've made affect the range 118-127.
Posted : 02/05/2015 5:13 am
Topic starter
I tried it with both elements set to velocities 1 - 127, and they still don't behave the same. Here's how I have it set up:


With Element 1, each note plays at maximum volume regardless of how hard I hit the key.
With Element 2, each note's volume depends on how hard I hit the key (harder is louder).
I looked at all the other settings, but I didn't see anything that looked relevant. It's a mystery…
Posted : 03/05/2015 1:52 am
According to how you have the Amplitude engine set for both Elements neither Amplifier is velocity sensitive. Level Velocity Sensitivity = +0.
If you are hearing/feeling a response to velocity for Element 2 it must be from the Filter engine. A Velocity Sensitive Filter will also effect how loud a sound is as a closed Low Pass Filter will remove upper harmonics. Without seeing it, I can tell you that Filter Velocity Sensitivity is set fairly high on Element 2.
Element 2 was originally programmed in this Voice as the "hard strike" (velocity range 118-127). To make it responsive in just this range, a setting of Sensitivity higher than +32 would be used. Remember a setting higher than +33 means extremely low velocities start to have no effect. A setting of +63 means low velocities do not cause a response.
+0 = no velocity response
+32 = linear response (for each unit input, there is a unit output)
+63 = low velocity cause no output... Only extreme velocity causes output - used in "cross fade" situations where you want little or no response to low velocity.
For example, on a "hard strike" it would be wise to set Velocity Sensitivity to a very high value, a Filter Velocity Sensitivity near or approaching +63 would be typical to create a situation where only very hard key strikes would open the filter and allow sound.
Short answer: while the Amplifier affects output level overall, directly, the Filter also affects your perception of how loud something is as well -a closed filter reduces output level via frequency response. Check the difference in the two Elements on the corresponding FILTER screen.
Hope that helps.
(I went looking for the thread where I explained this about the Filter response... Only to find it was my first post in this thread 🙂
Go figure!)
..............................................................................
[Edit]:
Here is where the Filter is impacting the Velocity Sensitivity:
[F3] FILTER
[SF1] TYPE
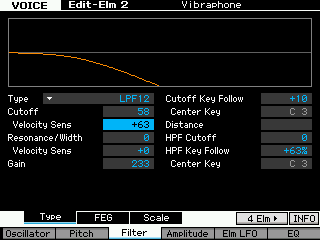
You can see that a 12dB per Octave Low Pass Filter is being applied with Velocity Sensitivity (as expected) at the extreme +63 to the CUTOFF FREQ... this has the impact of reducing the level (specifically of the) high frequency content, until a very hard strike is encountered.
Extra Credit
To understand this screen graphic: Frequency is the center line left-to-right, low-to-high frequency. Under the curved line Low Frequencies are allowed to 'pass', the "Cutoff" Frequency is the point on that center line where the download slope begins - literally frequencies above this point start to be eliminated (cut off). It slopes downward so that it is 12dB down (quieter) for each octave you move up the scale. This gives it a gradual curve rather than a cold stop. There are 255 points along the frequency scale when the cutoff frequency can be set. Any audio signal to the right of that curve is silent.
Of significance is each Element in an AWM2 audio engine has its own Filter with its own set of fully programmable parameters.
Resonance can be understood as an 'emphasis' or peak that is applied at the Cutoff Frequency. This would cross above the center line, and be heard as "louder" than frequencies lower than the current cutoff.
Posted : 03/05/2015 5:25 am
Wow, Very good tread it helped me a lot!
Coming from a Roland stage piano I had a real battle in getting the XF80 to react the way I play the piano. I walked around with fingers hurt because I hit the keys so hard to get the high velocity sounds.
First I tried the 'soft' velocity curve in the utility mode. I was able to hit the high velocities, but if you want to reach level 127 you still need to hit the key with the same force as the normal curve, as all curves end at exactly the same spot in the right top corner.
Then I found that changing the sensitivity in voice mode is very difficult and almost impossible (if your not an expert) It appears that the velocity limit in the oscillator page act as a 'gateway' to the velocities of the keyboard making it hard to deal with multiple velocity layers in elements.
My quest ended when I found the Velocity Sensitivity Depth parameter in the Performance / Song / Pattern mode. I set it to 70, and finally it feels like a real piano! And I can switch sounds without adjusting the settings all the time, so it is totally workable for me.
A very welcome fix would be to add the Velocity Sensitivity Depth parameter to the velocity curve in the Utility mode. This would make it a one-time adjustment and makes it possible to have the same keyboard feel in the voice mode.
Anyway, I'm happy! I hope my message makes sense and I hope and might help a few piano players struggling with the same thing. : D
Posted : 16/07/2016 3:32 pm
Page 1 / 2
Next
