Notifications
Clear all

Topic starter
Hello - I tried to get into FM-X this morning for the first time since updating to 1.60, and have a serious problem. Having navigated to the 'Algorithm' screen and changing the algorithm, either the 'Init' sound sounds, or there's no sound at all, all the way through to Algorithm 88. The algorithm patterns change as expected, but the sound does not (or no sound at all).
Has this arisen elsewhere? I don't think I made any errors in navigation, but something somewhere isn't right. I am on the 'Edit - Part1 - Common' screen with 'Part Settings - Algorith' selected. It appears normal, but doesn't work.
Posted : 12/09/2017 9:44 am

yes, well that´s normal. the only operator you can hear in the init sound is operator 1, all others have the level at zero. so of course all algorithms that do not have op 1 as a carrier will be mute. and the others all sound the same because all of them have the same settings on op 1. it´s always been that way.
Posted : 12/09/2017 12:37 pm

That's Lesson #1 when dealing with FM-X.
The sound you hear is a Sine wave. Pure, simple, just the fundamental. No harmonics. Just the fundamental.
Did you do any of the FM tutorials? Now that you've had your first experience, build on it. Gabi, is right on target.
"Operators", (those little boxes in the Algorithm chart) are CARRIERS when they are at the bottom row, they are MODULATORS when they are stacked above another Operator.
Only CARRIERS can be heard.
MODULATORS are heard only by the effect they are having on the CARRIER.
The best way to envision this is... imagine a violinist playing with a bow. The action of the right hand (w/bow) dragging horsehair across cat gut, creates (or carries) the sound that we identify as the violin sound. We can hear the CARRIER.
The violinist is modulating the string by shortening and lengthening the active portion of the string (called adding vibrato)... you know the familiar gestures of wiggling the left hand on the upper portion of the string. That's the MODULATOR in this scenario.
Now picture the violinist lifts the bow from contacting the string... all sound stops. You cannot hear the vibrato now... even if the violinist continues the vibrato action with the left hand, the MODULATOR does not make any sound... even though the vibrato continues, you can only hear it as it Effects the CARRIER... while the CARRIER is active.
FM = the frequency of one Operator modulating the frequency of another.
The CARRIER carries the sound (like the bow/string) the MODULATOR is inaudible but its influence is manifest through the CARRIER (vibrato of the left hand applied to a sounding string).
That is FM Lesson #1
Do not call the repair shop, that smell is the wood burning as your brain now begins to understand how it works.
In an Init FM-X sound only Operator 1 has Output level (99). So only when Op1 is on the bottom row of the Algoritm will you hear it.
Create a M:C stack. Translation: when a MODULATOR sits atop a CARRIER, For example, if Operator 1 is atop Operator 2, that's a MODULATOR:CARRIER stack... or M:C
If both have Output levels you will hear a complex tone (one with harmonic)
If the COARSE TUNE of both M and C is 1.00 (meaning the RATIO = 1.00) a way of indicating the pitch you should expect.
Say you have a CARRIER tuned 1.00 and you play the "A" above middle "C" - the resulting pitch will be A440 (440 x 1.00)
Say you tune the CARRIER to 2.00 and you play that same "A" above middle "C" - the resulting pitch will be A440 x 2.00 or A880
At 3.00 you will hear E1320
And so on...
Please try the tutorial "An FM-X Exploration" in 4 Parts... it has less math than I've outlined above... and if you go through it you will learn all about the relationship of two Operators in a MODULATOR:CARRIER stack. And we do it "by ear", in other words, we explore how edit parameters influence Wave creation in a simple two Operator stack... and if you make the changes as instructed you will actually hear how FM works to create literally an unlimited number of timbres... how you can construct Waveforms! Manipulating FM in realtime as you can with MONTAGE is what's new about FM-X.
I remember asking Dr. Chowning (discoverer of FM synthesis) about some massive FM Synth they had out at Stanford with unlimited numbers of Operators... I asked him what he did with 256 Operators... he said, "I'm still trying to master what you can do with just two!" Humbling words.
Enjoy. And it has nothing to do with the update, except you haven't explored this previously and are noticing it for the first time. Seize this time to take that first step toward understanding!
Posted : 12/09/2017 1:17 pm
Topic starter
Hello Gabi and BM - been having 'Sign in' problems again (see separate Post). Thanks for explanation and instructions! I have been following them, and a dim light is dawning! But I have a couple of problems I'd like to address. please ...
1) How do I retrieve items from the 'Edit Buffer'? I can't even find it, and neither can Montage (I typed it into the Search window - got nothing). I downloaded the 'P4' sound, which appeared as stated - but then I couldn't get it back the next day.
2) I looked at the 'Assign' headings on the 'Init FM-X' Pf, and they're nothing like the headings on the 'P4' Pf. I can change the headings by calling up the required function and highlighting it on screen, then pressing the 'CONTROL ASSIGN' button and operating the required knob. But - where do I find the functions to start with? No mention anywhere of 'Skirt' for example.
More to it than I thought, and a lot to remember too. I've never been a fan of FM, but it has progressed a very long way from the early metallic noises ...
Posted : 15/09/2017 5:11 am
1) How do I retrieve items from the 'Edit Buffer'? I can't even find it, and neither can Montage (I typed it into the Search window - got nothing). I downloaded the 'P4' sound, which appeared as stated - but then I couldn't get it back the next day.
The edit buffer as a concept is not something you can search for. Data in the edit buffer is there temporarily. If you move away without storing the edit buffer will be cleared. Cleared as in the data disappears, and is filled with the next program you select.
There are a couple of ways to get data into the edit buffer. When you bulk a sound over from MONTAGE CONNECT the data arrives in this temporary memory location. When you recall a Performance the data is copied into the edit buffer. This is where you can edit it, play it, and interact with it... when you move away, the changes you made are cleared.
In the box with the Performance name (on the HOME screen) a small blue flag will appear as soon as you change any parameter. Recall your favorite Performance... turn an AssignKnob or move one of the eight Faders... as soon as any change is detected the little blue flag appears to indicate the program is no longer exactly as it was when it was originally stored (i.e., you've edited it). If you move away, by going to another Performance the data in the Edit buffer is cleared and replaced... however if you press [STORE] then the changes you've made will be stored to a new Performance (or if it was not a Factory Performance, you can overwrite the User Performance.
Think of the edit buffer as the place where you interact with the programmed data... if you do not store then your changes are cleared and the edit buffer is filled with your new selection. So using the search or typing in the name is not going to restore the sound.
If you moved away without storing, it's gone. You can send it again from MONTAGE CONNECT.
2) I looked at the 'Assign' headings on the 'Init FM-X' Pf, and they're nothing like the headings on the 'P4' Pf. I can change the headings by calling up the required function and highlighting it on screen, then pressing the 'CONTROL ASSIGN' button and operating the required knob. But - where do I find the functions to start with? No mention anywhere of 'Skirt' for example.
They are called ASSIGNABLE KNOBS because you (as programmer) can select what parameters are assigned to them. In the tutorial, it is explained that the parameters selected are a good example of how with the FM-X version of FM, real time control is available by selecting parameters and linking them with the Assign Knobs. The INIT (short for Initialized) FM-X means nothing is assigned to the Knobs (yet) YOU choose what gets assigned to the Knobs.
More to it than I thought, and a lot to remember too. I've never been a fan of FM, but it has progressed a very long way from the early metallic noises ...
You can only become a "fan" of FM when you reach a certain level of basic understanding. It's a form of synthesis. Take your time.
Posted : 15/09/2017 5:51 am

Also, X7B is basically saving your edit buffer. The "B" in X7B may stand for "Bulk" (as in bulk dump) but it could just as much stand for "edit Buffer".
Posted : 15/09/2017 11:10 pm
Topic starter
Hello BM and Jason - in my little mind I had assumed that 'FM-X' was a whole new ball-game, and that AWM2 stuff didn't apply. Wrong! The Edit Buffer is the same for both and therefore works in the same way. Got it! Done it again, BM - the 'I should have thought of that' approach. OK, back on track ... I notice that none of the Pre-set FM-X Pfs have named 'Assign' columns - just says 'Assigned' which isn't much help. I also notice that there are relatively few of them (only 250 or so out of 2000+), but are sprinkled throughout as 'Parts' of a hybrid Pf. I think that may be the way to go for me.
I will continue with the Tutorials so well presented by BM, but find the sheer number of possible parameters, and the ways they interact, somewhat bewildering. No doubt practice makes perfect. I do not like warbles and whistles and such - my first criterion is that the sound must be playable - so much of the parameter arsenal may well be lost on me. That should make it simpler! Yeah, sure ...
Still stuck on the knob assign function - I know how it works, but finding the assignable function escapes me. For example - how would I assign 'Skirt' to knob 3?
Posted : 16/09/2017 5:41 am
Here's a tip: if you know how to get to any parameter so you can edit it by changing the value directly then go to that screen and select (touch screen) the parameter. If the [CONTROL ASSIGN] button does not illuminate, then the parameter cannot be assigned a destination. Not everything is a destination.
The data list "Controller Box Destination" (in the "Control List" section) lists all destinations and there are 30 parameters in the "FM Parameter" category that can be assigned to destinations. You'll notice that parameter 107 is shown as "OP 1-8 Spectral Skirt". So when you touch that parameter in the FM menus - you will notice the [CONTROL ASSIGN] button illuminate. You can press the [CONTROL ASSIGN] button when it illuminates and a screen will show you what the parameter is called (the name) you should look for when assigning the destination.
In this video at time (1:37):
https://www.youtube.com/watch?v=M6c_aGgZXCk
After pressing the [CONTROL ASSIGN] the screen shows "Part 1 - InsB DstDrv" which is what to look for in the destination list for the parameter demonstrated. But, even better, you can - while this screen is showing - activate a controller. So you would simply turn assignable knob 3 - and then Montage will automatically assign knob 3 as the source and your selected parameter as the destination.
There is a tutorial (non video) here:
https://hub.yamaha.com/mastering-montage-9-controller-box-switches/
See part with heading "SOURCE: DESTINATION CONTROL ASSIGN Shortcut:"
Here - the parameter "Speed Control" is first highlighted as the example - but you would highlight the "spectral skirt" parameter in the FM-X edit screens and follow the same procedure.
Using the "helper" (illuminated [CONTROL ASSIGN] button) is not necessary - but you may find this method easier to deal with than selecting the destination parameter from a big list in the "Mod/Control" -> "Control Assign" screen.
Posted : 16/09/2017 8:24 am

Thank you Jason for linking my Moessieurs video about control assign 😉
You also have in complement of Yamaha Article the Moessieurs control assign page :
Posted : 16/09/2017 8:38 am
Topic starter
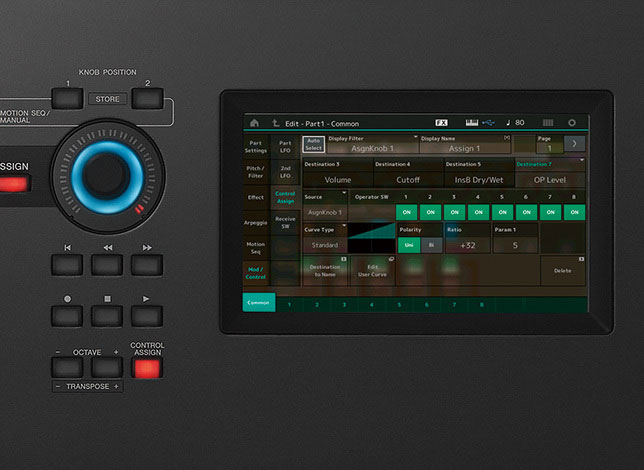
Hello BM - See the +7 value for OP1 Rate, change it to hear and understand that it is the "depth" control or the amount of application of Frequency change of Operator 1. Try all values from +7 ~ 0 ~ -7, while tapping on notes. Make a setting for this value, then turn Assign Knob 1. Hear and understand how the frequency change can be reversed at the parameter assignment
I've followed Tutorial 2 precisely, and I arrive at the screen you're referring to above - I have the +7 for the OP1 Rate - you say 'change it' which I must assume is done by moving Assign Knob 1 - but absolutely nothing happens. The figure remains at +7 - the only way I can change it is by highlighting it (Knob 1 still has no effect) and using the data wheel - that changes it alright, but there is no effect whatsoever on the sound ... so what on Earth am I doing wrong? I've tried it half a dozen times, all the way from switching Montage off and starting from scratch. Same result. Perhaps you've missed out an insignificant (to you) little step somewhere? Help!
Posted : 16/09/2017 4:30 pm
Helps users follow to provide links for reference. Here is the full article:
https://www.yamahasynth.com/resources/mastering-montage-an-fm-x-exploration-part-2
Does your "Control Assign" screen match the tutorial?
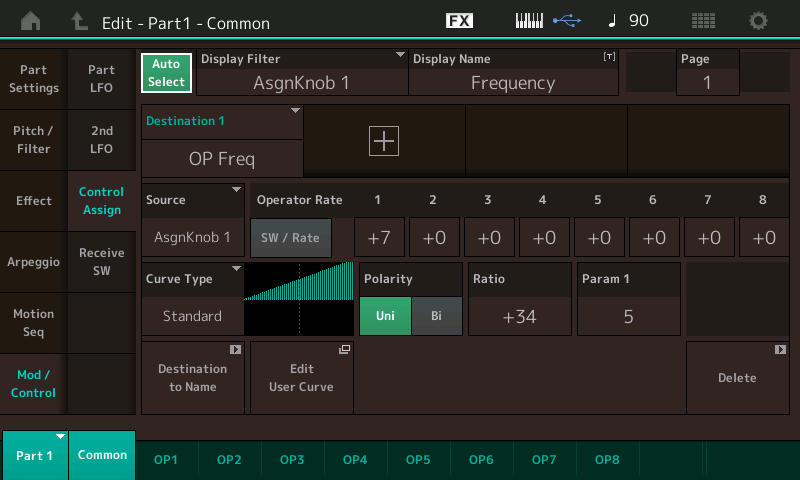
"Change it" - the "it" is referring to "... the +7 value". So the only part of the screen which says "+7" -- it's right above "Polarity" and is the value for the Operator 1 rate -- this is what you change to experimentally see how different values of the rate (or "depth" as explained) change the behavior.
The tutorial tells you to move the assign knob here:
"Make a setting for this value, then turn Assign Knob 1. "
And in the above sentence - "this value" is the +7 value which you change to anything between +7 and -7 as instructed to get a "feel" for how the operator rate ("depth") affects the Assign Knob 1 twirling.
The only thing I can think of if your screen matches and still have problems is that your knobs are set to the wrong mode. They can assume any number of modes depending on which buttons you press. To the left of the superknob is a button [ASSIGN] . Make sure that button is illuminated amber. If not, press it then try again.
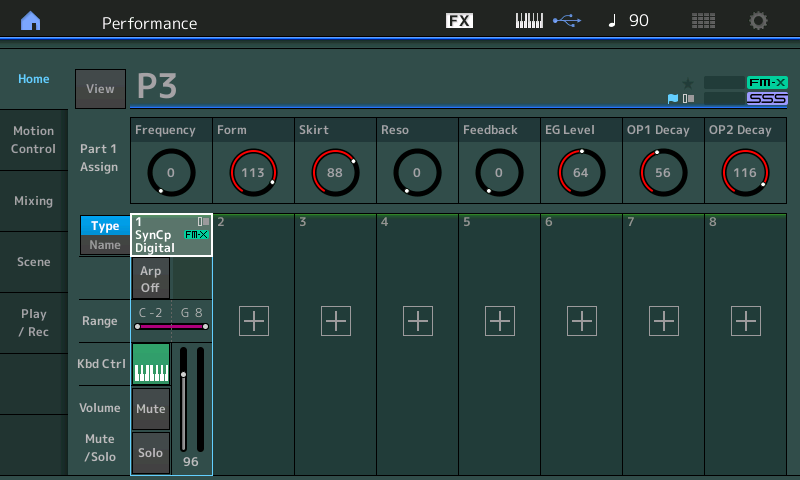
Just curious - did you start by loading the P3 example? The current performance should be shown as "P3" when you go to the (HOME) screen.
From the article:
Included at the bottom of this article download the MONTAGE Connect (P3.X7B) file for the tutorial, PERFORMANCE: P3
Posted : 16/09/2017 6:04 pm
I've followed Tutorial 2 precisely, and I arrive at the screen you're referring to above - I have the +7 for the OP1 Rate - you say 'change it' which I must assume is done by moving Assign Knob 1 - but absolutely nothing happens. The figure remains at +7 - the only way I can change it is by highlighting it (Knob 1 still has no effect) and using the data wheel - that changes it alright, but there is no effect whatsoever on the sound ... so what on Earth am I doing wrong? I've tried it half a dozen times, all the way from switching Montage off and starting from scratch. Same result. Perhaps you've missed out an insignificant (to you) little step somewhere? Help!
Your assumption is incorrect.
You are supposed to change the OP1 Rate value directly; move the cursor to highlight "+7" use the Data Dial or [DEC/NO] button to change it to +6. Move the Assign Knob 1 from minimum to maximum to hear the effect.
Next, using the Data Dial or [DEC/NO] buttons set it to +5, then move Assign Knob, minimum to maximum to hear how the amount of change you make has changed. Repeat for all values
You're supposed to try all fifteen settings for OP1 Rate +7 through 0 (which will give no change) through to -7 .... while moving the Assign Knob through its range... Until you've convinced yourself that this affects the range and direction of change. Listen closely to hear how the setting makes a change. Hear the difference between the +7 setting... and the -7 setting as you move Assign Knob 1. One brightens the sound, the other darkens the sound
Posted : 16/09/2017 6:40 pm
Topic starter
Hello Jason and BM - thanks for clarifications - basically, it was my layman's failure to interpret 'expert-speak' which is what I had feared - for me, enlightenment came when 'make a setting' became 'highlight and use the data wheel' rather than the Assign Knob I thought had been meant. Bingo! and Wow! Skipped through the rest of the Tutorials this afternoon, in 3 hours with a little experimentation. There is no way I can learn what I would need to know, so I've downloaded them so that I can reference them as needed. Like - all the time! But hopefully more bits will rub off as I go along. The prospect is literally limitless. I well understand Dr: Chowring's remark, BM - I doubt if I'll ever get past 2 Operators ... again, thanks for patience and willingness to help.
Posted : 17/09/2017 4:28 pm
Don't let the complexity of it get you... you do not have to master FM all in one sitting. There are literally, thousands of FM sounds floating around... you simply want to get to a point where you are comfortable tweaking. The basics are the basics of musical harmonics, so everything you learn has applications elsewhere in music. Take your time. I was working with an artist yesterday, and the function of mixing the Output level of two oscillators came up.
Adding a second oscillator was not what they were looking for, but rather than abandoning all hope, I simply pointed out that adjusting the relative volume of one to the other makes a huge difference in how the final result sounds. Some times it is the very basic things that make the difference. Even if you've done that tutorial previously, revisit it in a couple of weeks.
Revisiting a reading of the Owner's Manual after six months of ownership is extremely enlightening for folks (if they can manage to do it) you discover some of the things you now KNOW by heart, and you discover that, yep, there it is described in the manual, and how come I didn't see it before!
Posted : 17/09/2017 9:40 pm
Another tutorial:
Manny's FM-X Tutorial 1 (part 1) - Basics
https://www.youtube.com/watch?v=YWvSglv3iEA
Manny's FM-X Tutorial 1 (part 2) - Real-time Control
https://www.youtube.com/watch?v=pnkliAhKkjo
Manny's FM-X Tutorial 2 (part 1) - More Real-Time Control / Motion Seq
https://www.youtube.com/watch?v=6G8hIJ4n1zg
Manny's FM-X Tutorial 2 (part 2) - Scenes / Arps / Motion Seq
https://www.youtube.com/watch?v=P9jUImXhGT4
Posted : 18/09/2017 12:54 pm
Page 1 / 2
Next
