Cannot find detailed instructions for using Montage and Motif Rack XS live and controlling volume of each independently. I have a Motif Rack XS midi'ed to my Montage. I would like to control the volume of each independent of the other's volume. I'm using 2 FC7 foot controllers. One controls the Motion Control knob, the other controls the volume on both the Motif Rack as well as the Montage. In a live situation, I would like to cross fade from say strings on the Rack to piano on the Montage. Is this possible and how would you set this up?
Jeff
You can setup the Motif-Rack XS so that it behaves as a Part in your MONTAGE Performance.
The MONTAGE can transmit to as many as eight Parts simultaneously. This is handled by activating the KBD CTRL icon on a Part slot, 1-8.
You can substitute the Motif-Rack XS String Part for one of those eight internal MONTAGE Parts.
This is accomplished by using the MONTAGE’s Zone Master function to decide which Part slots are internal and which Part slots are routed Out via MIDI. We will setup the MONTAGE acoustic piano to play internally, and re-task one of the remaining Part slots to be an External Zone — transmitting to the Motif-Rack XS.
In order to crossfade between the internal Acoustic Piano and the external Strings, (you can accomplish this with the Super Knob), you’ll need to plug the Main L/R Outputs of the Motif-Rack XS to the A/D Inputs of the MONTAGE.
This will allow you to control the audio of the Motif-Rack XS using the Motion Control Synthesis Engine.
Extra Credit:
Motif-Rack XS setup
Press [VOICE] to place the Motif-Rack XS in Voice mode
Press [UTILITY] > select “MIDI” > set the MIDI I/O = MIDI
Press [EXIT] once
Select “Voice MIDI” > “Receive Ch” to 9
Press [VOICE] to return to Voice mode
MONTAGE setup:
Press [UTILITY]
Touch “Settings” > “Advanced”
Set the “Zone Master” = ON
You don’t give use which programs... you can substitute which ever programs you desire.
Say I want to use the “CFX Concert” as the MONTAGE acoustic piano (4-Parts)
Recall “CFX Concert” from the HOME screen
We will add a new Part slot. Tap the “+” in Part #5
The “Performance Merge” screen appears.
Place a “dummy” Single Part program in this slot (we will replace it with the M-Rack XS).
Set “Bank/Favorite” = All
Touch “Init” > select “Init Normal (AWM2)”
Press HOME
We have added a new Part, we will now substitute the Motif-Rack XS String Voice: “Back Ground“ for Part 5
Press [EDIT]
Press [PART SELECT 5]
With “Part 5-Common” highlighted in bright blue in the lower left corner of the screen
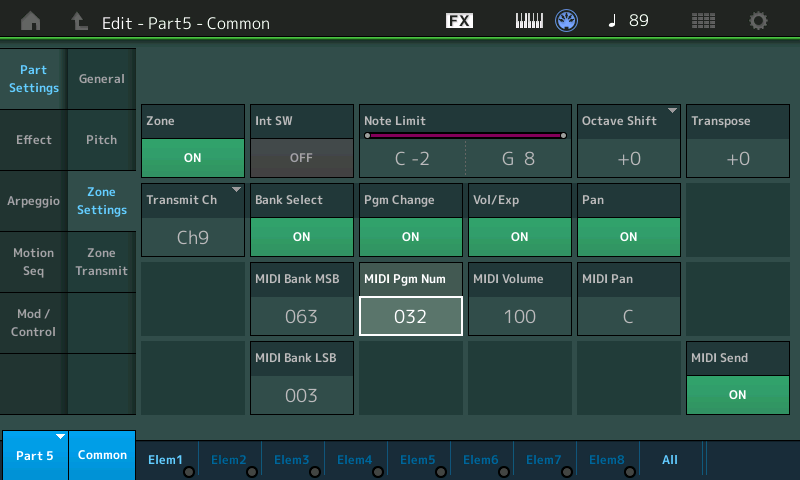
Touch “Part Settings” > “Zone Settings”
Set the “Zone” = On
Set the “Int Sw” = Off this will prevent the internal Part from sounding.
Set the “Transmit Ch” = 9 to match the Motif-Rack XS "Voice MIDI" Channel
You can setup the MONTAGE Performance to send a Bank Select and Program Change message to the Motif-Rack XS.
The following message will recall the Motif-Rack XS String Voice “Back Ground” MSB 063 / LSB 003 / PC 032
Touch “Zone Transmit”
Here you can review what your MONTAGE Controllers are set to do Out to your Motif-Rack XS. You can defeat a Controller by turning the Switch Off.
I have created a new upper “Common/Audio” level of the architecture... I cleared (Deleted) the controller assignments and setup my own as follows:
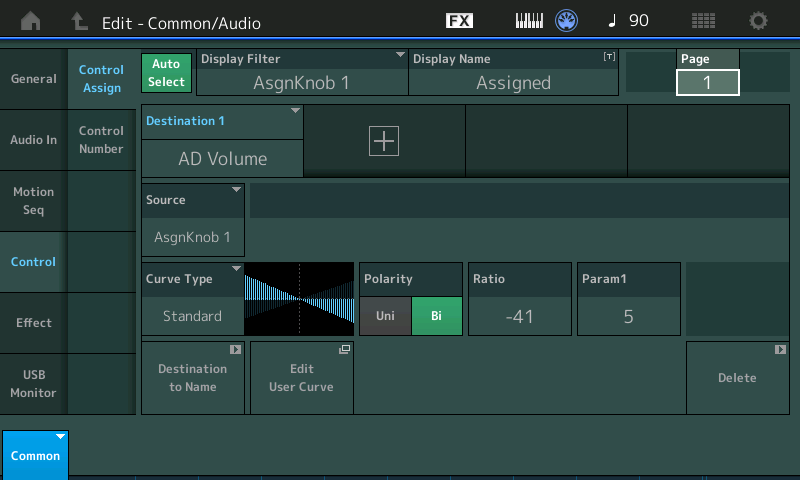
Source = AsgnKnob1 / Destination 1 — “AD Volume” As this Knob is increased the String Volume will decrease
Source = AsgnKnob2 / Destination 2, 3, 4, and 5 — “Part Volume” This works to turn the Acoustic Piano Volume down (I've repeated the same for all four of the Piano Parts).
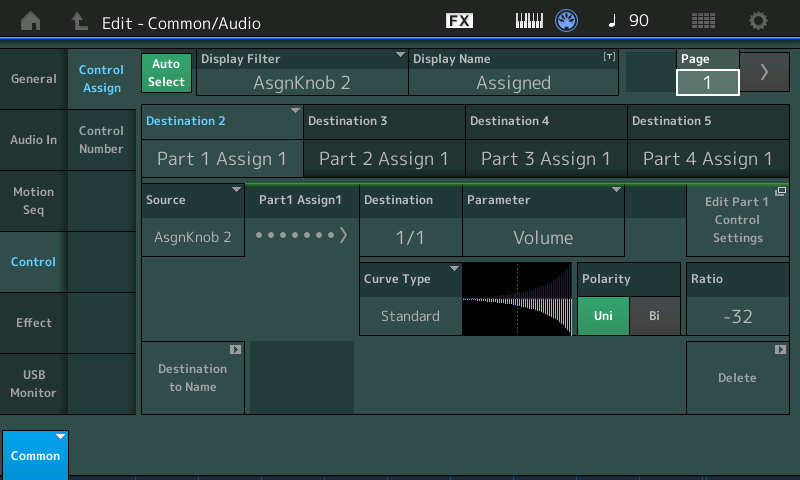
The Super Knob is programmed to turn AsgnKnob2 down at the same time it increases AsgnKnob1... thus accomplishing the crossfade between the external AD VOLUME (Strings) and the internal PART VOLUMEs of the Acoustic Piano. As they pass each other (one gesture for the Super Knob) you will hear them layered. Use an FC7 plugged into Foot Controller 2 to control the Super Knob with your foot.
This trickery is accomplished as follows... From the HOME screen:
Touch "Motion Control" > "Super Knob"
Here you can see how the direction of Common Assign Knob 1 is reversed... It is up a 127 (as the setting for minimum) and works in the opposite direction from the Common Assign Knob 2 which is at 0 (when minimum)... Turn the Super Knob while viewing this screen to see how the values change.
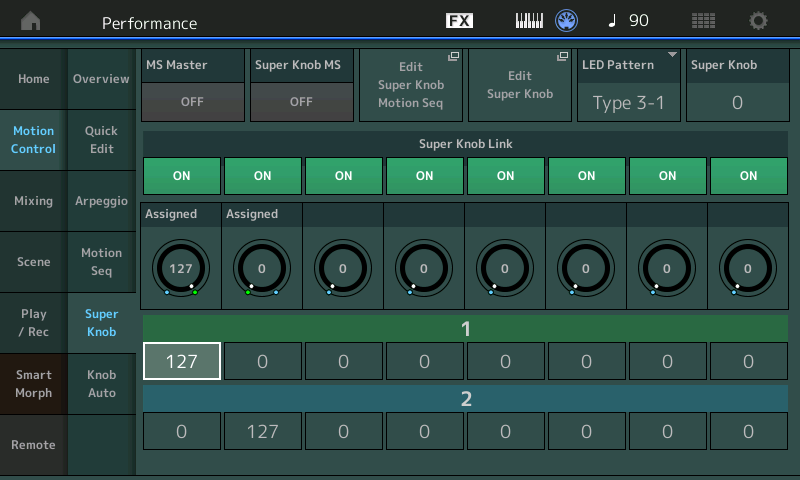
What we have done here is reprogram the “CFX + FM EP” Performance... replacing the FM EP with an external AD INPUT Part
You can read about this in the following Mastering MONTAGE article:
Mastering MONTAGE: Zone Master FAQ
If you would like independent Control over the Volume of the Strings - reach up and manually move Assign Knob 1.
If you would like independent Control over the Volume of the Acoustic Piano - reach up and manually move Assign Knob 2
Thanks Bad Mister...this is great! Can't wait to get home and try this out!
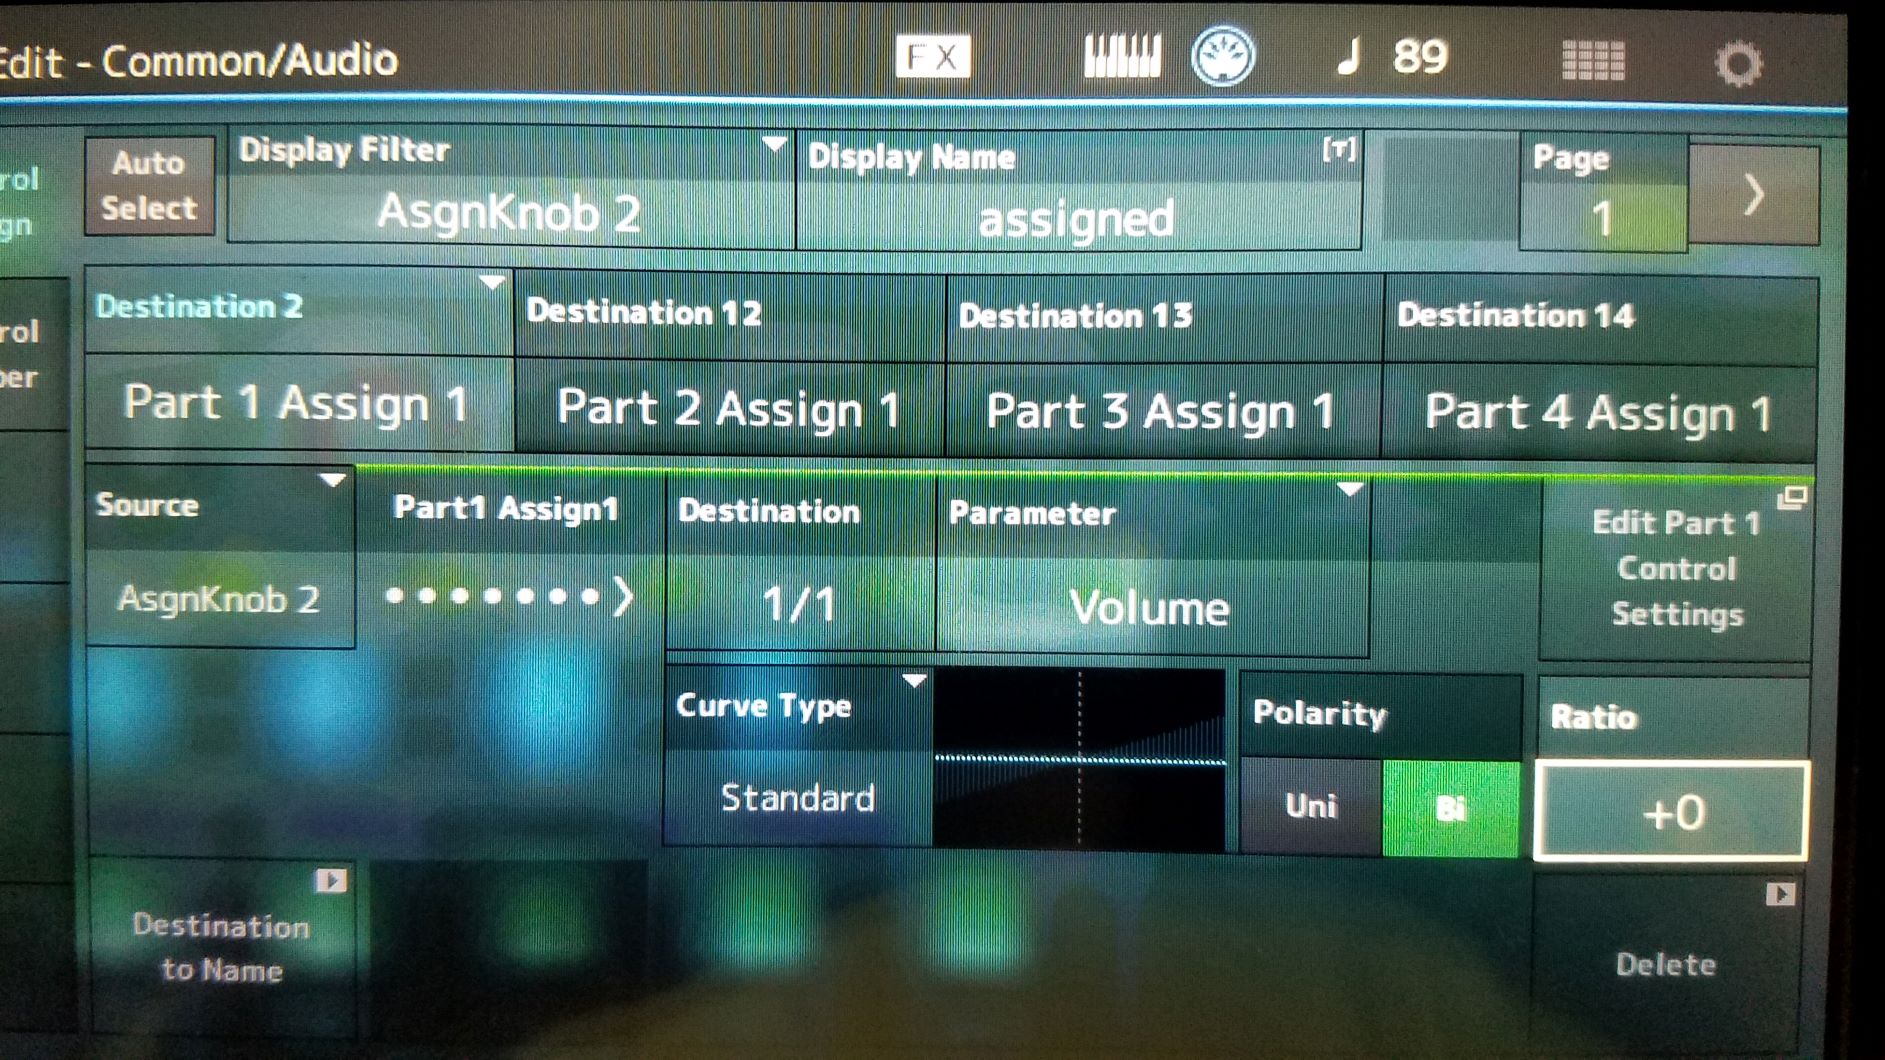
BadMister, really appreciate your help on this. I have noticed a step where I'm confused and am not sure if it is a concern or not. In your step that I have copied below, you are assigning Parts 2, 3 and 4 to Destinations 3, 4 and 5. When I do this I get Destination 2, but when I add the next part assignment, it may come up Destination 12 rather than Destination 3 as you have pictured. Subsequent assignments then might be to Destinations 13, 14 etc.
So my questions are: Is this a problem? How do I get my Destinations to be sequential like yours?
Appreciate your continued help and support,
Jeff
_Your step pictured below_____________________________________________________________________________________________________________
Source = AsgnKnob2 / Destination 2, 3, 4, and 5 — “Part Volume” This works to turn the Acoustic Piano Volume down (I've repeated the same for all four of the Piano Parts).
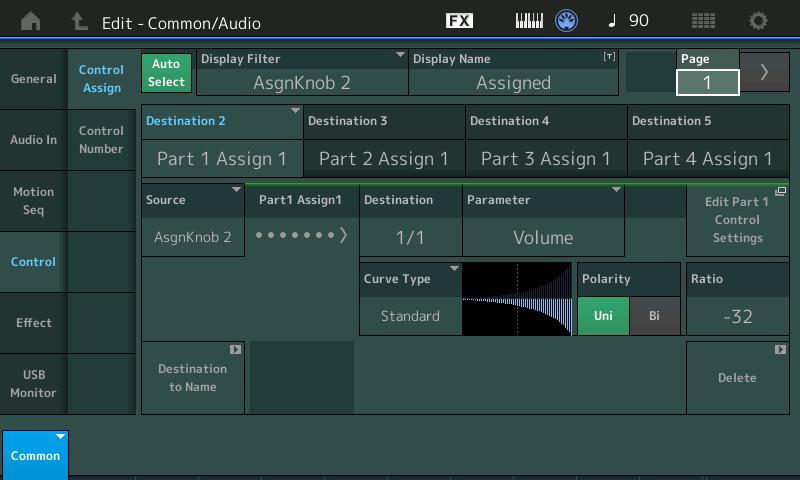
It doesn't matter what the values are as long as you don't run out of them. You get 16 total per Part and 16 total at the Common/Audio (global/Performance wide) level.
When you start editing an existing Performance (something downloaded from Soundmondo, something at an internal factory Preset, something from a sound library, etc) - you are starting with destination assignments already assigned inside that Performance. The original author may have added and removed destinations causing "holes". Or destinations 1-4 may be used up by existing programming - so the next free assignment is destination 5.
If you want, you can clean the slate and remove all destination assignments first. Then it may be easier to arrive at consecutive values. But having the values ordered like this is just window dressing. I do understand, however, it may be more difficult to follow a tutorial if everything doesn't match. And if you're learning - it may be difficult to adjust what you're looking at on your keyboard vs. the tutorial in order to make sure you've assigned correctly.
I have created a new upper “Common/Audio” level of the architecture... I cleared (Deleted) the controller assignments and setup my own as follows:
This is the step where BM cleared out the assignments in the Common/Audio level of the Performance. You get here by pressing the [PERFORMANCE] (HOME) button then the [EDIT] button. Then you want to "Delete" all of the existing assignments in the Common/Audio level using the delete button in the lower-right.
Did you do this first?
That's it Jason, that's the step that's missing. I didn't know how BM cleared (deleted) the controller assignments. When he said he was setting his "own as follows", I just blindly followed his next step and was wondering why my Destination numbers were so much different. Thanks for the clarification, that cleared up the mystery.
Appreciate your help,
Jeff
Well Jason, I thought we had it. Despite running through this a half a dozen times tonight, my destination still look like the picture below. BM must still have a trick up his sleeve! But, it seems you are right, even though the Destination are not sequential and that they skip up several steps, the end result is still functional and BM's tutorial accomplishes its objective. Still I wonder what magic he is performing to get the sequential Destination numbers...perhaps he'll let us in on the secret?
Jeff
I'm not sure you've conveyed yet absolutely that you've followed the step I hilighted.
Change the display filter to "All" and take a look at what destinations exist. Do you see anything assigned to destinations 3-11?
Here's what you should have cleared out after recalling "CFX Concert" then adding [+] (merging) the "Init Normal (AWM)" Part:
Destination 1: Rev RevTime (delete that)

	Destination 2: Var ER/RvBl (delete that)

	Destination 3: Part 1 Assign 7 (delete that)

	Destination 4: Part 2 Assign 7 (ditto - I won't keep this up)

	Destination 5: Part 3 Assign 7

	Destination 6: Part 1 Assign 8

	Destination 7: Part 2 Assign 8

	Destination 8: Part 3 Assign 8

	Destination 9: Part 1 Assign 5

	Destination 10: Part 2 Assign 5

	Destination 11: Part 3 Assign 5
I think the issue you're facing is not knowing how to show all of the destinations - so you don't know how to "clear (delete) the controller assignments". You may have been deleting something, but I'm not sure (maybe you have) the filter was changed to "all" in order for you to reach all of the assignments.
After you select "DisplayFilter" and change it to "All" - you can keep tapping on the "Delete" button until all of the destinations are gone. You will only see a single [+] under "Display Filter / All".
I'm doing that here and I do indeed get sequential destinations.
Even though it doesn't matter what the destinations end up being - it does matter that you know what you're doing here and really do follow the steps to clear out the old assignments. This step will avoid - for this "tutorial" - superknob fooling with the old assignments that may not be compatible with the new programming.
Regardless if there would have been a conflict - it's important to know the basics. Like how to follow (paraphrased): "delete all of the existing assignments at the common/audio level of control assignments". Steps were missed probably because they weren't all spelled out. I think as we become more sophisticated users - it's easy (for the "sophisticated" ) to leave out a step for brevity. This doesn't exactly make for the easiest tutorial to follow for beginners.
Yes, that's it Jason. I wasn't changing the filter to "ALL". Once I did that I was able to delete all of the existing Destinations and now can put back BM destinations sequentially. Your right, my unfamiliarity with diving this deep into the programming is certainly exposing my weaknesses. The Montage is a giant leap forward from my beloved DX7IIFD. Thankfully, both you and BM have been a great help which I really appreciate.
Jeff
Not yet knowing how to maneuver around your keyboard is not a "weakness". It's an opportunity to learn. My comment about leaving off steps was more of a reminder to the more experienced (including myself) to be more thorough in the steps so there's nothing missing.
The other aspect this "exposes" is perhaps a weakness in the user interface itself. The interface is not intuitive enough to guide a user through the experience of deleting all destinations and/or indicating what destinations are hidden and which are displayed. Therefore, this is also an opportunity for Yamaha to learn from the user experience.
Glad we've got the original questions sorted.
“There is no one way to proceed.“ I say it all the time... I gave an example, and I mentioned I cleared the Control Assignments. My habit when working with factory Presets. You are adding an external device (Part/Zone)... you may find you need to make accommodations in the Factory sound you start with. I gave an example because we were given no details as to what the Rack XS would be doing. You did mention piano for the MONTAGE sound...
When you program by “merging” Performances there are no additional upper Common Control Assignment brought along. The firmware forces you to activate any previous programming on that level on a case by case basis (in other words, the control Source/Destination assignments of the merged Part’s upper Common level still exist, but are not automatically applied.
In general, when programming your own User Performances it is your responsibility to review and sign off on each Controller Assignment on the upper Common level of the architecture. Adding even one more Part to a Factory Performance (even an external Part playing through the AD Input) can cause all kinds of unanticipated results... review all assignments that affect the entire Performance (Common). Delete those likely to cause a conflict for your newly added Parts. I always Delete the assignments and build up, anew.
Most Importantly...
Whether a Control Set is Destination #1 or Destination #16 is of no consequence, whatever. That’s still the point that needs to be the take-away from all of this. It will behave no different if it is Destination 1 or Destination 16. No different. The point of the screenshot was the Assignments (not the Destination number).
Review all upper Common Control Assignments. If you are not going to use it — DELETE it. (Lower right corner)
The upper Common level of the architecture has 16 Source/Destination Control Sets. Definitely review what is already assigned... because adding a new Part changes everything on the upper level.
Each Part has 16 Source/Destination Control Sets, of its own. While that is a lot... don’t leave an assignment that conflicts with your concept of this new Performance
As you will discover... for example, the acoustic piano Performances have things like “Rev Time“ programmed on the upper Common level (Super Knob)... say you add “+” (merge) a Bass or a guitar into that Performance... Because the “Rev Time“ changing will also affect any and all Parts added to the Acoustic Piano That are using Reverb, you must take care to review the programming completely.
Do you want or need that function any more? — based on what YOU desire. Even the Motif-Rack XS coming in the AD In will be affected by this “Common” parameter... If you decide to add Reverb. Remember the System Effects (Rev and Var), plus the Master Effects and Master EQ are all on this upper Common level.
This is why in the basic learning tutorials we try to eliminate all extraneous programming - so you only inherit what we are focusing in on... and we build up from a minimal point. It is so much more difficult to learn when you inherit someone else’s advanced idea. If you are combining (merging) Performances — it’s a must to know what’s what.
Tip: The Motif XF Performances are excellent to experiment with (especially when learning) this is because you inherit less and are left with plenty of room to expand. Because the Motif XF had only two Part Assign Knobs and six Control Set Source/Destinations... you now have six additional Part Assign Knobs and ten additional Control Set Source/Destinations. Plus four additional KBD CTRL Part slots! And the most important: there is no Super Knob or Common Assign Knob programming as the XF didn’t have that...
You *Delete* the Common (upper level) Controller Assignments the same way you make the Common Controller Assignments, one at a time. Not a weakness in the system, but rather a logical means to create and remove controller assignments. In a modular synth, you can, as a feature, change just the routing cable you wish, whether building or reprogramming. Again, a one at a time scenario.
Pulling all of the patch cables out (Deleting all Control Assignments) is accomplished on this system by building your Performance from an Init template (or as already discussed, one at a time). That’s the equivalent of removing all control Assign “patches“. From an Init Performance — when you add Parts, the upper Common Control Assignments are completely free and clear. As you populate it with Parts... the Part Control Assignments are all in tact. They are as much apart of the Part as the Waveform. The upper Common/Audio level that addresses the entire Performance is empty
Maybe one side would be more informative than the other. The left side is what happens today.

There already exists a “Display Filter” = All
Move the cursor to the “Display Filter” spin the Data Dial clockwise to “All”
Or tap it to view the menu, select “All”
The “+” signifies you can Add a Control Set.
There are four possible. Control Sets a Page, four PAGEs.
Understood - using the "All" filter was what was communicated to unhide the destinations hidden by the display filter. Still, the user ran into a struggle dealing with the signposts in from of them what to do. The GUI could be more intuitive and could be improved to reduce confusion.
I guess it's not worth looking at user experience as opportunities for improvement.
Sure it is ... but (again) IdeaScale. Here we make sure they know a method NOW exist to view “All” using the “Display Filter” options.
One person’s intuitive is another’s feature that is already addressed by the firmware (and detailed in the Manuals). I know that many forget to include the Supplementary Manual (page 91, 93) when considering feature set. Working the “Display Filter” and “Auto Select” features can only become apart of your workflow by using them. Once aware of how they work, they are quite intuitive. Particularly useful skill when reviewing programming, not your own!
