Notifications
Clear all
MONTAGE Series Synthesizers
13
Posts
5
Users
0
Likes
2,517
Views
Topic starter
hi
i bought montage 6 last year.I would like to check the brilliance of the sound with the fc7. how can I do? why does the control number only work when I select the cc11 (volume expression) or the superknob? why all the other numbers do not give me any effect?thanks
Posted : 02/02/2018 9:09 am

The FC7 is a Yamaha sweep type pedal. Here’s what you need to know
_ It can be plugged into the FOOT CONTROLLER 1 or FOOT CONTROLLER 2 jack on MONTAGE’s back panel.
_ Both jacks are programmable on a per Performance basis. So what they Control is customizable for each Performance
_ On the Factory Presets every Performance defaults as follows:
Foot Controller 1 defaults to cc11 Expression
Foot Controller 2 defaults to Super Knob
_ If you start with an “Init Normal (AWM2]”, or “Init Normal (FM-X)” the pedals default as follows
Foot Controller 1 defaults to cc11 Expression
Foot Controller 2 defaults to cc04 Foot Control
These two assignments are the default for the following reason (ease of use)
FC1 is set to a “fixed” function standard MIDI control for relative musical Volume called “Expression”
FC2 is set to a “non-fixed” function controller which means you decide what it controls
So FC1 is easily used as your musical Control over volume while performing. It always controls your musical Volume. As you might imagine ask 100 keyboards what two pedals they want - the answer is 2, volume and Sustain. FC1 quickly satisfies the Volume requirement.
FC2 is your Assignable Foot Control being cc04, it does not have a fixed function, you decide on a per Performance Part basis what parameter the MONTAGE responds to when Foot Controller 2 is moved and cc04 is the assignment. CC04 can do virtually anything.
Here is the impact of the difference between FC1 and FC2 as they default. FC1 will always do Expression which is volume change, always. “Fixed”... if you assign something else to FC1 while it defaults to cc11, it will be in addition to its fixed function.
FC2 will always do whatever you assign within the specific Part. It does not have a fixed function, you are free to make control any available Assignable parameter.
Fact: the MONTAGE can transmit on multiple channels simultaneously. If you move FC1 doing Expression then all KBD CTRL Parts will change their output level proportionally. But because Expression means change volume to all Parts, they all change. If by contrast you move cc04 FC2 each KBD CTRL Part can do something different because cc04 Foot Control can be targeting a different parameter within each Part. In Part 1 FC2 might be set to pan Part 1 Left to Right, Part 2 to change Part Volume, Part 3 In increase the VAR SEND, while on Part 4 it is opening the filter, while on Part 5 it Panning this Part Right to Center, Part 6 might change the Dry/Wet balance to a Delay Insertion Effect, while in Part 7 it is changing the speed of the Rotary Speaker Effect from Slow to Fast, and it might do Part Volume for Part 8. Its always your choice.
Point being FC1 is fixed at the most common usage musical volume control cc11 Expression
FC2 can do almost anything you design for each Part including volume. And because you can individually *scale* the depth and direction of each assignment, a single gesture can cause each of the assigned parameter to move exactly the distance you desire.
I explained all of that so that you could/would/should understand how you go about programming functions to the Foot Controllers.
The Factory Defaults cover all normal needs. Use FC1 as Expression because it always does Volume. Use FC2 as your Assignable option since it does not have a specific role, you pick from among the 251 parameter Destinations possible. These include parameters of the synth engine, the possible Insertion Effects, etc. you decide.
When to Change the Default Assignments
This falls under the “suggestions” category because you are free to do whatever you want but I highly recommend that you don’t go changing the FC CC Number unless you have a good reason.
If you set it to a CC Number other than cc11, cc4, or Super Knob you may notice that you wind up scratching your head. And the reason will become clear once you realize why it may not be responding.
Head Scratcher: If you want to use the FC2 for example to do PAN, well you know PAN is cc number 10. You set the FC2 = cc10. You move the pedal and nothing happens! You set the FC2 = cc74, again you know cc74 is CUTOFF but again nothing happens, okay you try FC2 = cc91 REV SEND, “come on” that doesn’t work either!!! Let me post a question...
something like that...? Don’t panic nothing is wrong …here’s what’s happening:
Okay what you are setting here is being SENT, Connect the MIDI OUT to your favorite module and sure enough it is responding like a champ, it pans when it gets cc10, it’s filter opens when it gets cc74, it’s reverb turns up when it receives cc91... conclusion:
MONTAGE does not use MIDI to trigger itself.
Let that sink in for a moment.
Before there was MIDI there were electronic keyboards. MIDI is a message that gets sent OUT by the controller device. The messages it sends to itself are not necessarily what it sends out. MIDI does not have enough parameter destinations compared to the synth’s own firmware. The firmware can address tons more parameters directly using the internal Control Matrix to directly assign a Source controller to Destination parameter.
MIDI is the way you address the external world. The FC2 when set to cc04 is not using that message number to speak to itself, the FC2 as a physical control of the synth can be directed in the Control Assign area directly to a specific parameter - you can direct it to Part Parameter Pan. When you do so OUT via MIDI goes cc04, the message to the Part in question is to change Part Pan position. For this Part cc04 is directly addressing the Part Parameter “Pan”. (When the synth receives cc04 coming in via MIDI from a Sequencer for example, this program sees cc04 and directs that to the parameter you selected). So when you set a cc Number for a Controller, the parameters that are directed to follow that physical control will follow that MIDI cc coming in the MIDI jack. By making the cc Number assignment you picking what cc Number coming IN via MIDI will do what you are doing directly.
You do not need to set the Foot Controller cc Number to 10 when you want to Pan, first it will not work internally to change anything, and every device external that receives cc10 will Pan.
Besides... There is already a dedicated channel Pan physical Controller on your front panel.
There is a dedicated Cutoff knob, there is a dedicated Reverb Send knob as well. If you want to control a parameter with you feet, don’t think MIDI CC, think about the direct parameter within the Part, the Element or within the Effect itself.
If you want to control the Cutoff Frequency of a Part, do not assign FC2 to 74, again that would go Out via MIDI; in order to address Cutoff internally go to a Control Assign and set the Element Cutoff parameter for the Part so Source = FC2, Destination is Element Cutoff. A “Direct” assignment... this allows you to use FC2 for an entirely different function in another Part. You might be opening the filter Cutoff with FC in one Part, and be turning Part 2 Down, and simultaneously turning Part 3 Up... all with FC2 set to cc04
When FC2 = SUPER KNOB, we mentioned that in the Factory Performances all 2143 (as of Version 2.00) have this setting, why? Consistency, the programmers were all asked to program the Super Knob, so rather than each creating their own control mapping, it was decided everyone would approach it similarly, that everyone would use FC2 as the Super Knob. (Imagine if it was FC1 on some programs and FC2 on others, totally possible... but obviously a convention by which all factory data is better). You can do whatever you want with your own custom data.
When you select FC2 = Super Knob, the Super Knob will be on a one-to-one basis with the Foot Controller position. The Foot Controller becomes the Super Knob freeing your hands to stay on the keys and other controllers. The Super Knob can be set to send a CC Number on Channel 1, or it can be set to send Sysex messages. The Super Knob can be controlling 8 Common Assign Knobs, which in term could be controlling various Part Assign Knobs in any of the sixteen Parts.
It would be wrong to think MIDI cc numbers when addressing the internal engine - they only work when literally they are coming IN via MIDI. Assign controllers *directly* to synth parameters.
No need to change the cc number of the Foot Controller. A fixed FC (cc11) and an assignable FC (cc04) covers all the bases.
What did you want to control specifically, that was not working?
Posted : 02/02/2018 3:14 pm
Topic starter
Godbless you, sir!
I want more brightness in acoustic pianos while i'm using Fc7. I mean:i push down the Fc7 and the acoustic pianos (as Cfx one) sounds brighter, more brilliant.
Thanks a lot!
Posted : 03/02/2018 4:46 pm
Because the programmer’s are all performing musicians, they, too, would like to have control over the sound - you mention “brighter, more brilliant” - these terms generally are addressed by an Equalizer. An Equalizer is a device that combines amplifiers and filters that are frequency specific... you can make a sound more present or less present but changing the loudness of particular frequencies. It is for this reason you find access to the boutique quality VCM EQ 501 already available via the Assign Knobs.
For example, the “CFX Concert” Piano has the EQ GAIN assigned to Assign Knob 5, which for Parts 1, 2, and 3 is linked to Super Knob position.
In the CFX Concert the sound is brightest when the Super Knob is all the way down. And as you raise the Super Knob you are changing a group of parameters that work together to move the “virtual listening position” farther from the keyboard.
Here’s what I mean, when the Super Knob is all the way down the sound is brightestest, the influence of the “room” is minimized; you are seated at the piano. If you move the Super Knob to about 9 o’clock you will notice the sound is slightly less present and you become aware of the room you are in... as you move the Knob higher and higher you are moving the listener’s position farther and farther away from the piano, so the sound is more rounded, and the reflections from the room make you feel that you are in a larger and larger space. By the time you reach 3 o’clock you are in the last row of a concert hall. The MW also is controlling a sense of “sharpness”... it is sharpest all the way down and as you move it up, the hammer strikes are less and less defined, adding to the illusion of being far away from the piano. With MW up and Super Knob at 3 o’clock you are in the last row.
—————————-
We mentioned the above, because as a general rule it is a good idea to study what is already programmed so you are not creating a conflict.
If you would like to have your own “brightness control” we can show you how to set that up. Setting up an Equalizer for real time control can be done several ways. You can assign it to the Knobs, Ribbon, etc., This can allow you to while playing to adjust the brightness. This is a bit complex because you will need to repeat the programming for each Part.. because each of the Parts has its own boutique EQ.
Another approach could be to assign real time control over the MASTER EFFECT to an Assignable Knob. Because all Parts run through the Master Effect it will more efficient to program real time control of it.
Set the Master Effect to “Presence”, here’s how:
From the HOME screen
Press [EDIT]
Press the upper [COMMON]
Touch “Effect” > “Master FX”
A pop-in menu will show you various Types.
Select “Presence”
There is a Preset called “Bright” which is a good starting point.
We can quickly assign this to a Knob by using the Assign shortcut;
Move the cursor to highlight the “Output Level” parameter within the Presence Effect Type.
Press [CONTROL ASSIGN] (next to the Octave buttons)
Turn Assign Knob 6 to assign it as the “Source”
“MFX Output” will be the “Destination”.
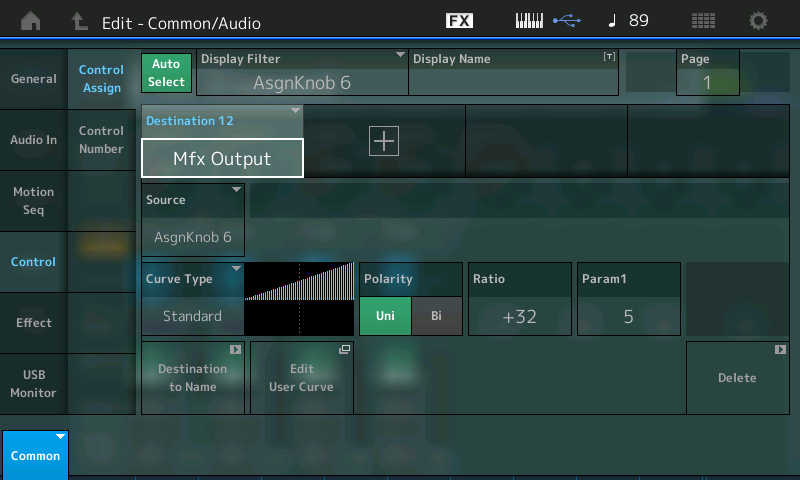
When you turn Assign Knob 6 you can brighten the piano sound.
The “Ratio” parameter controls how much you apply as you turn the Knob up.
Press [STORE]
Store as New Performance
Change the name so you’ll recognize your version
It will be stored to your User Bank.
I see you would prefer it on the Foot Controller... if so you may want to undo some of the original programming to the Super Knob. We should mention by assigning control over the MASTER EFFECT parameter to Common Assign Knob 6, it is automatically (by default) going to follow the movement of the Super Knob (although this is a choice, the default is to opt in..) I chose Assign Knob 6 because it was free of other programming.
From the HOME screen
Press [EDIT]
Press upper [COMMON]
Touch “Control” > “Control Assign”
Make sure AUTO SELECT is active (green)
Move the Super Knob...
If there is a Source/Destination assignment to the Super Knob that you do not want you can remove it by touching "Delete" that will appear in the lower right corner as you recall each assignment screen.
This is another reason to first study the original programming and evaluate what you want to accomplish. If the programming is doing something you will never use, that is what the USER Bank is for - its for your customization of the sounds/programs you want to use. If placing the virtual listener in the back of the concert hall is not something you are going to use, by analyzing how that was done, you can remove that programming and reprogram the sound to behave as you are going to use it.
Hope that helps.
Posted : 04/02/2018 6:53 am
Topic starter
oh,yes. i resolved. thank you for all.
Posted : 05/02/2018 8:07 pm
I am sorry to pose my question on this forum, but I would not know where else to go. Om my Montage 8 I can easily change scenes via midi using CC92.
On my Genos however I can not manage this. The reference manual goes to CC34 and does not include direct scene access (which they call registrations), Yes one can call up REG+ (see: https://www.youtube.com/watch?v=nuBJXuBU4Cg ).
The average Genos player probably will play pre-defined songs, where the sequence of registrations is predetermined. But I prefer to navigate myself directly by number. E.g. by using a midi-switch like Yamaha's MFC10.
Has anyone yet figured out how to send these type of commands to the Genos?
Does anyone have a list of parameters not specified in the reference manual?
Posted : 05/02/2018 11:49 pm
As you know, this is a forum for Synthesizers... Genos is not from the synthesizer department.
Posted : 05/02/2018 11:58 pm

The guidelines from BM made for an interesting read - at first I misread because there's a key phrase "buried". The post is accurate - but I wanted to highlight something so that users didn't have the feeling that the Foot Controller 1 (FC1) plug could only be used as volume. It is not fixed in this manner, it's programmable. Therefore, you are free to use the Foot Controller 1 or Foot Controller 2 plug (jack, connection) for anything you wish with no worry about also controlling volume (for FC1).
These two assignments are the default for the following reason (ease of use)
FC1 is set to a “fixed” function standard MIDI control for relative musical Volume called “Expression”
FC2 is set to a “non-fixed” function controller which means you decide what it controls[... paragraph removed ]
Here is the impact of the difference between FC1 and FC2 as they default. FC1 will always do Expression which is volume change, always. “Fixed”... if you assign something else to FC1 (ADDED FOR EMPHASIS ---> ) while it defaults to cc11 (<--- ADDED FOR EMPHASIS), it will be in addition to its fixed function.
FC2 will always do whatever you assign within the specific Part. It does not have a fixed function, you are free to make control any available Assignable parameter.
The key phrase is "while it [FC1] defaults to cc11". This is a convention followed by the presets which you can program and un-link FC1 from volume/expression.
From the [PERFORMANCE] (HOME) screen, touch the Performance name, then touch "Edit" on the left-hand side (you will be now editing Performance-level parameters. I call these "global" in the context of a performance), then navigate to the "Control" -> "Control Number". Change the value in the "Foot Ctrl 1" box from cc11 to anything else. Now your FC1 (Foot Controller 1) plug/jack/connector is no longer "Fixed" to Volume. It should behave just like FC2 in the sense that it is decoupled from volume.
I'm not sure "Fixed" is clear - at least in my testing. I would rather say that the assignment of FC1 to Volume/Expression is "default" and not "fixed" with the ability of the user to change the default for all user-generated content. Since you cannot change presets and re-save them - all parameters (FC1, FC2, elements, curves, volumes, ... you name it) are "fixed". But the usage of "fixed" vs "non-fixed" in BM's post is in the context of a user Performance where parameters can change and be saved.
... and not-so-fixed Volume/Expression for each individual PART even if you do leave the above "global" setting at cc11:
Furthermore, even if you do leave the FC1 assignment to cc11 (Volume/Expression) - each PART is not "fixed" to volume. You can PART-by-PART elect for each to respect or ignore the Volume/Expression changes.
I used the preset performance "Case 73 + FM" which has PART1 as an FM E-piano sound and PART2 as a sampled E-Piano (Rd).
PART1: edit to ignore Volume/Expression
1) [PERFORMANCE] (HOME)
2) Touch the PART1 name which brings up the "Edit", etc.. left-hand popup
3) Choose "Edit" on touchscreen to start editing PART1
4) Navigate to menu "Mod / Control" -> "Receive SW"
5) Change "Vol/Exp" from "ON" to "OFF" by touching the square.
PART2: leave as default (will be respecting Volume/Expression)
Play notes and notice when the pedal (FC1 connected) is in the heel position, you only hear the FM part. Go ahead and move slider 1 and slider 2 all the way up (while in PART control mode) so that both PART1 and PART2 have their max PART volume setting at 127. "Max PART Volume" is a different parameter than "Volume/Expression". Play notes with the expression pedal (FC1) is in the toe position, you hear the E-Piano + FM. You will notice the FM part which is PART1 is ignoring the expression pedal.
You can do the same experiment but switch around the steps (1-5) for only PART2. It may be easier to hear FM fading in and out vs. the E-Piano.
To me, there's more flexibility in the programming than my first read of BM's post. Just keep in mind that your programming can modify how coupled FC1 (or FC2) is to Volume/Expression.
The above points are only focused on internal controls - not external MIDI messages (meaning what's sent out Montage MIDI OUT).
Posted : 07/02/2018 6:38 pm
It's very simple, don't over complicate it but READ CAREFULLY, there are two Assignable Foot Controller jacks. Their name tells their story. They are both assignable. This means they can be assigned to anything you want (some things will not work, this does not preclude you from making unnecessary or unusable assignments - which is the point I was making to the original poster). But an understanding about the difference between Volume(7) and Expression (11) is necessary, in this discussion.
What the Assignable FC1/2 default to when you're building a Performance up from the INIT stage, covers the basic bases most keyboard players require. FC1 = 11, FC2 = 04
_One is assigned to cc11, a fixed function Control that always does musical "Expression" (relative volume). Reason: 99.9% of keyboards want a volume pedal to use while performing. "Fixed" means cc11 always affects Expression
_The other is assigned to cc04 a non-fixed function Control called "Foot Control". This can be set to any of the available assignable Control Destinations. Reason: You design what it controls within the Part... over 200 potential Control Destinations. "Non-fixed" means without a decision from YOU (as programmer) cc04 does nothing inparticular.
cc001 [Modulation Wheel] is an example of a non-fixed Control, you must define a role for it in each and every program, it has no particular thing it does (although most often used for vibrato, this is an assignment that must be made in each program).
cc064 Sustain is an example of a fixed function Control, it always does Hold 1
cc010 Pan is another example of a fixed function Control, it will always determine Left-to-Right positioning in the stereo field.
The two pedal assignments (a fixed and a non-fixed) are chosen as the defaults because it serves most players... and covers the most requested functions... a dedicated volume pedal, and one that can be used to be "whatever"... it can be Wah Pedal in one Part, a Rotary Speaker Speed Control in another, and a Volume control in yet another, and so on, and it can even do that all simultaneously, if you so desire!
Vol/Exp translates to "cc7/cc11" specifically.
Volume/Expression are NOT the same. You get a choice to opt in or out on them together (because they work together) but understand them as two separate entities that control your keyboard's audio output. If you set the Receive Switch to OFF for "Volume/Expression" you are opting out on both cc007 which controls the Part Volume via the Fader and cc011 which controls Expression (default of FC1)
Part Volume (7) is controlled by the Fader when the upper [COMMON] or [PART CONTROL] is selected.
Expression (11) always works "within" the maximum as set by the Part Volume (7).
Volume (7) when set to 127, Expression (11) works with the full range 0-127; heel down is 0 minimum, toe down is 127 maximum
Volume (7) when set to 100, Expression (11) works so that heel down is minimum 0 but toe down maximum will equal the acoustic output of 100 set by the Part Volume
Volume (7) when set to 0, Expression (11) does not work at all. Minimum equals maximum.
Again, Expression (11) works within the ceiling set by Volume (7).
They are not the same.
cc7 Main (Part) Volume causes all Parts that opt in (Receive Switch for Vol/Exp = On) to jump to the same value.
cc11 Expression causes all Parts that opt in to remain proportional as you move the control value up or down.
Try it, set FC1 = 7, all KBD CTRL Parts will jump to the same value.
Set FC1 = 11, all KBD CTRL Parts will change proportionally.
The FADER (7) is the recording/sound engineer's control, The FC1 (11) is the musician's performing level Control.
The musician's maximum cannot exceed the maximum allowed by the console's fader.
Not to confuse the issue, but it goes further... notice you can opt in or out for VOL/EXP independent of opting in or out for FC1 and FC2.
This initially causes one to scratch their head, particularly if you are unaware of the "fixed" functionality of cc numbers 7 and 11; or if you didn't "get" that both FC1 and FC2 are indeed assignable. Vol/Exp is specifically referring to those cc numbers, 7 and 11. When you want to specifically stop cc7 and cc11 from working, turn the VOL/EXP to OFF, not the FC1
When the Receive Switch for VOL/EXP is OFF, you can still use an FC1 to control the Part's volume... this is done in the CONTROL ASSIGN area by setting Source = Foot Controller 1, Destination assigned directly to the parameter within the Part.
This allows you to use the devices as you may require. Of all the Controller Assign situations we've had in recent history, MONTAGE has the most flexible controller assignment matrix.
Posted : 07/02/2018 10:21 pm
Here's a simplified version of my comment:
I think of the [MASTER VOLUME] Slider as a "fixed" function. It's tied to the hip to both the Main L&R and Phones outputs without a way to program disable this. It is a hardware feature without a software method to decouple.
I feel if you can program a setting away from the default value such that it is no longer coupled to the default value - then this is not a "fixed" value.
Upon first read, "fixed" threw me off slightly although I see you did qualify this in at least one phrase.
Maybe others read it the same way - so I clarify that neither FC1 nor FC2 need to have anything to do with Volume/Expression for the internal PARTs (i.e. not "fixed").
I gave examples of different ways to decouple Volume/Expression from FC1 - either keeping the CC value at 11 and opting out each PART or moving away from CC 11.
Do not conflate complexity. My response was basic nuts and bolts.
Like I said - good first overview - just don't think that FC1 how PARTs are affected by FC1 deserve the "fixed" label.
Posted : 08/02/2018 1:51 am
It is not the FC1 that is fixed.... it is assignable. It's what you assign it to send that has a fixed function or not.
cc11 as a Control Change message has a fixed function that will always change output level (Expression)
cc10 as a Control Change message has a fixed function
cc04 as a Control Change message does NOT have a fixed function.
Try to separate the physical controller (which is assignable) from the cc message it is sending which either has a function always associated with it, or not.
Posted : 08/02/2018 4:52 am
HI I need to dig up this post to ask a follow question. I thought it might be good to get an answer on this post. How does all this info work in conjunction with the Montage Remote (plugin tab)? How does changing the Fc7 number on that page work with this? Is it essentially just letting us assign a midi cc value that we can reference as a modulation connection? How does it interact with plugins who have default midi cc assignments like filter cutoff midi cc 74 etc?
Posted : 31/01/2021 12:44 pm
HI I need to dig up this post to ask a follow question. I thought it might be good to get an answer on this post. How does all this info work in conjunction with the Montage Remote (plugin tab)? How does changing the Fc7 number on that page work with this? Is it essentially just letting us assign a midi cc value that we can reference as a modulation connection? How does it interact with plugins who have default midi cc assignments like filter cutoff midi cc 74 etc?
Re-reading this old thread, I need to update one fact... when you initialize an AWM2 or FM-X Performance, the Foot Controller 2 now defaults to Super Knob (change since 2018).
When the “Remote” layer is activated, the MONTAGE front panel becomes a device to control an external DAW (Track/Transport) and/or an external plug-in synth, Out via USB. When you activate “Remote”, you have two configurable Control screens, 1/2.
Control 1
...For “Track” Mode
The Assign Knobs are Pan controls for DAW Tracks, the “” box, change the current view of available Tracks.
The Sliders are Faders for Track Volume
The Scene buttons are DAW Function buttons
The Track Select, Mute, Solo functions are accessible via the right front panel buttons
...For “Plug-in” Mode
Assign Knobs 1-8 - cc#1-95
Super Knob - cc#1-95
Sliders 1-8 - cc#1-95
Scene buttons 1-8 - cc#1-95
Control 2
Foot Switch - cc#1-95, can be set Momentary/Latch
Foot Ctrl 1 - cc#1-95
Foot Ctrl 2 - cc#1-95
Assign Sw1 - cc#1-95, can be set Momentary/Latch
Assign Sw2 - cc#1-95, can be set Momentary/Latch
MS Hold - cc#1-95, can be set Momentary/Latch
MS Trigger - cc#1-95, can be set Momentary/Latch
See Supplementary Manual for more details
These two configurations are intended either for the DAW itself - referred to as “Track Mode” or for assignment within a synth “Plug-in Mode”
The cc# values you select for the “Track Mode” are generated and routed on MONTAGE USB-2 (Port 2) and arrive in your DAW where you should target the DAW functions.
When you select “Plug-in Mode” the cc# generated here are routed to the DAW as MONTAGE USB-1 (Port 1) and arrive in your DAW where you can route them to the target MIDI device.
The assignments you set are independent of those you have for the current internal Performance, and will not interfere with them because you select where these get routed in your DAW. In other words, the PLUG-IN setup should be configured for the specific plugin.
Posted : 31/01/2021 9:40 pm
