Notifications
Clear all
Topic starter
Hi,
Is there a way to limit the range of volumes of a part?
Example: I change the volume of a part with and external controller (via CC07). The CC that is sent has a value between 0-127. I would like to have the actual volume on the part change from f.e. 50-127. Or 50-100.
Reason is: the actual external controller is a lever/controller stick. When I push slightly against the stick, the volume on the MODX changes massively. I want to limit these dynamics.
On the keyboard itself this cannot be changed.
PS. other solutions that reach the same goal are also welcome!
Posted : 04/03/2020 1:25 pm

You could add a volume offset on all PARTs. Set if superknob is 0-63 then the offset could be -27. If the superknob is 64-127 then the offset is +50.
When external control is at 0-127 and superknob is (full to "half" ) counter-clockwise then the effective volume will be 0-100 (127 minus 27).
When external control is 0-127 and superknob is ("half" to full) clockwise then the effective volume will be 50-127.
If you set the Knob 1 and Knob 2 buttons to force superknob (knob 1 button - above the superknob) to full counter-clockwise and Knob 2 button to full clockwise - then you can press a single button to transition between the two ranges (0-100 or 50-127).
EDIT: Note - to quickly assign superknob to the PART volume - go to [PERFORMANCE] (HOME), touch (touchscreen) the volume slider for one PART - you should see the [CONTROL ASSIGN] button illuminate. Press the [CONTROL ASSIGN] button. Then spin the superknob. Repeat for all PARTs.
Posted : 04/03/2020 7:02 pm
Topic starter
Hi Jason,
Thanks for your answer. I will try it.
I find it a bit regretfull that the Superknob is being used for this. I am trying to save the Superknob functions for sound evolving effects. Or is there a way to flip the function of the Superknob between functions?
Posted : 05/03/2020 10:30 am

Is there a way to limit the range of volumes of a part?
Thanks for the question. Yes, this is possible using the MODX’s Control Assign matrix. Within a Control Set you can determine the minimum and maximum range of modulation for any assigned parameter. In fact, there are several ways to approach this... we’ll talk about two of them below. One with and one without the Super Knob... (there are advantages to both).
The controller assignment and nature of the parameter response are handled with direct communication between the MODX controller and the MODX parameter. The MODX does not use MIDI cc# to address itself... therefore, cc7 and cc11 will not be used. The MODX does generate cc messages when you engage one of its physical controllers (we will not use the universal messages cc7/cc11, but one that we can choose that does not have a built-in function. And because you also want to use an external MIDI controller to apply this modulation, you will need to add one additional step.
That additional step would be to assign your external controller to the same cc# as the MODX controller we task with modulating the volume change. We will use a PART ASSIGN KNOB to do the deed internally on the MODX... then you can assign your external control device to control that Part Assign Knob.
You cannot use cc7 (as it is absolute channel volume), you cannot use cc11Expression, because you wish to set both a minimum other than 0 and a maximum other than 127.
Method 1: Control Assign Knob
With this method, we’ll use the PART VOLUME setting to establish the *minimum*.
From the HOME screen select the Part in question
Press [EDIT]
Touch “Part Settings” > “General”
Set the Volume to the *minimum* setting you require (50)

While it is highlighted, you are able to press the glowing [CONTROL ASSIGN] button to be taken to the Control Assign matrix where you will setup how Volume will be modulated.
You are asked to move the controller you wish to use... you want to find a Part Assign Knob that is available (by available we mean is not tasked with doing something else... this can vary depending on what you want to accomplish. If anything else is assigned to this knob it will also be manipulated by your gesture). Turn the [ASSIGN] knobs, (make sure the [ASSIGN] button is lit), until you find one that has no other assignment Destinations listed for it. (we want to use a fresh knob so we don't inherit any other unwanted changes).
Destination = Volume
Source = AsgnKnobX (The available Knob)
Curve Type = Standard
Polarity = Uni
Ratio = a positive (+) value setting the *maximum*.... as you raise the Ratio value you will hear your sound get louder... this is an offset...we are adding to the *minimum* setting... it will reach theoretical maximum when the right side of the graphic reaches its highest point (ceiling)... (+32) this occurs as the graphic reaches tthe upper right corner.
Values greater than +32 simply reach the theoretical maximum (ceiling) earlier in the movement of the controller. You want to set the value somewhat less than +32 (+32 will equal 127) as you want max out at the equivalent of volume = 100 (set it to the maximum you desire between +1 and +32) ... volume should always be set by ear... to equal about 100 use a setting +20 or so...

...in this method you are using the stored volume to be the *minimum* — when your controller is at minimum the output level will be the stored volume (50)... when you engage the controller it will increase the output level as you apply it... it will reach the *maximum* as offset by your +Ratio setting.
Each Part Assign Knob can be manipulated by an external device sending in the appropriate cc#
Assign Knob 1 = 17
Assign Knob 2 = 18
Assign Knob 3 = 19
Assign Knob 4 = 20
Assign Knob 5 = 21
Assign Knob 6 = 22
Assign Knob 7 = 23
Assign Knob 8 = 24
You can change the cc# if you desire on a per Performance basis.

The MASTERING MODX article series (Super Knob) cover the use of the Control Set parameters (Curve Type, Polarity, Ratio, etc) to determine the range of control you apply with any specific controller.
Mastering MODX Article Series Links
Method 2: Super Knob
Super Knob Value 1 and Value 2 on the “Super Knob” window (shown below): The Values 1 (green) and 2 (blue) are setting limits for the modulation ranges for each Knob 1-8. (Basically, setting MINIMUMs and MAXIMUMs per Knob).
In the default setting you will find the Super Knob set to control full range (0 – 127) for all knobs.
Value 1 = 0
Value 2 = 127
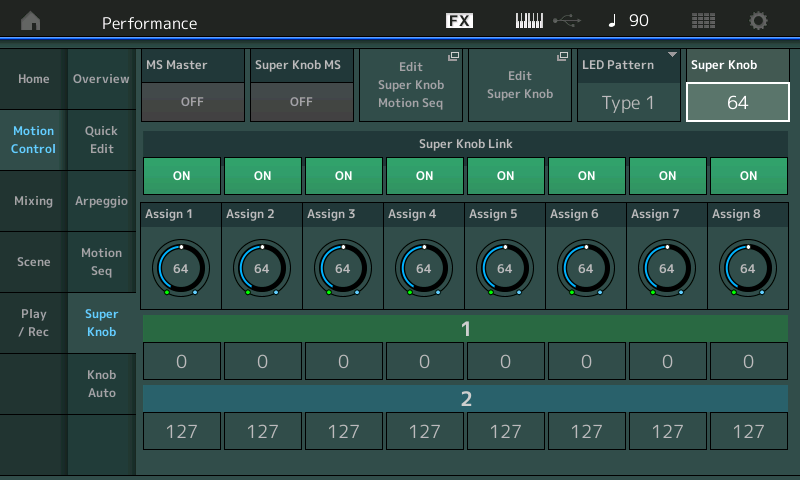
The above is from the MASTERING MODX Article: Super Knob Value Ranges
Here is how to set this up... what we can do is assign the Part Volume to an Assign Knob as in the previous example, link that Assign Knob to the Super Knob, then set the minimum and maximum range you want to control using the Knob Value 1 and 2 limits. The Super Knob can be controlled by a cc# coming IN via MIDI... and the Super Knob can control the precise range of change that you determine works for your musical situation.
The advantage of involving the Super Knob system is you can assign minimum and maximum ranges more precisely and you can control multiple parameters simultaneously — but this may be overkill for your particular use case since you simply want to control Part Volume alone... involve the Super Knob when you have a bunch of settings you wish to change with that single controller gesture...
say you not only wanted to control the volume from 50(min)—100(max), but also wanted to move the item in the stereo field by panning, and at the same time open the filter a set amount and increase the send to the reverb chamber... etc. and since each has its own Control Set, each can be tailored to move in the direction and within the limits you setup.
When the Super Knob is at 0 - AssignKnob 1 = 50

When the Super Knob is at 127 - AssignKnob 1 = 100

You would set your external controller to the same CC# generated by the Super Knob (95 in the example above).
As you noted, this runs the possibility of changing more than you want to change... and that can be a disadvantage (in that you will need to make all the other parameters behave as you desire when controlling the volume of this Part). Your follow up question was:
is there a way to flip the function of the Superknob between functions?
Yes. You can use SCENEs to determine what Common Assign Knobs are currently linked with the Super Knob. On the screen shot above you can see the “Super Knob Link” ON/OFF option... this is storable on a per SCENE basis. So it is possible to isolate just what you want to manipulate at any time.
Hope that helps.
Unknowns: We don’t know (because you did not mention) the nature of the lever you are using as your controller... if it is a minimum-to-maximum device (like a MW, FC) or is it a controller that is at rest in the middle value (like a PB Wheel, Pan control)... this matters - because those that are rest in the middle will have minimum when at rest (making all settings lower than the centerpoint meaningless) when controlling volume.
Posted : 05/03/2020 2:48 pm
I picked superknob because - it wasn't clear - but you seemed to want to have two discrete ranges for the volume that you could easily switch. Running with this assumption - and knowing superknob has two buttons for quick recall - I ran with that. Although SCENE buttons could be used just as well if those are easier to access. Since SCENEs can memorize the superknob position and two scene buttons can be used instead of the superknob memory buttons.
Unfortunately, SCENE buttons can't memorize the common assignable knobs. That'd be an effective way to easily switch between two values using a single button.
I also picked superknob because it's fairly easy to setup using [CONTROL ASSIGN] without itself having other configurations to mess with.
... but you have a ton of options here really.
You could assign one common assignable knobs to fan off to all 16 PARTs (or less) and a single assignable knob would move one PART common assignable knob that in turn is the source for the volume destination. This is the same as superknob assignment except you use a single common assignable knob as your mini-super-knob instead. This is harder to setup because I don't believe you can use [CONTROL ASSIGN] to assign the common assignable knobs. I may be wrong - but, off the cuff, I think perhaps when you touch the volume slider from [PERFORMANCE] (HOME) - the PART will be selected which (may) change the assignable knobs to PART assignable knobs. It's something I'd have to go to the keyboard to check out.
Perhaps it'd just be easier to use an assignable switch instead. Instead of moving superknob after the other instructions (previous message) - you could instead press one of the two assignable switches. As with anything else (like Superknob - which you want to save for some other function) you may run into situations when a Performance already uses assignable switches for element XA Control and want to retain this feature whereby assigning a switch for this feature will "mess up" the existing function. Instead of assignable switch - you could use footswitch AND get a latching footswitch instead of momentary. If you used assignable switches - then you'd want to also go to the Performance Edit-Common/Audio area and set the assignable switch you're using to Latched instead of Momentary.
... there's lots of ways to skin this cat. Each of the options will consume/utilize one or more controllers (button/knob/pedal). And you may or may not want to use said controller for some other purpose. But pretty much all of these options deal with leveraging the Mod/Control "Source"->"Destination" matrix where the destination is PART volume.
... there may be other ways to do this without using the Mod/Control matrix. Maybe use some effect that either lowers the volume and/or compresses the volume range to change how "loud" a PART can get. Then you can disable/enable whichever level of effects you select (insertion or system). This is no longer a button press - but a touchscreen press. And another drawback is having to architect the effects to keep your PARTs sounding "right" when the said level of effects is disabled. So YMMV. I just throw this out as a way - take it or leave it (probably lots of cases to leave it). I was just trying to think of ways without using the Mod/Control matrix.
... a hybrid idea might be to use a single assignment on the common/audio level of Variation effect (system effect) parameter to change the entire volume profile of the variation effect (compressor has input/output offsets among other options). Where each PART you want to participate in the volume control would use the system effect yet using some controller (assignable knob at the common level) would change the Variation effect to change the volume range. At the common level only assignable knobs, MS lanes, and envelope followers can be used as sources. So the options are more limited what can be a source controller. The benefit here is that you wouldn't need to use source/destination pairs inside each PART. You would have to setup the variation effect in each PART you want to control volume response of (all PARTs I presume). And you could get even deeper into the ocean by using envelope follower - a "throw away" PART that's used only to create the envelope to follow with output set to OFF (output is not routed to Main L&R - only used for envelope following) - and use another controller like assignable switch or footswitch or ... to turn "on/off" this single PART by setting the volume to 0 or 127. Then the common/audio variation effect parameters could be modulated by the envelope of this PART which would accomplish indirectly connecting the assignable switch (or footswitch or ...) as the "source" for a Common/Audio variation effect parameter through the envelope follower.
Not necessarily giving the "best" ideas (that's not really for me to determine) - but demonstrating there are so many ways to get this job done coming in at different angles.
Posted : 06/03/2020 7:52 am
