So I wanted to add a piano to "case 73 soft" and control the volume with the super knob. I deleted part 2 for case 73 soft as it was a clicking noise. I pressed the plus button on the performance home screen and added cfx stage piano. Then I touched the volume slider, control assign, and turned the super knob. It said "assignable knob full" indicating the super knob, since it said knob singular and not plural, was full. I then selected part one, edit, mod/control, and control assign. There was nothing assigned to the superknob. I then repeated steps for part 2. I got the same result: nothing assigned to super knob. I am confused because there is nothing assigned to the super knob. I have spent a couple hours trying to analyze this error with no avail. Hence, I am here. Please any help is valued. Thank you.
Pulling in a diagram from https://www.yamahasynth.com/ask-a-question/controlling-filter-cutoff-with-superknob ...

When you went to Part 2 - or any numbered Part - you were looking at the green assignable knobs (and assignable functions below). There's another area - which is the common area - where Superknob utilizes resources. These are depicted as the purple knobs in the image. There are only 8 of these total (not 8x16 - 8 for each Part like the Part-level knobs).
In both levels - Common and Part level - there are 16 maximum assignments you can make. When we're talking about Superknob assignments - we mean Superknob will turn any of the 8 common-level knobs which, in turn, will turn any of the 8x16 Part-level knobs.
At the common level - a SOURCE (when focused on superknob assignments) can be any of the 8 COMMON assignable knobs (purple). You're limited on destinations. Only 16 at this level. And your destination can be any one of the 8 assignable knobs of any of the 16 Parts (8x16). This is the bottleneck. You have all of these possible destinations - but only 16 actual.
Therefore, I would advise you look at the COMMON area for the assignments.
1) Press the [PERFORMANCE] (HOME) button
2) Touch (touchscreen) your Performance name at the top of the screen. A side window will popup asking, among other things, if you want to Edit. Choose (touch) "Edit"
... at the top of the screen you will see "Edit - Common/Audio". This is the COMMON section (not a Part) where the purple knob assignments live.
3) Choose the menu (touchscreen) "Common" -> "Control Assign"
4) Touch "Display Filter" and change to "All"
5) Look at destinations and count. Press right arrow key or touch on screen to see more destinations to the right. I'm guessing you have 16 used now.
Although for MODX - and although referencing older firmware - this video/tutorial covers the topic:
https://yamahasynth.com/learn/montage/mastering-montage-2-super-knob-common
This is for MODX:
https://yamahasynth.com/learn/modx/super-knob-common-mastering-modx
So I wanted to add a piano to "case 73 soft" and control the volume with the super knob. I deleted part 2 for case 73 soft as it was a clicking noise. I pressed the plus button on the performance home screen and added cfx stage piano. Then I touched the volume slider, control assign, and turned the super knob. It said "assignable knob full" indicating the super knob, since it said knob singular and not plural, was full. I then selected part one, edit, mod/control, and control assign. There was nothing assigned to the superknob. I then repeated steps for part 2. I got the same result: nothing assigned to super knob. I am confused because there is nothing assigned to the super knob. I have spent a couple hours trying to analyze this error with no avail. Hence, I am here. Please any help is valued. Thank you.
Thanks for the question… we’ll try to hone in on exactly why you see the “Assign Knob full” message and what you can do about it.
The message appears because when you assign a Part parameter (PART VOLUME) to the Super Knob, you are in fact, assigning a Part Assign Knob to one of the 8 Common Assign Knobs, which, by default, are automatically linked to the Super Knob position. While the Common Assign Knobs may, indeed, be available… What the “Assign Knob full” message is informing you is that in the “CFX Stage” Part all of the 8 Part Assign Knobs are already occupied.
Call up “CFX Stage” and let’s look at its Part Assign Knob configuration.
Part Assign Knob 1 — InsB EQ 1 Gain
Part Assign Knob 2 — InsB EQ 2 Gain
Part Assign Knob 3 — InsB EQ 3 Gain
Part Assign Knob 4 — InsB EQ 4 Gain
Part Assign Knob 5 — InsB EQ 5 Gain
Part Assign Knob 6 — Cutoff
Part Assign Knob 7 — Rev Send
Part Assign Knob 8 — Var Send
This does not mean you cannot add Volume as one of the controlled parameters but it must be able to “share” the Assign Knob with whatever else is already assigned. This requires you deciding what will work and how it working will impact any other assignment.
If the Assign Knob was completely free, the system would have looked for the lowest numbered empty Assign Knob and automatically made the link to Common level and the Super Knob. But because each of the Part Assign Knobs already has a function associated with it, you must manually assign it and make sure that when the Knob is told to change - what results is what you want to happen.
Ways to proceed
You can “Delete” an assignment - thus freeing the Knob completely — or — you can program a Control Set so that the one Part Assign Knob is manipulating multiple parameters.
_The “CFX Stage” was programmed by the factory programmers so that the Performer has access to each of the 5-Bands of the “VCM 501 EQ”(Insert Eff B). You may decide you don’t need access to all of that control.
_You have a Knob set to change the “Cutoff” Frequency - you may decide that this is a parameter you are not going to need to adjust in this particular layer.
_If you are not going to be changing the Reverb Effect during play, you might opt to eliminate that.
_You may not use the Variation Effect at all - so you might opt to eliminate that assignment.
Eliminating an assignment, of course, will free that Part Assign Knob.
Step-by-Step:
Let’s say you started with the 2-Part “Case 73 soft”, you Deleted Part 2 (the mechanical noise), you then “+” merged the “CFX Stage” as Part 2.
Picking it up right here….
From the HOME screen:
Press [SHIFT] + [PERFORMANCE (HOME)] to see the “Motion Control” > “Overview” screen
Change the Part from “Common” to “Part 2”
The graphic will show you that in Part 2 all of the 8 Assign Knobs (green) are occupied.
Take the shortcut, tap the box “Edit Part 2 Control Setting” — this will take you directly to Part 2’s Control Assign area.
Make sure “Auto Select” is active (green) and the [ASSIGN] button is lit
Now turning an Assign Knob will recall the Part parameter assignment to that Knob.
Turn each Knob, in turn…
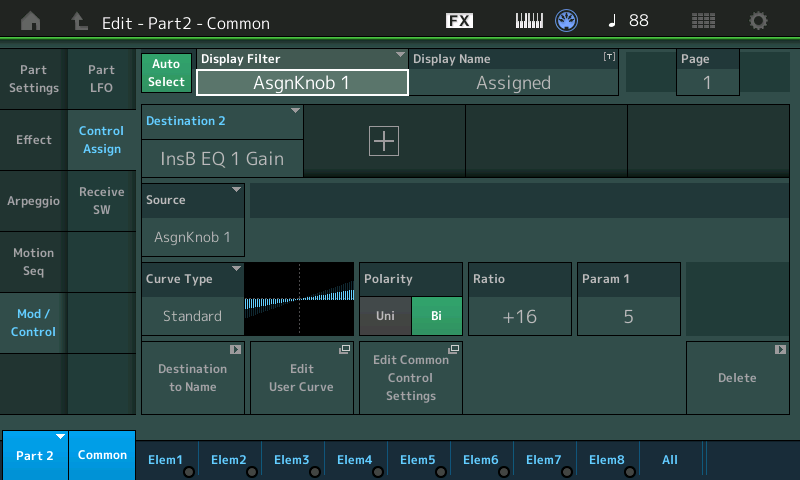
Press the [ASSIGN] button again to view Assign Knob 5-8 (flashes).
Review the eight Part 2 Assign Knob assignments. You can see how you can ‘scale’ the response of each assignment using the Curve Type, Polarity, Ratio etc.
For this example, let’s eliminate Assign Knob 8’s assignment to control the VarSend amount. (You can choose whatever you decide).
Turn Assign Knob 8 to recall this assignment
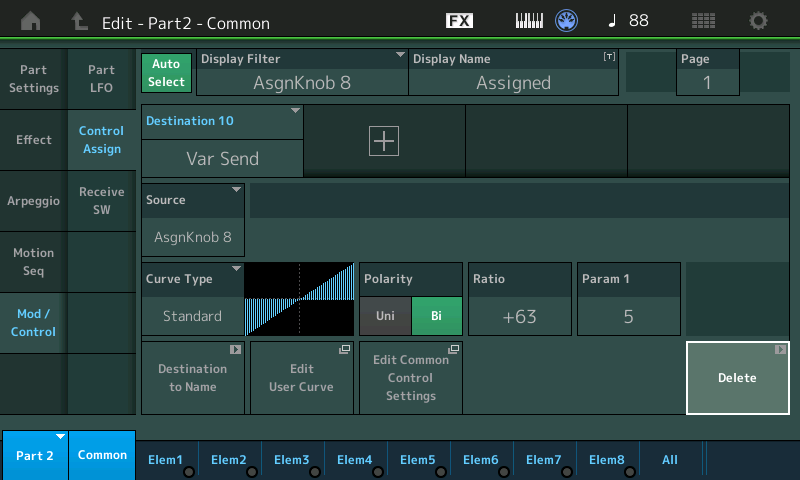
Tap the box in the lower right corner to “DELETE” this assignment.
You now have a Part Assign Knob available to be linked to the upper Performance Common level (the ones that link to the Super Knob).
You can, now that a Part Assign is available, go ahead and assign Part Volume to the Super Knob.
If you do as before, that is, move the cursor HIGHLIGHT to Part VOLUME, Press [CONTROL ASSIGN] and then turn the Super Knob.... you will see a drop-down saying “Modified: Common AsgnKnobX —> AsgnKnob8” as the assignment is made...
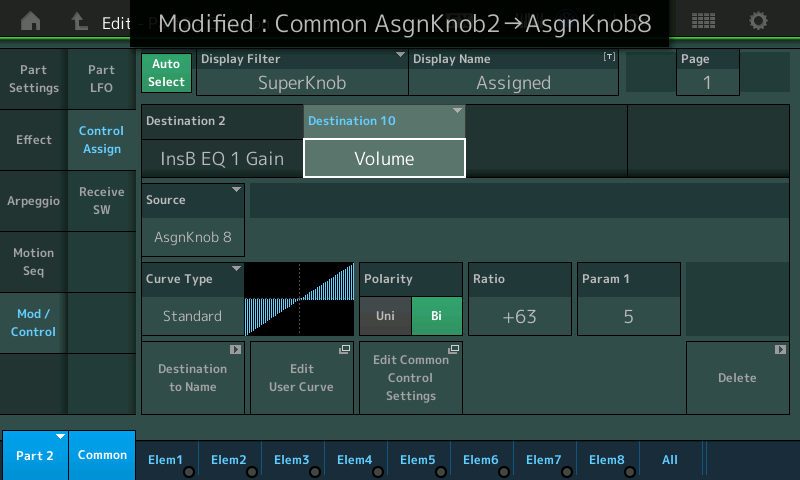
“X” being the first completely available Common Assign Knob is set to determine what happens to Part 2's AsgnKnob 8
To manually make the assignment:
Hit the “+” to add an assignment for Source = Part Assign Knob 8
When a parameter appears, tap it to see all of your Assign options…
Select Part Parameters > Volume
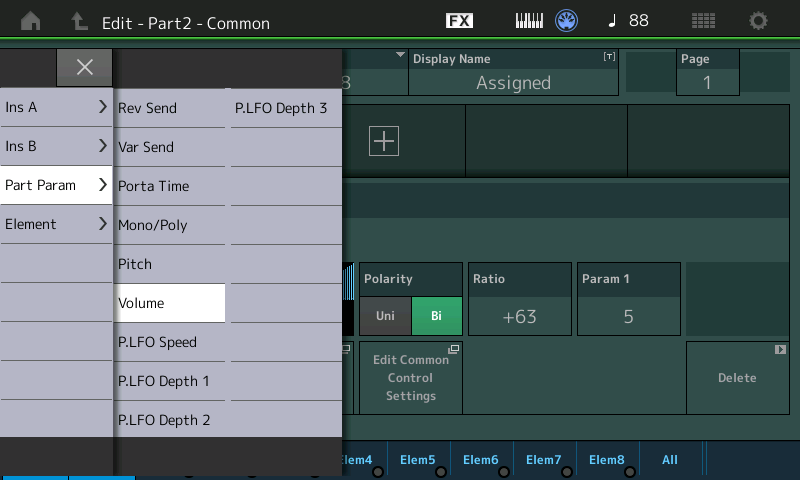
Control Set settings
Set the Curve Type, Polarity, Ratio, and Parameter 1 as you require.
The original volume of the “CFX Stage” is 105.
If you want the Super Knob to control the full range of minimum-to-maximum for the acoustic Piano, you could set them as follows:
Curve Type = Standard
Polarity = Uni
Ratio = +32
Param1 = 5
For this to work set and store the Part Volume for Part 2 = 0
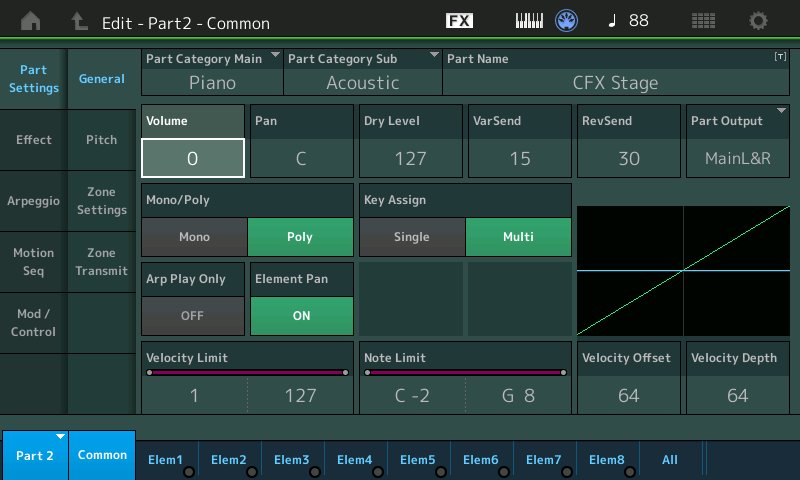
This will make it so that when the Knob = 0 so will the Volume, when the Knob = 127 so will the Piano Volume.
If you simply want to raise an lower the Volume from a specific amount, use the Part Volume as the minimum setting.
For example, if the Part Volume is stored as 105… this will mean your setting will start at 105 and get louder from there to maximum and return to 105 as minimum (stored) value.
If you wish to raise and lower the acoustic piano, use Polarity = Bi, this will make the stored Volume in the center and turning clockwise increases, turning counterclockwise will decrease volume from the stored value.
Summary: the warning you received does not mean you are out of assignments. Often you will see multiple parameters are assigned to a single Knob, but the system will not automatically make that assignment for you. It wants you to “sign off” on whether or not it makes sense.
If for example, you knew you were going to change both the Reverb Send and the Variation Send at the same time, you could consolidate the control of both of these with a single Part Assign Knob — each could change an independent amount, even change in opposite directions, if you wish.
As the tutorials point out, you can assign many things to a single Knob, but it needs you to make that decision. If you have empty Knobs it can simply choose the next one available. But to avoid chaos, it will never stack parameters on the same Knob automatically… you must make that assignment to verify it makes musical sense.
Hope that clarifies what’s happening.
