New to the MODX this week. I have been going through the "Mastering MODX" articles and trying things out as suggested, and one thing is confusing me (so far!).
I'm experimenting with making a simple piano/strings layer to start with something basic. I'm starting with "S700 for Montage" in Part 1, and then adding strings (let's say Solo Cello AF1, which is what's in front of me right now.) The cello is distributed over the next 2 parts, so now what I have is this:
Part 1: S700 for Montage
Part 2: Solo Cello AF1
Part 3: STRINGS
When I adjust the Part Volume for the piano, the volume moves up and down as expected from 0-127. However, regardless of where either of the faders are for Parts 2-3, it seems that the cello stays at 127, and continues to play at the same volume regardless of where I have the value set (ie - I can set Part 2 and 3 both to Volume 0 and the playback volume does not change, and the meters continue to move as if I had the volumes all at 127).
I noticed that if I adjust at an element level, I am able to change the perceived "volume" by moving the element faders and getting the response I would expect; additionally, if I use a single-part (green lettering) string patch, the Volume adjusts as expected. This only happens with multi-part strings that I am unable to use the Volume fader.
Is this part of the way the "Solo Cello AF1" and similar performances were constructed, and just a setting that needs adjusting to do what I am thinking?
Thanks in advance!
Likely volume is offset by a controller like assignable knobs controlled by superknob which is why sliders do not have a direct 1:1 control over the volume.
Since you merged in the Cello part - and it does likely "want" some ties to superknob - you'll want to reconnect superknob to the PART-level assignable knobs post-merge. Or (not better, just more efficient at the possible cost of polyphony priority) you can start with the Cello multi-PART performance first and merge in S700.
Part 1: S700 for Montage
Part 2: Cello Solo
Part 3: Solo Cello AF1
Part 4: STRINGS
I'm starting with "S700 for Montage" in Part 1, and then adding strings (let's say Solo Cello AF1, which is what's in front of me right now.)
This is not Solo Cello AF1 + S700 for Montage. Solo Cello AF1 is only 2 PARTs and S700 for Montage is only 1 PART. Your result should be 3 PARTs - not 4.
This doesn't really matter for your question - but wanted to clear up something that didn't jive with your description.
Is this part of the way the "Solo Cello AF1" and similar performances were constructed, and just a setting that needs adjusting to do what I am thinking?
Excellent thinking! Typically, when the Part Volume slider doesn’t change the Volume of the Part, it is because another (real-time) controller has been put in charge of the control of the output level. If you think of the PART VOLUME slider as the sound person's control, think of this alternate Volume control as a control that the "player" would apply at the instrument (as a performing gesture).
The sound person works sliders on a mixer, the musician does the Volume control within the instrument... When you take control away from the sound person (mixer), you have it within the instrument's programming... here's how to dive in:
Recall “Solo Cello AF1” as a separate Performance.
When you are on the Home screen with the Performance Name highlighted, sliders 1 and 2 should normally control each Parts Volume, respectively.
And as you have observed, the Part Sliders have no affect. When this occurs another controller is responsible for controlling their output. This controller is within the PART itself.
Press [EDIT]
In the first column tap “Control”
In the second column tap “Control Assign”
Touch the box labeled “Auto Select” so that it is active (green)
This will recall controller assignments when you move a controller.
Each PART can have 16 Control Sets (Source/Destination) assignments.
Source = a Physical Controller
Destination = a Parameter within the instrument
Turn the Super Knob
You will see two assignments:
“Part 1 Assign 6” is Destination 1... (translation: Part 1's AssignKnob 6)
“Part 2 Assign 6” is Destination 2 ... (translation Part 2's AssignKnob 6)
Each is responsible for Part Volume
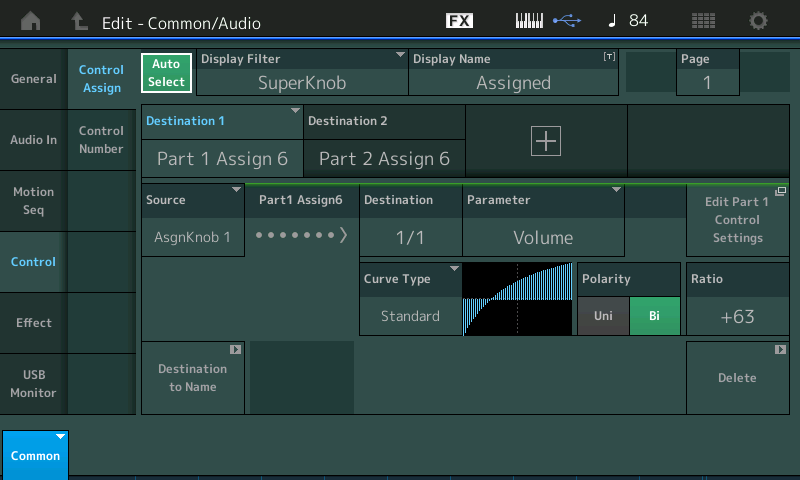
Allowing the Super Knob to morph between them... as you move the Super Knob you see Assign Knob 1 turn down Part 1 (if you move Assign Knob 1 directly you will hear it control the Volume of Part 1). And as you move the Super Knob you see Assign Knob 2 turn up the Volume of Part 2... turning it directly you will hear how it is in charge of Part 2's Volume.
This allows you to perform with a Yamaha FC7 sweep pedal plugged into the Foot Controller 2 jack this transition. The Foot Controller allows you to keep both hands on the Keyboard while controlling the morph between these to Cello Parts.
Let's take a closer look at Destination 1 (Part 1 Assign 6)
When "Destination 1" is blue you are viewing its Control set... This is where it is linked the Super Knob movement... What it translates to is: Part 1's sixth Knob is assigned to Control the Part Volume of this sound...
Tap the shortcut box labeled "Edit Part 1 Control Settings"
This will take you directly to PART 1's Control Set where you will find "Source" = AsgnKnob 6 is set to VOLUME
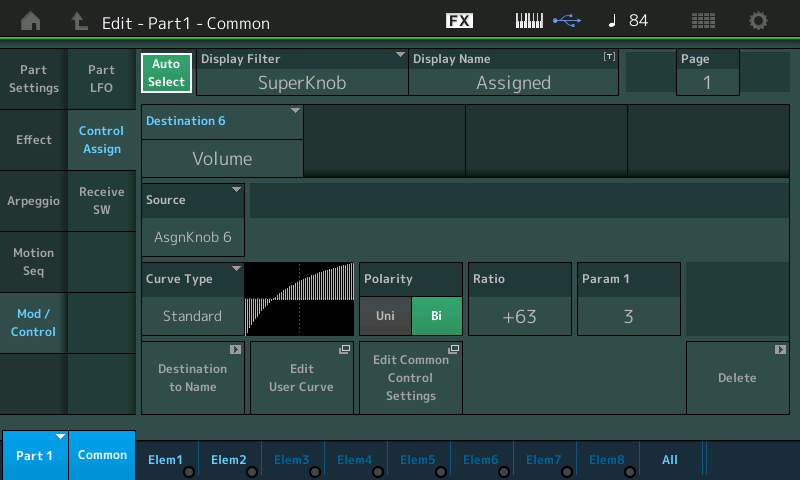
If you touch the box in the lower left corner that says PART 1, you will see a pop-up menu allowing you to select PART 2
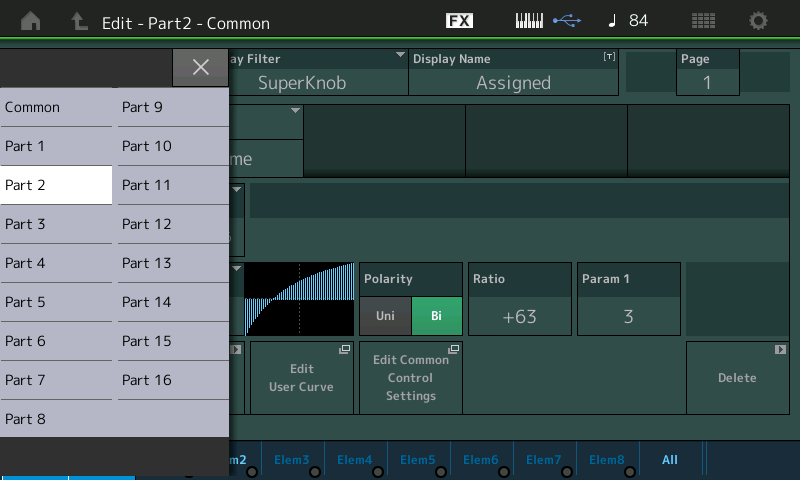
Here you will see that it also has Part 2 AsgnKnob 6 is also set to control VOLUME
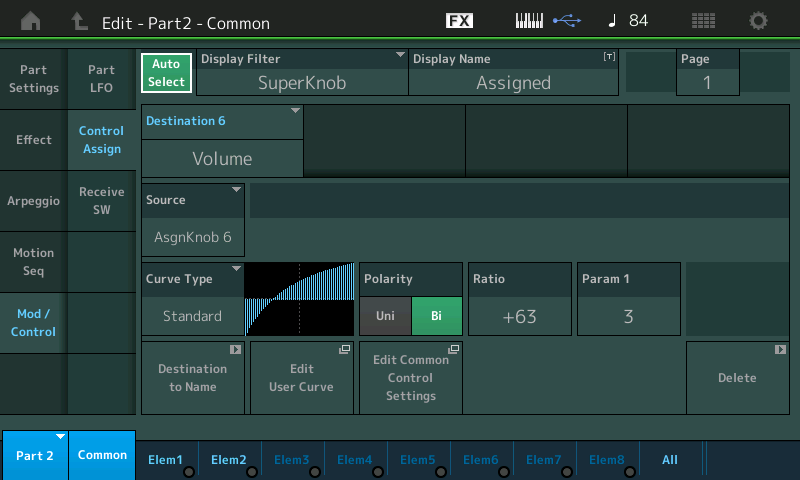
If you would rather control the VOLUME of these PARTs with the Sliders - you can simply tap the box in the lower right corner of each PART screen to "DELETE" the Assignment. This will return sole control to the Part Volume Slider
You may wonder how the COMMON Assign Knobs are moving in opposite directions - this is handled on the following screen:
From the HOME screen touch "Motion Control" in the first column and "Super Knob in the second column
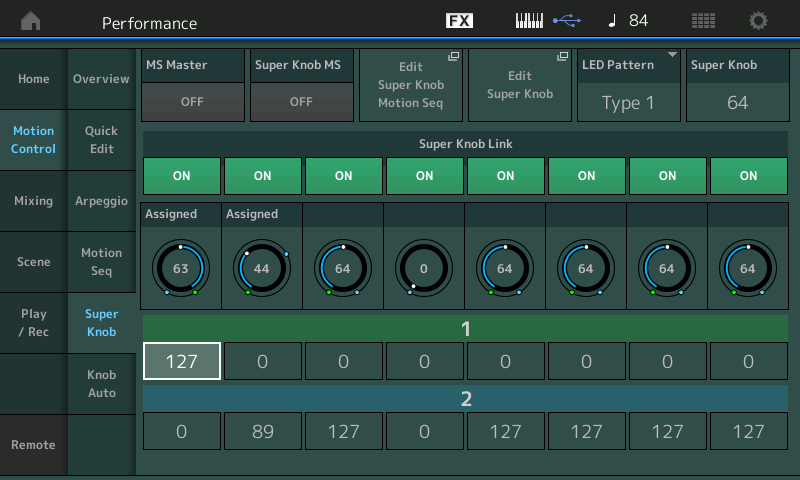
Instead of the range going from minimum to maximum - Common Assign Knob 1 is set to go from maximum (127) to minimum (0)
While Common Assign Knob 2 is set to go from minimum (0) to a maximum of 89
Turn the Super Knob to see how the Common Assign Knobs are programmed to move
The other PART Assign Knobs are adjusting EQ - this gives the sound that bright bowed sound as you move the Super Knob - this is very compelling when done with the Foot Controller moving the Super Knob.
Bad Mister - thanks so much for the explanation! That solved my issue perfectly. I'm still in the process of getting comfortable and familiar with MODX logic/architecture so I appreciate the walkthrough.
Jason - I noticed just after posting that one of the PARTs I initially referenced was from the one-part cello patch I was using to reference in my experimenting. I edited the post but you must have already been mid-reply! Thanks
Thanks for the question!
I’ve added some screenshots to help you navigate and see what’s going on...
Extra Credit:
Mastering MODX: Super Knob Morph
The above is a part of a series on the basics of the Super Knob, starting with:
Mastering MODX: Super Knob - Common
Thanks for the question!
I’ve added some screenshots to help you navigate and see what’s going on...Extra Credit:
Mastering MODX: Super Knob MorphThe above is a part of a series on the basics of the Super Knob, starting with:
Mastering MODX: Super Knob - Common
Perfect, this is a huge help! Thanks so much again
