

Tagged Under
RECORDING A BASIC DRUM GROOVE 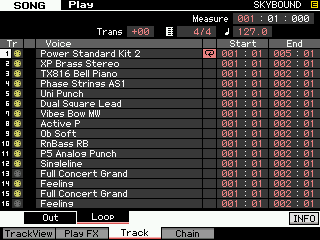 SONG MODE
It is possible to record your own original drum tracks. This can be done in Pattern mode or in Song mode. The Motif XF has a new feature that allows you to PLAYBACK loops in SONG mode. This is extremely useful if you are working on a composition and wish to play along with a basic drum groove, rather than just simply playing with a metronome. Often a drum groove can give a better “feel” for what you want to accomplish. Therefore you may want to temporarily setup a drum groove to cycle while you are recording “linearly” in SONG mode. Later you can go back and construct a more complete drum track adding fill-ins and variations.
From the main Song screen press the [F3] TRACK and then [SF2] LOOP. Here you can set any track to loop from any measure to any measure. There is a column for the loop icon – when showing this will indicate that the track is set to cycle. In the screen shot (above) you can see that track 1 is set to LOOP between 001 and the top of measure 005 – this creates a 4-measure cycle.
Say you record the first four measures with a drum kit, you can then set measures to loop continuously by setting the START parameter to 001:01 and the END parameter to 005:01, then set the LOOP On by pressing [INC/YES] when you place the cursor in the LOOP box. This will playback looping the first four measures. Yes, you must set this so that the measure:beat region is inclusive. For details on this see page 143 of the Reference Manual “Loop Playback Settings”.
The loop can be set at any particular point in the composition. For example, many songs begin with a musical introduction, and the drums come in after some time with a build up and a roll into a crash, before settling into a groove. For example, the piano may start the song for 8 measures alone, but in measure 7 and 8 the drums do a build up and then drops into a groove at measure 9. You can set the loop to go between measure 009~017. Use your imagination.
The SONG LOOP function is here as a ‘work-in-progress’ tool and you will probably finalize a complete drum track before completing the SONG. You can use the arpeggiator or the PATTERN mode to create specific drum measures to finalize a complete drum performance.
Recording your own original drum Pattern
You may opt to use PATTERN mode for drum track creation. Pattern mode itself is designed around how old-style drum machines worked. That is, you have a set number of measures that will automatically loop during the RECORD process and allow you add data on each pass. This became popular as most drum machine purchasers where not drummers, and therefore needed multiple passes to complete a complete sounding drum pattern. Also memory on early drum machines was extremely limited. You could record a maximum of 1 or 2 measures at a time… then you linked (chained) those short patterns together to make a drum composition.
You can record by overdubbing (adding while listening to what you have so far) as the phrase cycles around. If you have never played drums before, not to worry… programming drum grooves from a keyboard is not for everyone. But you may find that you have an undiscovered talent for it anyway.
Drummers are not even aware sometimes that they make the best drum programmers, because there is such a thing as “thinking like a drummer”. The most convincing drum grooves are those that sound as if they could actually be played. The principal keys (notes) for the basic drum kit are found between C1-B2 on the keyboard. There you will find a kick or bass drum, several different permutations of snare (full, sidestick, handclap), toms, high hats, rides, crashes, tambourine, vibra-slap and cowbell. Above this you will get into full on percussion and other miscellaneous stuff. Below C1 you will find alternate kicks, snare rolls, brushes, etc.
The more you listen to good drummers the more you will be able to effectively program convincing drum grooves. One word of advice though, nothing says you have to emulate real drums but remember a drummer has only four limbs that they use for playing the kit. They only use two sticks and have only two feet (in most cases)… so if you have toms rolls, snare hits, high hats, crashes and rides all happening at once, just remember you have created a science fiction “virtual” drummer. Good and great programming leaves the listener unconcerned (and unaware) that it is not a real person sitting behind a real kit.
Recording Drum Grooves using the Arpeggiator
If you have no talent for programming your own drums, remember the Motif XF comes with more than 2300 drum patterns in the arpeggio section. Up to five different arpeggio types (grooves) can be assigned to the [SF] buttons. You can record while activating the different arpeggios so it is easy to outline a track with fill-ins and transitions.
• Go to PATTERN mode and assign a drum kit to Part 1 of a blank pattern.
• Press [MIXING]
• Press [EDIT]
• Press Track [1] to view PART parameters
• Press [F2] ARP MAIN
• Set the SWITCH = ON
• Set HOLD = ON
• Set CHANGE TIMING = MEASURE
This will allow the ARP to play the drums, you will not have to hold down a key manually and when you do change arpeggios they will change at the top of the next measure (making the transition between arp types occur only at the top of the next measure). It is a good idea and is recommended that you turn LOOP OFF when you record arpeggios to PATTERN mode – this is so that the sequencer STOPS automatically at the end of the LENGTH you have selected.
In general, you will see a two-letter prefix (as part of the ARP name) that will give you a clue about what type of drum groove you’ve selected. If “M” is the first letter it is for Main and the letter following is degree of complexity with B being more complex than A, C being more complex than B, and so on. “MA” for example, is a Main “A” section groove, “MB” is a Main “B” section groove. “F” as the first letter is for Fill-in, “I” is for Introduction, and “B” as the first letter is a Break. But this is in general, you can use whatever you want; wherever you want – after all, it is your music. Simply pick the drum arpeggio type by ear – not necessarily by what is being suggested by the prefix.
At the bottom of the screen you can select from the more than 2300 “DrPc” category (Drum and Percussion) arpeggio types – listed between #3815 and #5723.
As a quick example make the following assignments: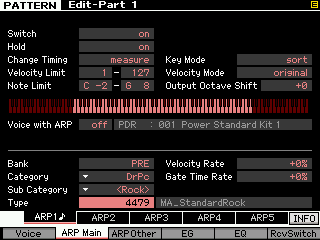 • Press [SF1] ARP1 and assign:
Bank = PRE
Category = DrPc
Sub-Category = Rock
Type = 4479 “MA_Standard Rock”
In turn assign the following:
• Press [SF2] ARP2
Type = 4480 “MB_StandardRock”
• Press [SF3] ARP3
Type = 4481 “MC_StandardRock”
• Press [SF4] ARP4
Type = 4482 “FA_StandardRock”
• Press [SF5] ARP5
Type = 4483 “FB_StandardRock”
Activate the main [ARPEGGIO ON/OFF] button.
You can hear that #4479 (MA) is like the verse, and #4480 (MB) the drummer opens the groove to the ride cymbal (chorus), and you can use #4482 (FA) as fill-in to transition between the main A and the main B grooves. And you can use #4483 (FB) to transition between the main B and main C grooves #4481. That is how it is designed to work… but you do not have to do this at all – just file that away in your memory banks. There are no rules about using any of this. You can decide to use a Fill-in as a main groove – it’s your music.
If you wanted to record yourself making these types of transitions, you simply press [RECORD], then press [F2] ARPEGGIO, and you are given access to the [SF] buttons controlling the arpeggio types. Now when you press the PLAY button to start the transport – you can still access the [SF1]-[SF5] buttons in real time. You can interactively recall Fill-ins and move from arpeggio to arpeggio. This can be done in PATTERN or in SONG mode to facilitate real-time selection of arpeggio types.
The unusual: Looking for some inspiration? Here we will give you a tip on some of the unique drum arpeggio gems that you may not discover on your own or even know about. Drum/Percussion arpeggios #6789-6810 are in a category called “Genrl” (general)
• Call up Arpeggio Type #6802 “16BeatSlice1” These “General” arp types can be used in a unique fashion to create alternative drum patterns – you will have to use your imagination and not be afraid to experiment.
• Hold down note “C1” (kick drum). Observe that a rhythmic pattern plays.
• Add note “D1” (snare drum) – so that now you are holding down both “C1” and “D1”
• Add note “F#1” (closed hihat)
• Add note “A#1” (open hihat)
Any held notes will create a drum pattern – the last four notes played will be active. Alternatively you can play individual notes and trigger a pattern that way. For example, in succession play a tom-tom fill using D2, C2, B1, A1
There are several ROLL arp types. To use these you may want to set the ARP’s LOOP = OFF
This is found by pressing [F3] ARP OTHER (shown below)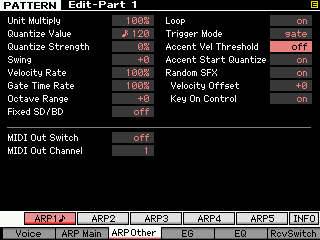
At [F3] OTHER you will find also the TRIGGER MODE parameter, which can be set to “Gate” or to “Toggle”. Gate is the normal setting and is easily understood – when you press a key the arp plays and depending on the HOLD setting, when you let go it will stop. Toggle is the setting that allows the first touch to start playback of the arpeggio phrase and the next touch stops it.
The ACCENT VEL THRESHOLD parameters sets a velocity level that when exceeded can add pre-programmed “accent”. Refer to the DATA LIST 2 booklet to see if a particular drum arp type features VELOCITY ACCENT. Initially, this parameter maybe set to a value of 64 which can be an issue – set as you desire.
You can very much influence how an arpeggio is playing on this particular screen. Experimentation is the name of the game. For definitions of each parameter please see the Reference Manual pages 59-60.
TIPS: When composing don’t force yourself into working uncomfortably. We get many questions about should I use SONG mode or PATTERN mode when first working out ideas. This is a personal choice. Pattern mode is convenient for some things and not so much for others. Its the old hammer and nail thing. PATTERN mode, for example, is great because it cycles, but you may not think initially in a set number of measures. Perhaps you get your best ideas by opening a linear record structure and just play freely – until inspiration hits. So SONG mode is a viable option. And since Tracks can be set to LOOP in SONG mode while you are working out basic ideas, why not use it if you find linear recording more inspiring!
Don’t have a favorite mode. Learn to use the both. You would not hire a builder that only had a hammer! If all you have is a hammer, every problem starts looking like a nail!