

Tagged Under
ARPEGGIOS EXPLORED
If you think you don’t like arpeggios, this article is for you.
If you have no idea what you can do with all those arpeggios, this article is for you.
If you think you know what arpeggios are, this article is for you.
If you think they are only flourishes of notes up and down the keyboard, you are really in for a surprise.
We’ll take a close look at some of the musical magic you can do with these flexible MIDI phrases
This function lets you automatically trigger musical and rhythmic phrases using the current Voice by simply pressing a key or keys on the keyboard. The Arpeggio sequence changes in response to the actual notes or chords you play, giving you a wide variety of inspiring musical phrases and ideas, both in composing and performing.
Arpeggios Explained
It is important to understand what an arpeggio is capable of doing and not doing. As implemented on th Yamaha synthesizers, the arpeggio is a tool that has purposefully been left “open” as to how you can utilize it. Instead of making a long list of rules, the arpeggio creation process is open for interpretation and experimentation. The actual restrictions are really very few – but very important to grasp – particular when it comes to data you input or select to use as an arpeggio. Arpeggios are often flourishes of notes or they can be controller gestures (movements), but whatever they are, first and foremost, they’re MIDI events that can be controlled in a unique/interactive way. That said, they are all created using the MIDI Sequencer. So you have to be able to play, perform or enter it in to the sequencer, at least once, in order to be able to convert it into an arp. Any MIDI data from a song file, that meets the requirements, can be converted into an arpeggio, as well. We will take a look at how the rules were designed to work, then we will look at how we can bend those rules. If you do not know the rules, they quickly become limitations rather than assets.
Arpeggios can be interactive, where they respond with some degree of artificial intelligence (chord recognition), or then can be used to playback exactly a particular musical phrase or gesture. They can include note data and/or controller data. They can loop, they can play once and stop, or you can toggle them on and off. They can play while you hold keys or they can be held with the ARP HOLD parameter or the sustain pedal. There are even “hybrid” arpeggios that themselves are rebels within the system.
There are 7,881 Preset arpeggios in memory – and yet most musicians have a desire to create their own. Before we delved too deeply into arpeggio creation, we will give you some idea of the potential by studying the Presets. Converting MIDI data with the built-in sequencer’s JOB function creates arpeggios.
• PUT TRACK TO ARPEGGIO: This Job copies data in the specified measures of a track for creating Arpeggio data. Up to 16 unique note numbers can be recorded to the Arpeggio track. If more than 16 different note numbers have been recorded to the MIDI sequence data, the Convert operation reduces the notes in excess of the limit. Because of this, be careful to record only up to 16 different notes when you create an Arpeggio, especially when using all four tracks.
The difference between recording a musical phrase to the sequencer and triggering that same musical phrase with the arpeggiator is what we are discussing here. While the result may (and can) sound the same to the listener, how they occur (are triggered and controlled) is very different.
The MIDI events recorded to the sequencer are stored on a track and played back (in sequence) after the [PLAY] button is pressed. Pressing the [PLAY] button is not really a musical gesture; anybody can press the button. However, interacting with an arpeggio, that is, controlling it by touching keys, can be a musical act. It can, and most often does, require some musical skill, and those skills would not be available necessarily to just any civilian …if you get my meaning.
They both are automated playback of a musical phrase or gesture, but the ARP may need to be controlled by a “certified” musician… knowing when to trigger it, where on the keyboard to trigger it, how hard to trigger it, and what to play to effectively control it, can be involved.
The simplest arpeggio Convert Type is the “Fixed Note” arpeggio. A drum phrase is a typical example of a “fixed note” arpeggio. Literally, the notes contained in the arpeggio type are fixed – they do not transpose or change chord tense, because the drum and percussion sounds that they trigger are in fixed locations on the keyboard. In real life, the drummer does not care if the chord played is a Major chord or a Minor chord. In the Drum Kit Voice, the kick drum and snare drum remain assigned to the same keys no matter what. When the “Put Track To Arpeggio” explanation above talks about “16 unique note numbers”, you have to understand this as a drum kit with access to 16 different drum sounds. It does not mean that an arp can only be 16 notes in length. It means that the kick drum on note C1 is counted as 1 unique note number, the snare on D1 is counted as second unique note number. How many times you hit “C1” or “D1” is of no consequence here. That is the first thing to understand. Even when creating musical phrases that are chord intelligent, you must limit yourself to 16 unique note numbers. And as we’ll learn, there are arpeggios that are musically correct in that they adjust to the chord quality of the control notes. And then there are arpeggios that simply play whatever you want.
If you record a musical phrase and use the convert type “Fixed Note”, that phrase will play exactly as recorded every time it is triggered. This means that there will be no adjustment to chord quality – no change from Major to Minor, no adjustment at all… “fixed note” can be taken literally. We mention this because historically arpeggios are thought of for their ability to adjust to the controlling trigger notes. The “Fixed Note” Convert Type was developed to accommodate DRUMS specifically, but this does not mean you can’t use it for musical phrases, only expect that musical phrase to be “fixed”.
“Original Note“ converted arpeggio types will play exactly what you input when you create the phrase, but will adjust the notes in the phrase according to the musical Key and Chord tense (major, minor, dominant, augmented, diminished) of the controlling trigger notes. This is wonderful for bass lines, chord comping, etc.
CONCEPT: In the most common Arpeggio Types, the notes used to trigger/control the arps are themselves not heard. This is a very important thing to grasp. While the key you press normally makes a sound, when the ARP is ON, the notes that you touch may or may not cause a direct sound to occur. For example, an arp Type that is a guitar picking part will “pick” the note (play staccato) even though you are holding down the key that would make that note sound. You could be holding a whole note chord. That whole note chord (we’ll refer to as the ‘trigger notes’) is not heard, typically, what you hear is the arp phrase picking away. This is due to a parameter called the “KEY MODE“.
There are 5 Key Modes:
• Sort: Notes play a pre-arranged arp pattern
• Thru: Notes play in the order they are pressed
• Direct: The trigger notes sound (used for Controller Arps)
• Sort+Direct: Both the pre-arranged arp pattern and the trigger notes are heard
• Thru+Direct: Both the arp notes played in the order pressed and the trigger notes are heard
We’ll start our discussion with the first two most common Key Mode types: SORT and THRU
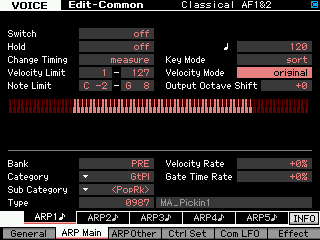
Recall: “Classical AF1&2” PRE2:050(D02)
Play an F Major 7 chord: F-A-C-E – the Voice responds directly as you depress the keys.
• Press [ARPEGGIO ON/OFF] to activate the arpeggio
• Select [SF1] ARP 1
• Hold down an “F Major 7” chord: F-A-C-E
You never hear these notes directly; you simply hear the picked notes played by a predetermined pattern.
Basically, the Key Mode determines if the arp is going to pay attention to your key presses and sound directly or if it is going to sort the notes according to the selected (stored) arpeggio Type.
• Press [EDIT]
• Press [COMMON] EDIT
• Press [F2] ARP MAIN
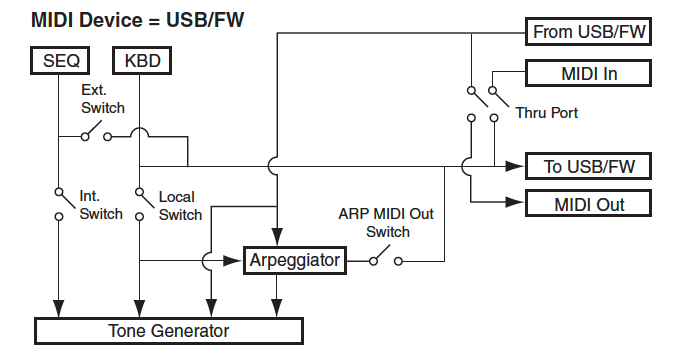
Thinking, as you always should, in terms of SIGNAL FLOW, you can surmise that the arpeggiator is located between the keyboard controller and the tone generator and that the LOCAL CONTROL SWITCH must be connected (ON) in order for the keyboard to communicate with the Arpeggiator. We will come back to some of these concepts later in the article when they will make more sense to discuss them. But before we do let’s take a look at how the arpeggiator has evolved to get to where it is now. Data from either the KEYBOARD or coming in via USB-MIDI or FW-MIDI can trigger the ARPEGGIATOR – which in turn can trigger the internal TONE GENERATOR.
Arpeggios are also designed to be recorded to the internal Sequencer or routed OUT via MIDI.
Historical view: Early Arps went UP/DOWN, DOWN/UP…
Let’s recall a very basic arpeggio. When synthesizers were still in their infancy creating a sequence of notes that repeated over and over is what people understood as an arpeggiator. It did your basic up and down, down and up gestures, and the random thing, but not much more than that. And they were very cool – basic and cool. And this function remains very useful still.
Recall the following VOICE: PRE7:004(A04) Bright Dance
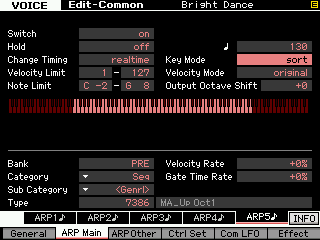
Press [EDIT]
Press [COMMON EDIT]
Press [F2] ARP Main
In the arpeggio library you will find these by searching in BANK = “PRE”
MAIN Category = “SEQ”
SUB Category = “GENRL”
Recall [SF5] ARP 5
Which is the following arp TYPE:
On the Motif XF: Seq > General: 7386 MA_Up Oct1
This is your basic bottom-to-top arpeggio in one octave. If you need to repeat a single note over and over, using the “Up Oct1” arpeggio type while holding a single note gets this done. Try it.
Take your time and recognize this is the origin of the “classic” arpeggiator. Try several different Arps in this Main/Sub Category and explore what they can do.
If the KEY MODE = “sort” the lowest note plays first, then any note pressed and held will be sorted so they play bottom to top (lowest toward highest). The more notes you hold down, the more that are added to the playback… but always bottom (lowest) to top (highest).
If, however, you set the KEY MODE = “thru”, the notes will be sounded in the order you press them. Notice also that no matter how many notes you add, the additional note is simply added to the end of the phrase.
CONCEPT: Try the HOLD parameter function:
Recall: “Classical AF1&2” PRE2:050(D02)
Set HOLD = ON. Get used to how it works to “hold” the keys down for you – it does not cause the sound of the resulting notes to sustain (they still play in a staccato fashion as instructed by the arpeggio). See how it recognizes which keys have a finger on it pressing down. Use your sustain pedal. Immediately, you will notice that the sustain pedal does not sustain the sound, it holds the keys for you – it is, after all the same “HOLD” function. The sustain pedal holds the key down instead of you having to use your finger. So the notes are still quick and short but you do not have to physically hold each keys.
What does this mean: This means if you play a C Major 7 chord (C-E-G-B) so that you press and hold the C, then press and hold the E, then press and hold the G and finally press and hold the B – as you now hold down 4 notes observe the difference when you switch the order in which you press and hold down the keys. Compare what happens when ‘Sort’ is selected, versus what happens when ‘Thru’ is selected.
‘Sort’ will always play the notes lowest to highest.
‘Thru’ will change the order to mimic the order in which you actually engage the keys.
In a similar scenario the VELOCITY MODE parameter will interpret how the notes respond to velocity (which may affect the amplitude/loudness). The selections here are “original” or “thru”. Back when synthesizers first had up and down, down and up arpeggio patterns, Velocity was not involved in analog synthesizers, at all.
Velocity mode = ‘original’ will play as documented (recorded) in the arpeggio data itself.
Velocity mode = ‘thru’ will allow your trigger velocity to influence the loudness of each note of the arpeggio.
A VELOCITY mode did not exist on the old analog synths, as velocity sensitivity itself was not available on early analog synthesizers.
To appreciate what the VELOCITY MODE does, switch back to the “Classical AF1&2” guitar sound PRE2:050(D02) and try out the VELOCITY Mode parameters.
First try: “original” and then “thru”.
As you can hear the “original” Velocity Mode setting allows the pre-determined velocities to control the note-on events. The “thru” setting allows you to influence the velocity of each note-on in the phrase.
Task: Increment through the arpeggios in the SEQ > GENRL category.
Experiment with the Sort/Thru Key Mode, and Original/Thru Velocity Mode parameters. Find the various Down, Up/Down, Down/Up, various octave offsets, random, random over various octave offsets, etc., etc. Historically speaking these SEQ/GENERAL (up/down, down/up and random) Types of arpeggios were the standard fair for arpeggiators for many of the early years of synthesizers. What you hear the Motif/MOX and S-series synthesizers doing is the result of the evolution of the arpeggiator into a more interactive and intelligent musical tool.
Also to understand these early “simple” arpeggio structures from their historical standpoint is important, so that when you begin to create your own arpeggio phrases – you understand where they fit into this evolution. Synthesizers soon started to show up that could play more than one or two notes at a time. Fancier arpeggiators would be used to create interesting Ostinato lines and rhythmic-chordal-pulses could be generated by the notes being held. But like a baby, they had to crawl before they could walk… Even later synthesizers that could respond to velocity were developed.
It would be several years into digital synthesizers before data could be configured into the velocity specific, highly interactive, chord intelligent arpeggios that you hear in the current Motif/MOX and S-series synthesizers. Since the introduction of the Motif (classic) in 2001, these arpeggiators have evolved. New Modes and new concepts have been introduced. Let’s take a look at some of these.
Some 21st Century Arpeggio Concepts: To illustrate some of the newer concepts, consider…the Hybrid VELOCITY ZONE: There is a separate article on these Velocity Zoned Arpeggios but we will mention them here as well, because they are so innovative. For example, call up the following VOICE: PRE 6:120(H08) Mr. Wah!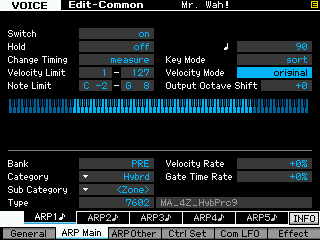
This four Element Voice features a four-velocity zone arpeggio Type. Each of the four Elements is velocity limited to respond in a specific range of velocities. The data was created using the 4-arpeggio construction tracks such that each has a specific rhythmic role to play. You can hear this as follows:
• Press [EDIT]
The lighted buttons [9], [10], [11] and [12] indicate that this is a Voice with four of the eight Elements active.
Use the [MUTE] button to listen to different combinations and the [SOLO] button to hear each Element alone – so you can distinguish what rhythmic role each plays.
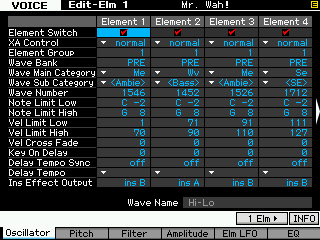
Press [SOLO]
Press [1] to hear Element 1’s contribution
Press [2] to hear Element 2’s contribution and so on.
Next try turning the [ARPEGGIO ON/OFF] button OFF.
Play the keyboard varying your velocity to find the four specific ranges. Do you think you can play the musical pattern as specifically and consistently as the arpeggiator? Of course you can’t. The arp can go and “get” a specific sound because it can precisely repeat the velocities necessary to do so.
With the Velocity Mode set to “original” the arp can be pre-programmed to be very specific (re:musical).
In the OSCILLATOR screen shot (above), you can see that Element 1 only responds to velocities between 1-70 (Vel Limit Low/Vel Limit High), where Element 2 takes over at 71-90, Element 3 is 91-110 and Element 4 respond only to velocities greater than 111.
(To toggle the ELEMENT view from one Element to four Elements simultaneously, just press [SF5] “1 ELM” or “4 ELM”)
• Solo Element 1
• Set the Velocity Limits as follows:
o Vel Limit Low = 1
o Vel Limit High = 127
You can hear the full rhythm that is this arpeggio played from one sound – the Voice takes its character from the interaction of the different Element components and specifically the rhythm each is playing and limited to reproduce. Let’s switch them around:
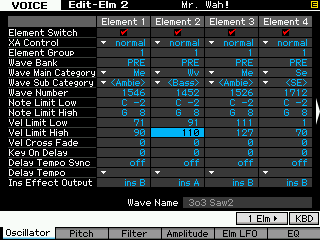
In the screenshot above, you can see that the Element Velocity Ranges have been altered to give an entirely different spin on what occurs with the same Arp Types. Use the [EDIT/COMPARE] button to A/B the results.
Definitions from the MANUAL:
Motif ES Type Arpeggios
These Arpeggio types use the same multi track Arpeggio architecture as the MOTIF ES. This ES type of arpeggio has the following benefits:
• These arpeggios can create complex notes and chords even when triggered by one note.
• The arpeggio closely follows the notes played on the keyboard (but the area where the arpeggio is assigned) allowing a good deal of harmonic freedom and the possibility to “solo” using these arpeggios.
Motif XS Type Arpeggios
These Arpeggios use a newly developed chord recognition technology to determine what notes should be played back by the Arpeggio. This XS type of arpeggio has the following benefits:
• The arpeggios respond only to any area on the keyboard where an XS type of arpeggio is assigned. Other areas of the keyboard do not effect the chord recognition. This allows very natural keyboard playing across the entire keyboard with arpeggio generated bass and backing parts.
• The arpeggio will always play harmonically correct parts. These are especially useful for bass and chordal backing parts.
Translation: Both of these Types add a form of chord intelligence – where they analyze the trigger note data and can adjust the arpeggio phrase results. The “ES Type” plays a specific riff and follows the area (region) of the keyboard of the trigger notes. So you can control what region of the keyboard the arpeggio riff is sounding. The “XS Type” plays a specific riff – always sounding in a specific range of notes. The “ES Type” could be used anywhere up and down the keyboard and the phrase would follow with high and low pitches… while the “XS Type” plays a riff ‘where it belongs’, even if the trigger notes are not specifically involved in the phrase.
Additionally, the “ES TYPE” can play a specific riff using a single note as a trigger. To get the desired phrase sometimes means simply triggering the “root” note. Take as an example, a keyboard riff.

Call up the “Natural Wurli” Pre1:045(C13).
Assign the following ARP TYPE to this VOICE:
Bank: PRE
Category: ApKb
Sub Category: <PopRk>
Type: 0152 MA_6/8 Pop _ES
• Turn the SWITCH and HOLD parameters to ON.
To trigger the arpeggio’s stored riff you only need to enter a single note indicating the key in which you want the riff to sound. Play the “F” above middle “C”… and listen.
Now play an “F” anywhere else on the keyboard – notice the phrase adjusts to sound in that region.
• Assign the TYPE: 0145 MA_6/8 Pop _XS

This is the “XS TYPE” version of the same riff. This will help you understand the difference. Now you need more than one note to trigger the intended phrase – the XS Type can adjust the chord quality, as well. If, for example, you finger an F triad (F-A-C) – anywhere on the keyboard, the same intended phrase plays. If you play an F Minor triad the phrase adjusts the chord tense.
The “XS Type” and its fixed play zone allows for the phrase to be triggered from anywhere on the keyboard. This can be useful, particular for chordal phrases, for example, that will always sound in the proper range. Often as a keyboard player you are unaware of what voicing a guitar would use or even what range of notes on the keyboard to use to trigger them. The fact that the phrase plays properly gives you great freedom as to how (and WHERE) you control the arpeggio.
As an advanced application of this: You can control the chord-comping of a Jazz Guitar while you walk an Acoustic Bass (real time) in your left hand and outline the chord changes and melody with your right hand. “PERFORMANCE USER 2:074(E10) Let’s Comp