

The YC61 one-to-one interface makes it easy to set up, store and recall Splits and Layers. It’s all right there in front of you and with the LIVE SET you can store them for instant recall. This article will both show you how it works and give you a few tips and ideas on creative ways to set them up.
For reference, let’s take a look at the YC front panel: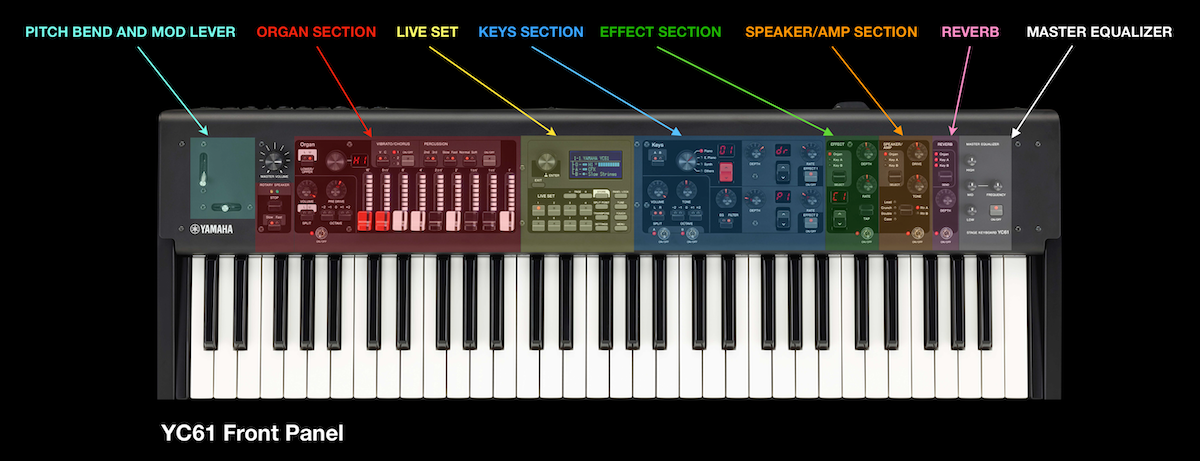
I’ll be moving around through all these sections throughout the article but most of the time I’ll be working with the Organ and Keys Sections. Notice that area in dark black is the same in each Section and I’ve highlighted the [SPLIT] and [OCTAVE +/-] buttons in blue and the [VOLUME] and [TONE] knobs in orange. These are important settings when creating splits and layers: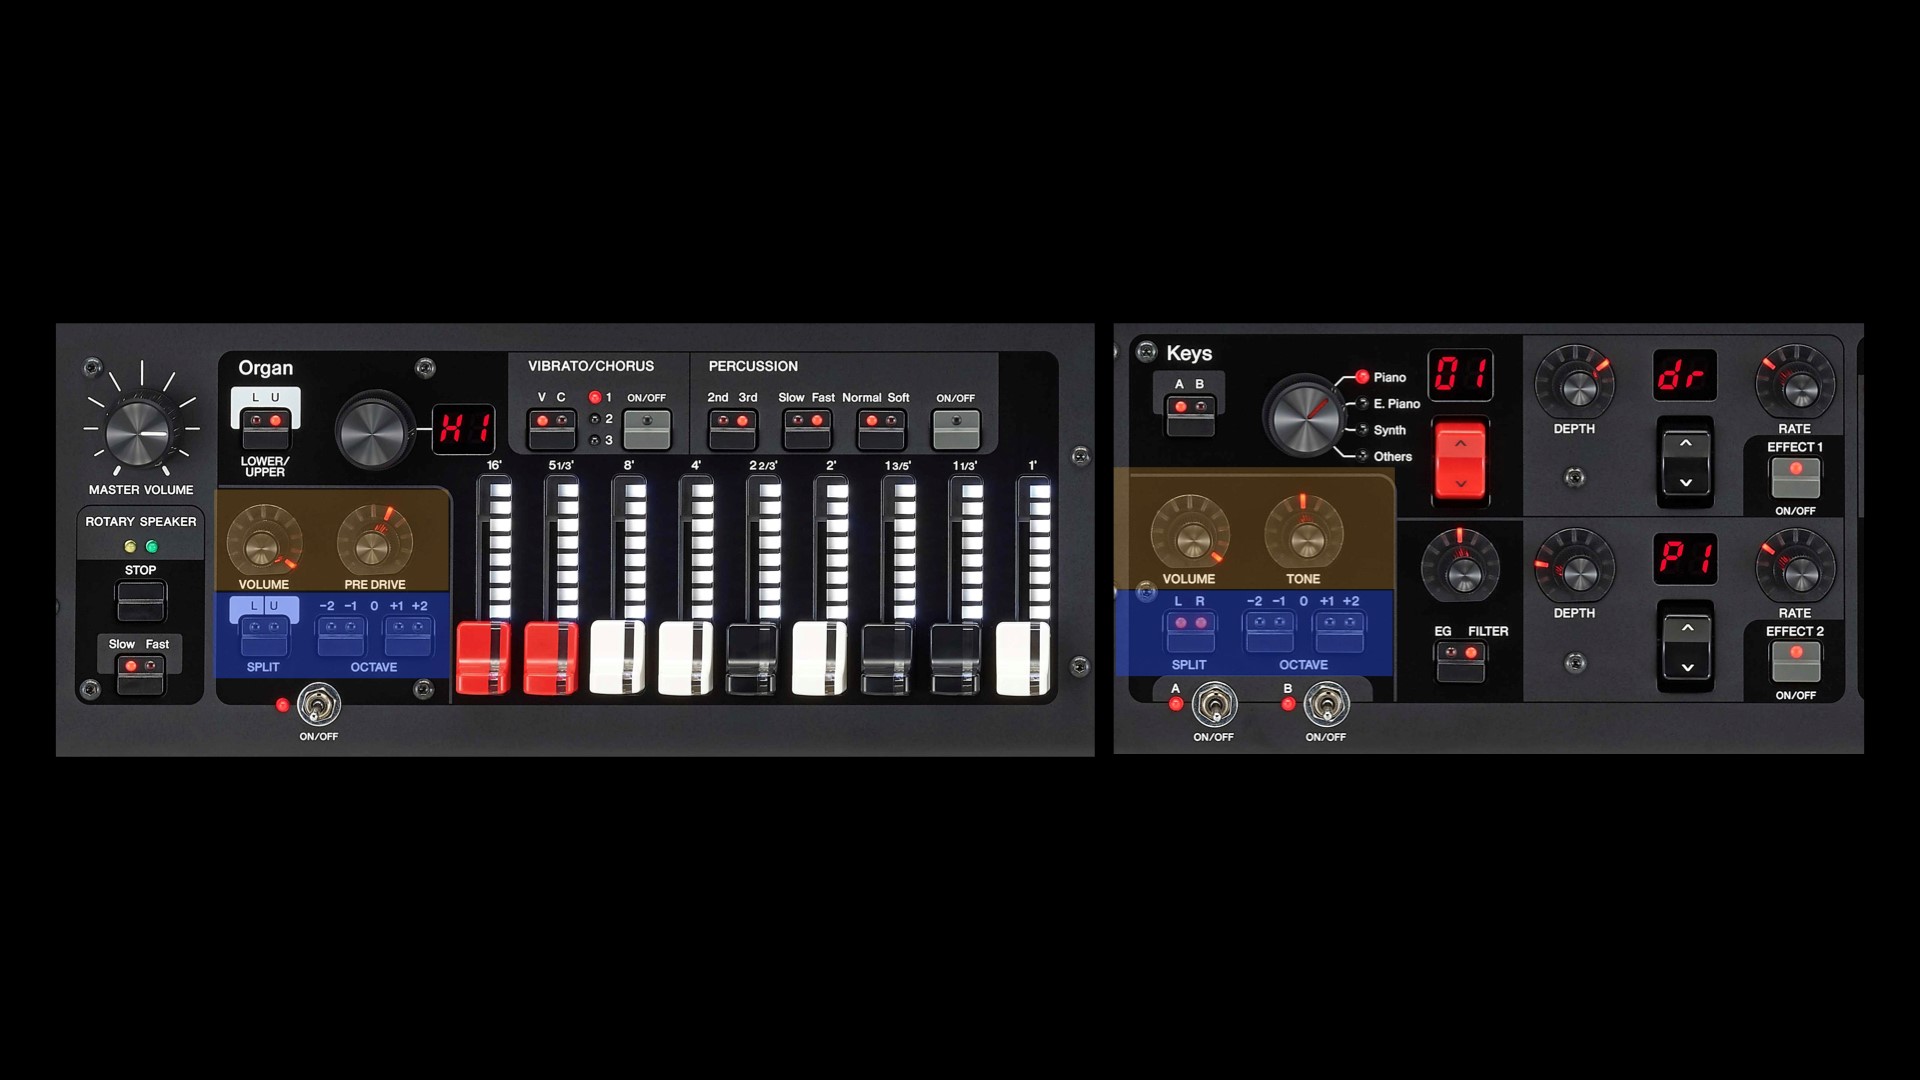
Let start with splits.
SPLITS
There are a several ways to use splits in the YC61 and I’ll cover three kinds in this article:
Organ Split
Traditionally, most drawbar organs have two manuals or keyboards. Each manual has an independent set of drawbars that determine the tonal characteristics of what sound that manual will play. Traditionally players use the Upper manual for a lead or soloing role and use the Lower manual for comping chords. There really is not set rule regarding that. In general, just keep in mind that you have two manuals with unique controls sounds for your musical applications. The YC61 is capable of the same task.
Pictured below is the Organ section of the YC61: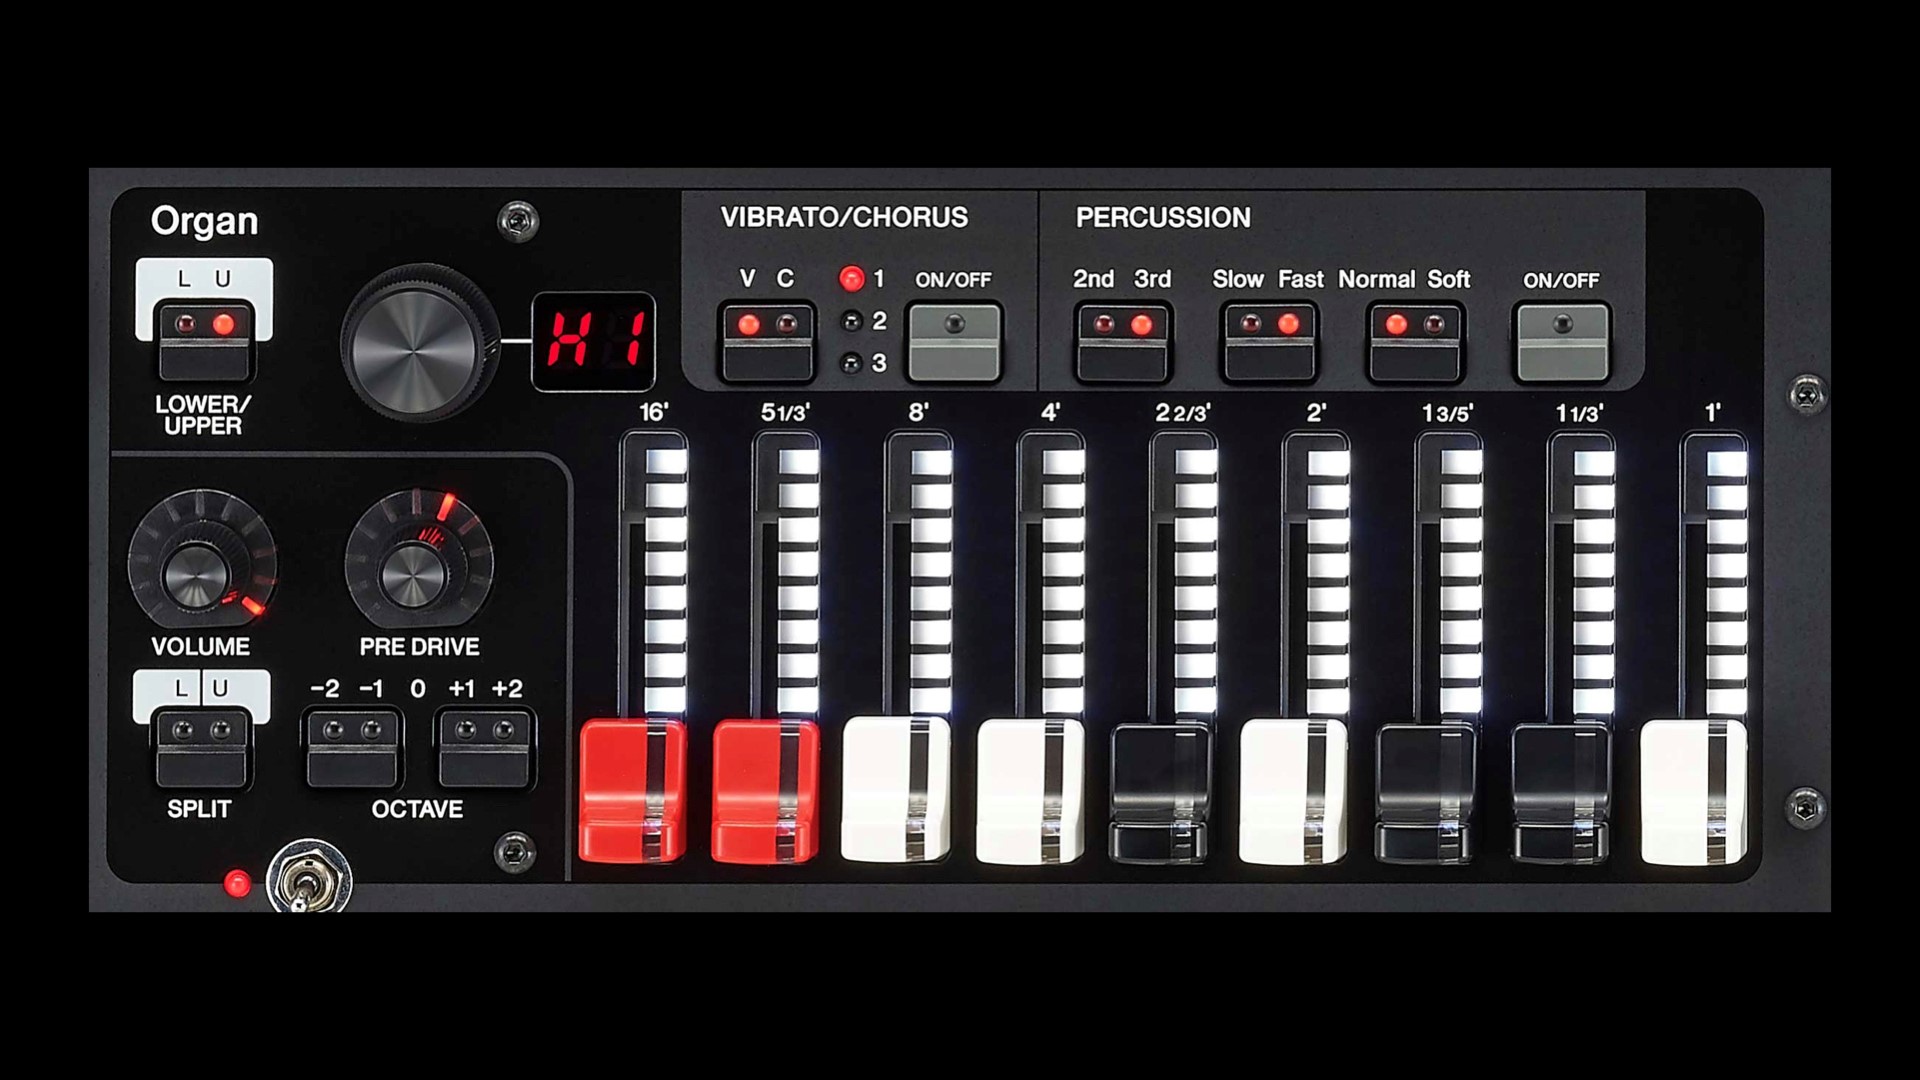
This is probably the easiest split to show on the YC61, and at the same time probably the most inconspicuous. Every organ setup in the YC61 has TWO manual drawbar settings, an Upper and a Lower.
For this example, I’ll select LIVE SET 1-1, Jazz Lead.
Pushing the Lower/Upper switch allows you to toggle between selecting playing either the Upper or Lower manual drawbar setting on the YC61 keyboard. By default, the drawbar LED colors are set to different colors so that you can tell them apart.
If you want to play both drawbar manual settings (Upper and Lower) from the YC61 keyboard, the keyboard can be split to do this. The SPLIT button in the Organ section allows you to choose if the Organ will play in the Upper [right LED], the Lower range [left LED], or BOTH, by simply pushing the switch so that BOTH LED lights are lit. 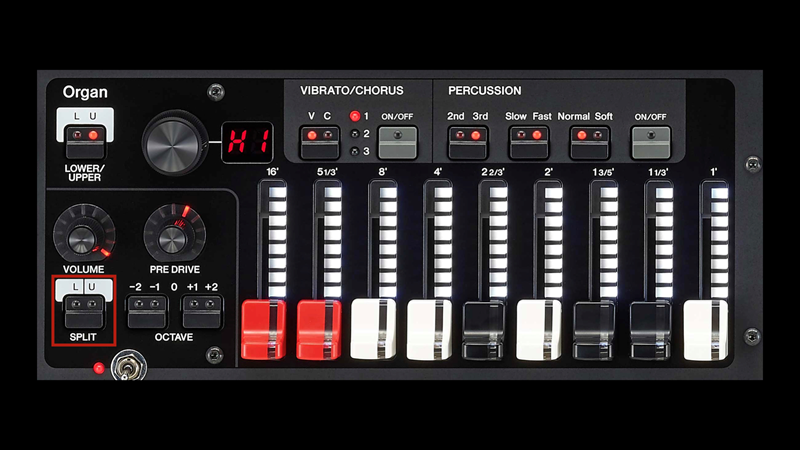
The YC61 display will also indicate that both manuals are active and will even indicate the drawbar positions on both the Upper and Lower manuals.
To assign the Split Point that determines where the Upper and Lower manuals divide, simply press the SPLIT POINT button below the display:
Once the Split Point parameter is on the display, a split point can be selected by either touching the key on the keyboard at the desired split point location OR by using the Data Dial to choose the split point. Then, push the Data Dial to enter the value.
Organ/Bass Split
This is probably the most common way to split the keyboard with a bass sound on the left and a piano or keyboard sound on the right. In this example we will use the Organ section as the keyboard sound for the right-hand, and a bass sound from the KEYS A section.
To start this setup, I’ll select LIVE SET 1-1, “Jazz Lead”. This LIVE SET will already have the ORGAN section turned [ON] soI will turn the KEYS A section [ON] to add my Bass sound and leave the KEYS B section [OFF].
Since I already have an organ sound selected, after I turn [ON] the KEYS A section, I’ll need to select which sound I want there. For this example, I will select the OTHERS category and then use the RED toggle switch to select 42 for Acoustic Bass.
At this point I have two sounds layered across the keyboard; Organ and Acoustic Bass. Yes, that’s how easy it is to layer. We’ll get to that later. Now that I have these two sounds combined, I will need to change the areas that they are mapped across the keyboard, one sound on the right (Organ) and one sound on the left (Upright Bass). This is done by pushing the SPLIT button in the Organ area so that the LED indicates [R] for the right side and then pushing the SPLIT button in the KEYS A section so that the LED indicates [L] for the left side of the keyboard:
The two sounds are now split across the keyboard.
For the final tweak, I need to define where the split point is between the two sounds. To do this, simply press the SPLIT POINT button below the display. Once the Split Point parameter is on the display, the split point can be selected by either touching the key on the keyboard at the desired split point location OR by using the Data Dial to choose the split point. Then push the Data Dial to enter the value.
KEYS A/KEYS B Split
This process is very similar to the Organ/Bass split in the previous example. I won’t be using the Organ section in the YC61 for this example, so I’ll be turning the ORGAN section [OFF]. For this example, I’ll use sounds from KEYS A and KEYS B, so I will need to turn them [ON].
For this Basic Bass Split I’ll use the S700 piano on the right-hand of the keyboard (using KEYS A) and the Upright Bass on the left (using KEYS B). I will also adjust the effects so my piano will have reverb, but my bass will be dry. This is a common way to set up a bass split because reverb can make the bass sound less pronounced and “muddy”. To start, select LIVE SET 1-6 “Natural CFX”. Then select the Piano category in the KEYS A section by pushing the [KEYS A/KEYS B] switch so that the LED indicates KEYS A and then use the RED toggle switch to select S700.
Next, select the KEYS B section by push the KEYS A/KEYS B toggle switch so that the LED indicates KEYS B. Select the OTHER category in the KEYS B section and then use the RED toggle switch to select Upright Bass. To make sure that the sounds are in the area of the keyboard that I want, I’ll press the SPLIT button in the KEYS A section so only “R” is illuminated. Next, I’ll select KEYS B using the [KEYS A B] button and press the SPLIT button so only “L” is illuminated.
Now I have my two Sections split with CFX in the right and Upright Bass in the Left. The next thing I need to do is set the split point, adjust the Reverb send for each Section and Save the set up to a LIVE SET for instant recall: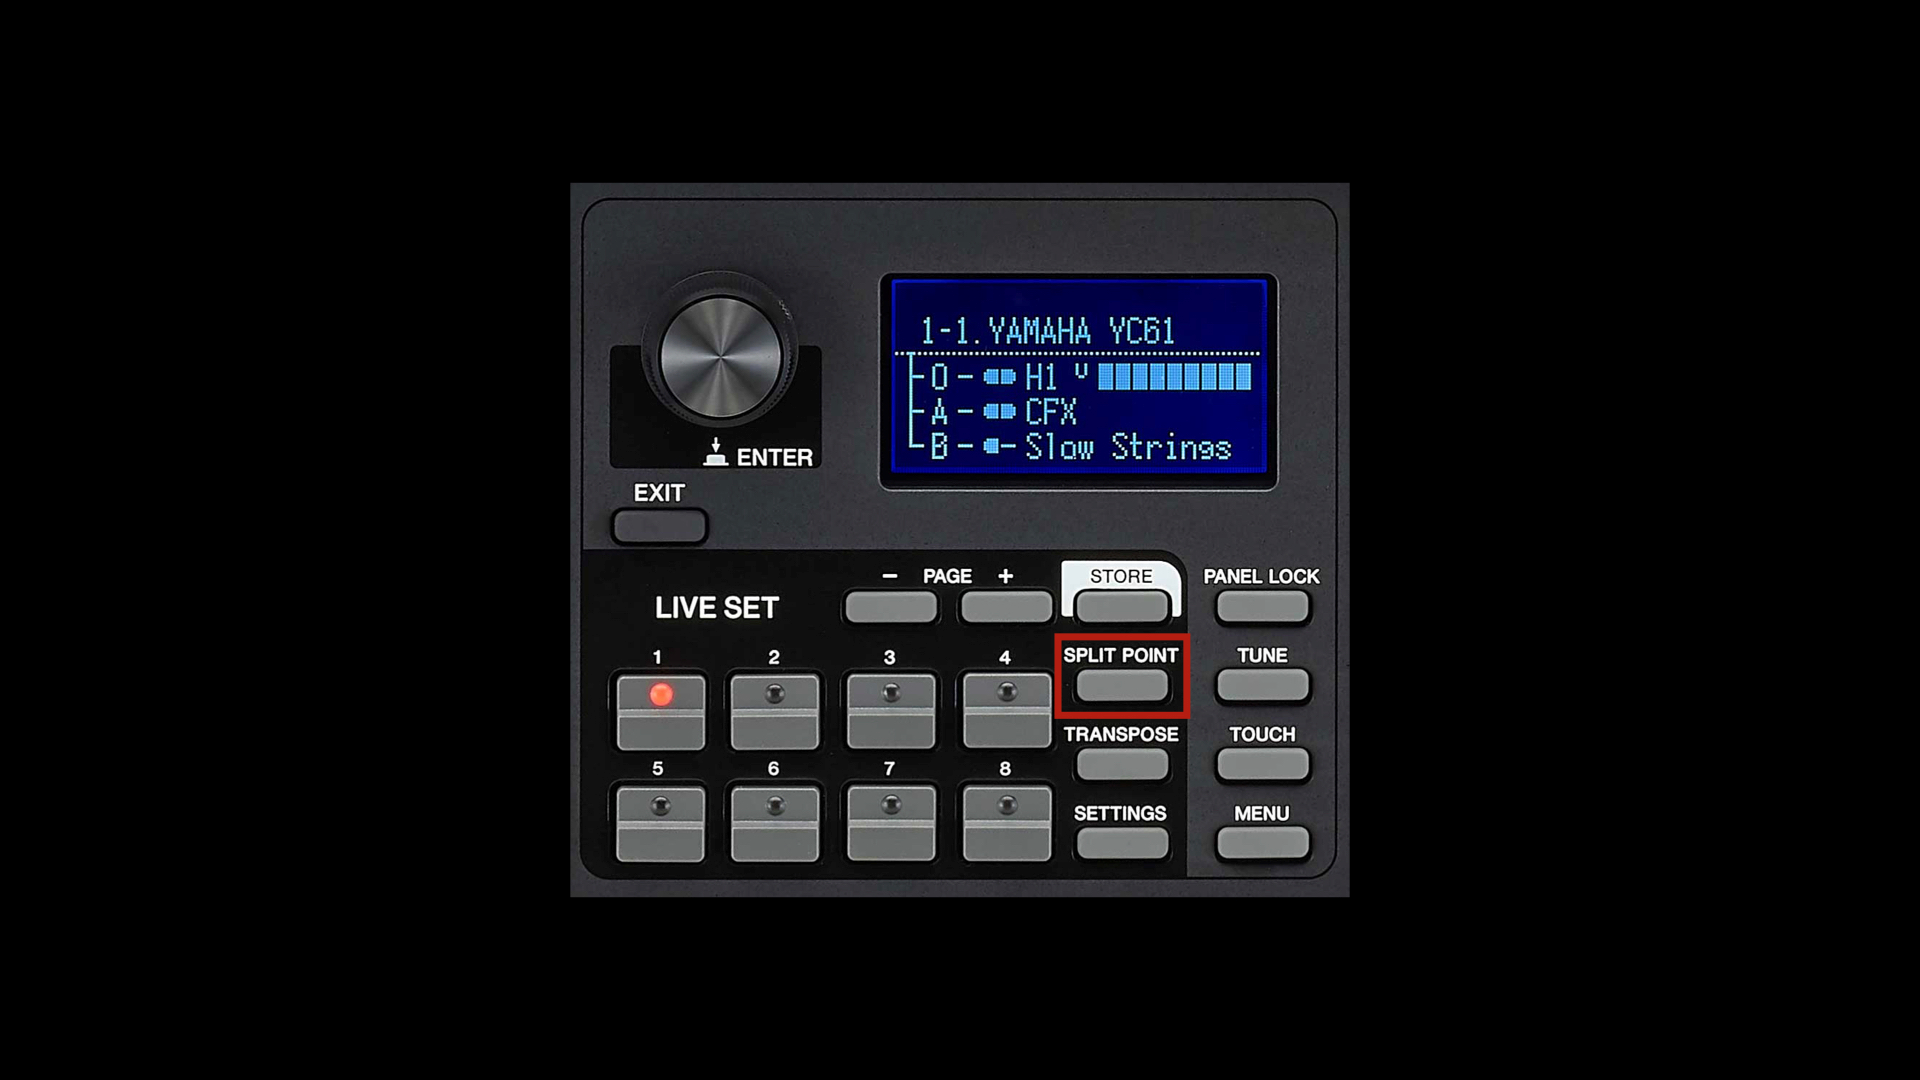
1. Split Point: This button is located in LIVE SET. Press the [SPLIT POINT] (highlighted in red above) button and touch a key on the keyboard to set the split (I chose G2, the G below middle C) and press [EXIT] button to confirm!
2. Reverb: The Master Reverb is located on the right side of the keyboard (highlighted in blue above.) To set the send for each Section press the button indicated to toggle through the parts the LED will illuminate next to the selected Section (If all the LEDs are on you are selecting ALL Sections). In this set up I have a little Reverb on the CFX Piano and None on the Acoustic Bass.
3. LIVE SET: Press [SETTINGS] and use the knob (referred to as the “Encoder dial/[ENTER] button” in the manual) next to the LED to navigate to “Name” and press down on the dial to select. You use the LIVE SET buttons to navigate and name the LIVE SET…I have named this “S700-Bass Split”. To complete storing the LIVE SET push the “Encoder dial/[ENTER] button”, select “Store” (highlighted in yellow above), choose a location in the LIVE SET memory, and then Push [ENTER] to store.
Building on what we’ve learned creating a bass and piano split, let’s create a left-hand accompaniment using the KEYS A section and a right-hand lead split, using KEYS B for the lead sound. For this example, I’ll shift the left-hand comp section up an octave, select a right-hand synth lead from the KEYS B section and engage a few more effects.
THE LEFT-HAND COMP/RIGHT-HAND LEAD SPLIT
This is a great setup for playing chords in your left hand and a lead part in the right. For example, you could play a pad sound transposed up an octave in your left along with a synth lead in the right. To make this easy, I’ll start with an electric piano sound that I already like, LIVE SET 2-5, “Trem EP”.
With this setup, I’ll set KEYS A to “Trem EP” as the left-hand comp shifted up one octave and push the [SPLIT] button so only “L” is illuminated.
For this example, I’d like to use a Phase Shifter instead of the assigned Tremolo effect. To change this this I’ll push the Black Toggle switch for Effect 1 “down” once to select P4, Dual Phaser.
For the next step, I’ll switch KEYS B “On” and choose “43 Calliope Lead”, turn on EFFECT 1, and change the effect to Digital Delay for Section Effect 1. Adjust the Depth and Rate to your taste.
Next we need to adjust the split point, just like in the previous examples. Press the [SPLIT POINT] button and touch a key on the keyboard to set the split point (I chose C3, middle C) and press [EXIT] button to confirm.
For one final touch I will adjust the amount of Reverb on both sounds; the electric piano with very little and the Calliope Lead sound with a large amount.
LAYERS
Let’s take a look at Layers. Layers are easy to set up and manage.
A Layer combines two or more sounds with no split point. Layered sounds span the entire keyboard area.
Two-Section Piano/Strings Layer
For this layer, let’s start from LIVE SET 1-6 “Natural CFX”.
The setting uses the CFX concert grand piano. I have the Section Volume and Tone set high. The Tone setting to high will help the piano cut through once we add the pad layer.
Next, I switched the KEYS B section “ON” and selected the Synth category and then selected “Lite Strings” (16) as my layer. This is a nice analog synth string sound with a Harmonic Enhancer applied in the Effect 1 section.
I set the Volume of KEYS B to about 75%. As you play this sound combination, you’ll notice that the synth string overtakes then piano sound by a little as you hold down the notes. The synth string sound already has a release that is rather slows so it doesn’t require as much reverb. I set the Reverb settings as pictured right.
For the final step we need to save to the LIVE SET memory.
Press [SETTINGS] and use the knob (referred to as the “Encoder dial/[ENTER] button” in the manual) next to the LED to navigate to “Name” and press down on the dial to select. You use the LIVE SET buttons to navigate and name the LIVE SET…I have named this “S700-Bass Split”. To complete storing the LIVE SET push the “Encoder dial/[ENTER] button”, select “Store”, choose a location in the LIVE SET memory, and then Push [ENTER] to store.
External Keyboard splits
The YC61 sounds can be split/layered in a several ways, however, there may be situations where you want more keys. Obviously there are some situation where this would make sense, but if you want more playing space the YC61 has a feature that allows the connection of an “external” MIDI keyboard and various ways to configure what sounds are played on the YC61 keyboard and which sounds are played on the external keyboard.
For more information on this, check out the upcoming article “Mastering YC-Using an External Keyboard”.
Want to share your thoughts/comments? Join the conversation on the Forum here.